3DGS expansion pack
The 3DGS expansion pack is an advanced paid feature that requires authorization. To protect your rights and experience, please contact customer service through official channels to purchase. After successful authorization, you will receive exclusive support services provided by our technical team, including but not limited to expansion package deployment, activation and initial use guidance to ensure that you can activate various functions smoothly and efficiently.
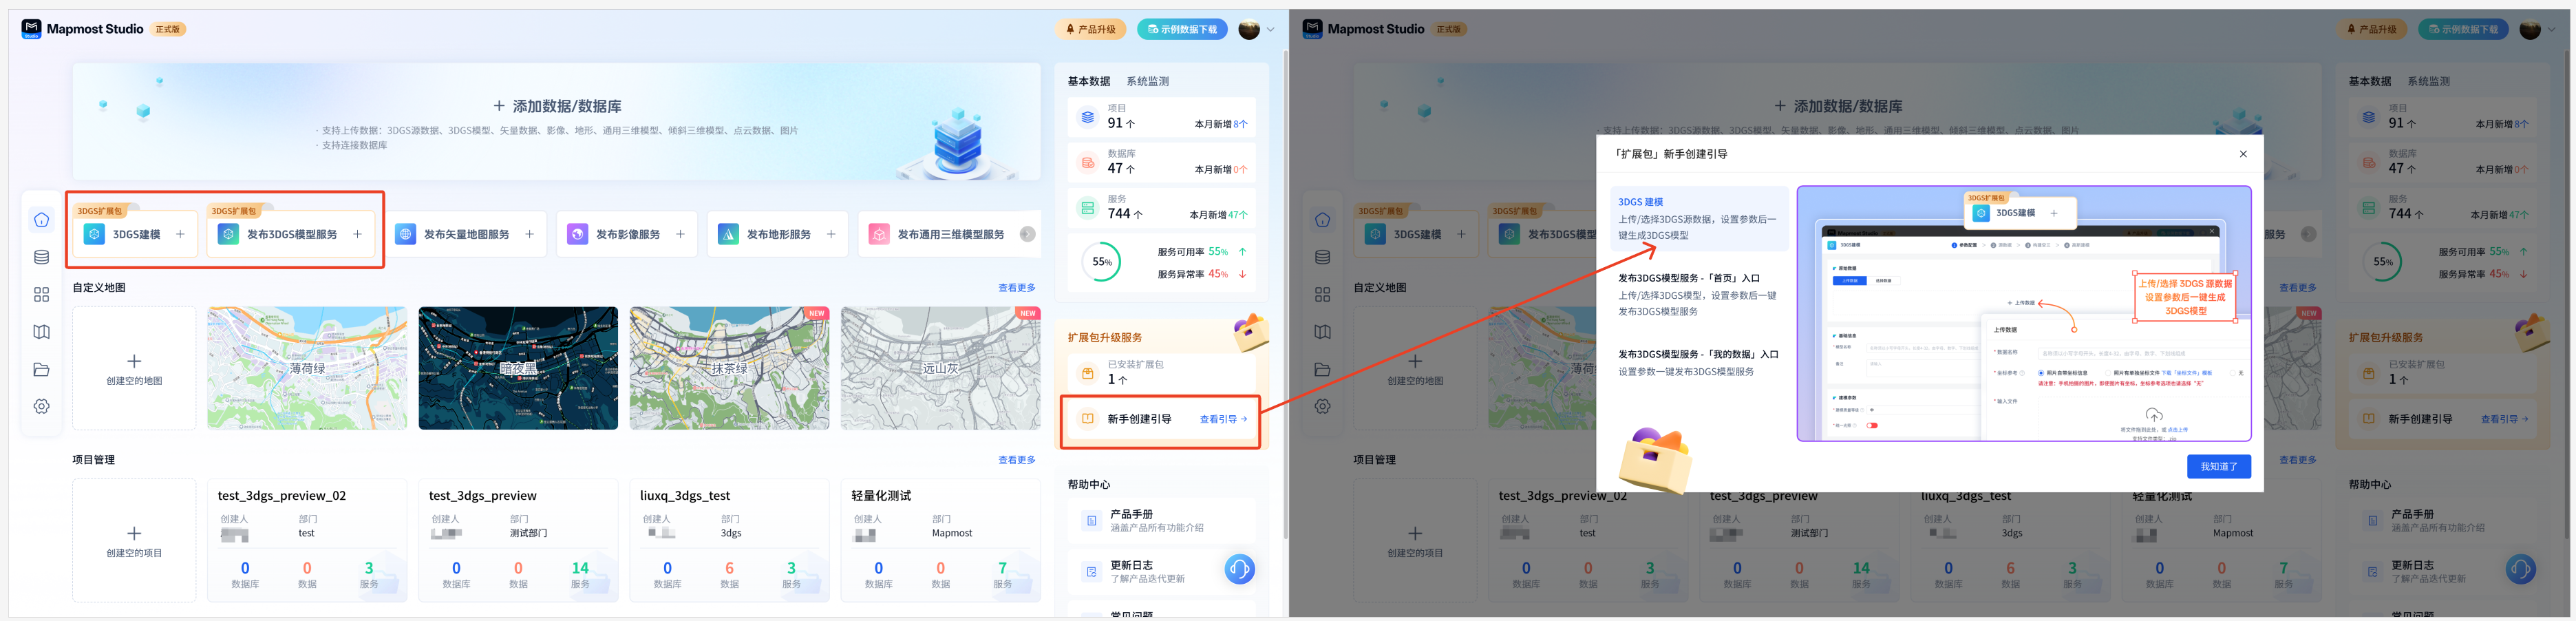
The 3DGS extension package includes two core functions: 3DGS modeling and publishing 3DGS model services. For detailed operating procedures and techniques, please refer to the "Newbie Creation Guide".
1. 3DGS modeling
There are two ways to enter the 3DGS modeling function:
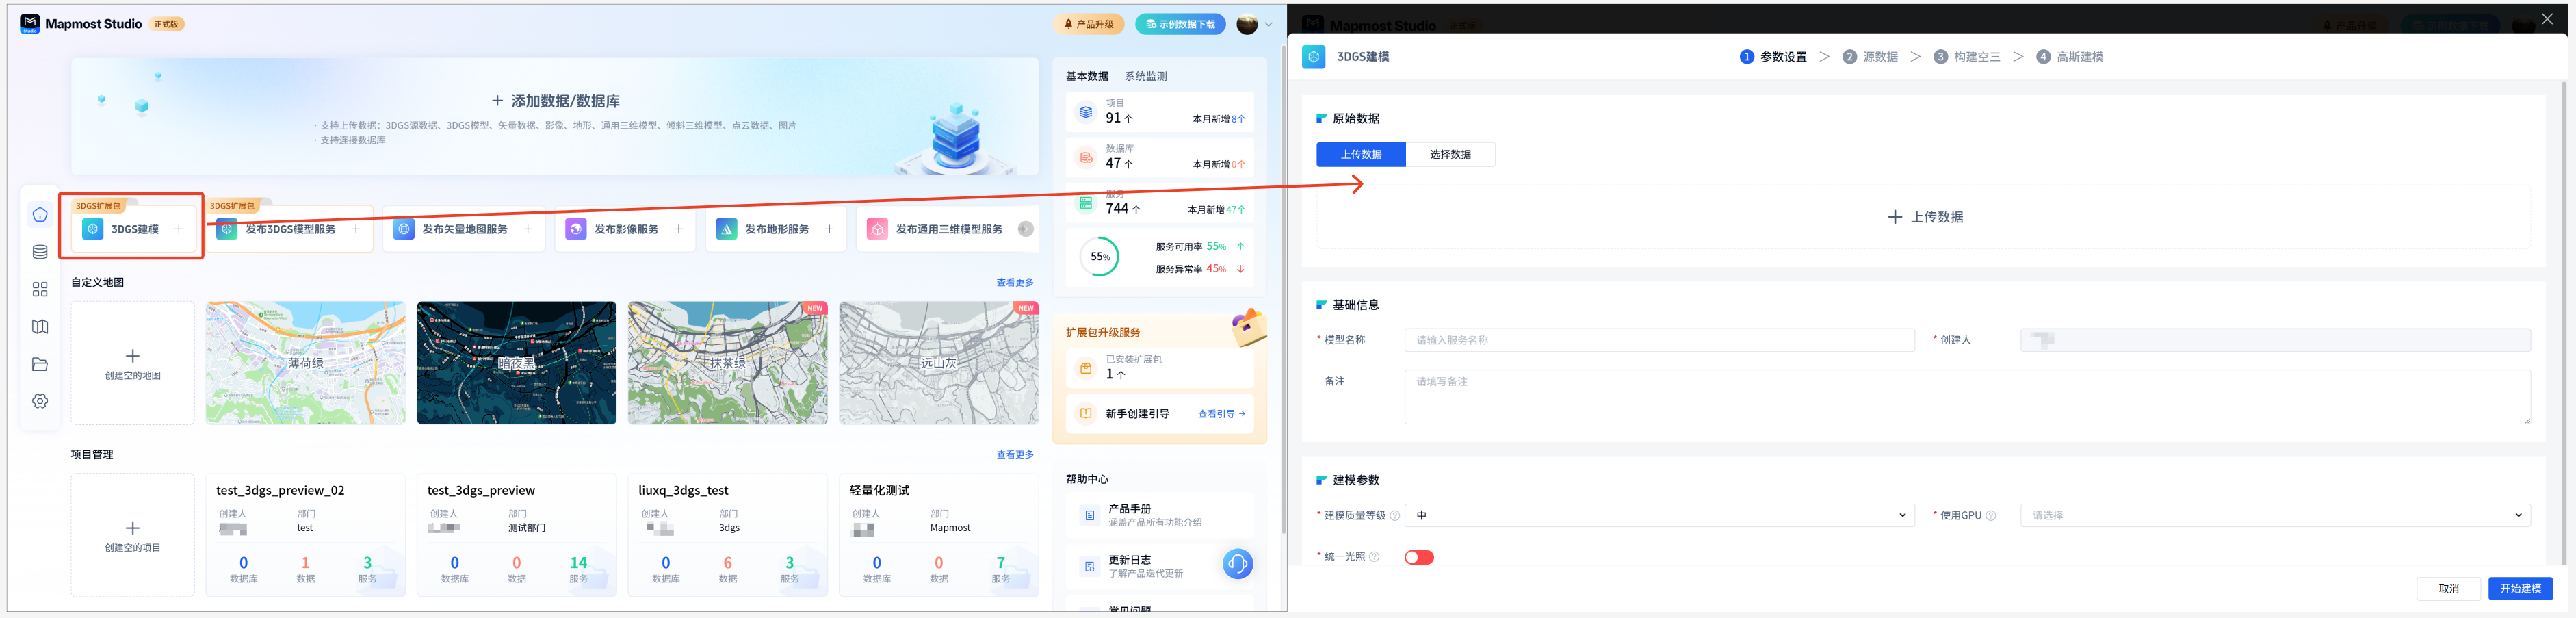
- Method 1: Open the "Mapmost Studio" software, switch to the "Home" module in the left navigation bar, and click "3DGS Modeling" to enter the corresponding 3DGS modeling page.
- Method 2: Open the "Mapmost Studio" software, switch to the "My Data" module in the left navigation bar, click the Data List-3DGS Source Data classification list "Modeling" operation, and use the 3DGS source data for modeling. (The 3DGS source data must have been uploaded before there will be records in the data list).
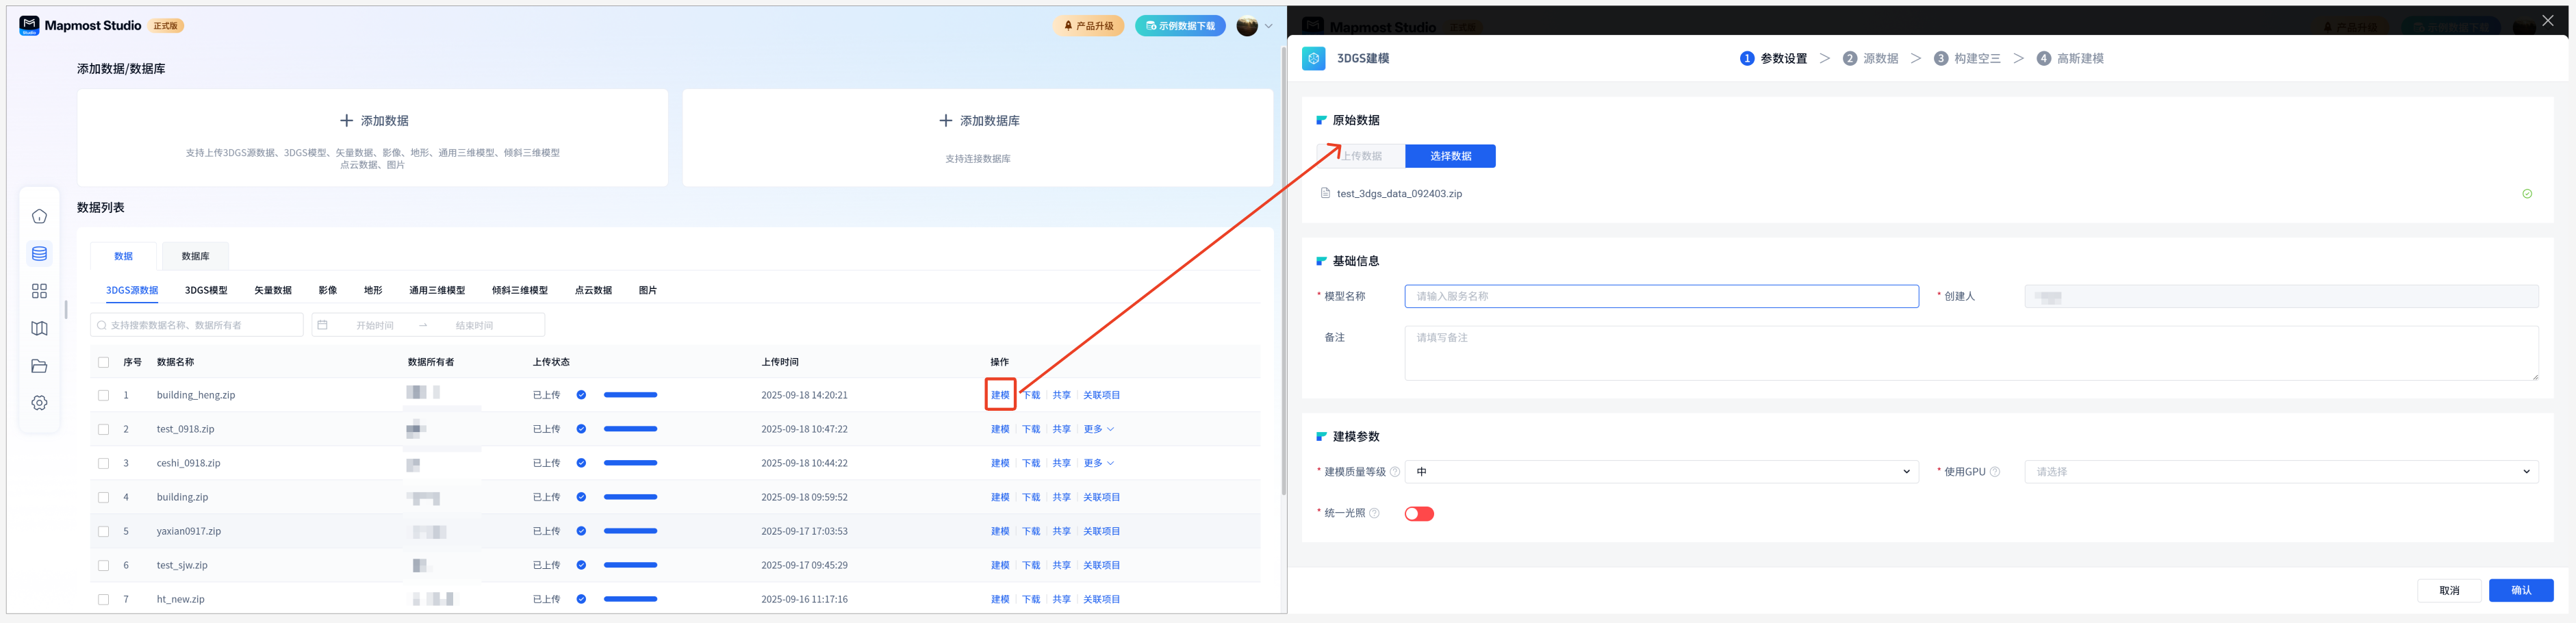
Please note: 3DGS modeling currently only supports single-task operation. If there is currently a modeling task in progress, please wait until it is completed (or manually terminate the current task) before initiating a new task.
1.1. Step one: Parameter configuration
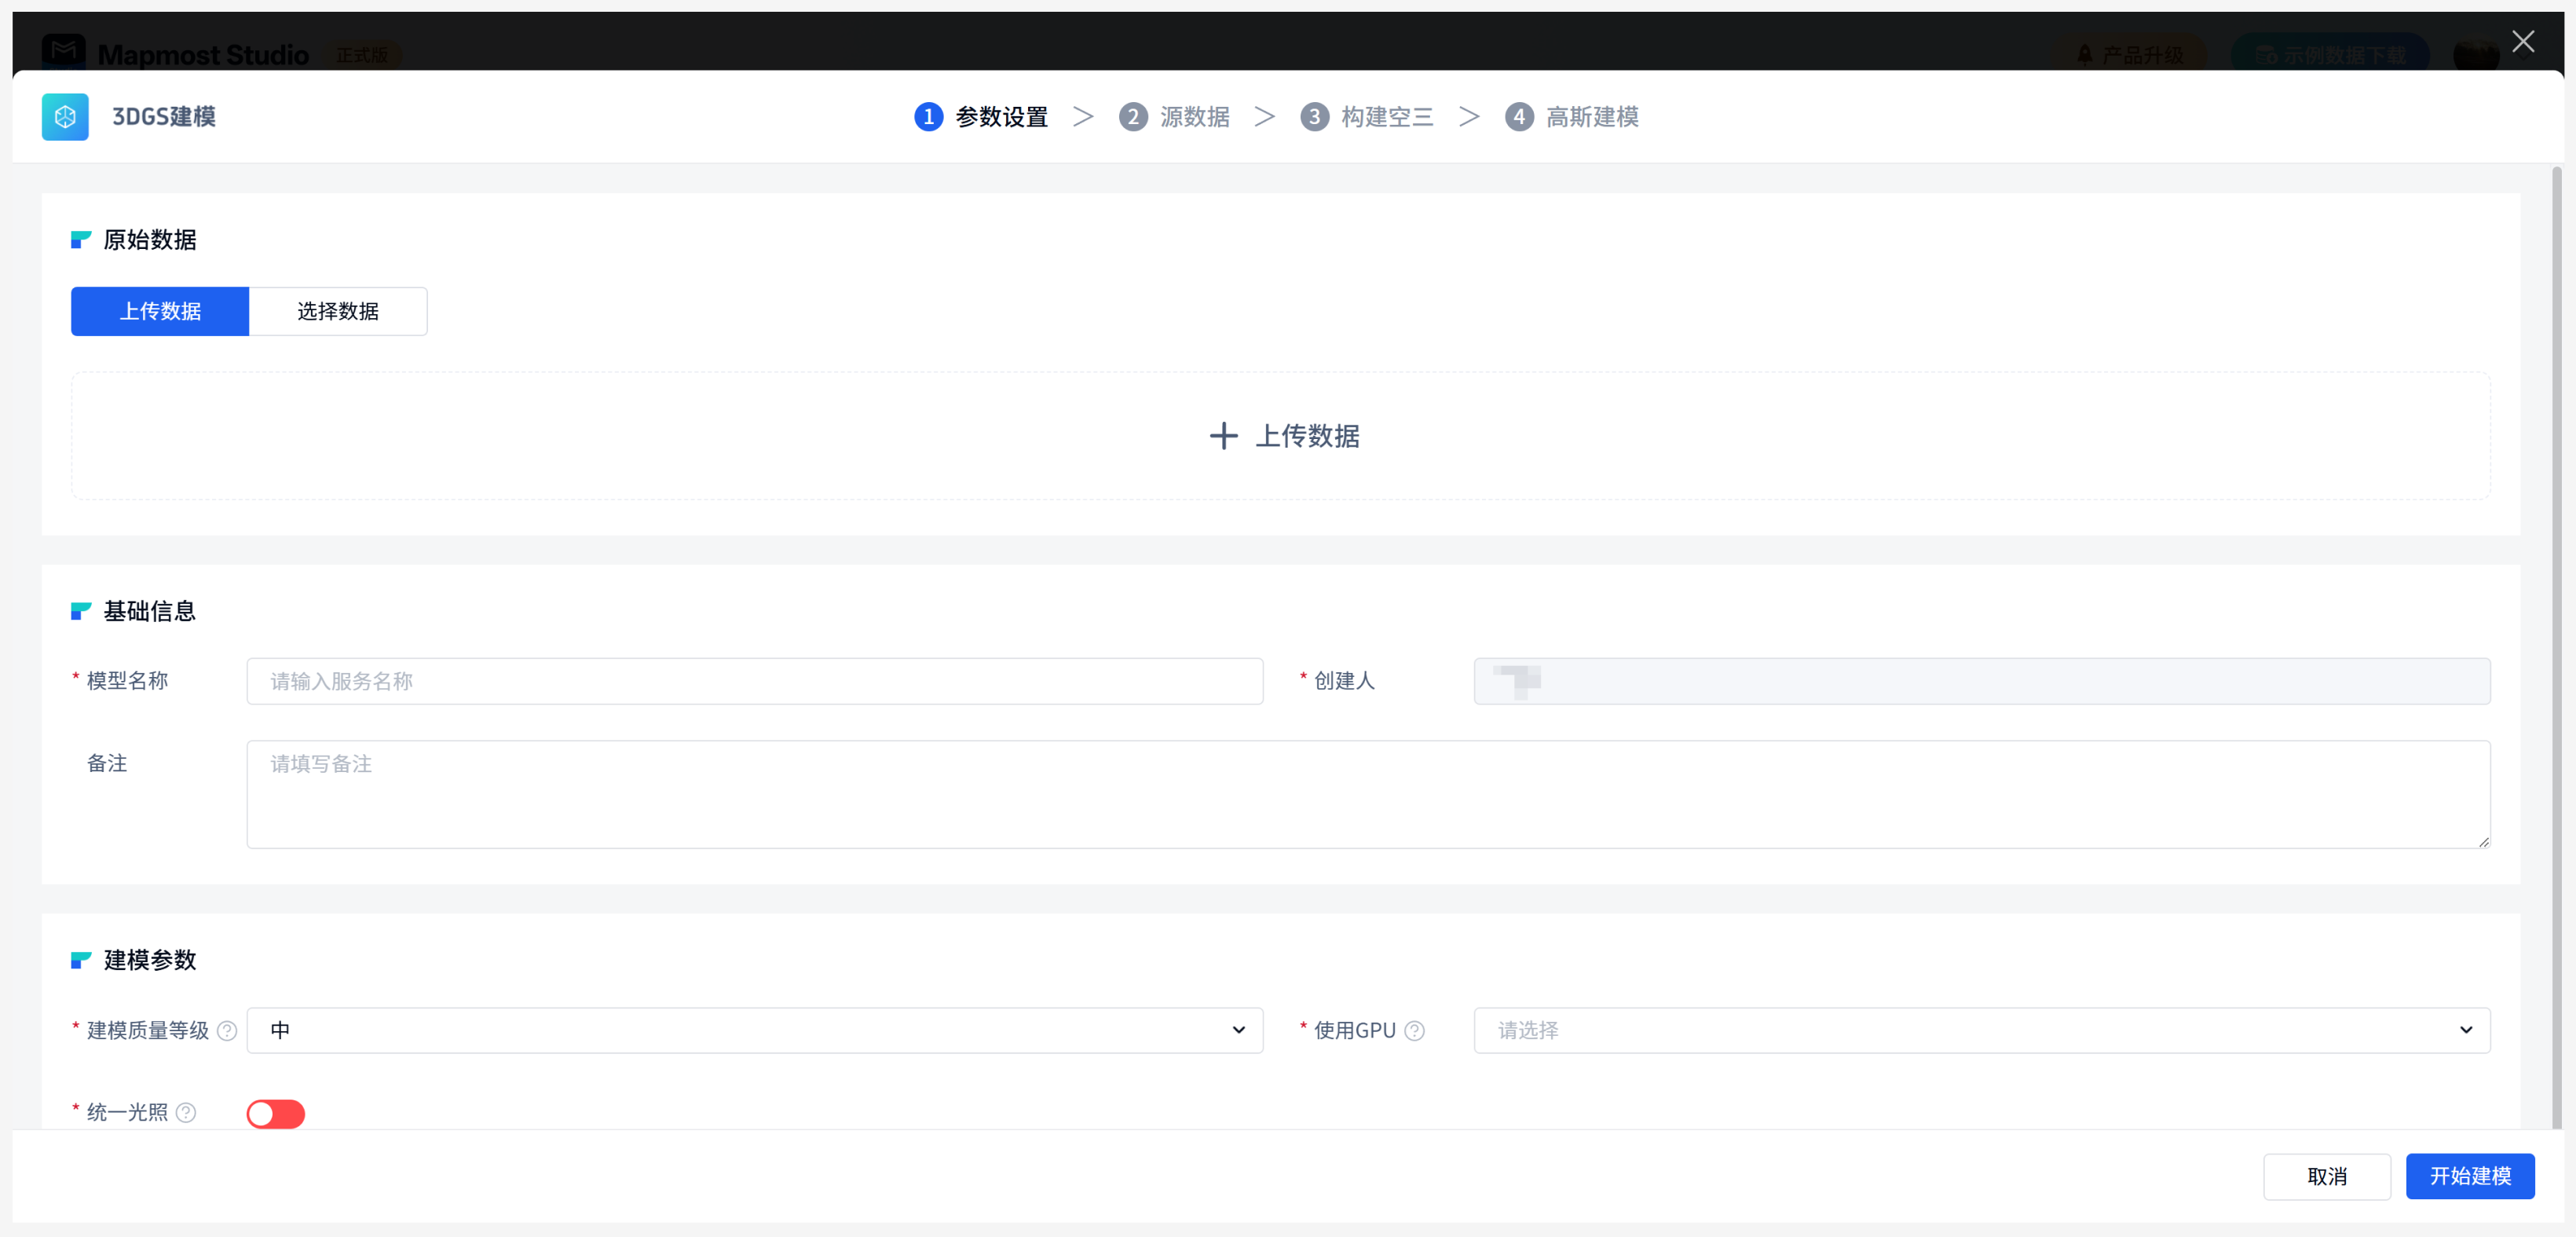
The parameter configuration page supports uploading/selecting data, filling in basic information, and configuring modeling parameters. Click Confirm to start full-process automated modeling.
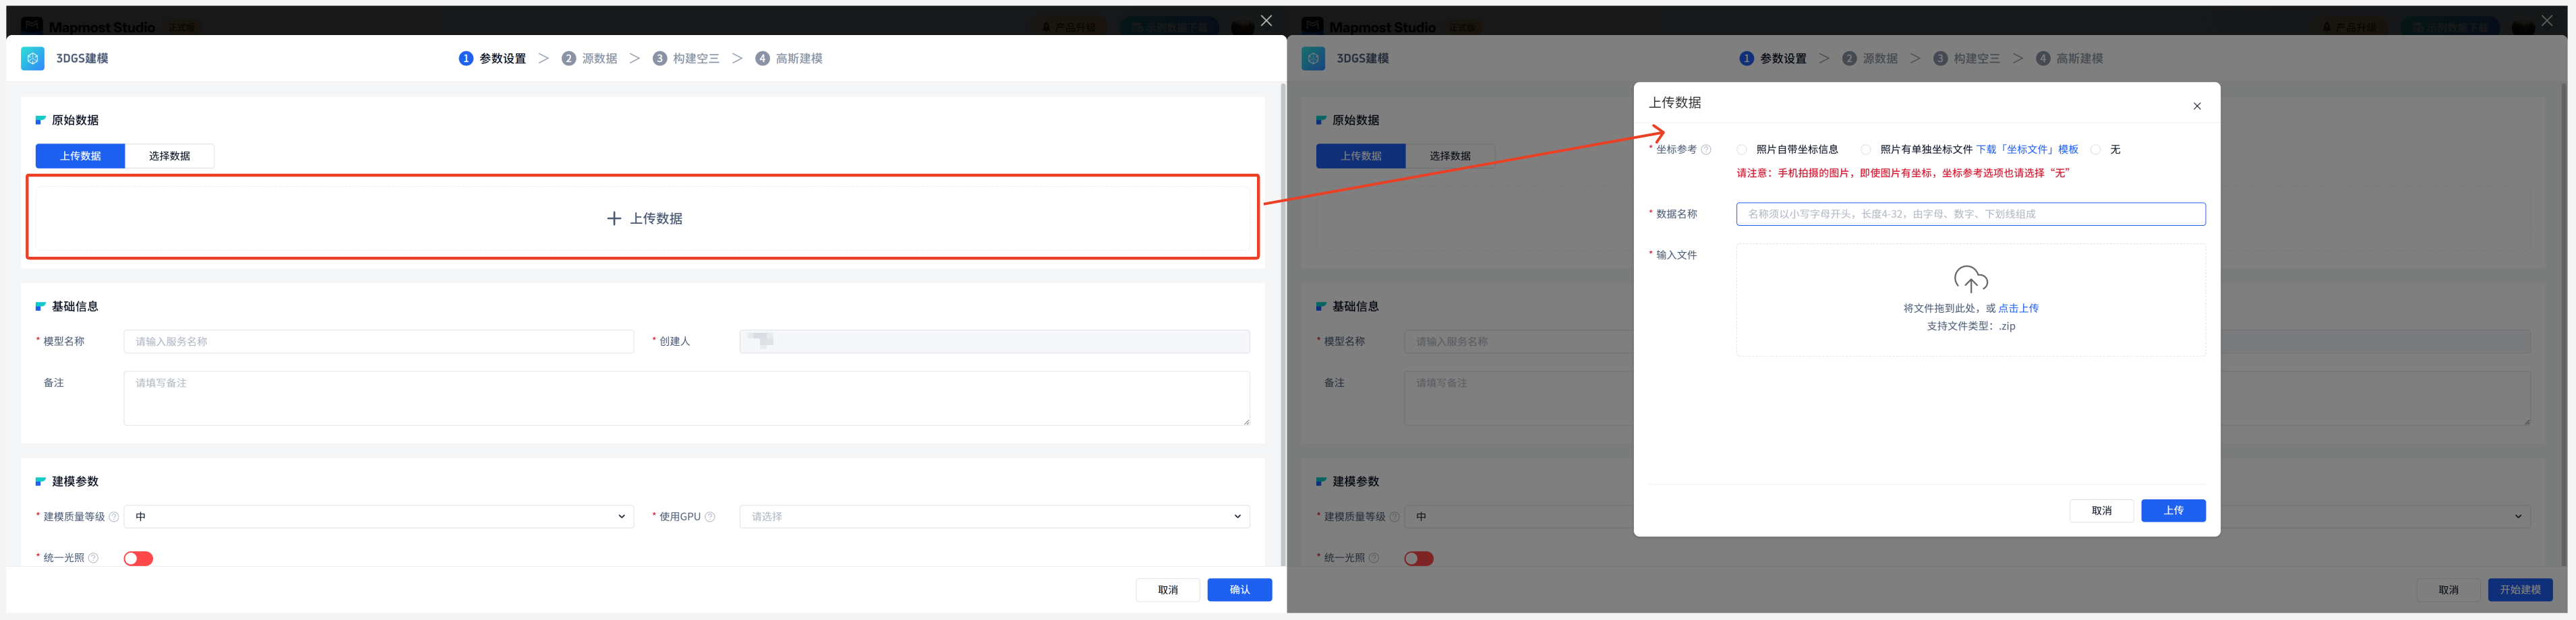
Raw data:
(1) Upload data: Support users to upload local data. The upload data page requires users to fill in the data name, coordinate reference, and upload files.
① When the coordinate reference selects photos with their own coordinate information: The file type supported for uploading is zip. It is recommended that the zip contains 50-10,000 photos. The supported photo formats are jpg, png, ipeg, and JPG. The user needs to place the photos directly in the root directory of the zip package. Do not create any folders in the zip package;
② When the photos selected for coordinate reference have separate coordinate files: The supported file type for uploading is zip. It is recommended to contain 50-10000 photos in the zip. The supported photo formats are jpg, png, ipeg, and JPG. The zip package must contain coordinate files. The supported file formats are csv and xlsx. Users need to place the photos and coordinate files directly in the root directory of the zip package. Do not create any folders in the zip package;
③When None is selected for coordinate reference: The supported file type for uploading is zip. It is recommended that the zip contains 50-10000 photos. The supported photo formats are jpg, png, ipeg, and JPG. Since the photos do not have accurate coordinate information, the position, scaling, and rotation of the output model are wrong, and they need to be processed manually. The user needs to place the photos directly in the root directory of the ZIP package. Do not create any folders in the ZIP package.
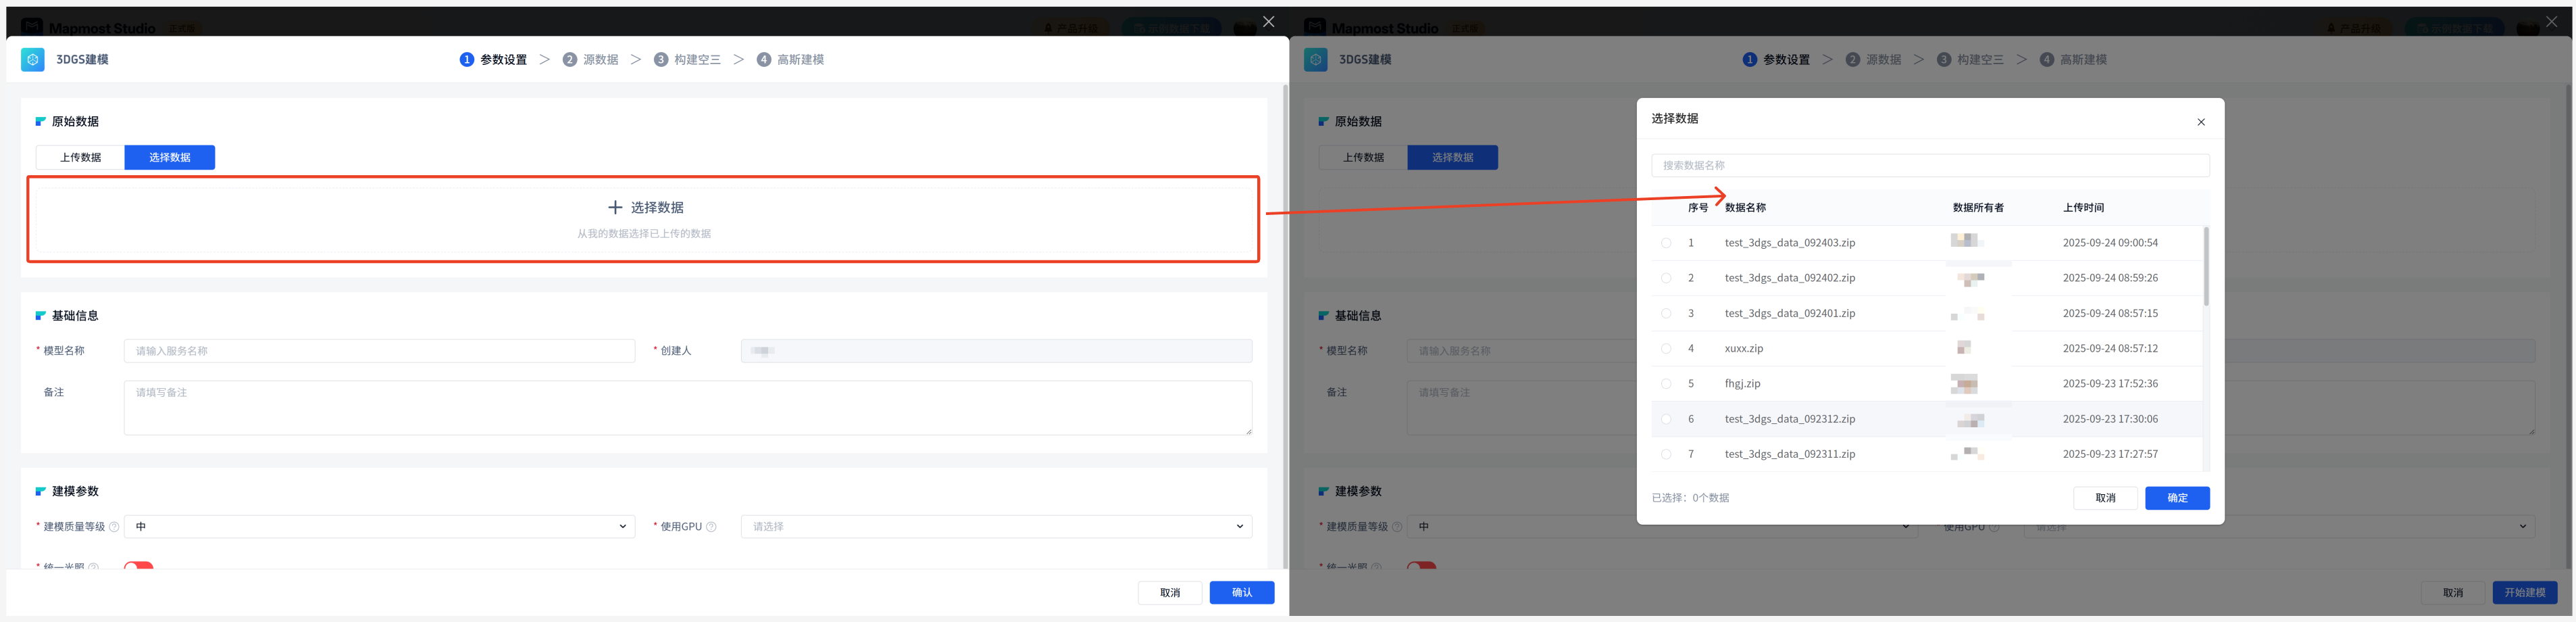
(2) Select data: If you enter modeling from the "Home" page, the original data needs to be selected from the 3DGS source data that has been uploaded in "My Data - Data List". If there is no 3DGS source data in "My Data - Data List", you can upload the 3DGS source data first according to the guidance; if you enter the modeling from the "My Data" - 3DGS source data list page, the original data will be automatically filled in based on the selected input data by default and does not support modification.
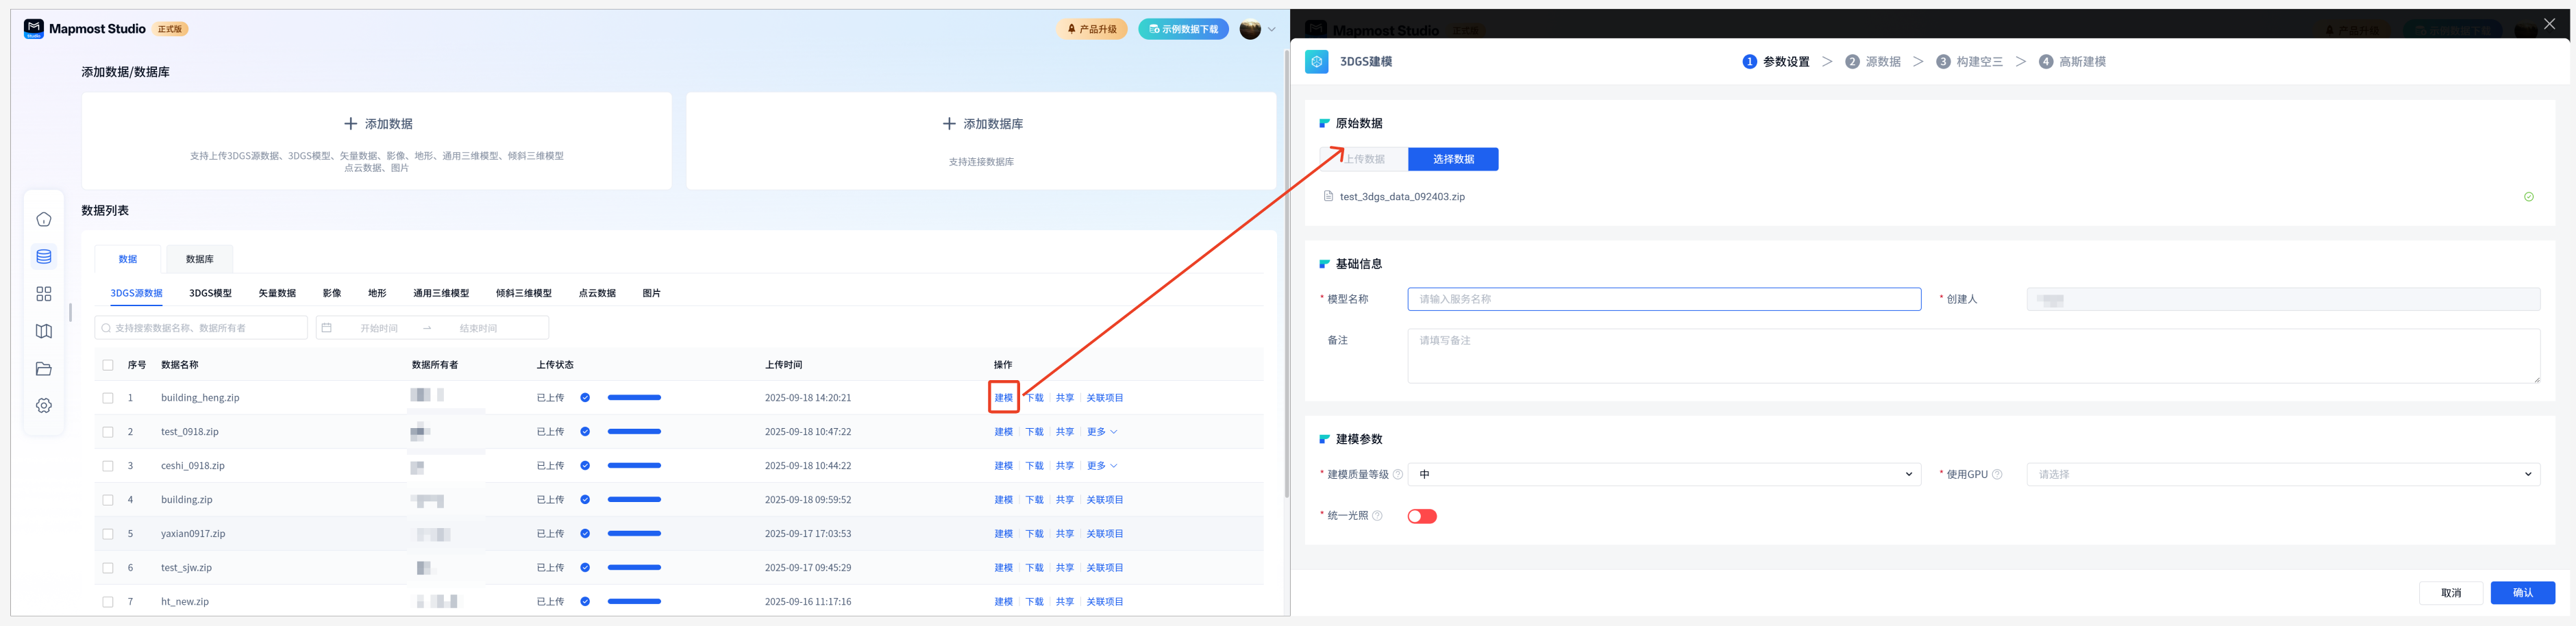
Basic information:
| Field | illustrate |
|---|---|
| Model name | Required, the name must start with a lowercase letter, be 4-32 characters in length, and consist of letters, numbers, and underscores. |
| Creator | Required, automatically entered, cannot be modified. |
| Remark | It is not required and can be filled in according to the actual situation. |
Modeling Parameters:
| Field | illustrate |
|---|---|
| Modeling quality level | Required, supports user drop-down selection of high, medium, and low. The default is medium. Description: This parameter is used to control the precision of modeling. The higher the level, the more refined the model, but the slower the speed. |
| unified lighting | Required, supports users to turn it on or off, and is turned off by default. Description: Suitable for photo collections with large lighting changes (such as large differences in light between morning and evening). |
| Use GPU | Required. The GPU status is idle or busy. Idle is optional and busy is not optional. Description: Specify the GPU number used for training, such as GPU 0 means using the first GPU, GPU 0, GPU 1 means using two GPUs in parallel. |
operate:
| Field | illustrate |
|---|---|
| Cancel | Click Cancel to exit the current modeling process, and the entered content will not be saved. |
| Start modeling | Click the Start button to save the current input content (this modeling record will be added under Data List-3DGS Model-System Construction) and start modeling, and proceed with the subsequent source data, aerial triangulation, and Gaussian modeling processes in sequence. |
1.2. Step 2: Source data
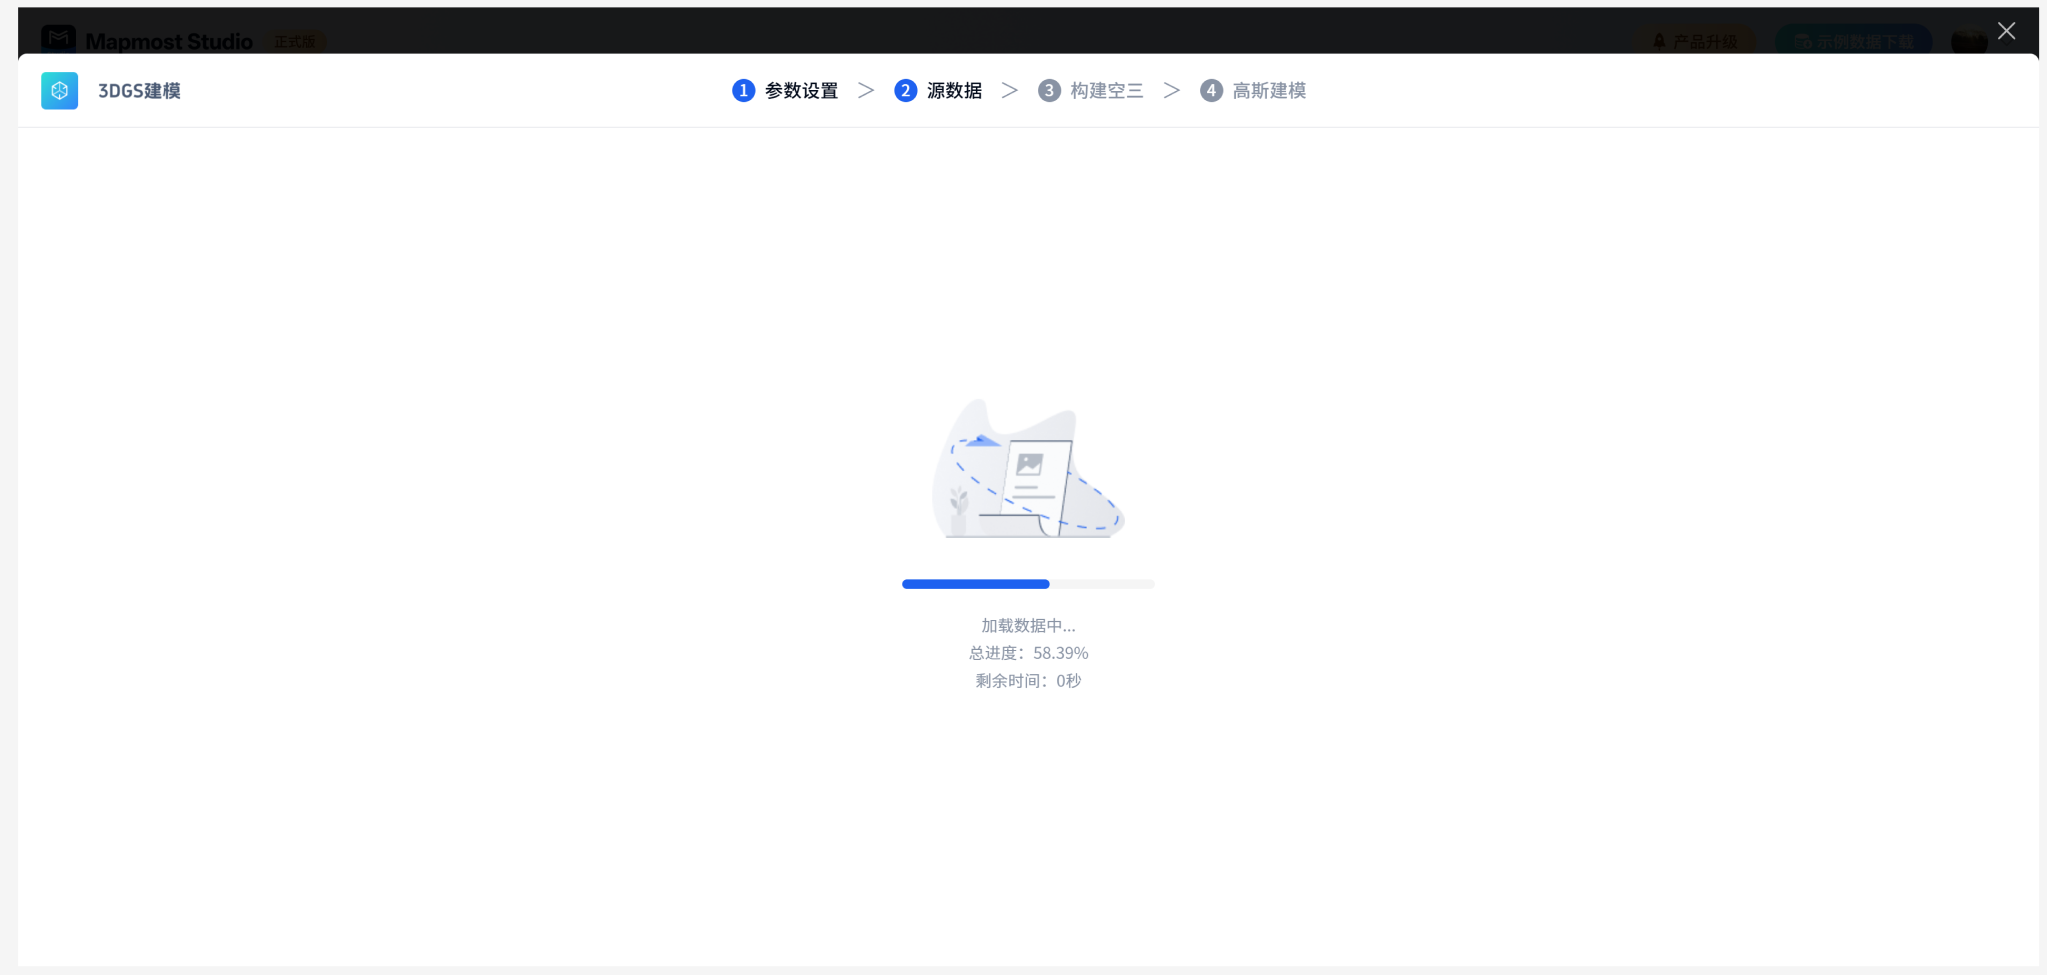
Based on the parameter configuration information entered in the previous step, the data loading status and results are displayed in real time. The upload progress bar and remaining time are displayed during the loading process.
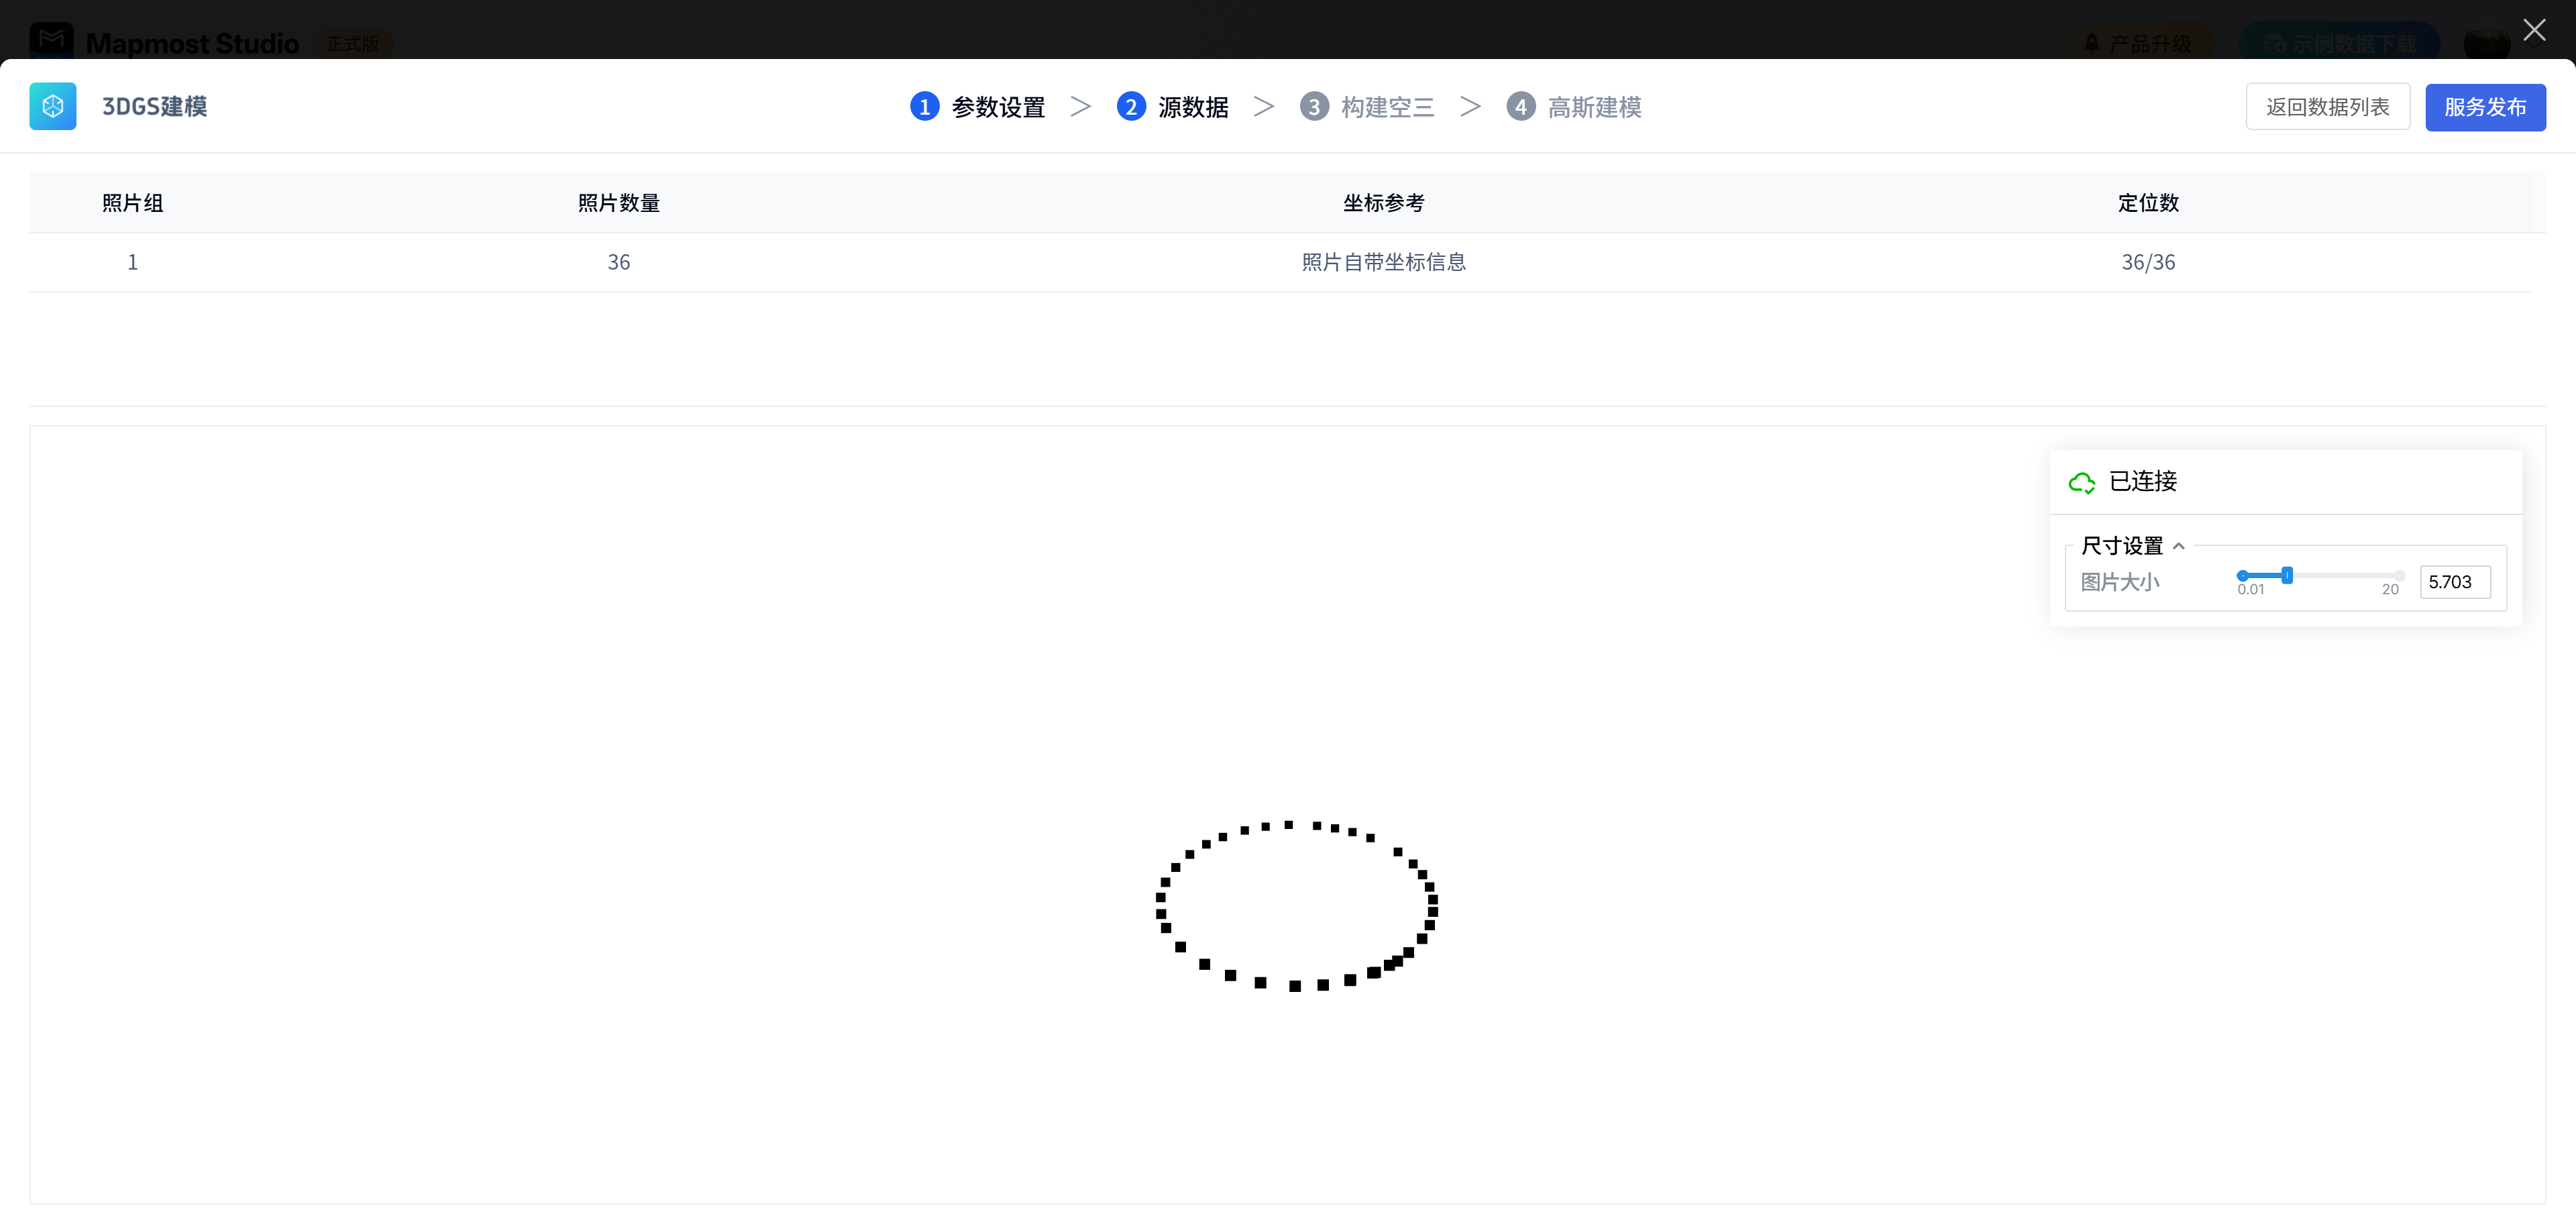
Case 1: If the upload is successful, you can view the source data upload results, view the number of photos, coordinate information, adjust parameters and view the pose of the photos.
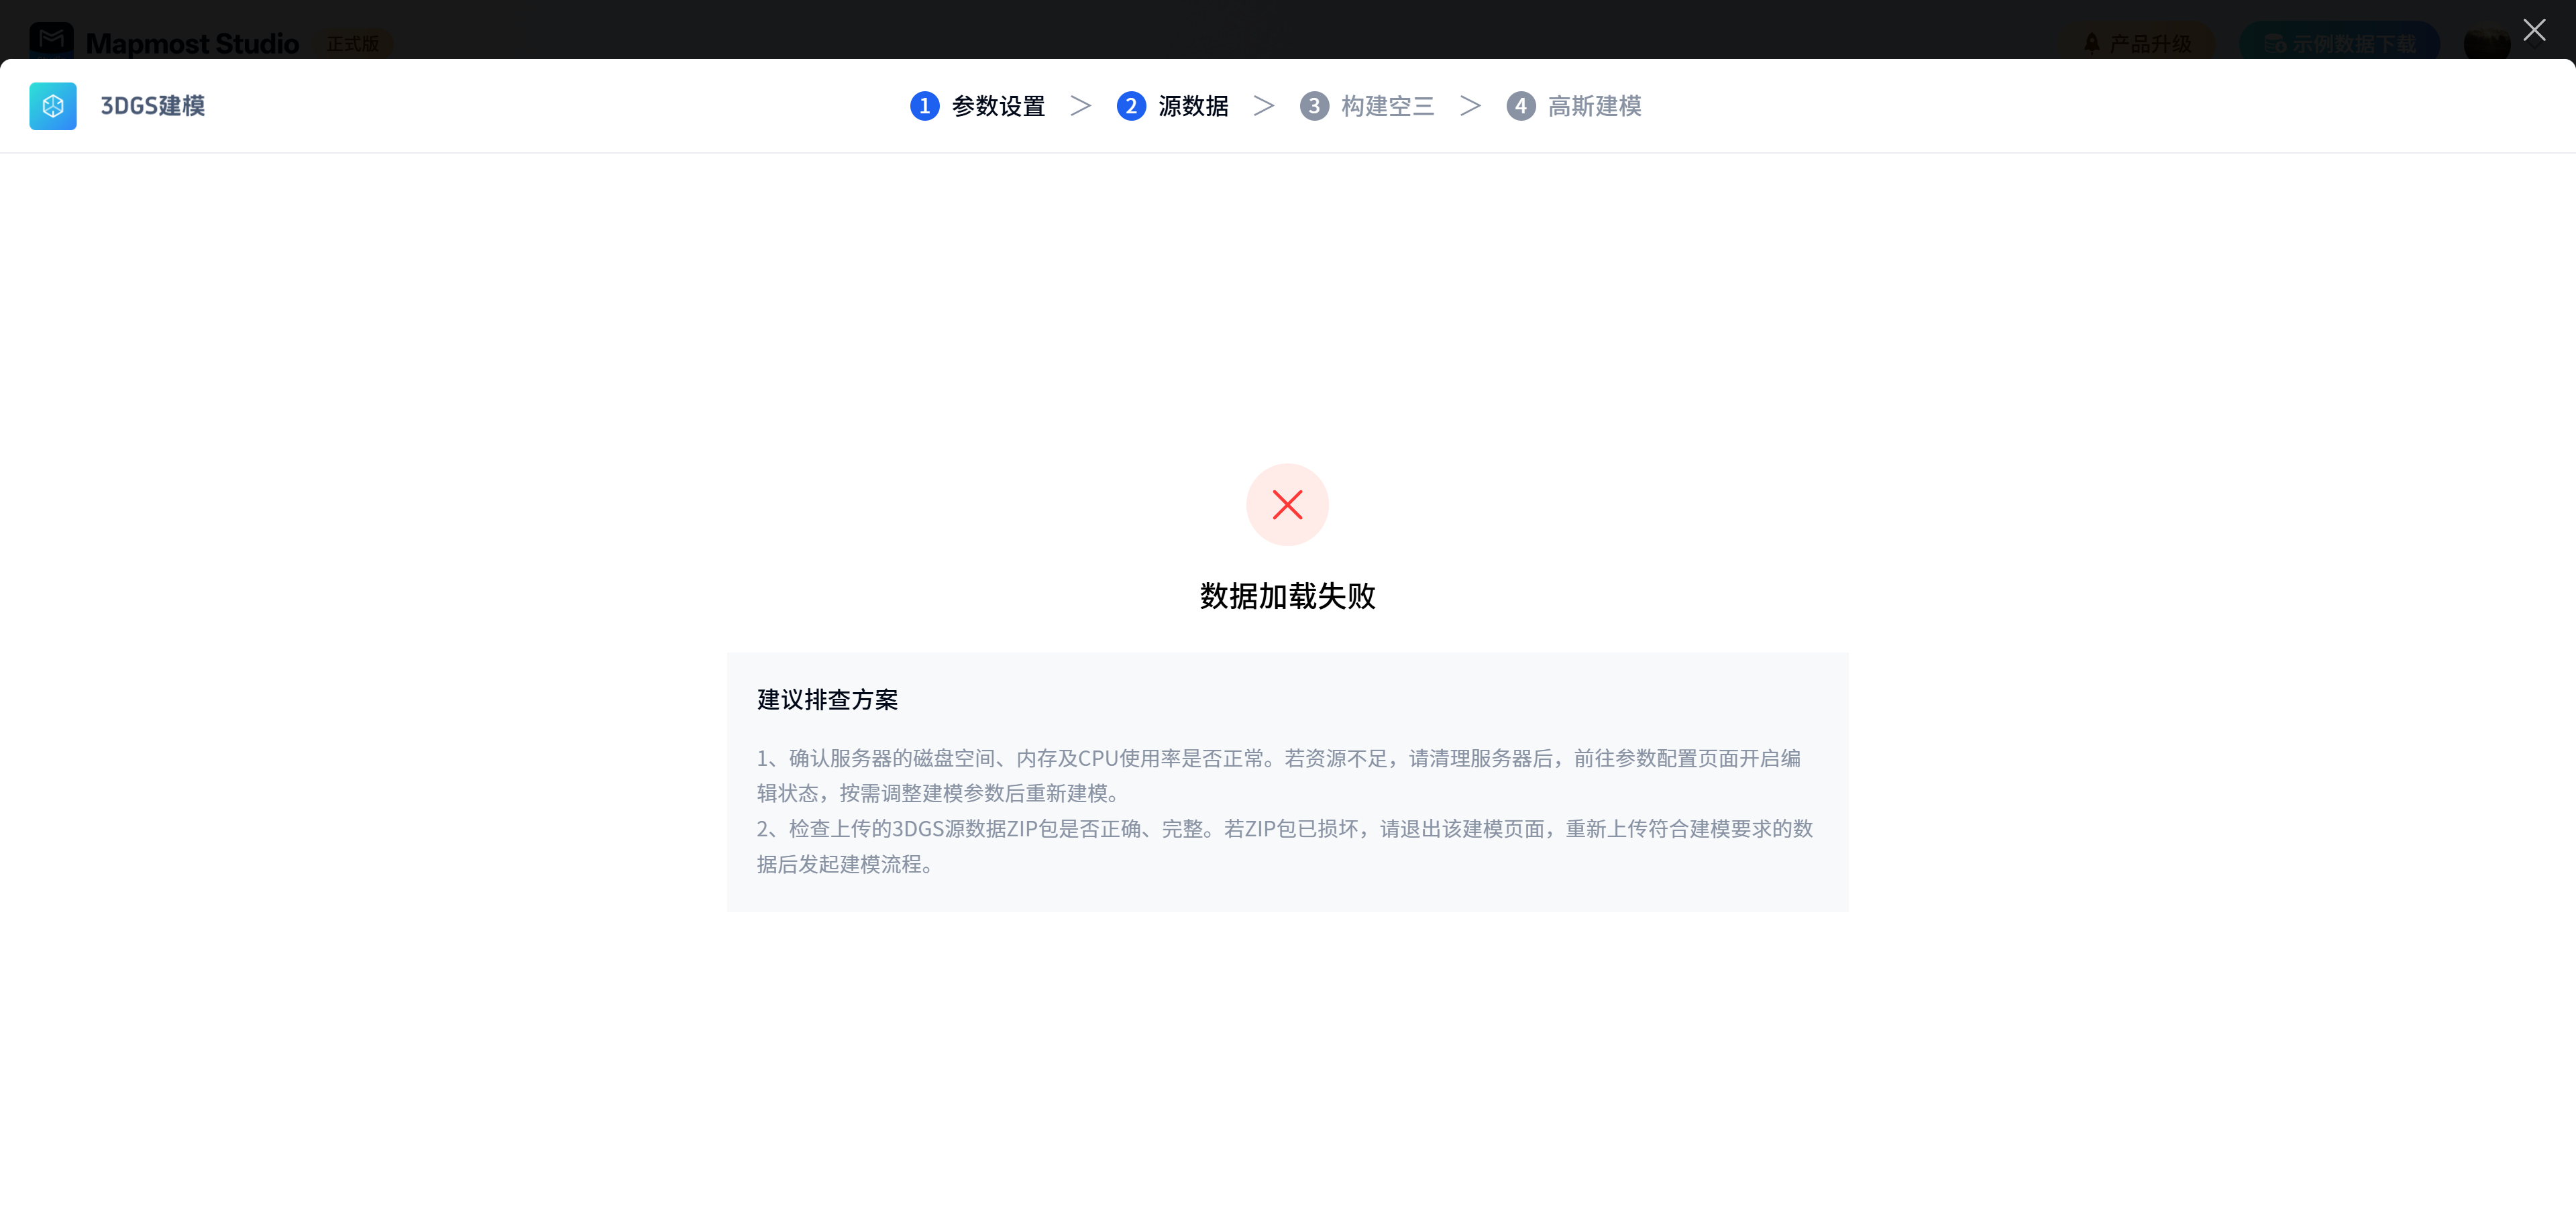
Situation 2: If the upload fails, you can check and re-model based on the troubleshooting plan provided; you can also click Parameter Configuration to return to the parameter configuration page, adjust the modeling parameters and then restart modeling.
1.3. Step 3: Build aerial triangulation
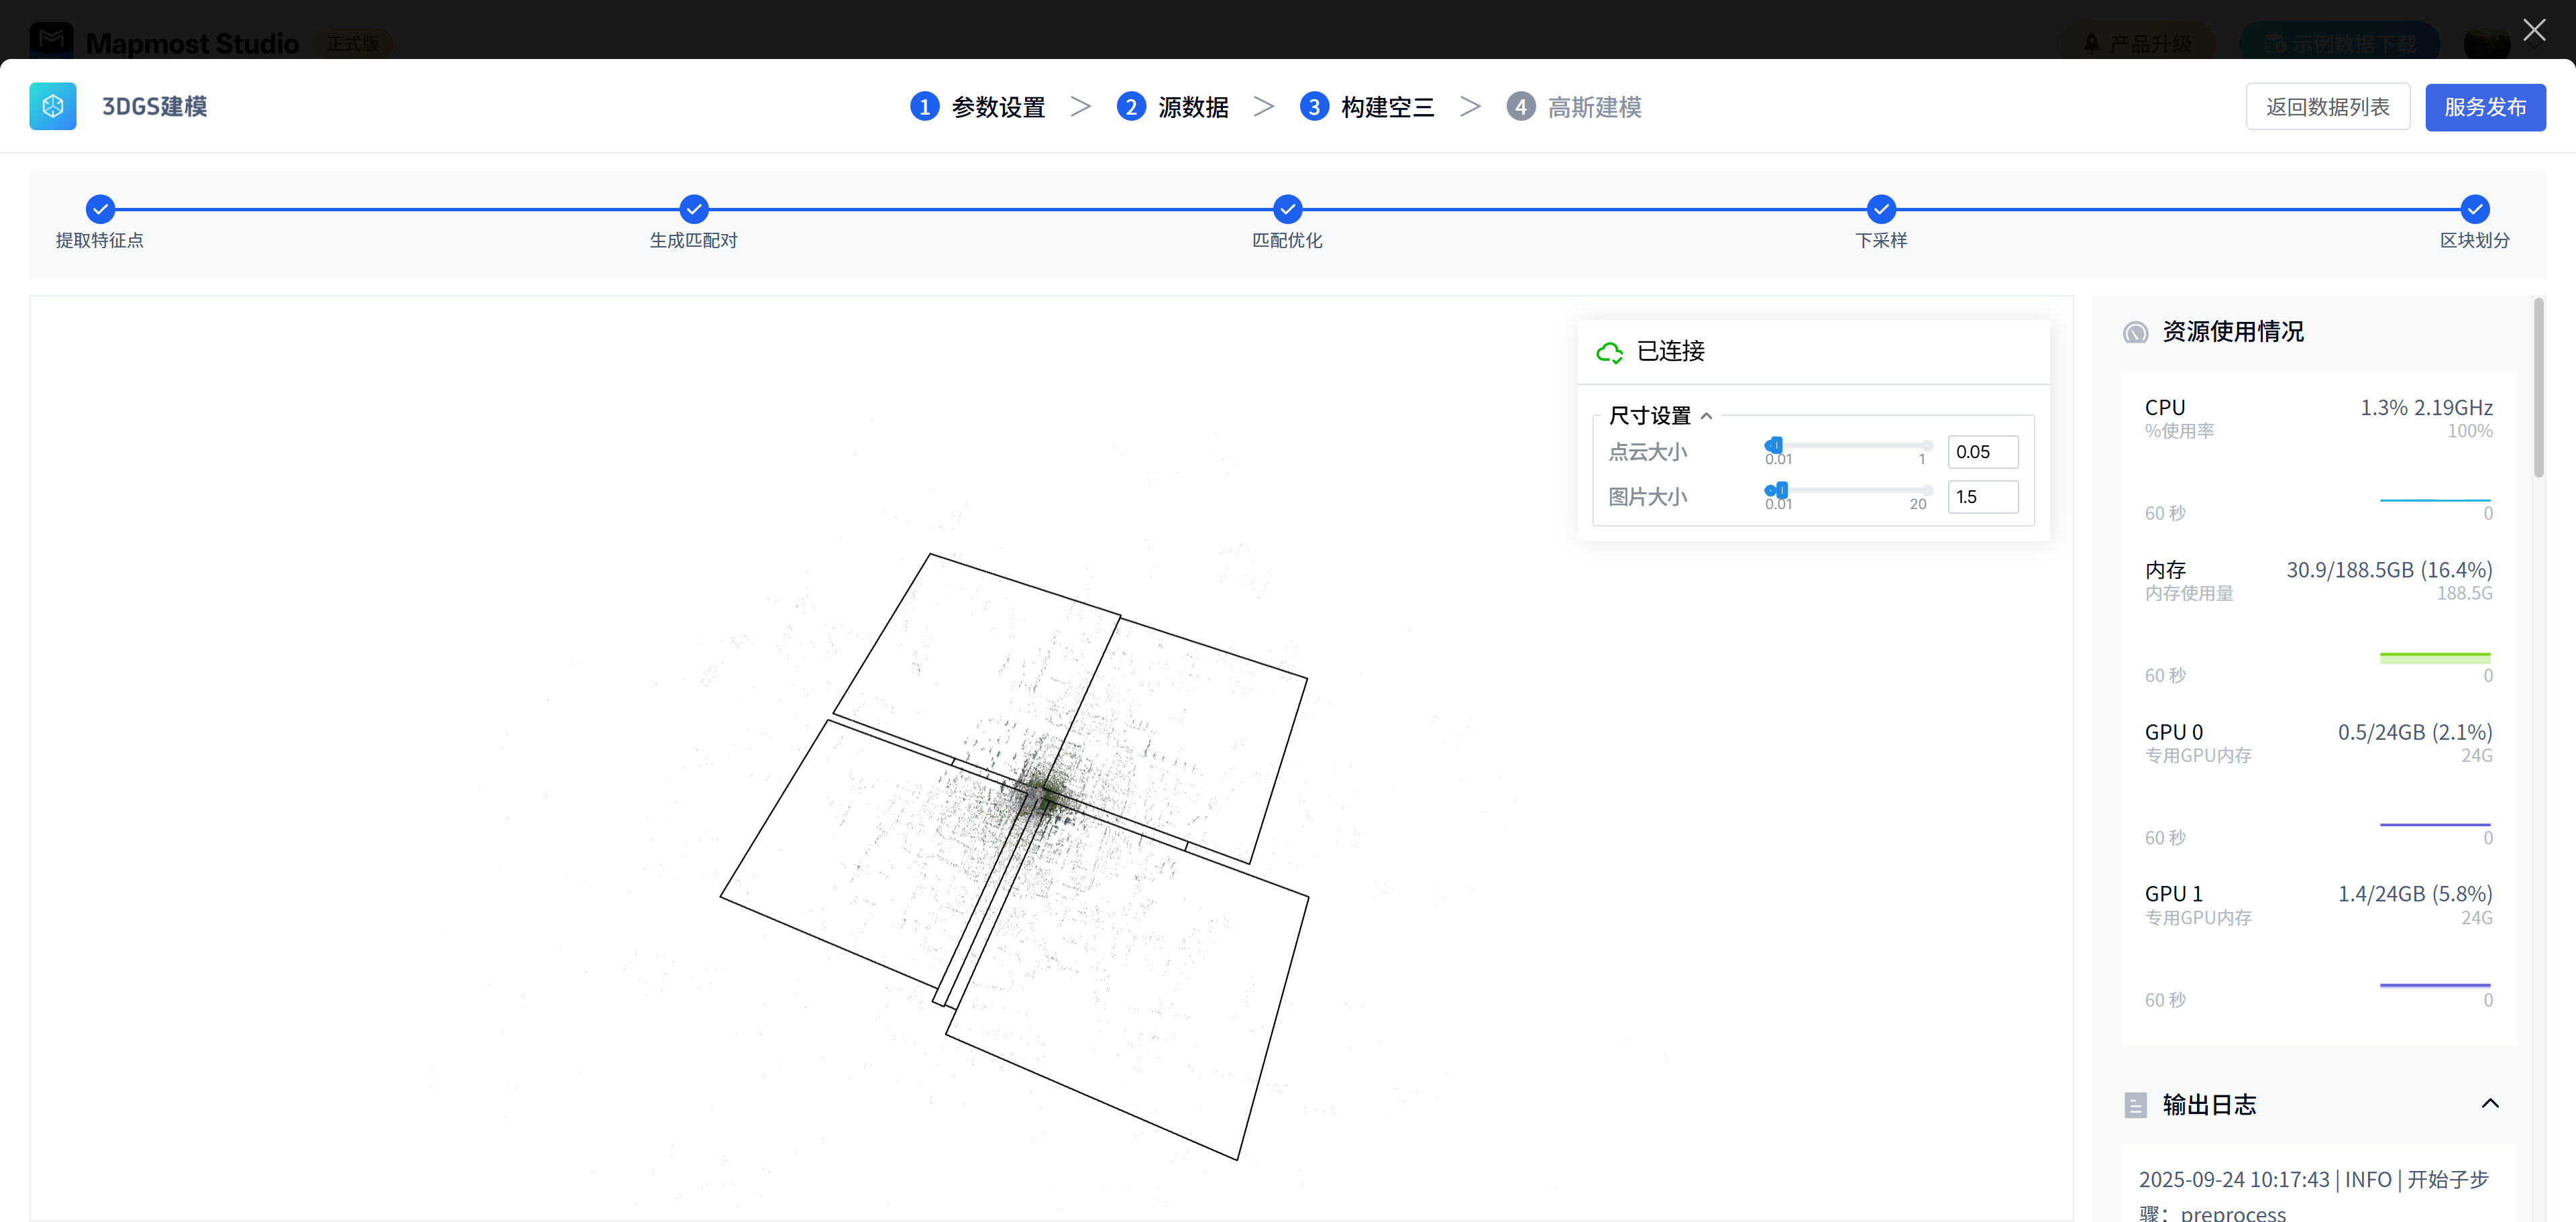
The content displayed on the page of the third phase of building the aerial system includes progress display, results display, real-time hardware monitoring and real-time log viewing.
| module | illustrate |
|---|---|
| progress display | The construction of aerial triangulation is refined into 5 steps, which are displayed in the progress bar at the top of the page, including extracting feature points, generating matching pairs, matching optimization, downsampling and block division. |
| Achievements display | After Matching Optimization is completed, the aerial triangulation results will begin to be displayed in the visualization window. Before matching optimization is completed, no data will be displayed in the visualization window. After the block division is completed, the data division status is displayed in the visualization window. Supports adjusting parameters to view aerodynamic results. |
| Hardware real-time monitoring | The real-time occupancy of different hardware resources is displayed through the curve chart: the memory occupancy is displayed through the curve; the CPU usage is displayed through the curve; the real-time occupancy of different GPUs is displayed through the curve chart, and only the GPU in use is displayed. |
| Log view | The process log is output in real time in the lower right corner and can be collapsed. |
Case 1: If the construction is successful, it will automatically enter the Gaussian modeling process.
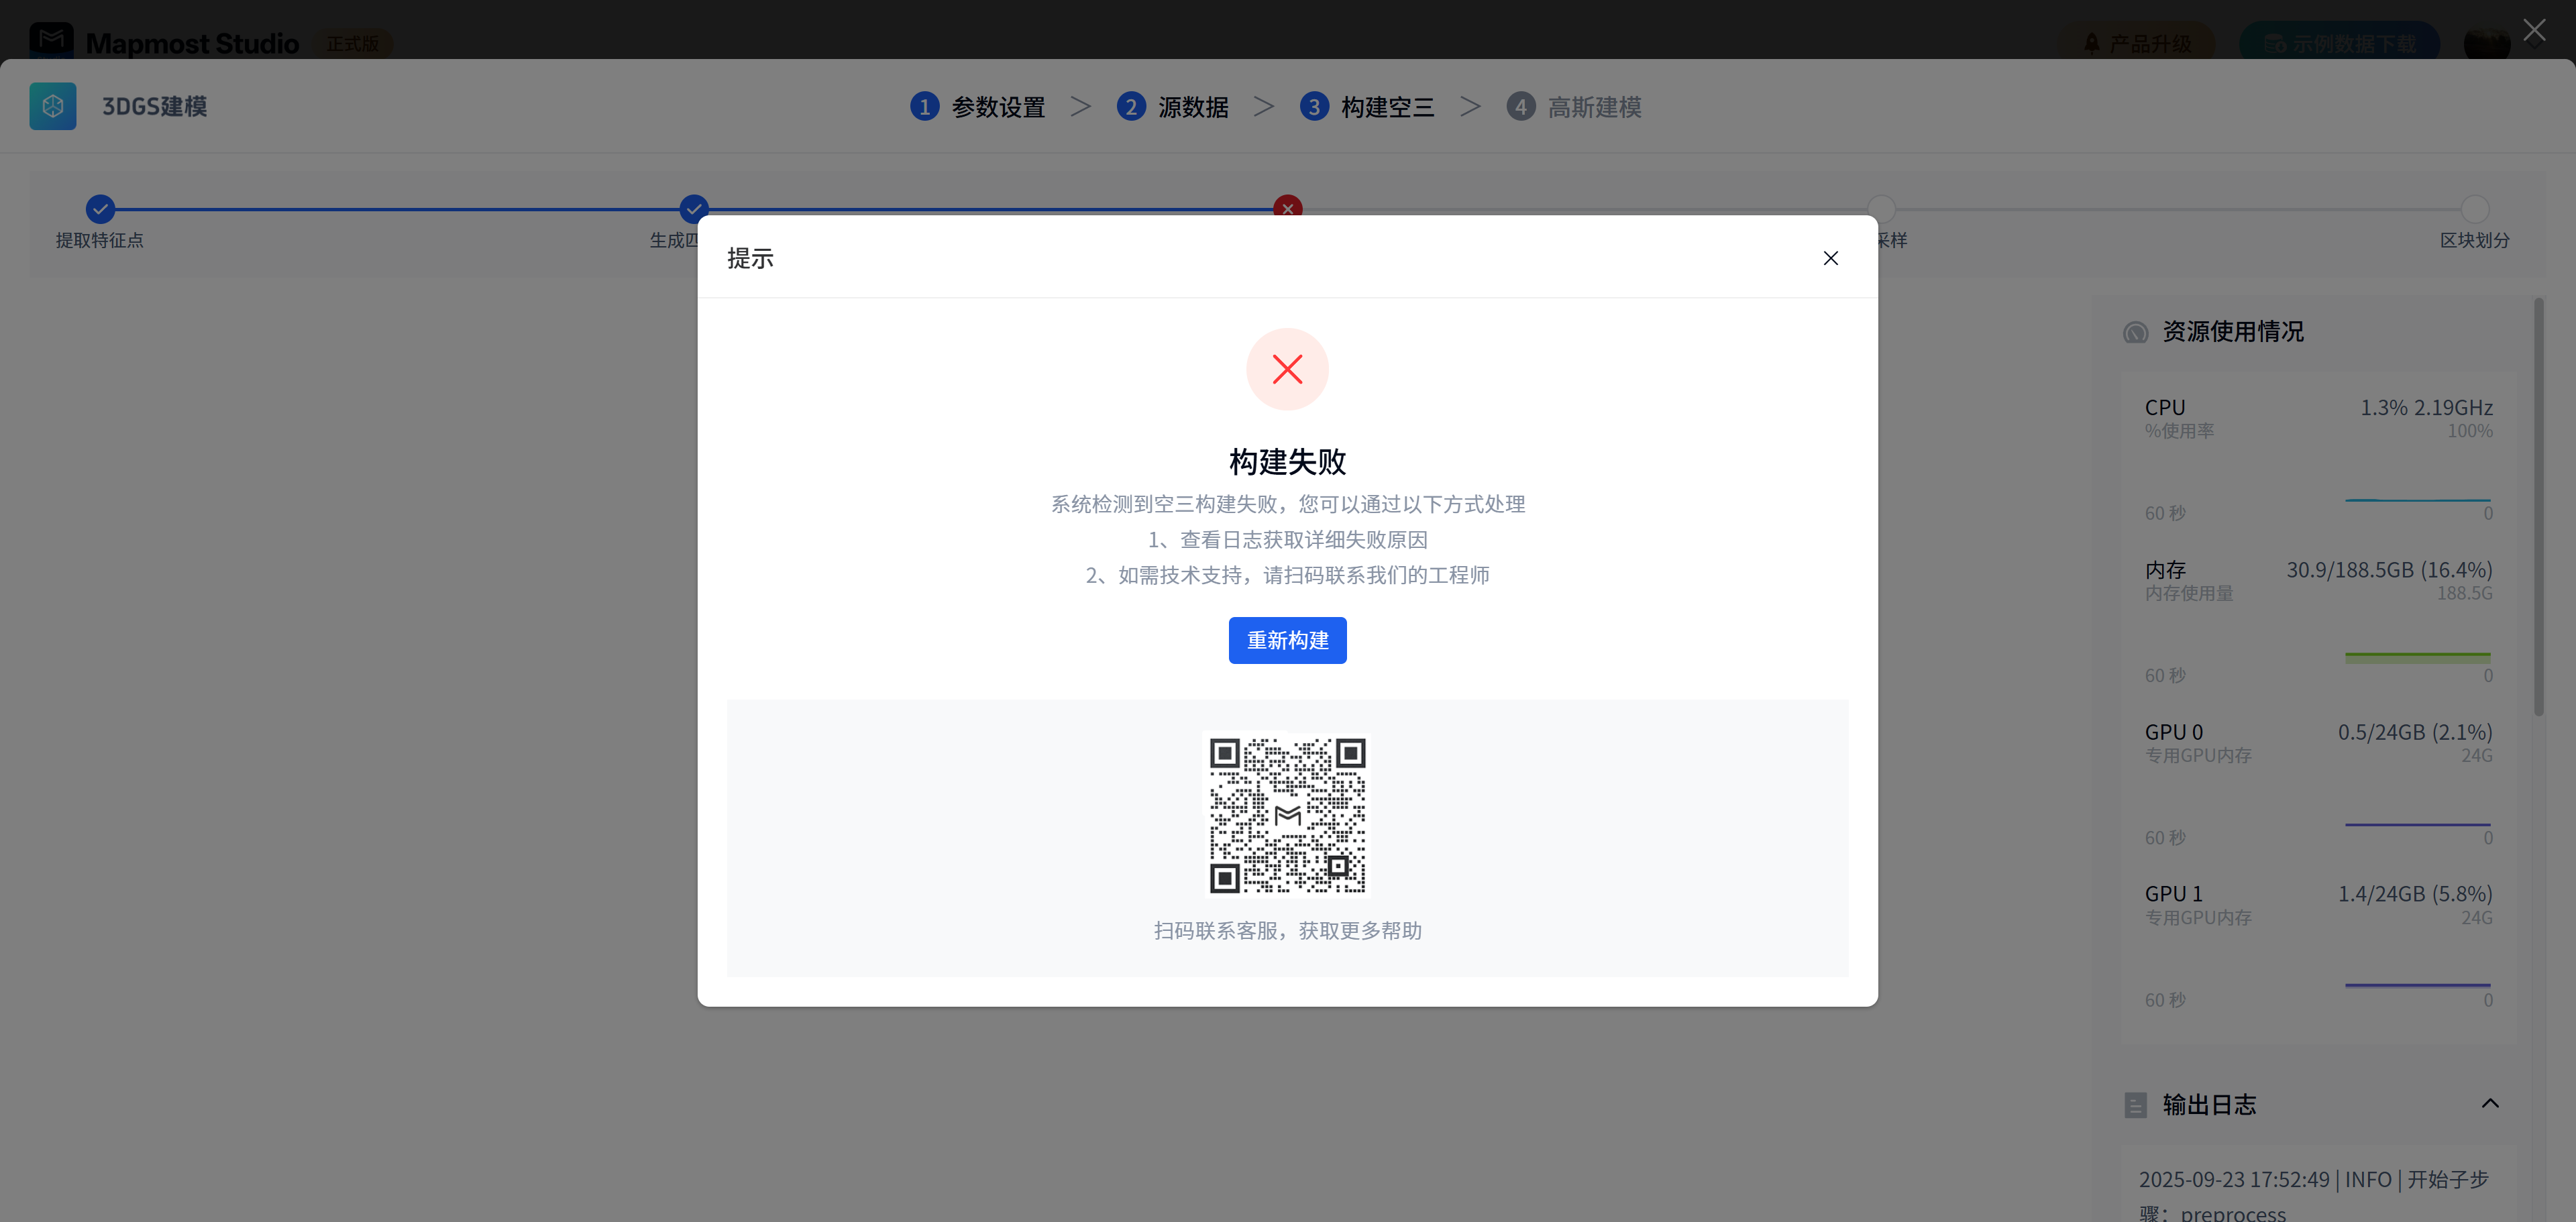
Case 2: If the build fails, the corresponding failed node is displayed.
- Adjustments can be made based on the prompt failure reasons and suggested solutions. If the cause is not located, you can contact technical customer service through the QR code displayed on the page to help solve the problem.
- Supports rebuilding. Click Rebuild to start rebuilding from the current stage.
1.4. Step 4: Gaussian modeling
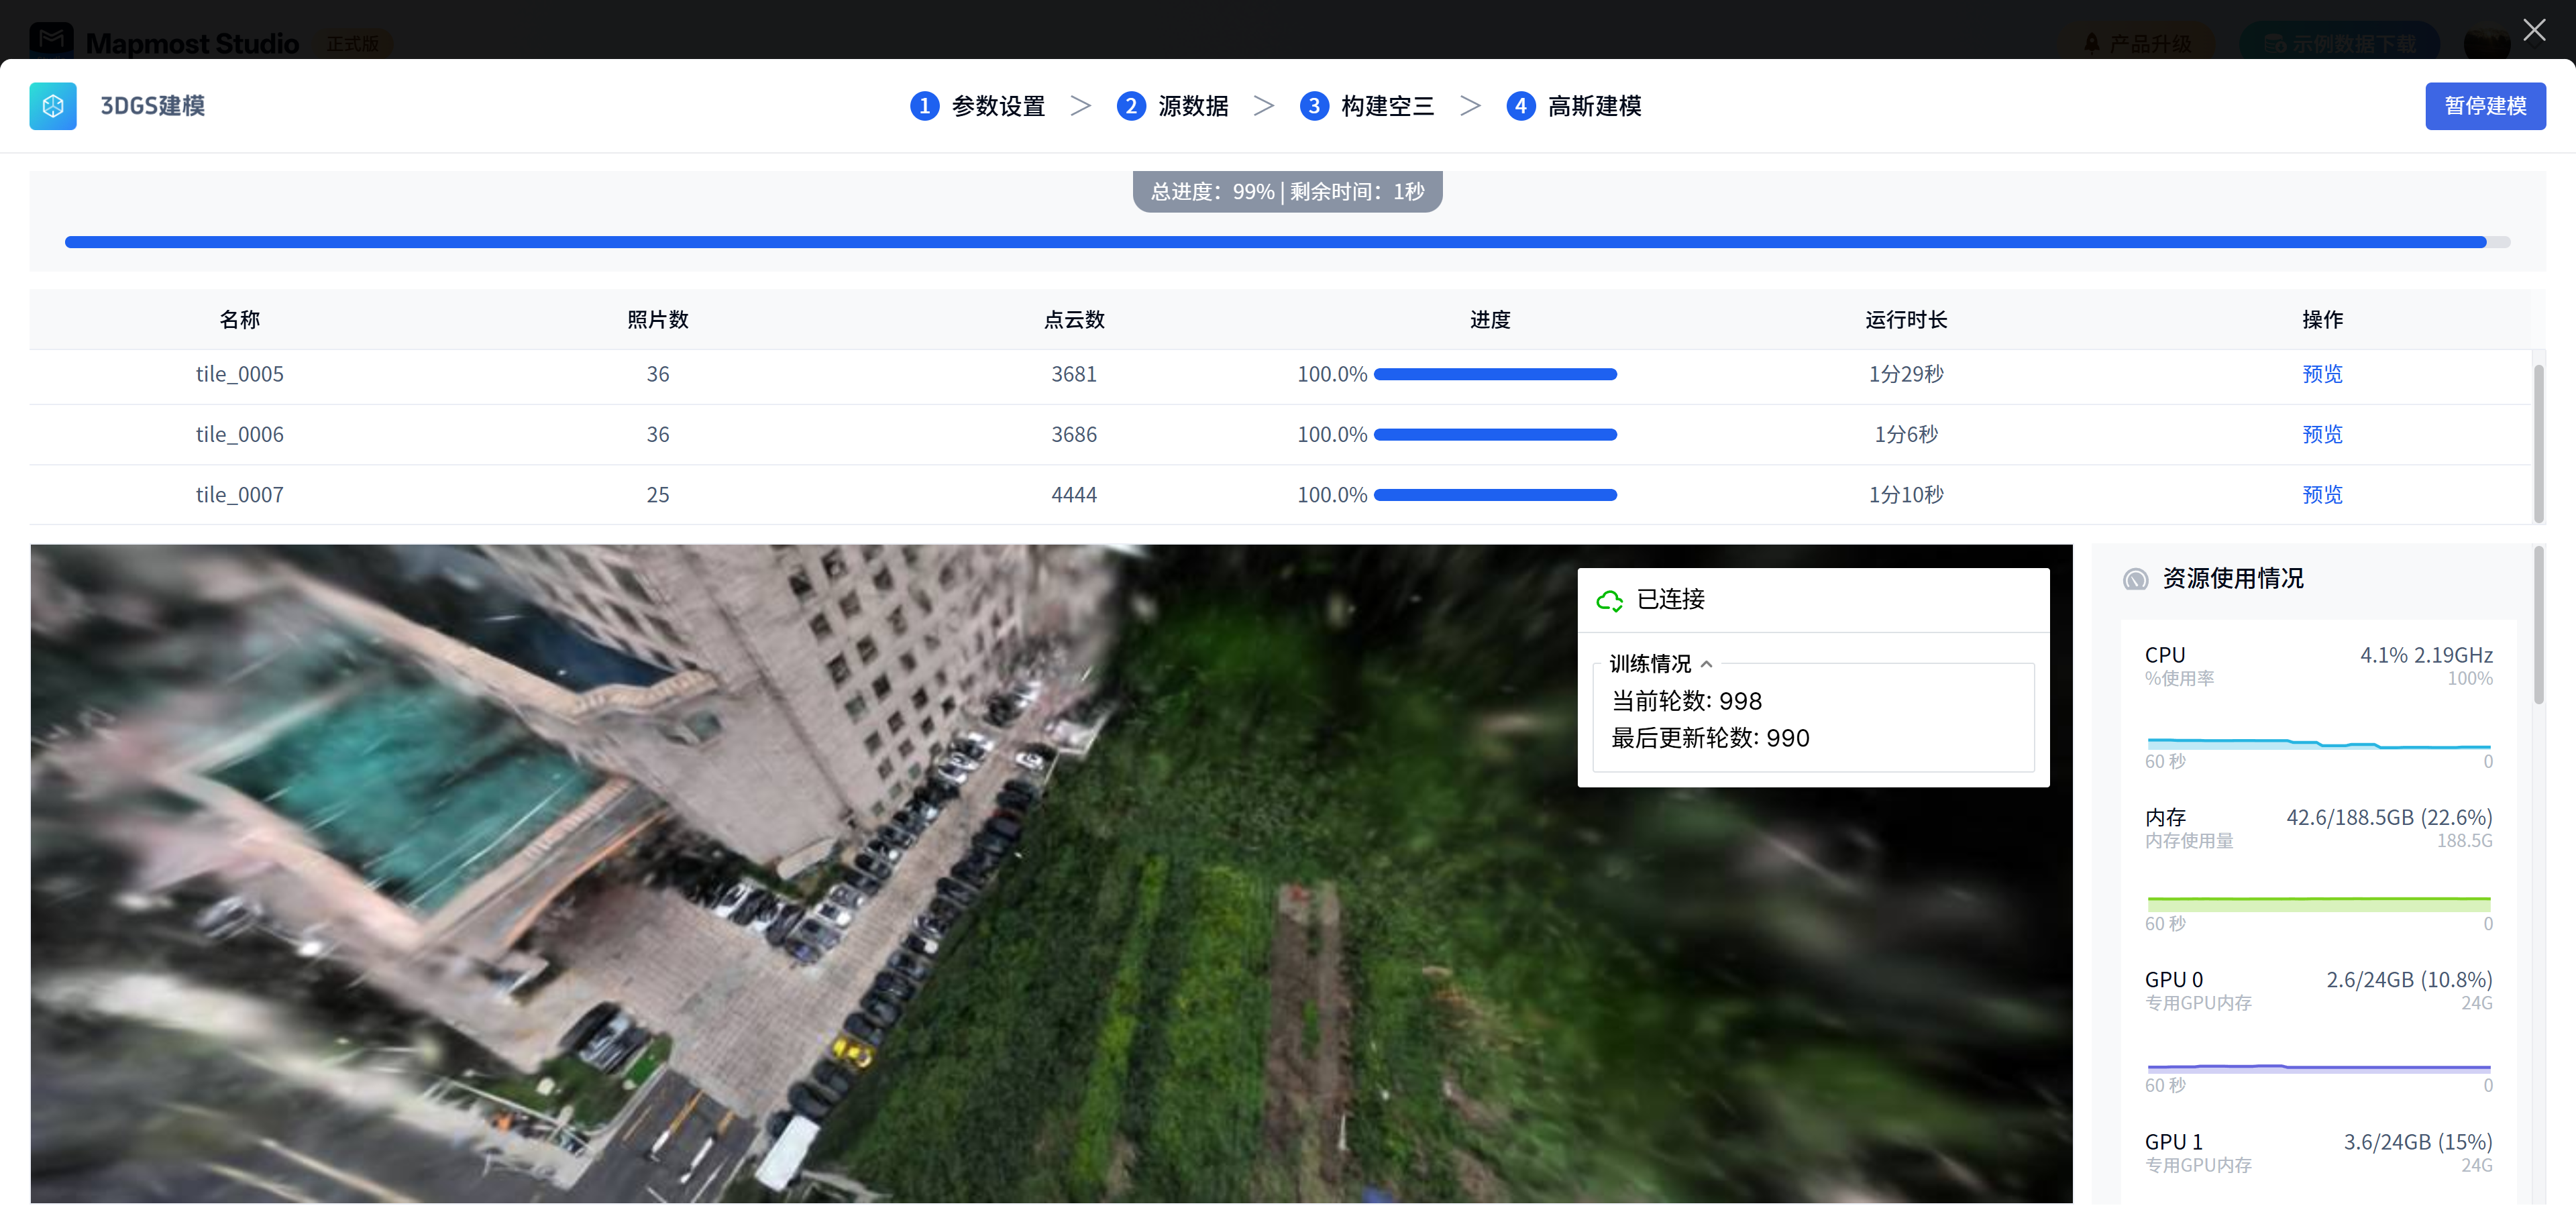
The content displayed on the Gaussian modeling stage page includes total progress display, block modeling list, block modeling results preview, real-time hardware monitoring and real-time log viewing.
| module | illustrate |
|---|---|
| Overall progress display | The total progress of modeling is displayed in the form of a progress bar, including the overall progress completion percentage and remaining time. |
| Block modeling list | Displays the block name, number of photos, number of point clouds, block modeling progress, running time, and operations. |
| Preview of block modeling results | Supports adjusting the display of modeling results in the visualization window through the preview button: the block being built is previewed by default; if there are multiple blocks being built at the same time, any one of them can be selected for preview; the user can preview the blocks under construction and completed, and the preview of blocks that have not started to be built is disabled. Only single block preview is supported. |
| Hardware real-time monitoring | The real-time occupancy of different hardware resources is displayed through the curve chart: the memory occupancy is displayed through the curve; the CPU usage is displayed through the curve; the real-time occupancy of different GPUs is displayed through the curve chart, and only the GPU in use is displayed. |
| Log view | The process log is output in real time in the lower right corner and can be collapsed. |
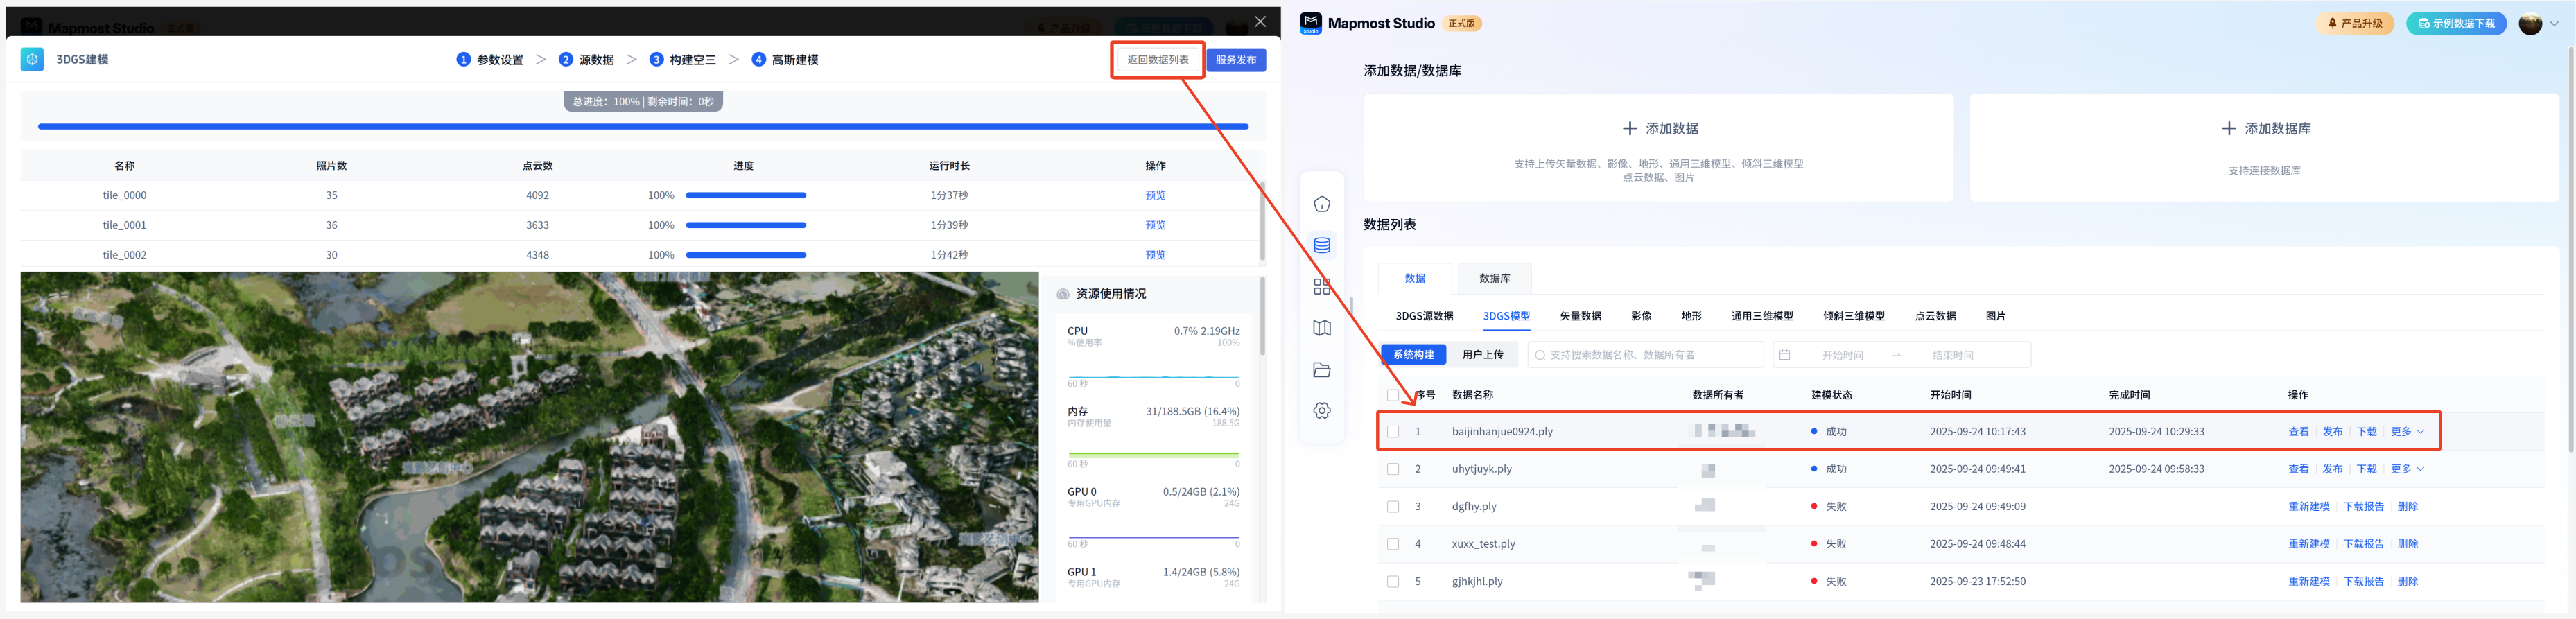
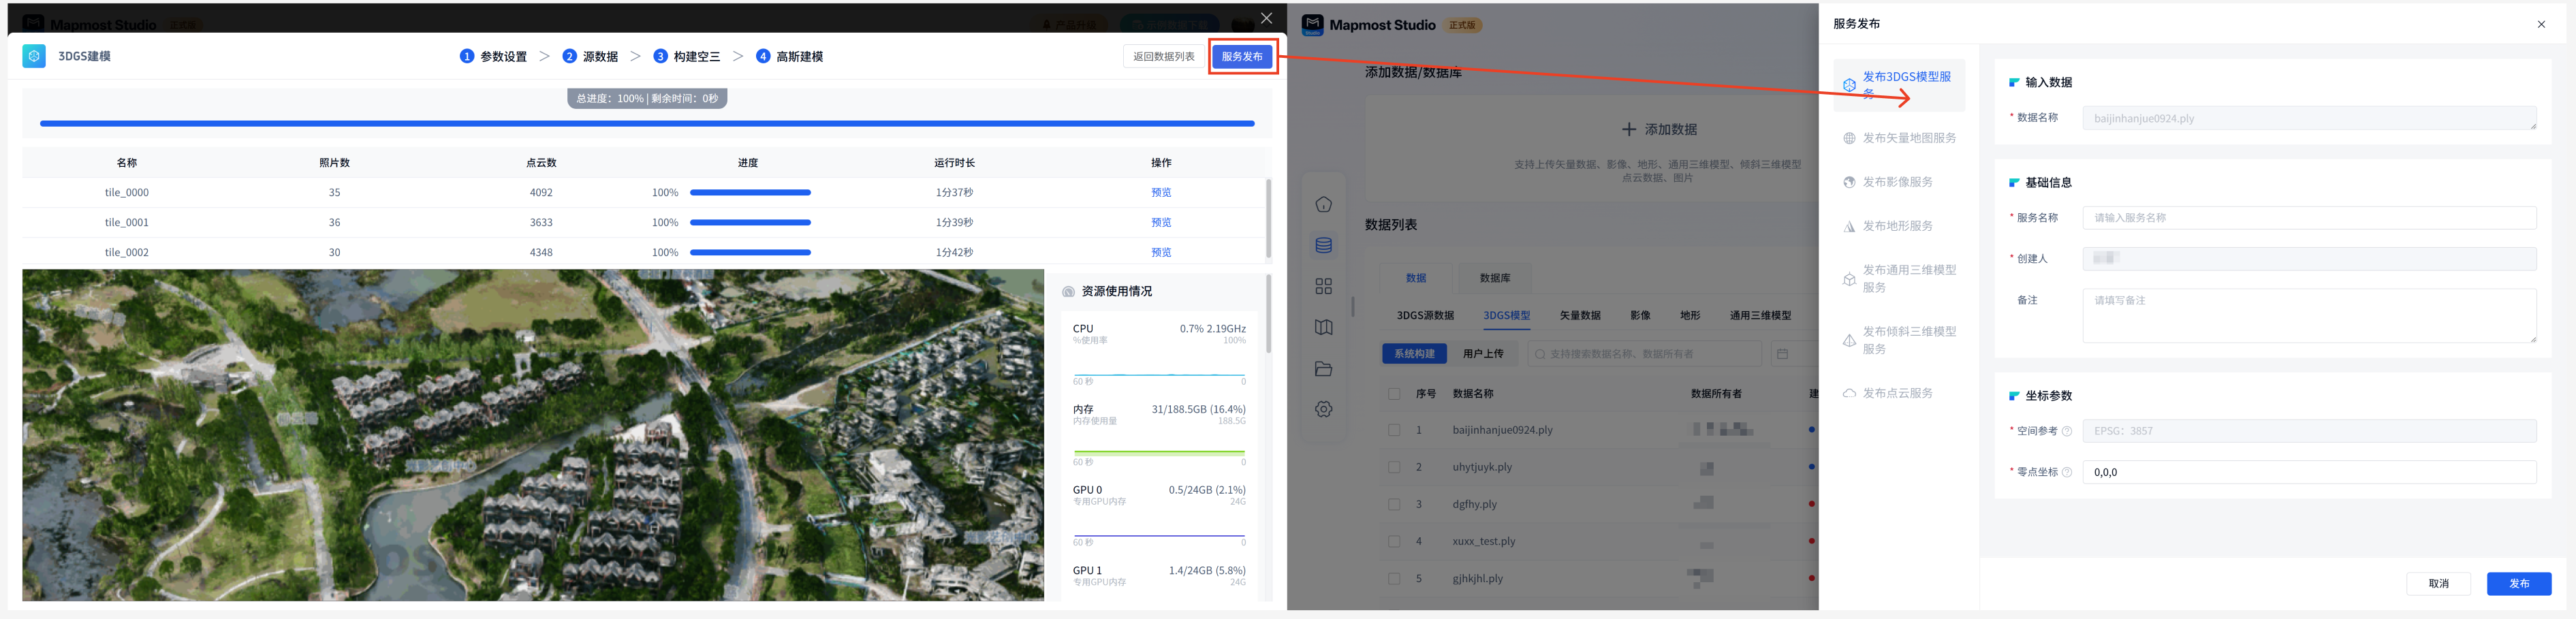
Case 1: If Gaussian modeling is successful, it will stay on the current page. The following three operations are supported:
- Click "Preview" in the block modeling list operation to view the block modeling results on the current page.
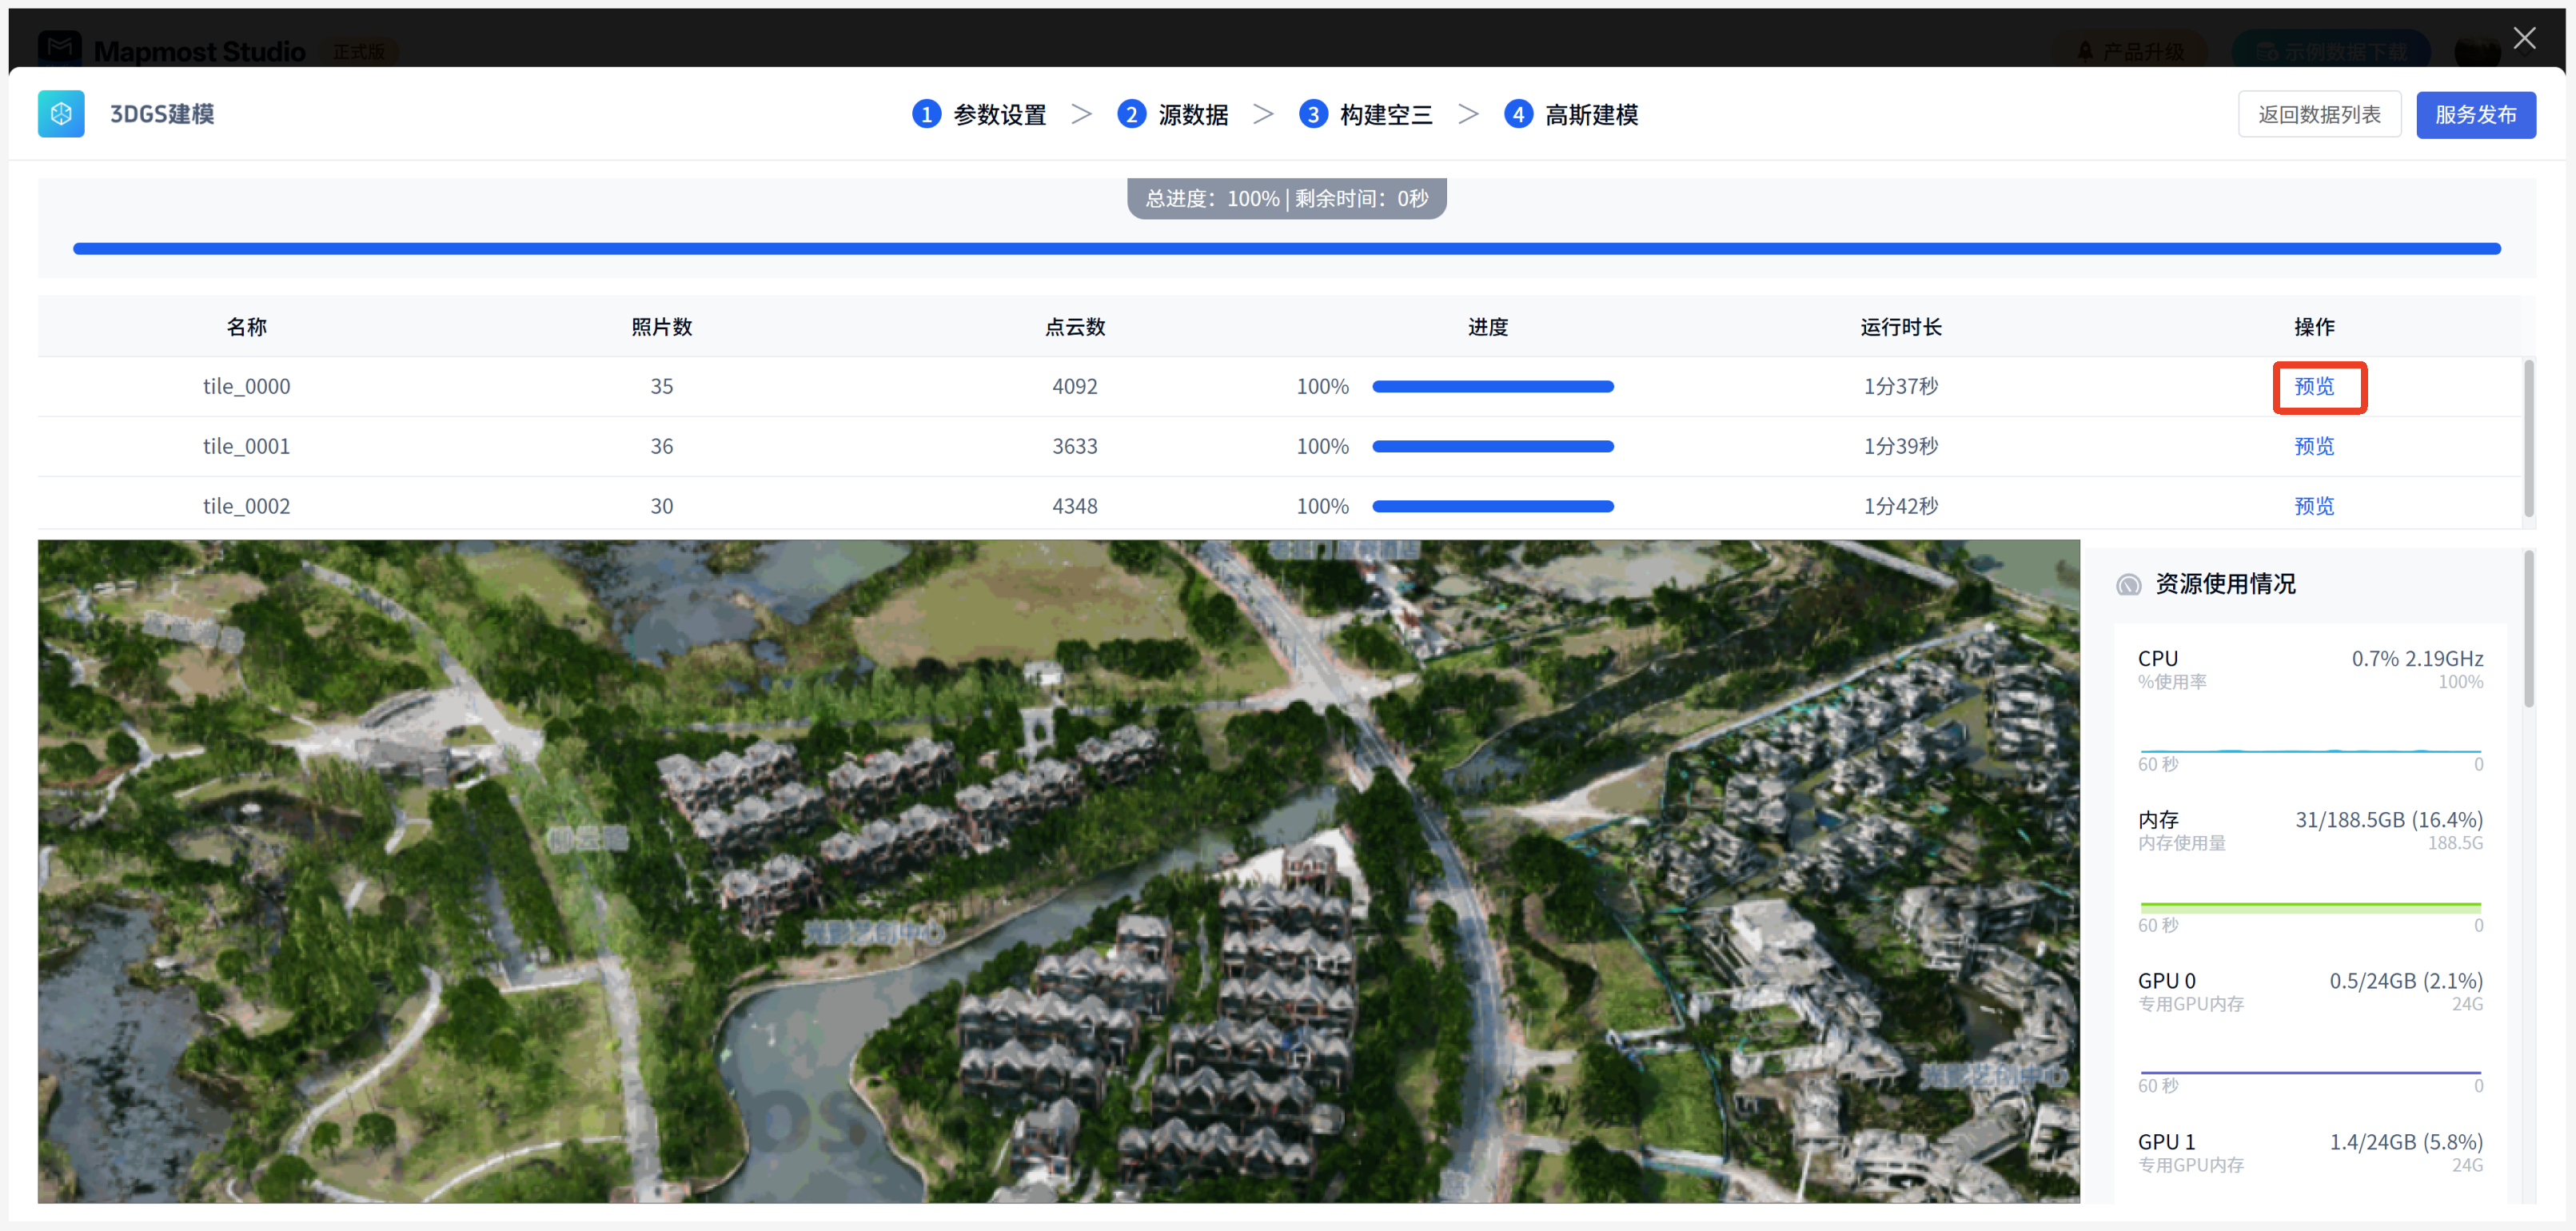
- Click "Return to Data List" in the upper right corner of the page to return to the My Data page and view this modeling record in the 3DGS Model-System Construction List.
- Click "Service Publishing" in the upper right corner of the page to publish the service using the results of the current modeling.
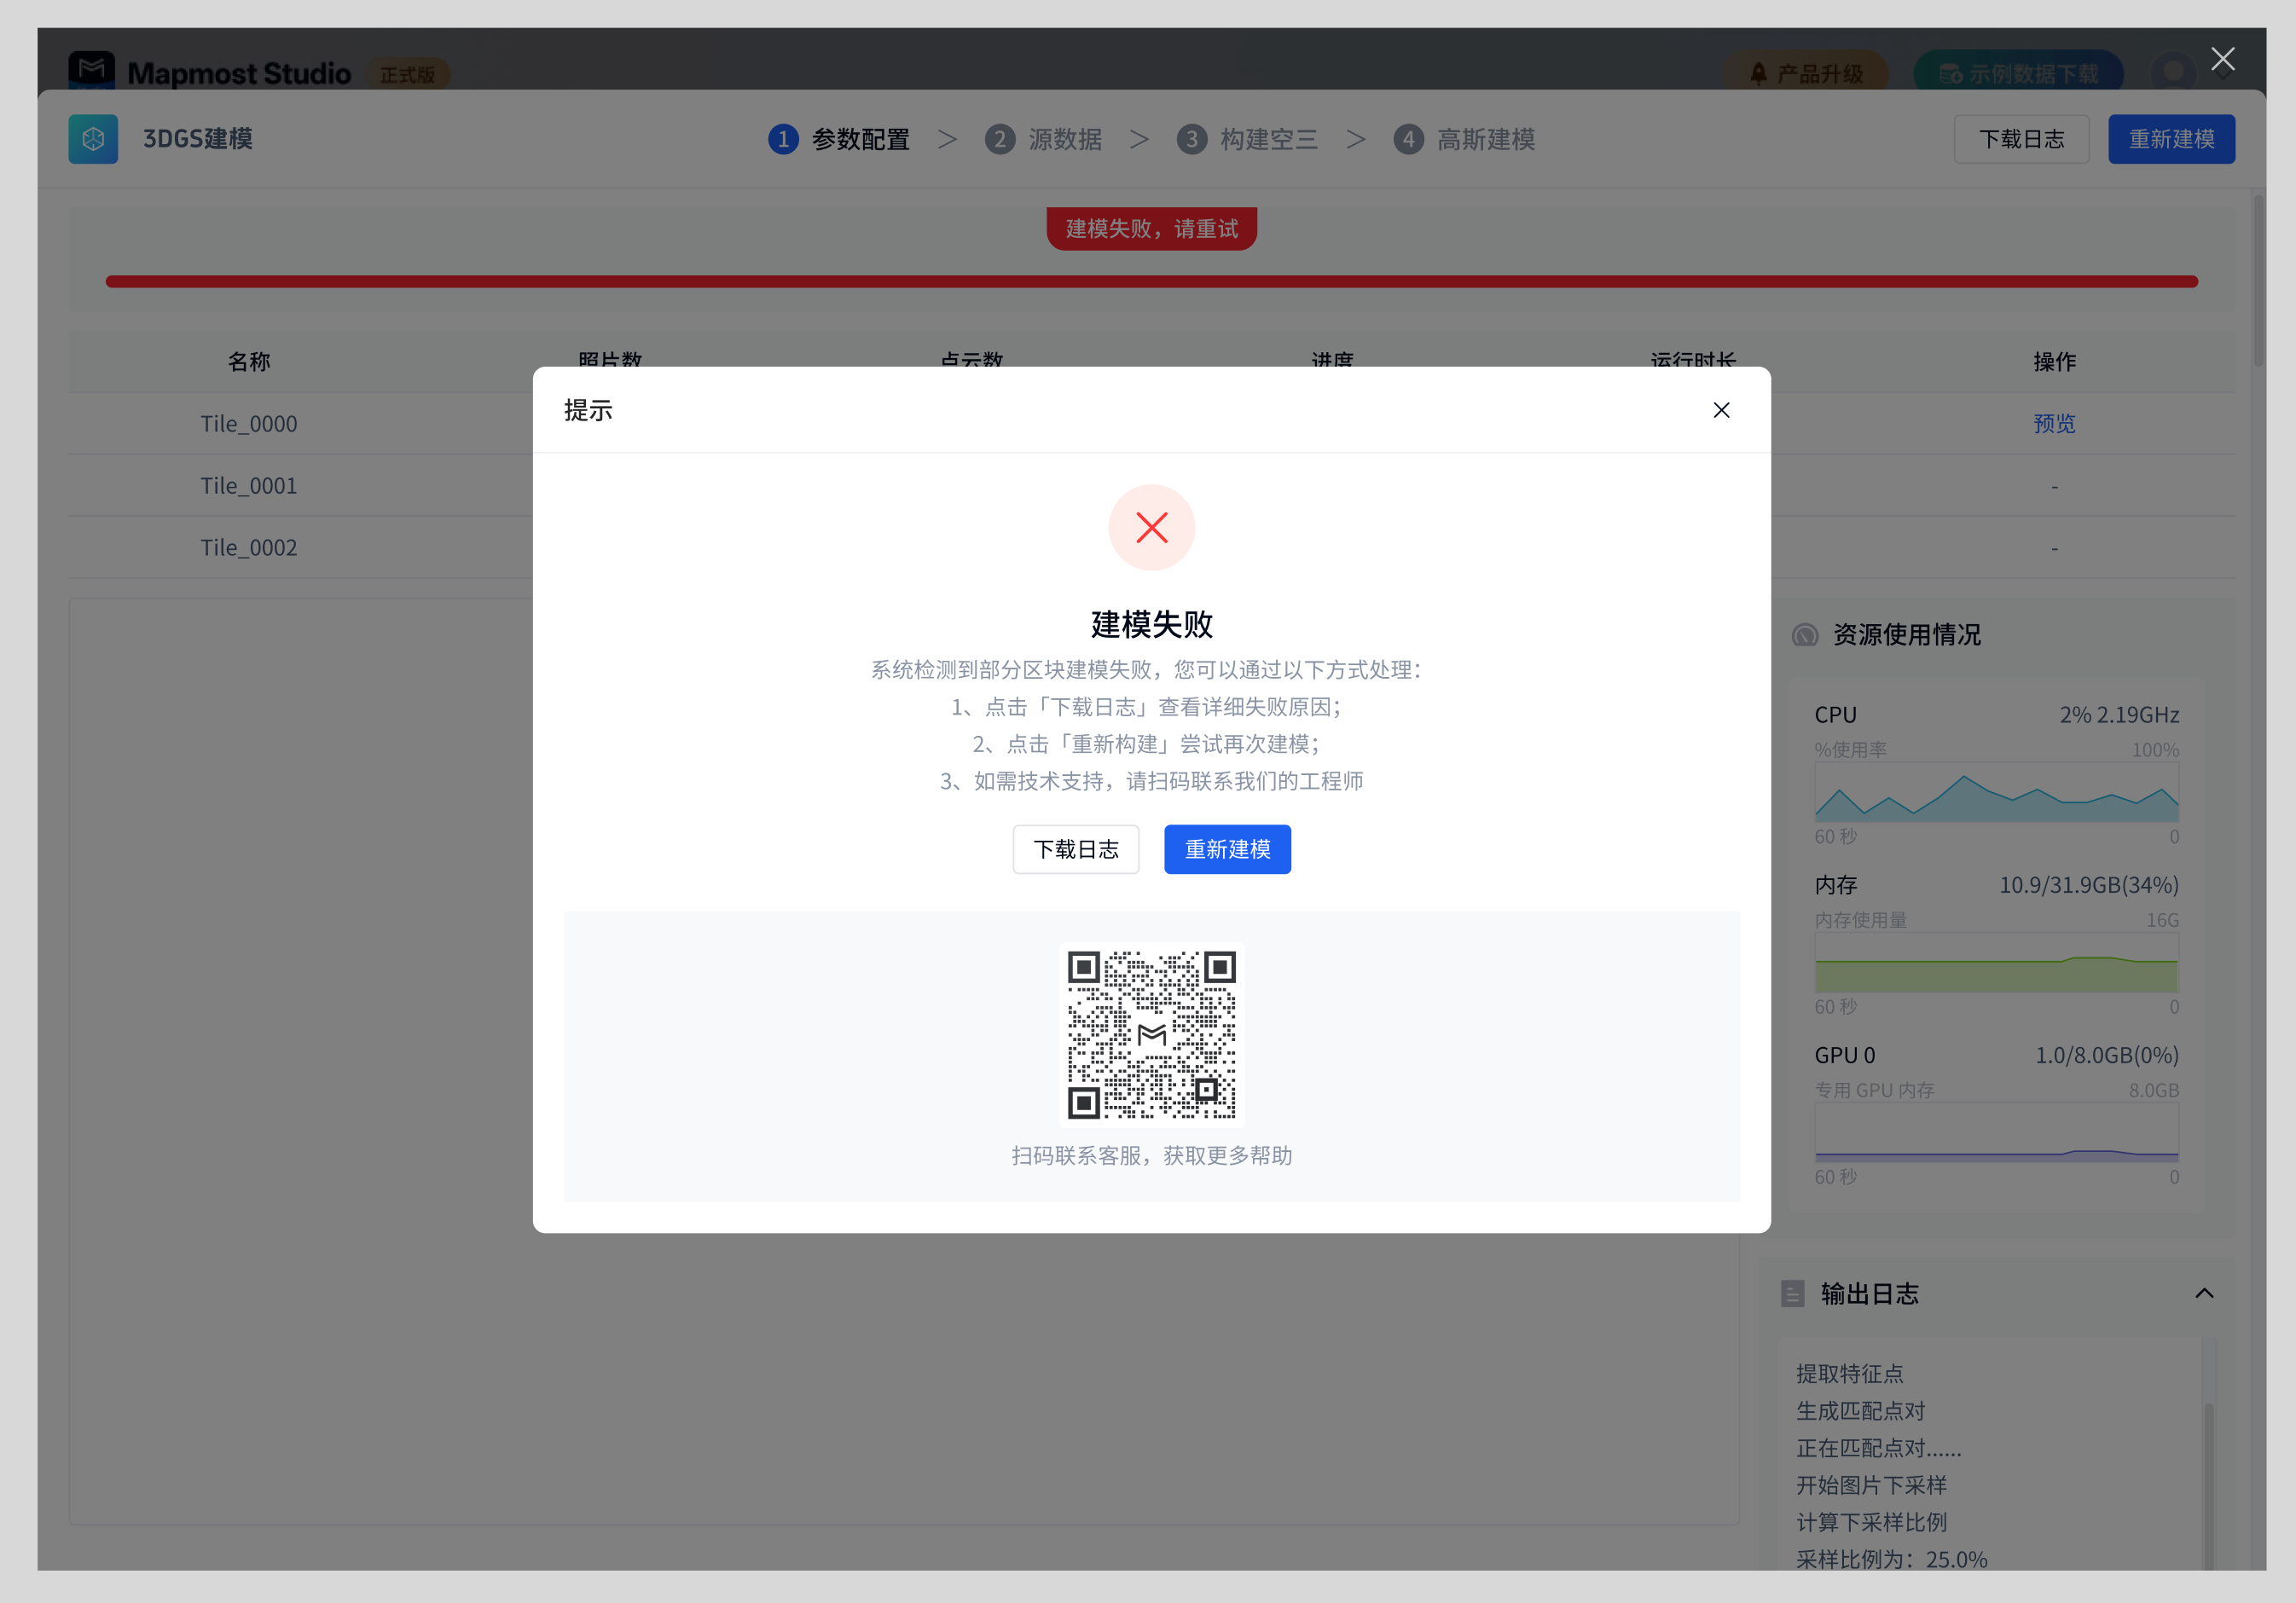
Case 2: If Gaussian modeling fails, the corresponding failure block is displayed.
- You can adjust the solution according to the prompts, and you can contact technical customer service to help solve the problem through the QR code displayed on the page.
- You can download the log to learn more about the detailed failure reasons.
- Supports remodeling. Click Remodel to start remodeling from the current stage.
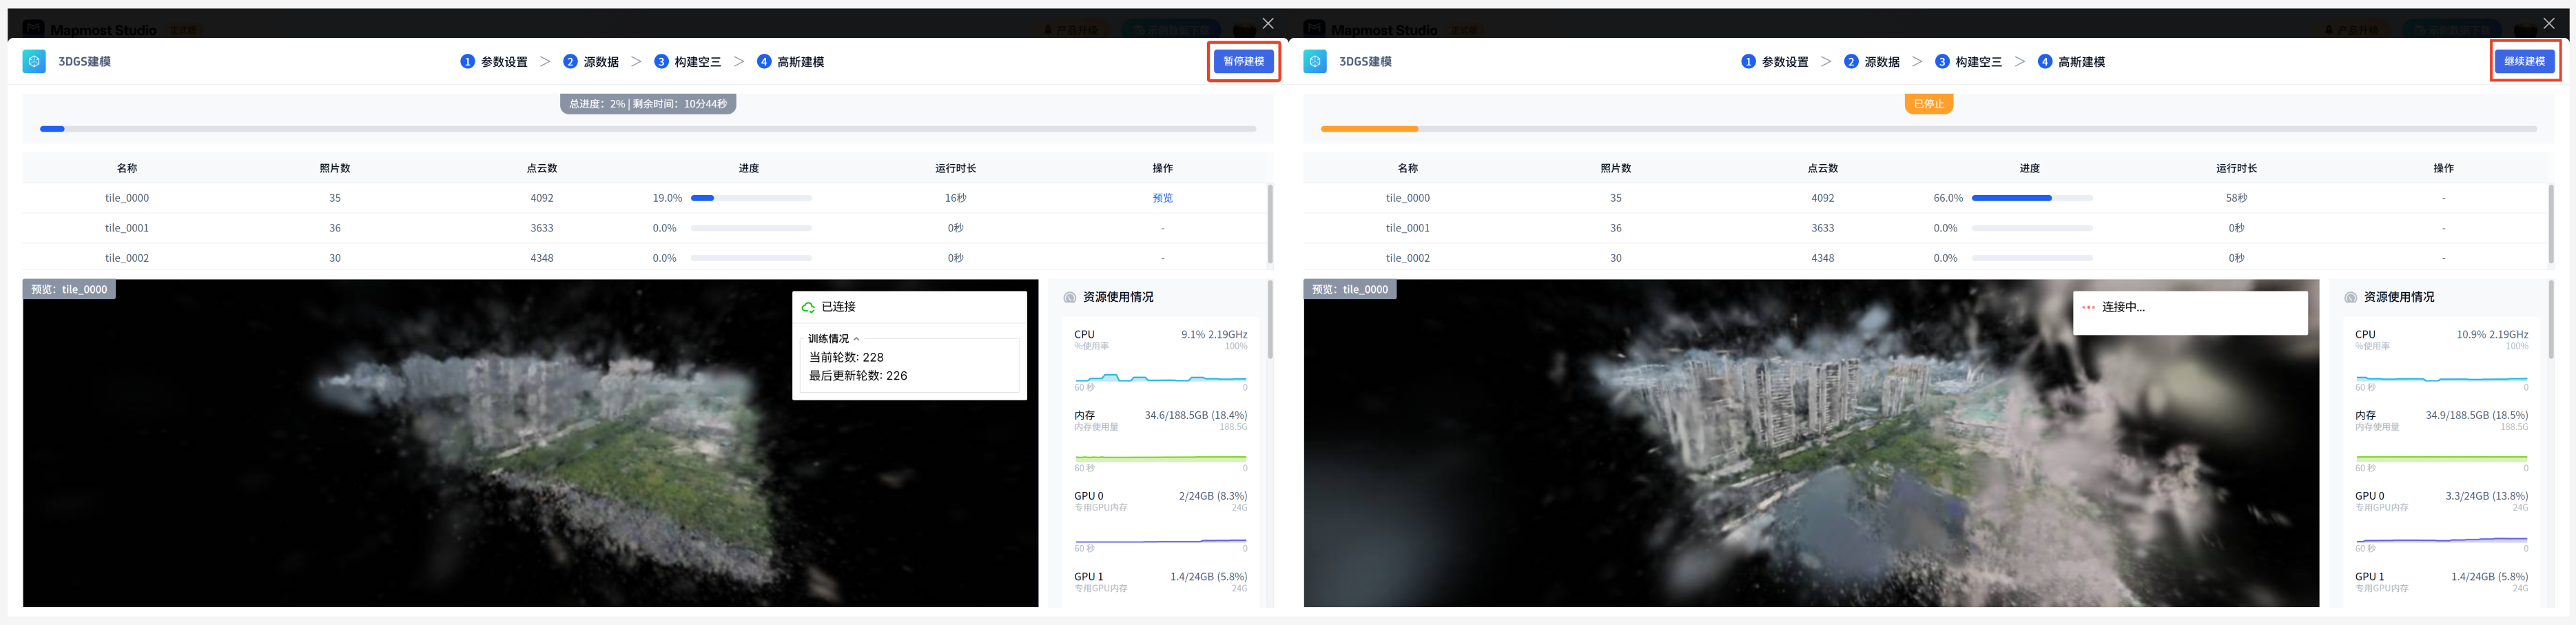
Case 3: Pause operation is supported during Gaussian modeling.
- Click "Pause Modeling", the modeling process will stop, and the status of this record in the data list-3DGS model list-system construction is displayed as interrupted.
- Click "Continue Modeling" to continue the current Gaussian modeling process
1.5. Data list
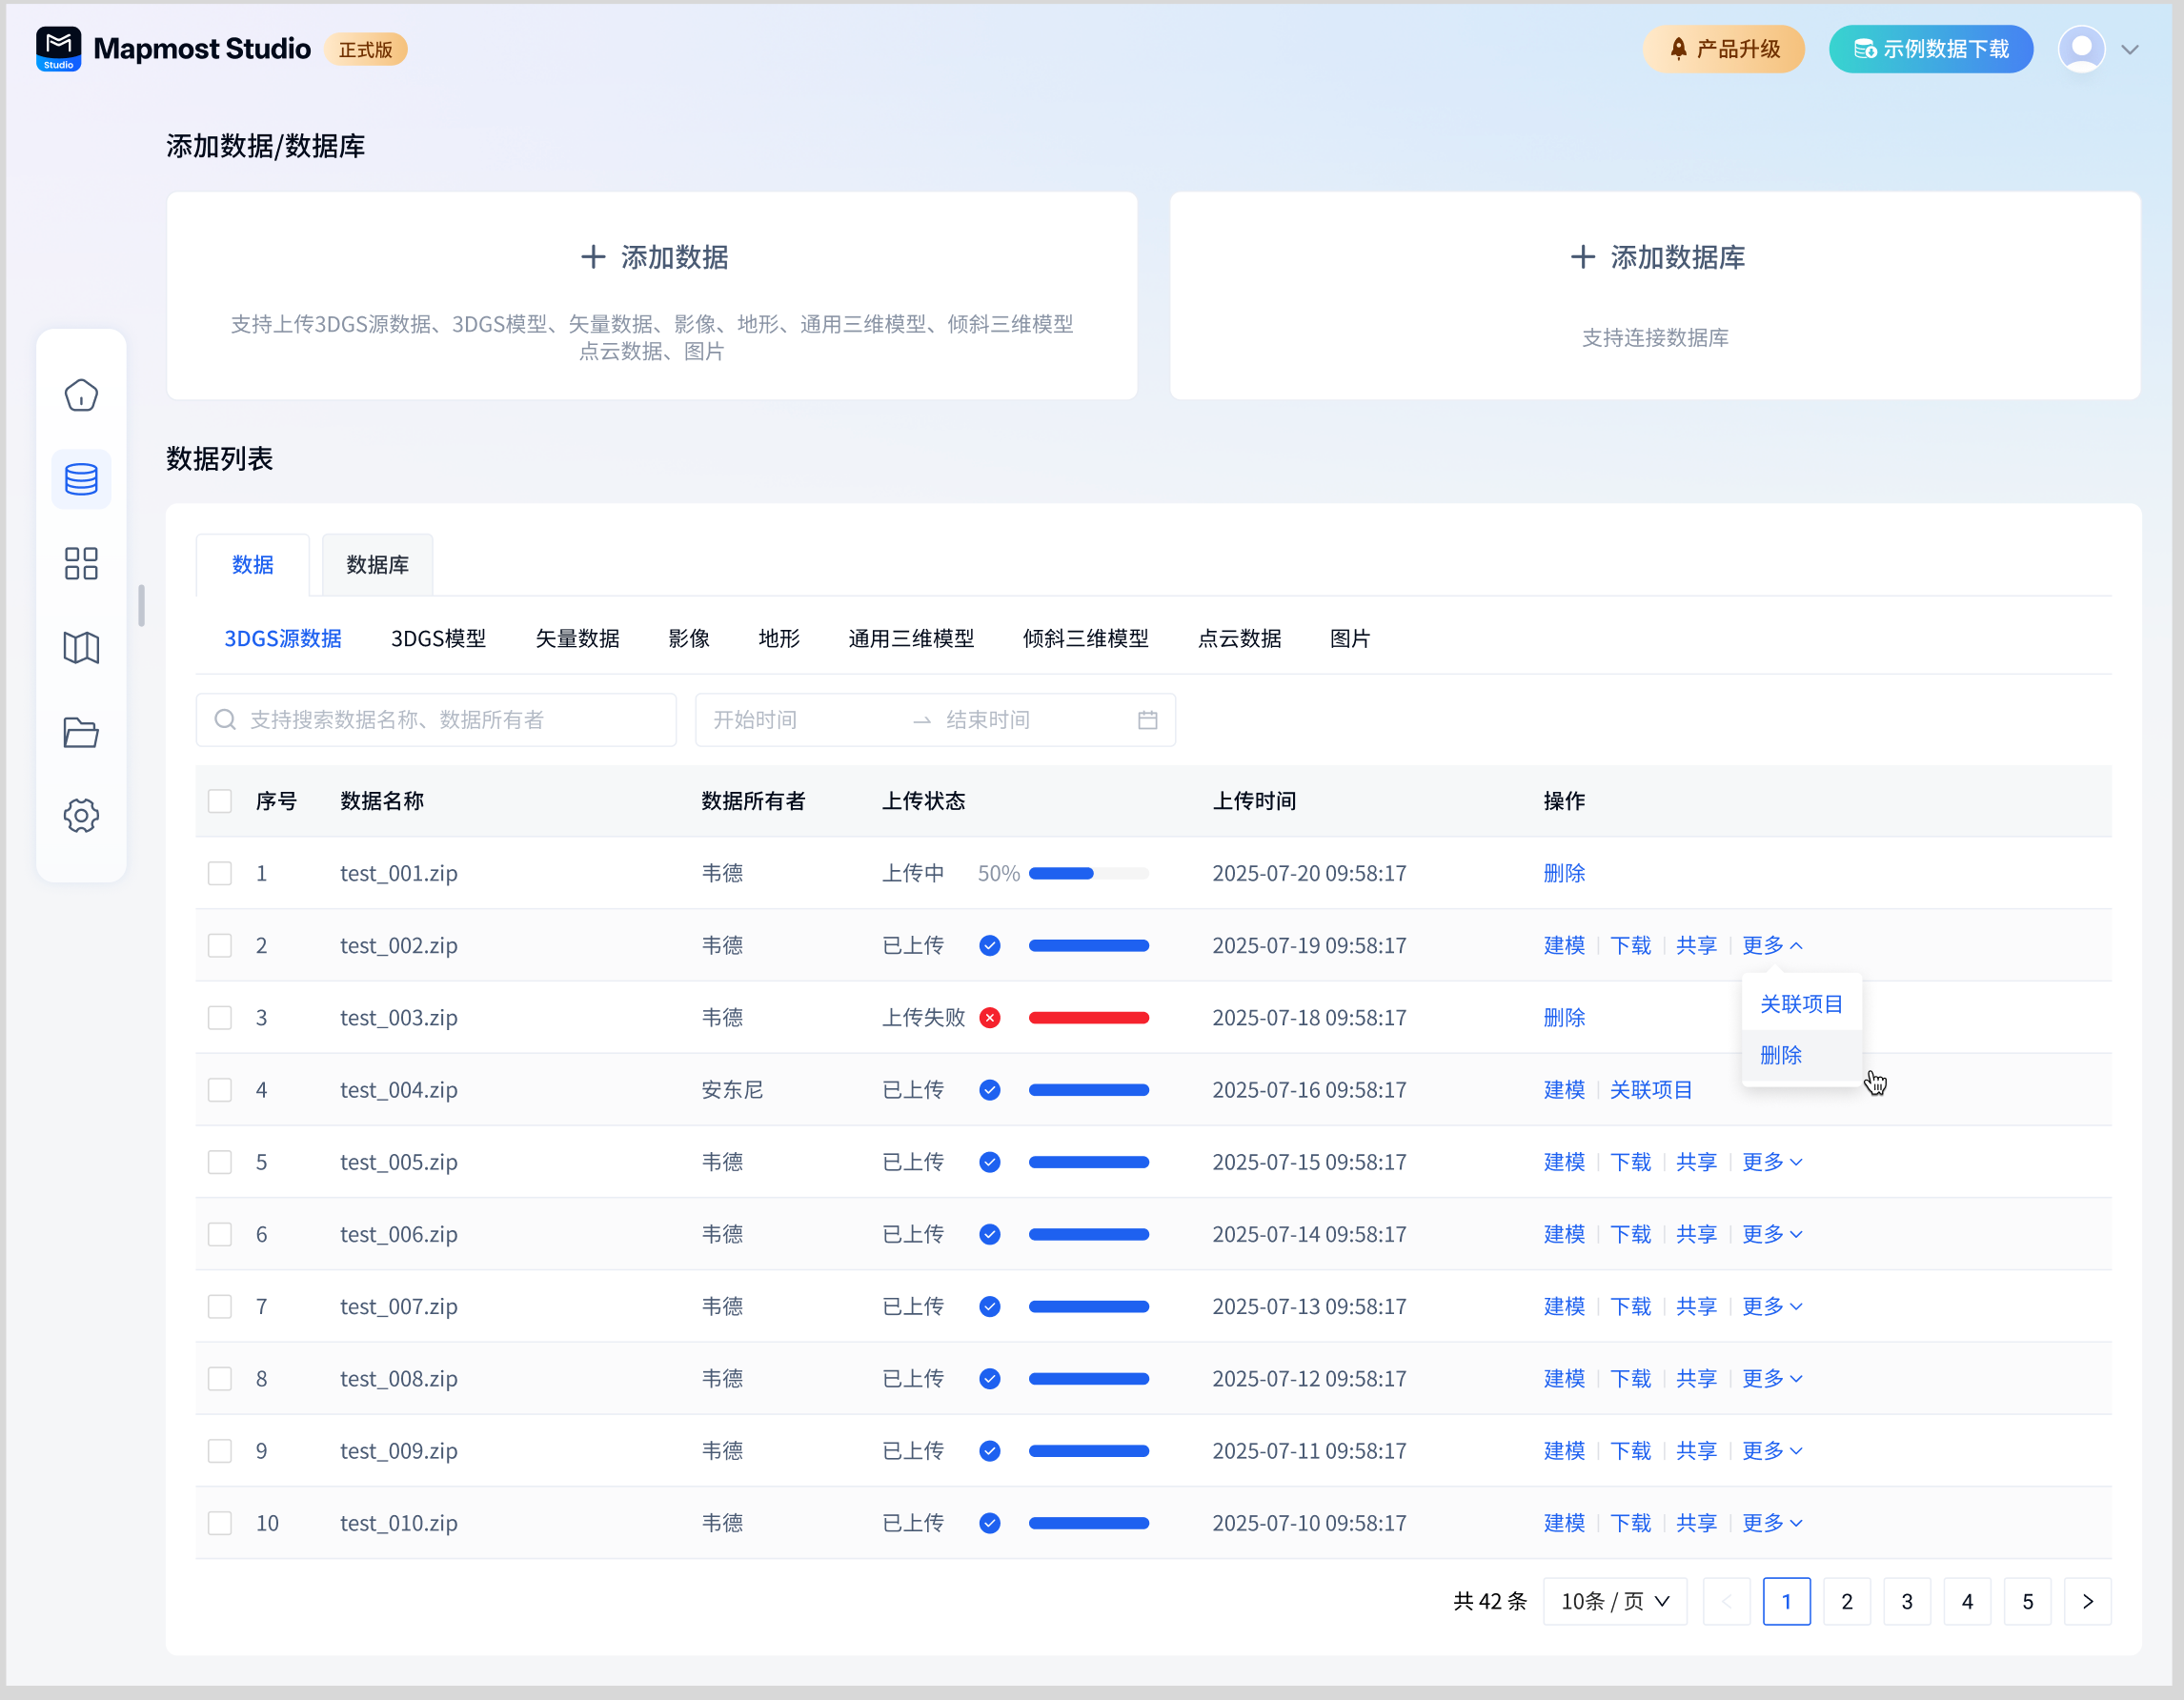
The uploaded 3DGS source data and built/uploaded 3DGS model resources are displayed in the data list.
1.5.1. Data list-3DGS source data
The 3DGS source data uploaded on the 3DGS modeling page is managed in the data list - 3DGS source data list. The 3DGS source data in the list supports operations such as modeling, downloading, deletion, sharing, associated projects, and data filtering.
1.5.1.1. Modeling
Successfully uploaded 3DGS source data supports modeling operations. Only single data modeling is supported. For detailed operation procedures, please refer to the previous article 3DGS Modeling.
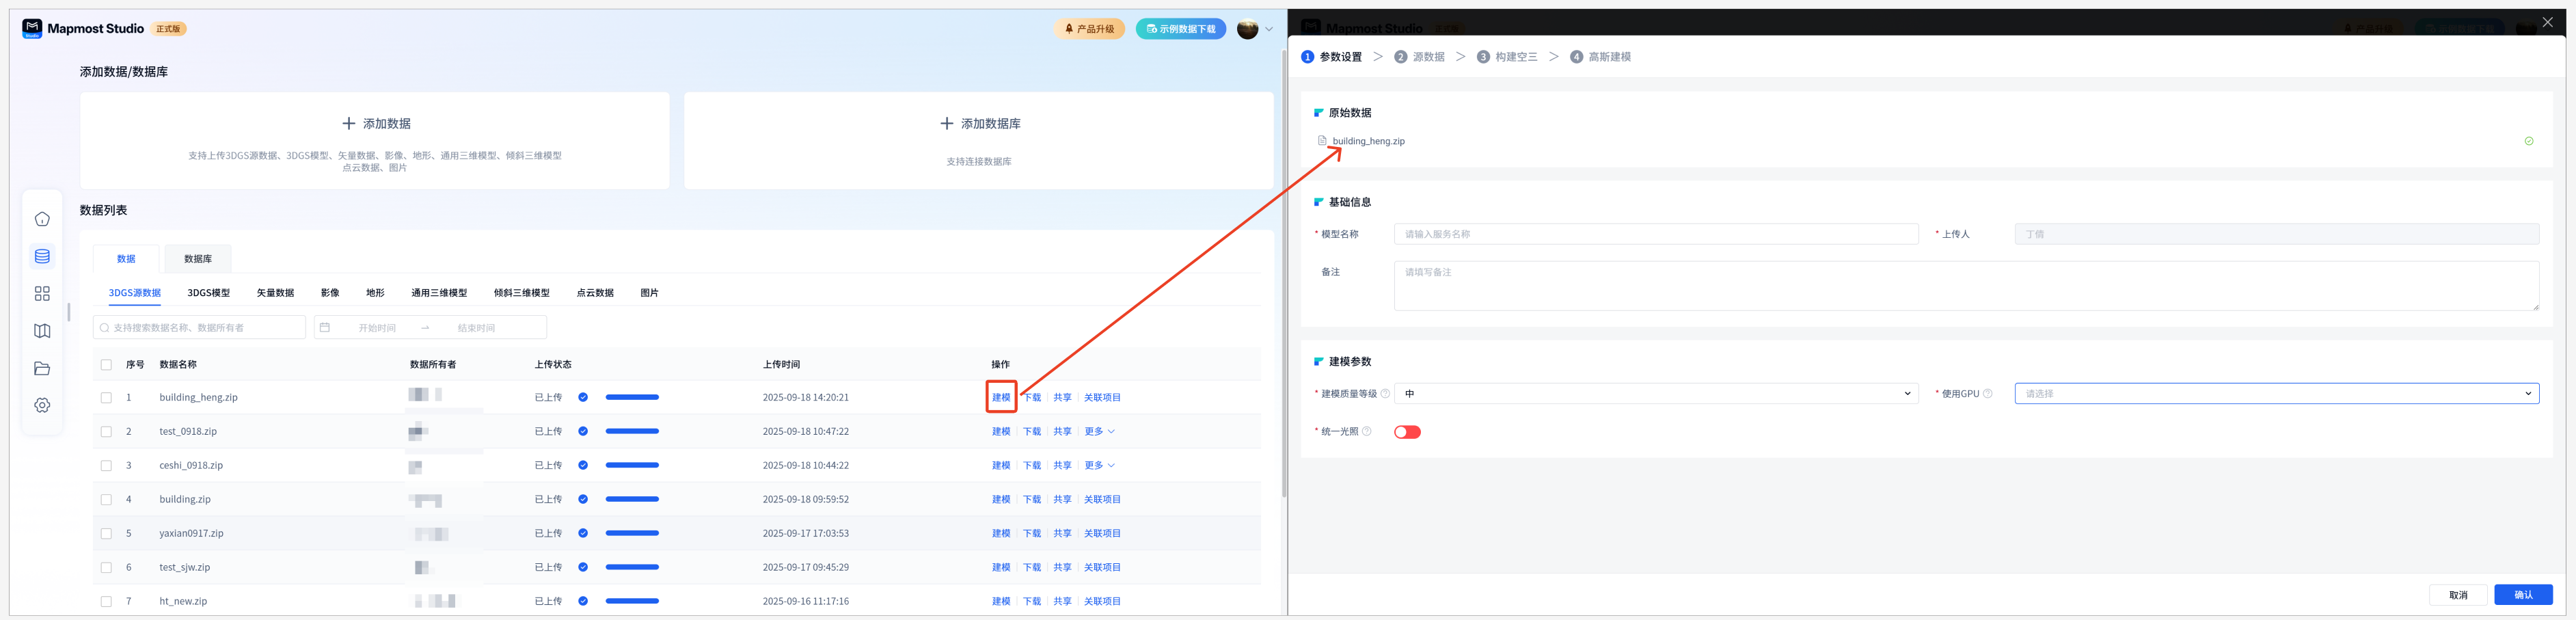
Please note: The modeling function requires the purchase and activation of the 3DGS expansion pack. If not purchased, the modeling function cannot be used.
1.5.1.2. Download
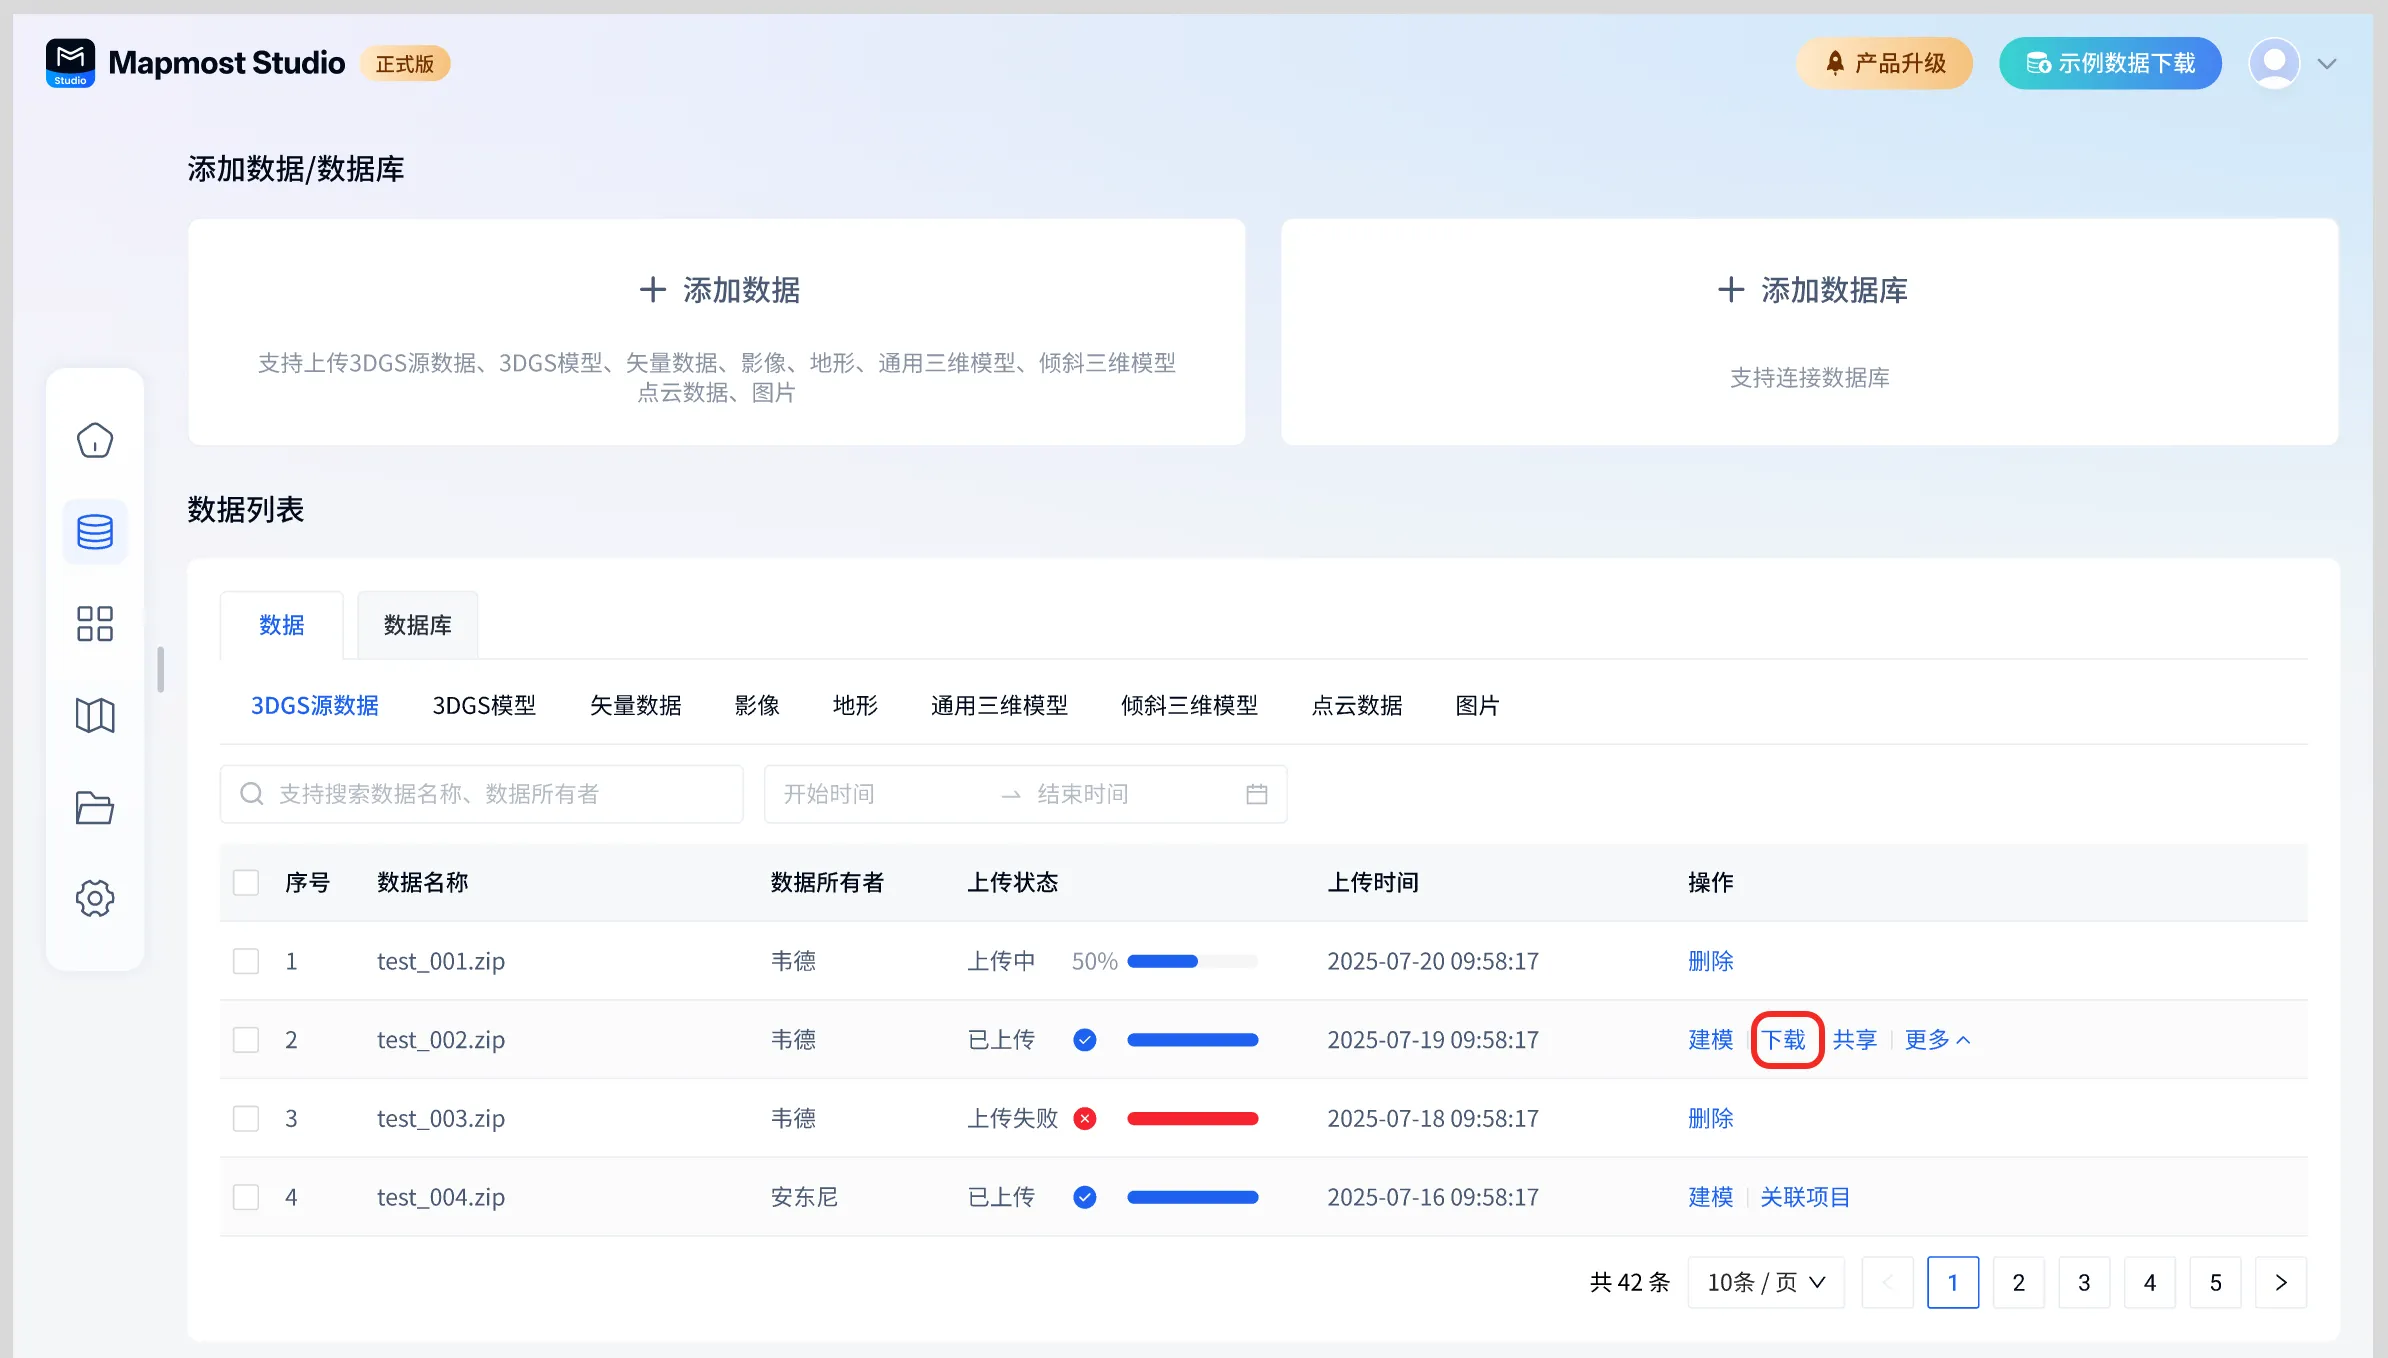
Data successfully uploaded by myself can be downloaded to the local area, but data shared by others cannot be downloaded.
①Single data download: table operation-download, supports single data download.
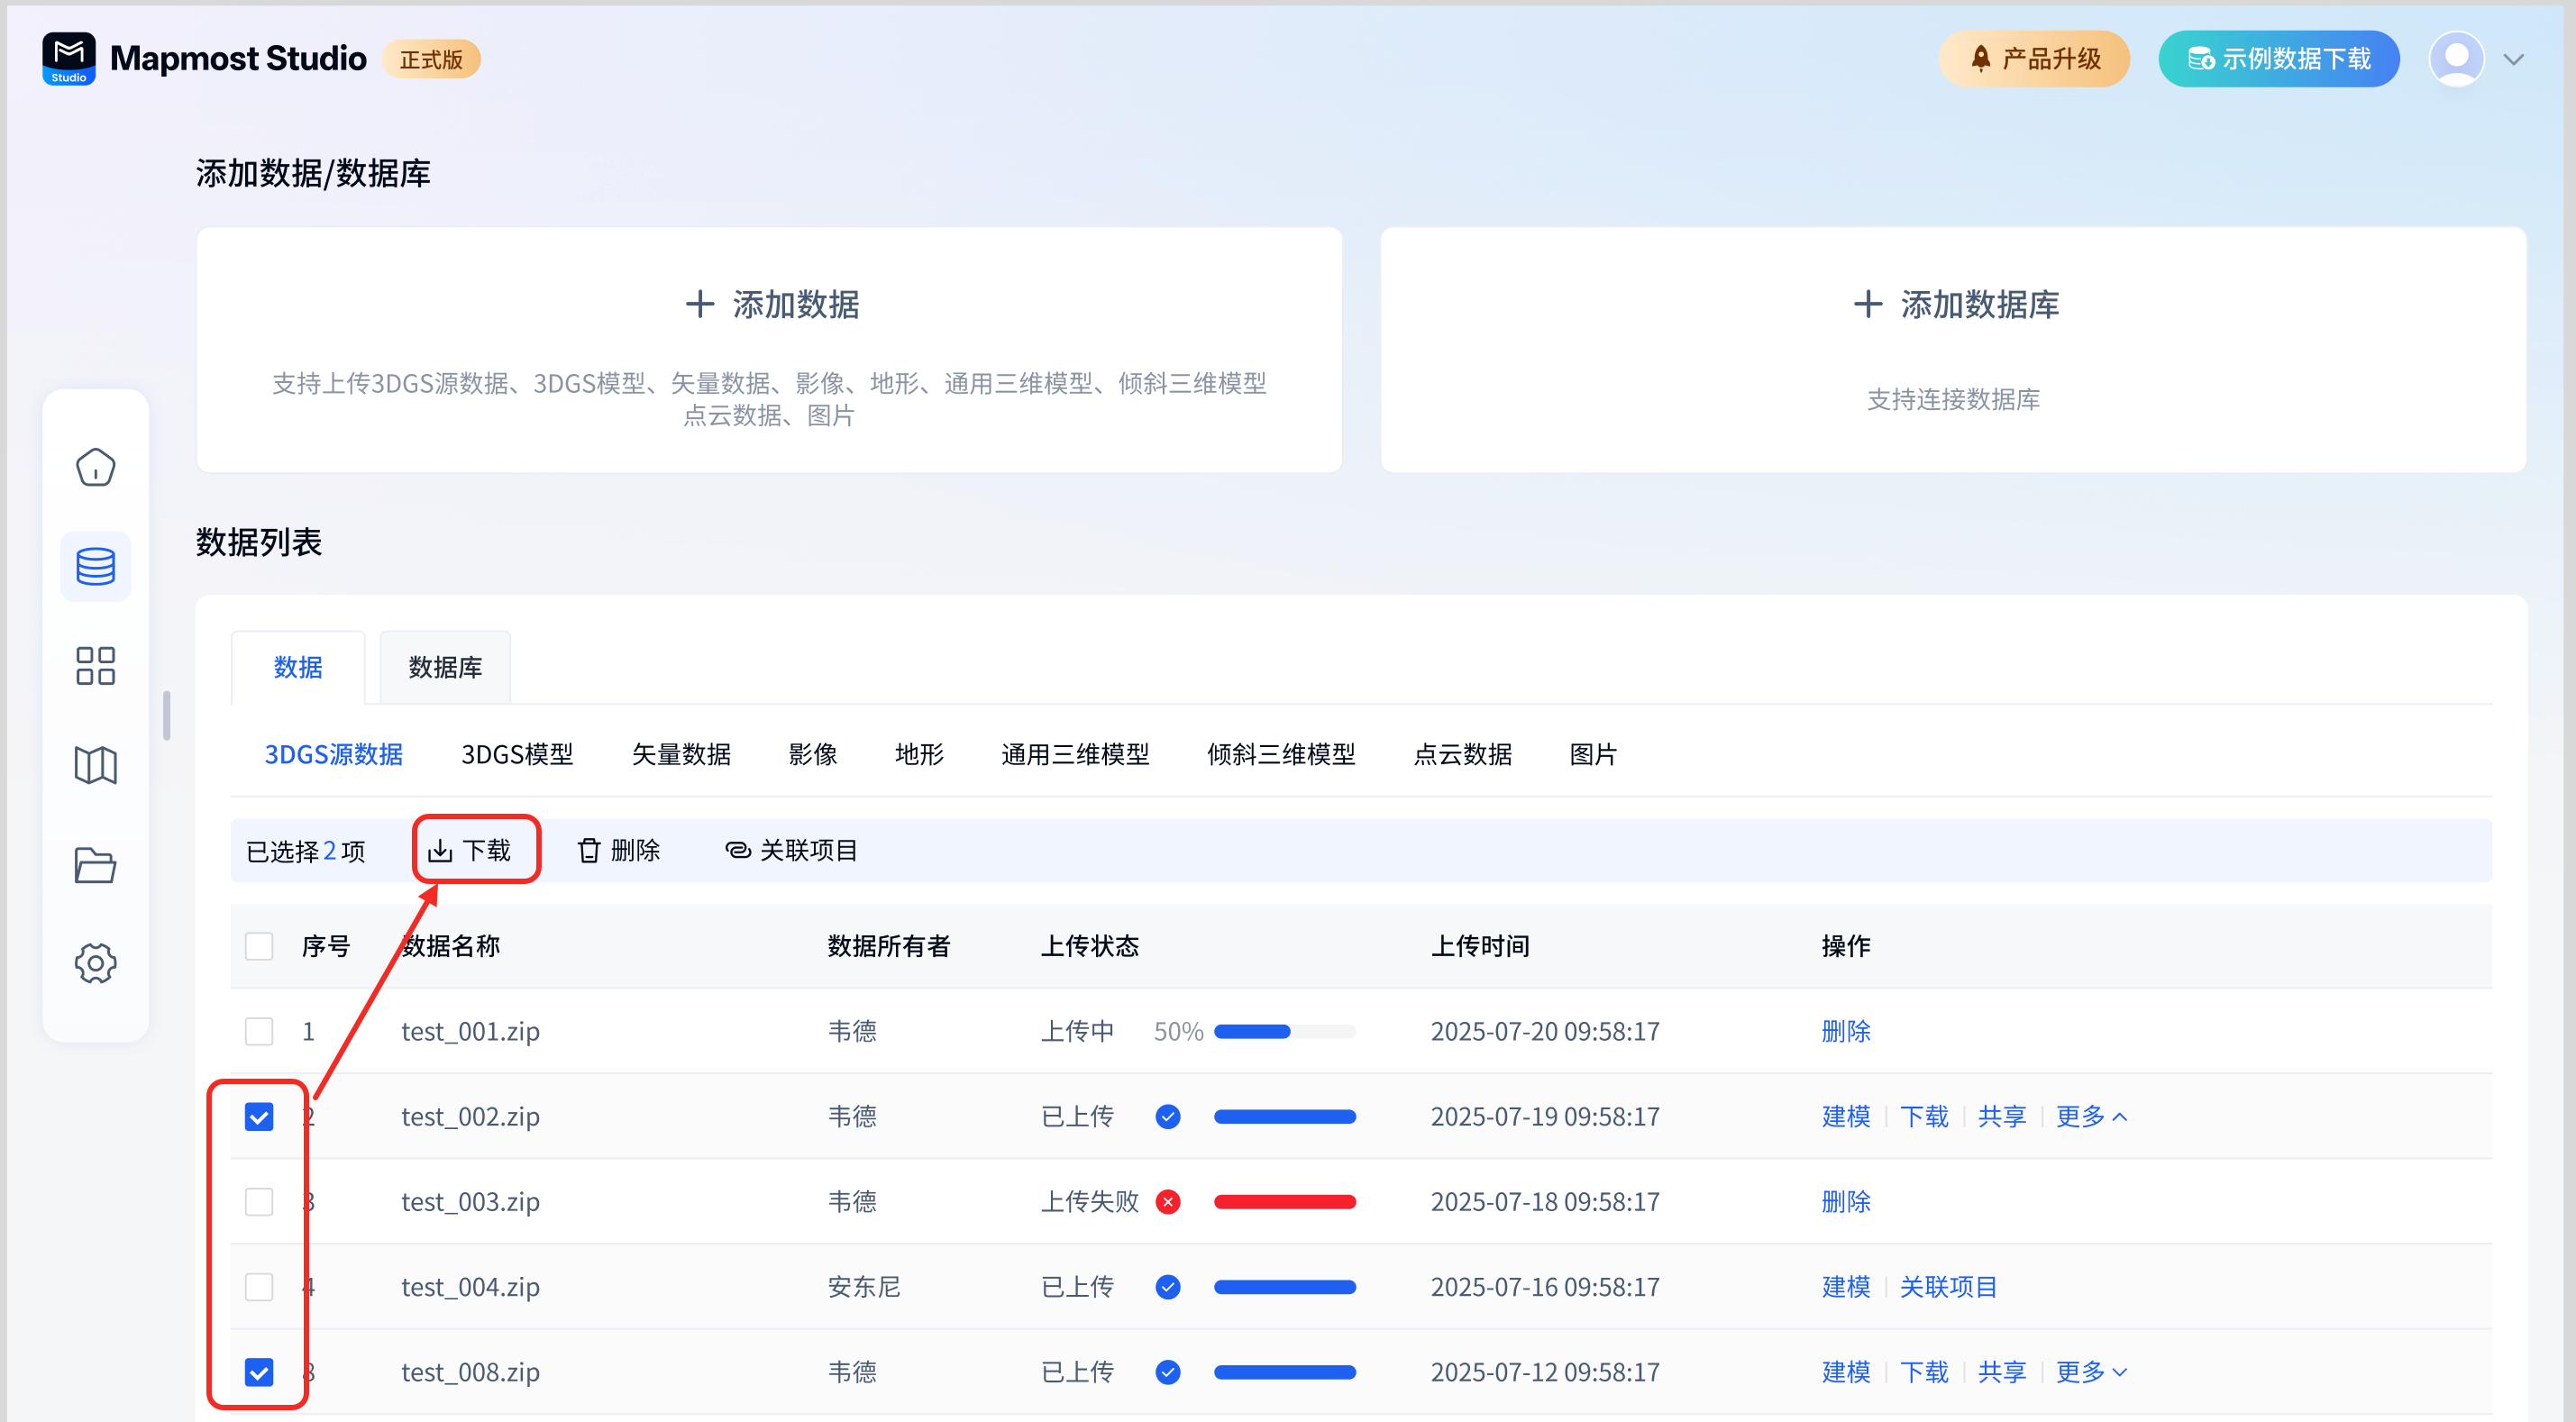
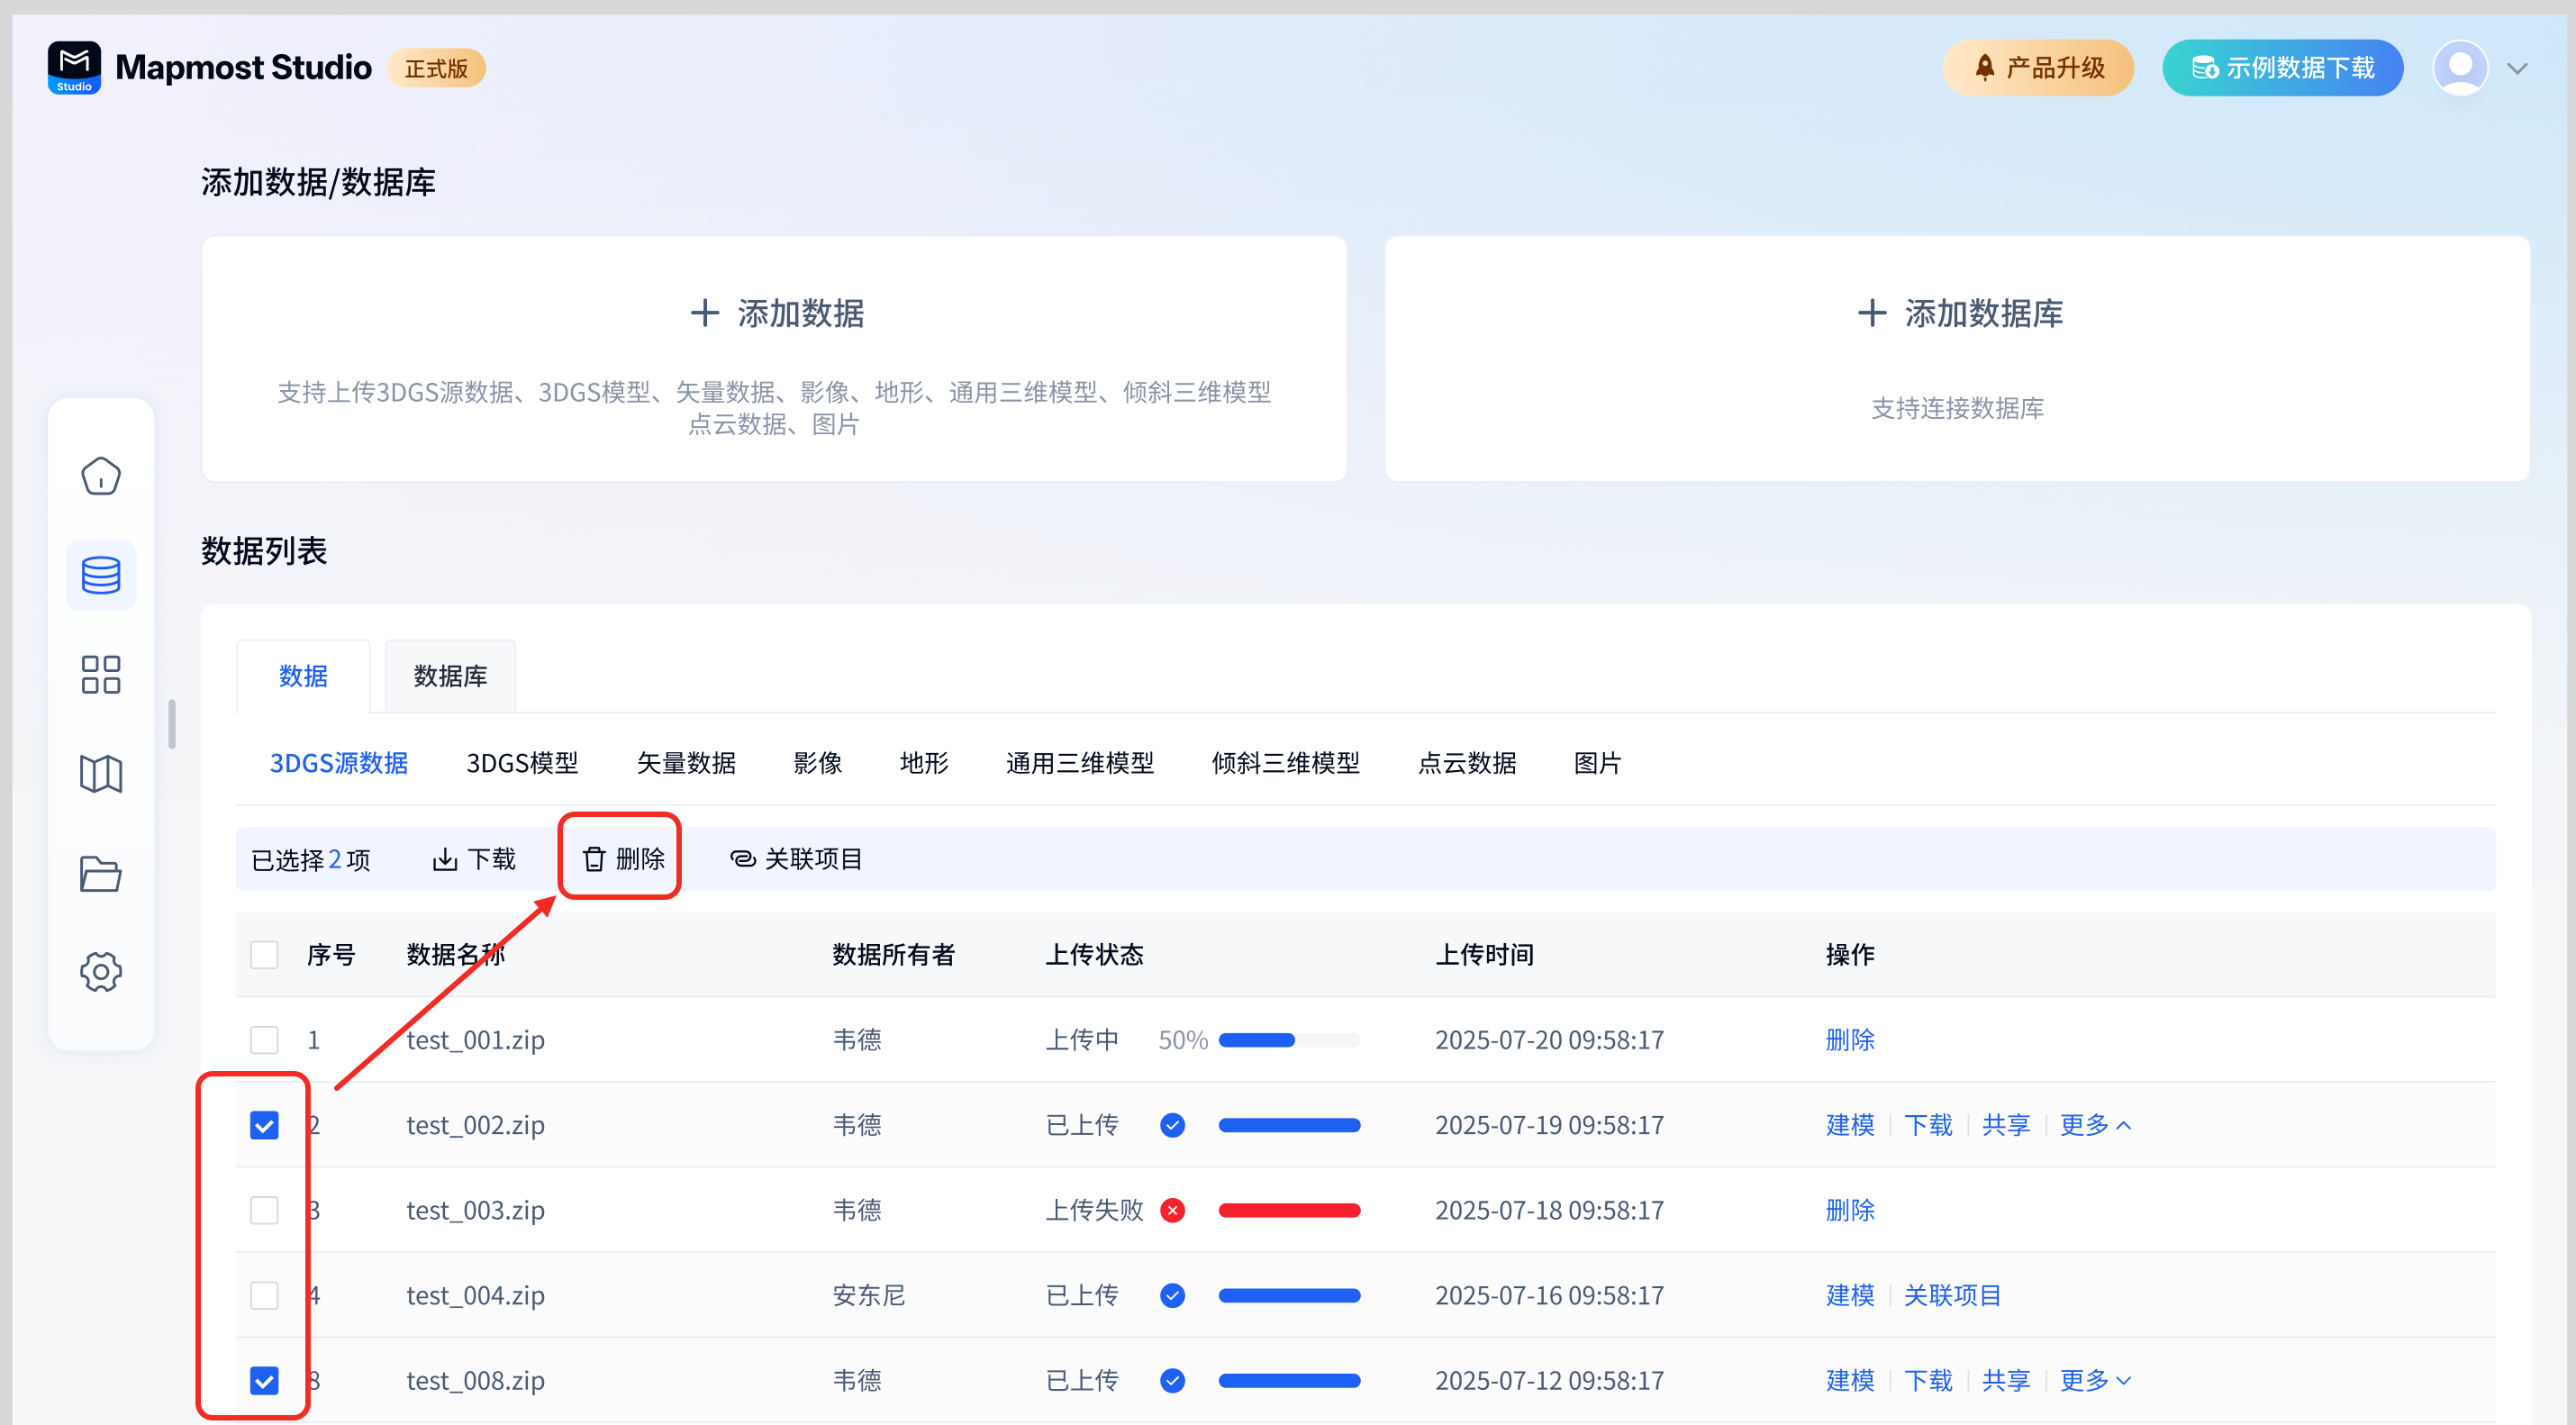
② Batch data download: Select multiple data to be downloaded and click the download button in the multi-select operation box above the table.
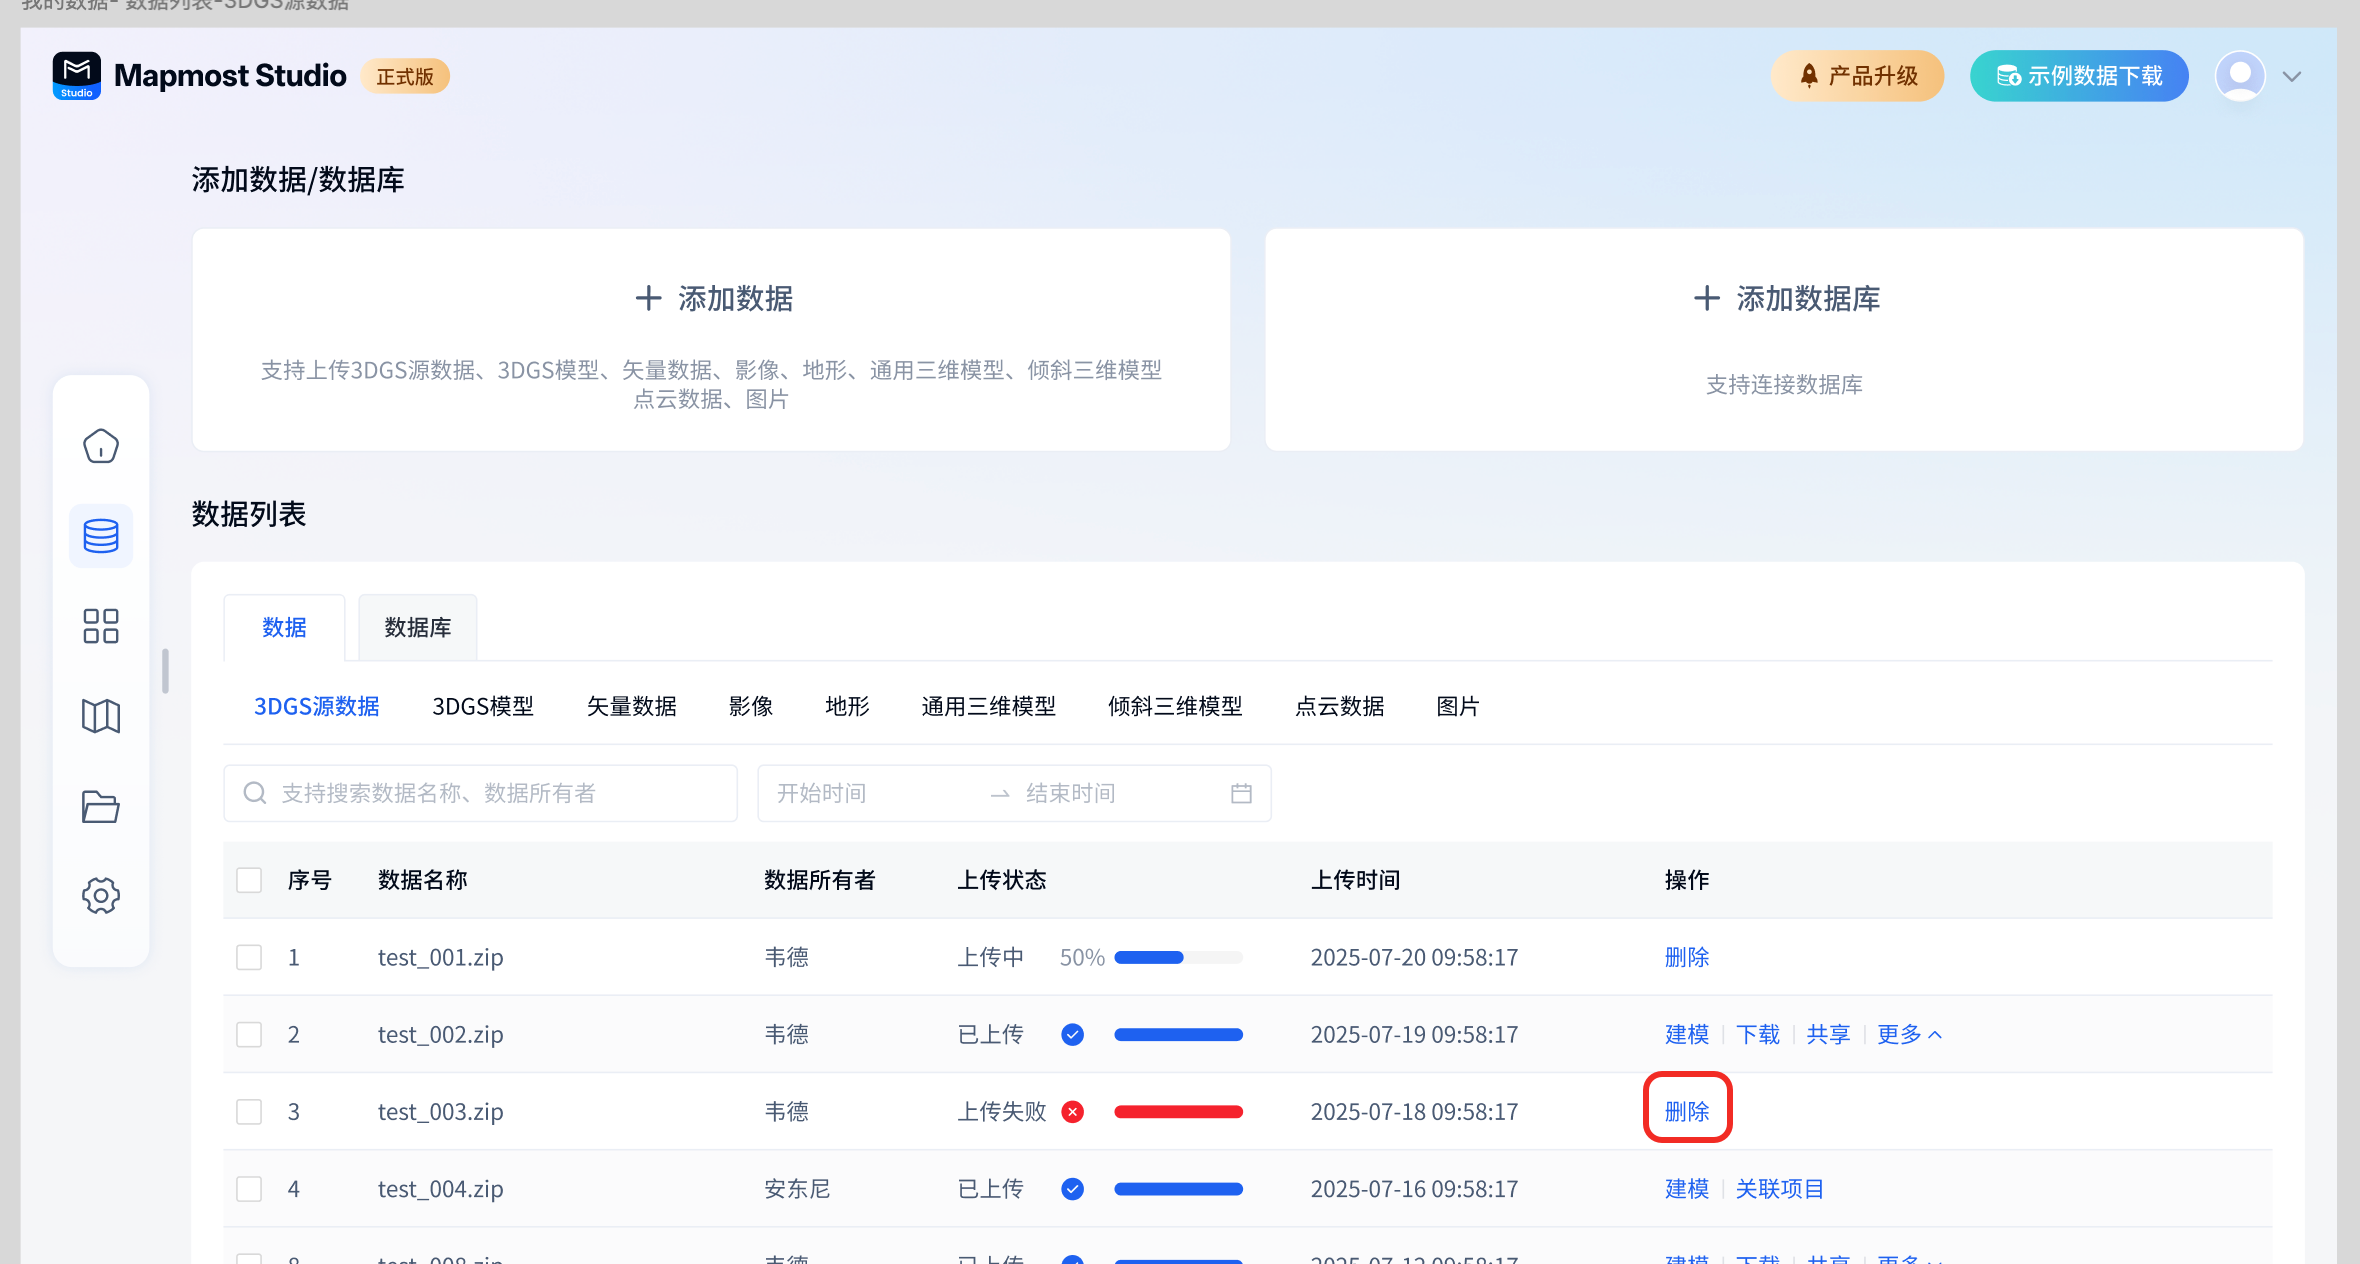
1.5.1.3. Delete
Only data uploaded by yourself can be deleted. Data shared by others, data of associated projects, and data under modeling cannot be deleted.
①Single data deletion: table operation-deletion, supports single data deletion.
② Batch data deletion: Select multiple data to be deleted and click the delete button in the multi-select operation box above the table.
1.5.1.4. Sharing
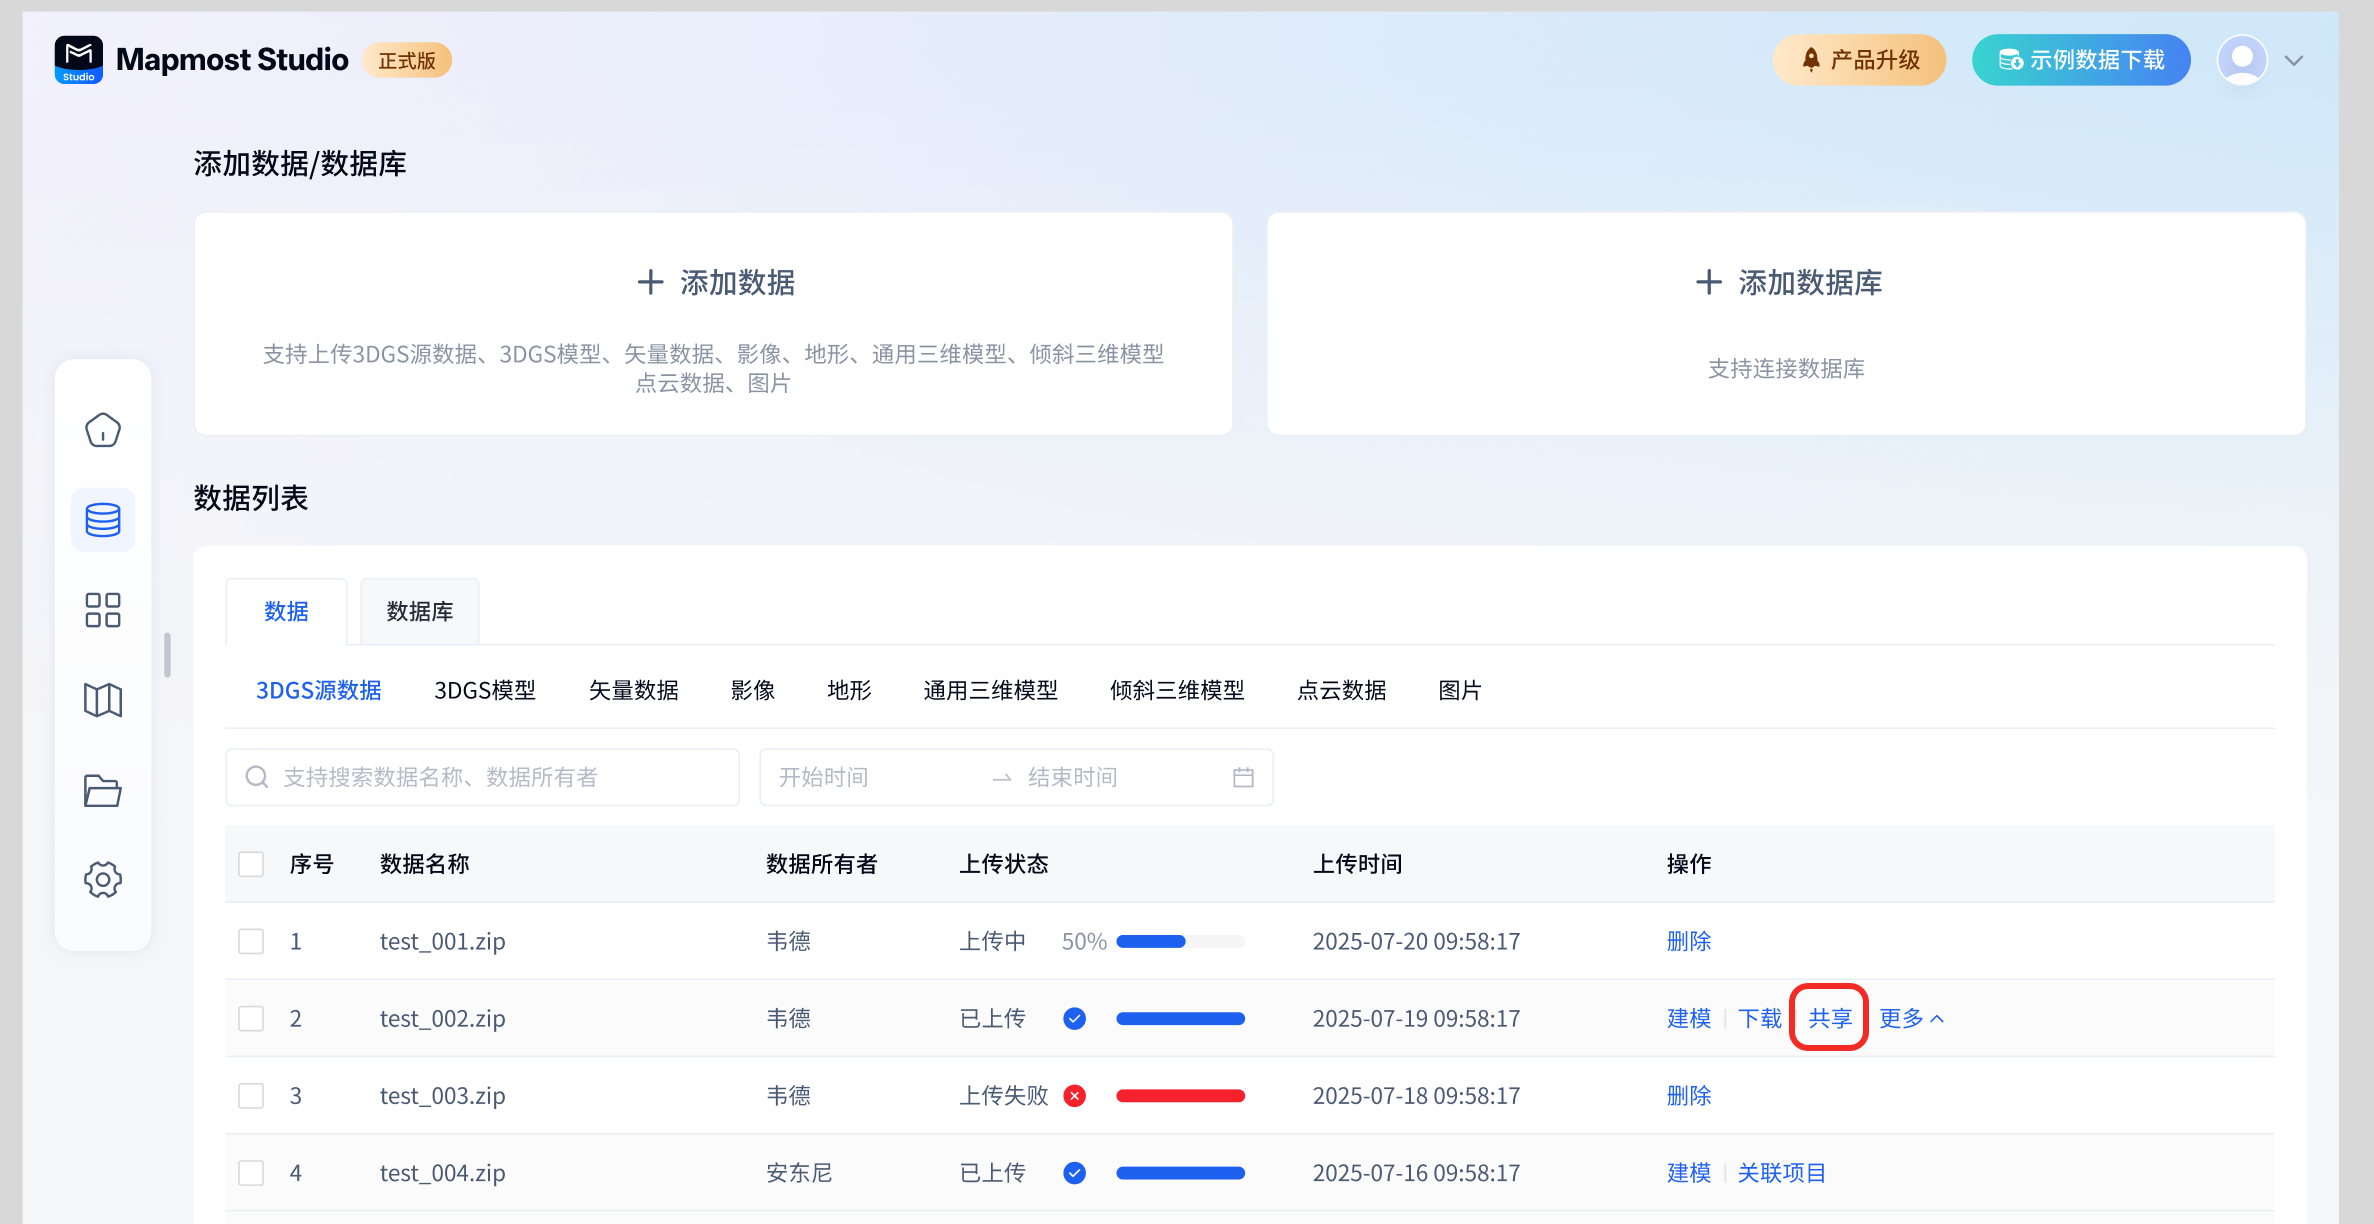
Only the data successfully uploaded by myself supports sharing. The operation path is: table operation-sharing.
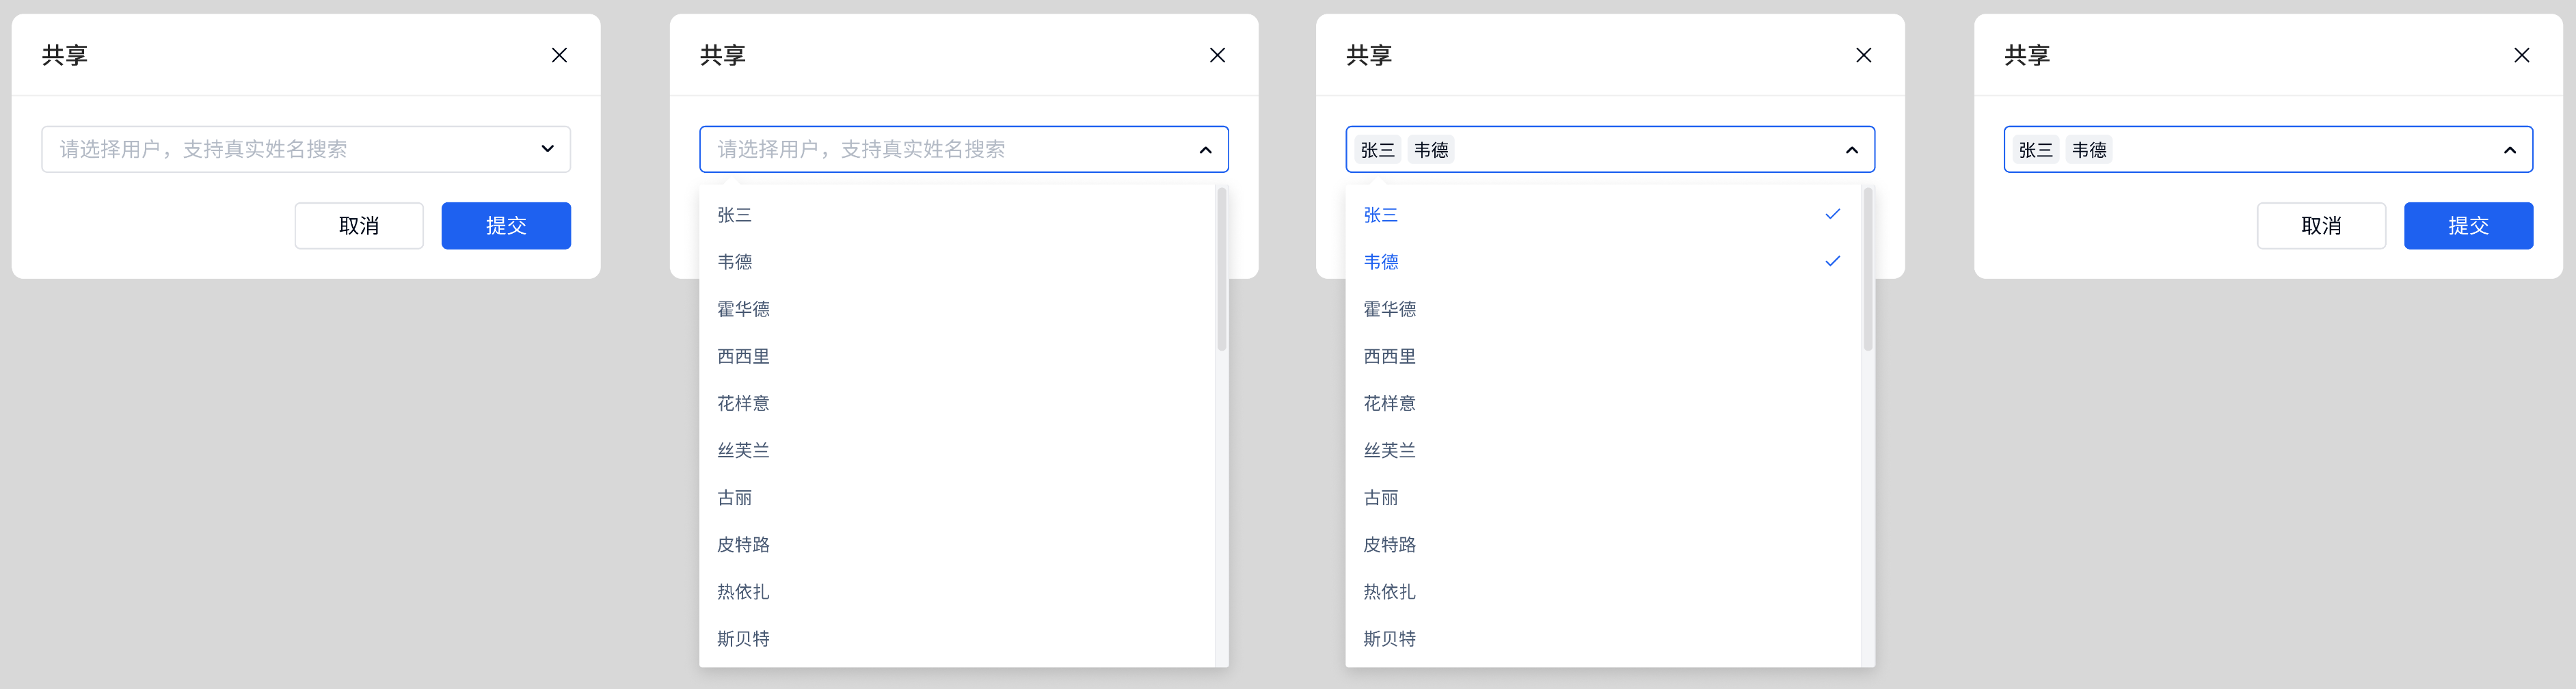
Sharing supports sharing by typing or searching for members' real names. The names of members who have been shared will be displayed in the sharing pop-up window.
1.5.1.5. Related projects
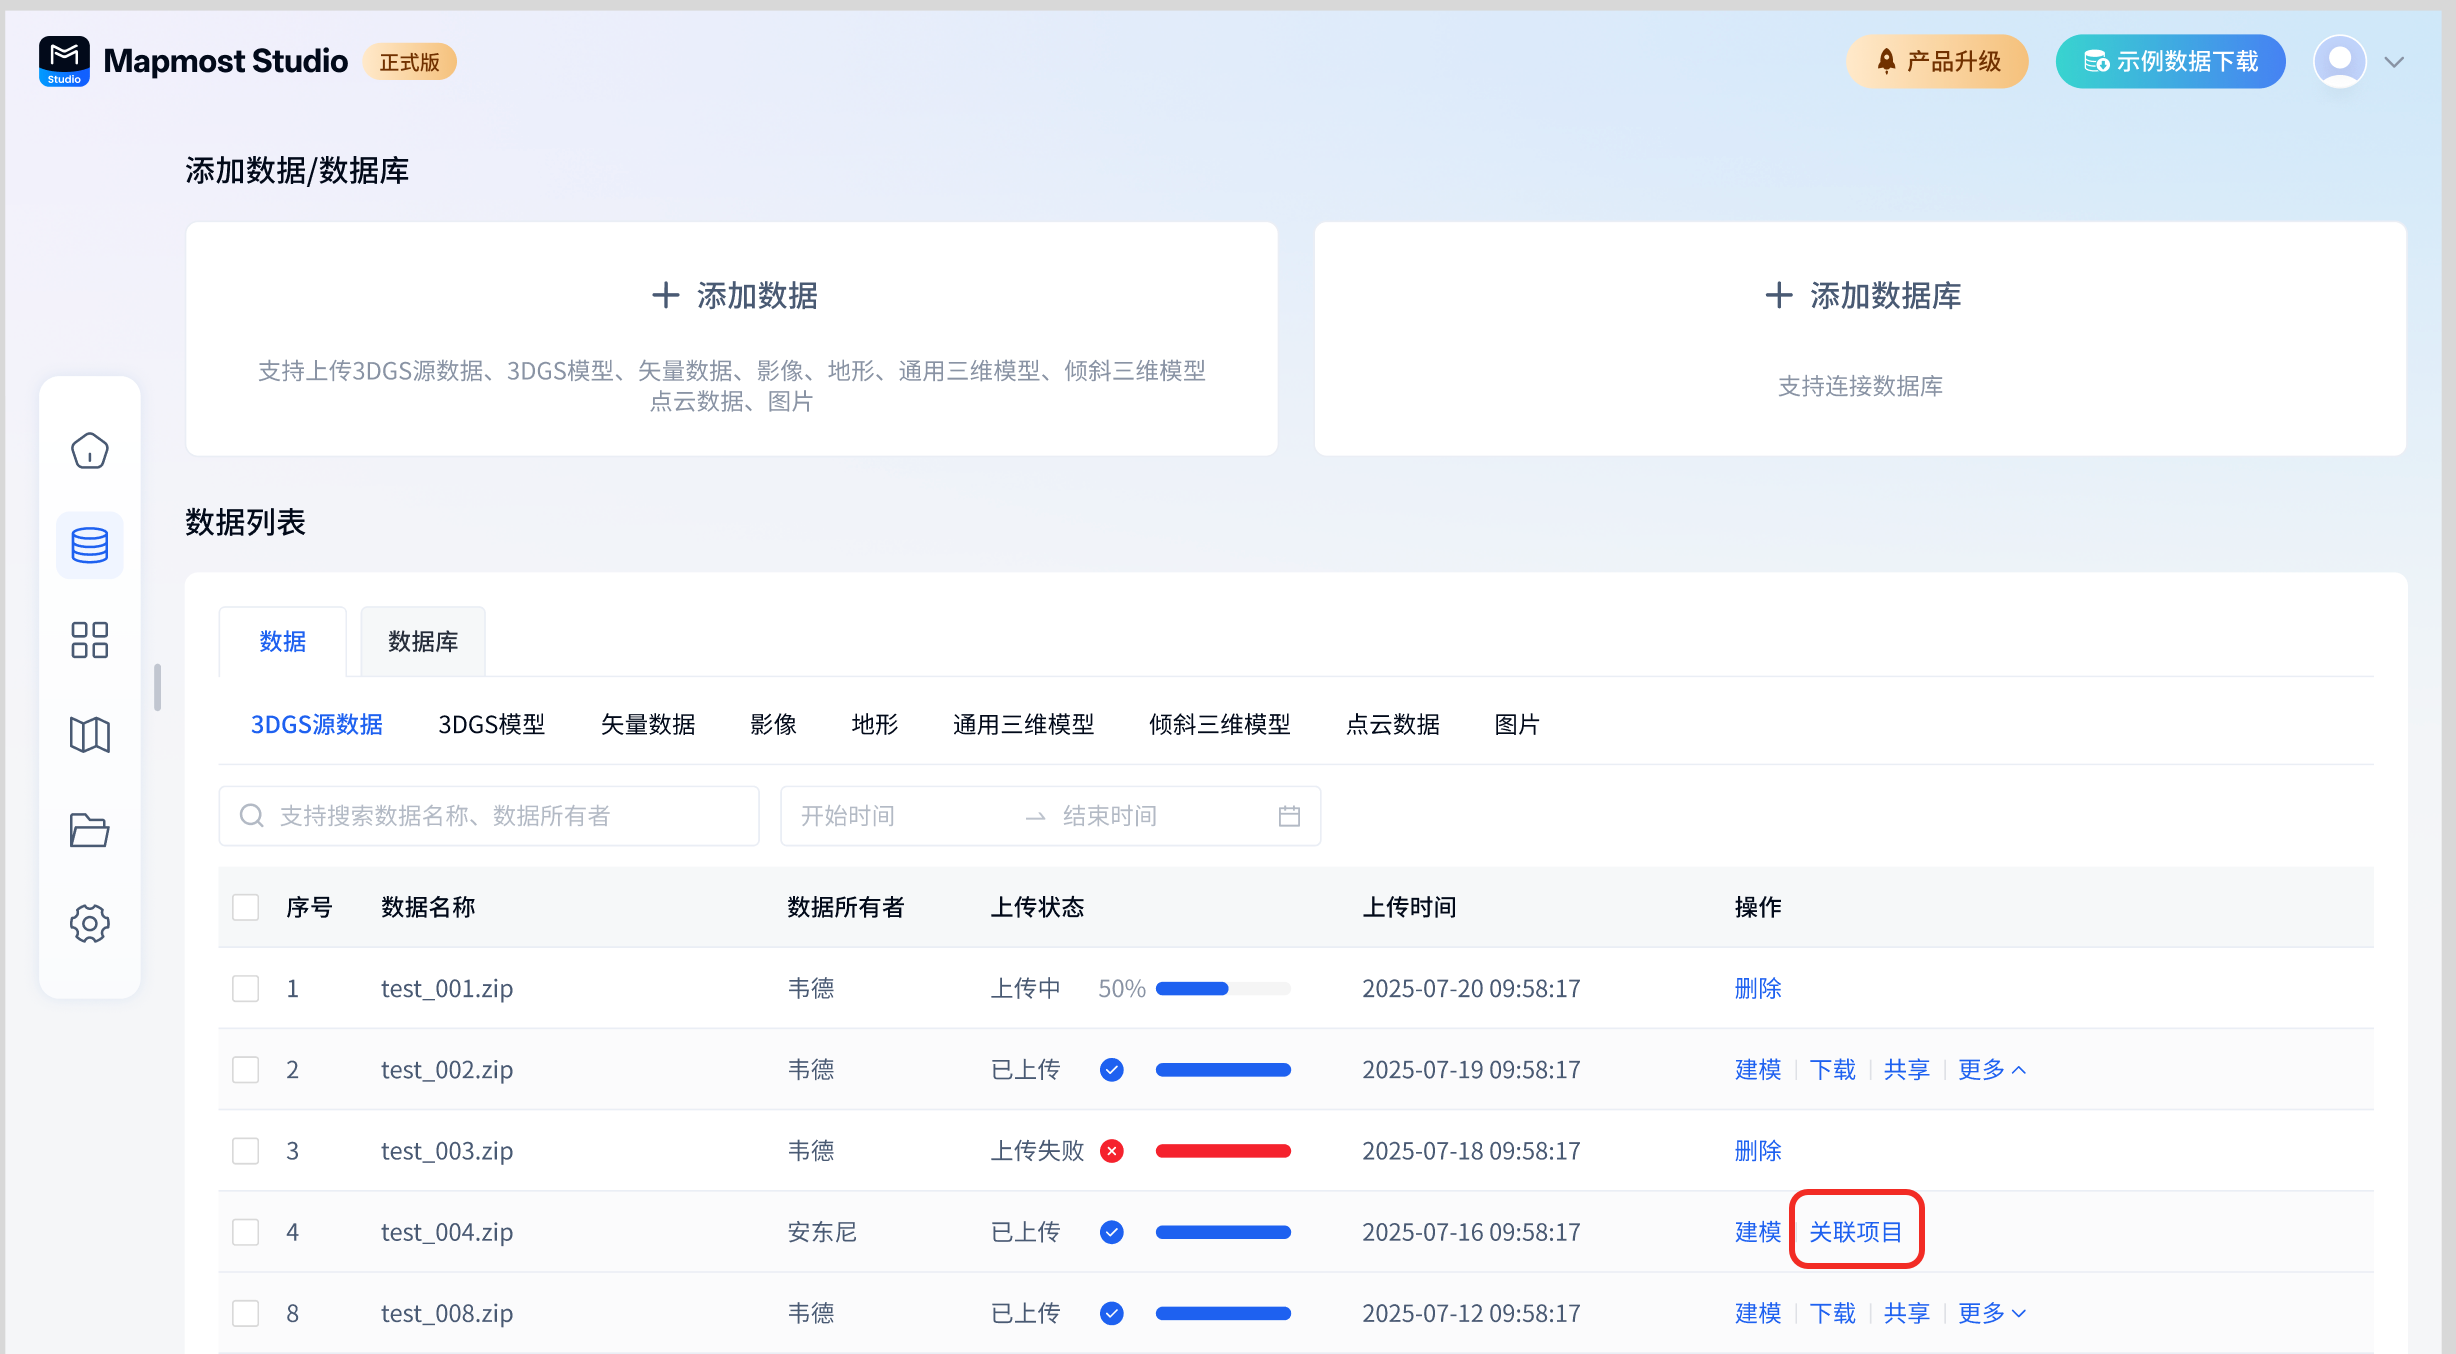
①Single associated item: table operation-associated item, supports single data association.
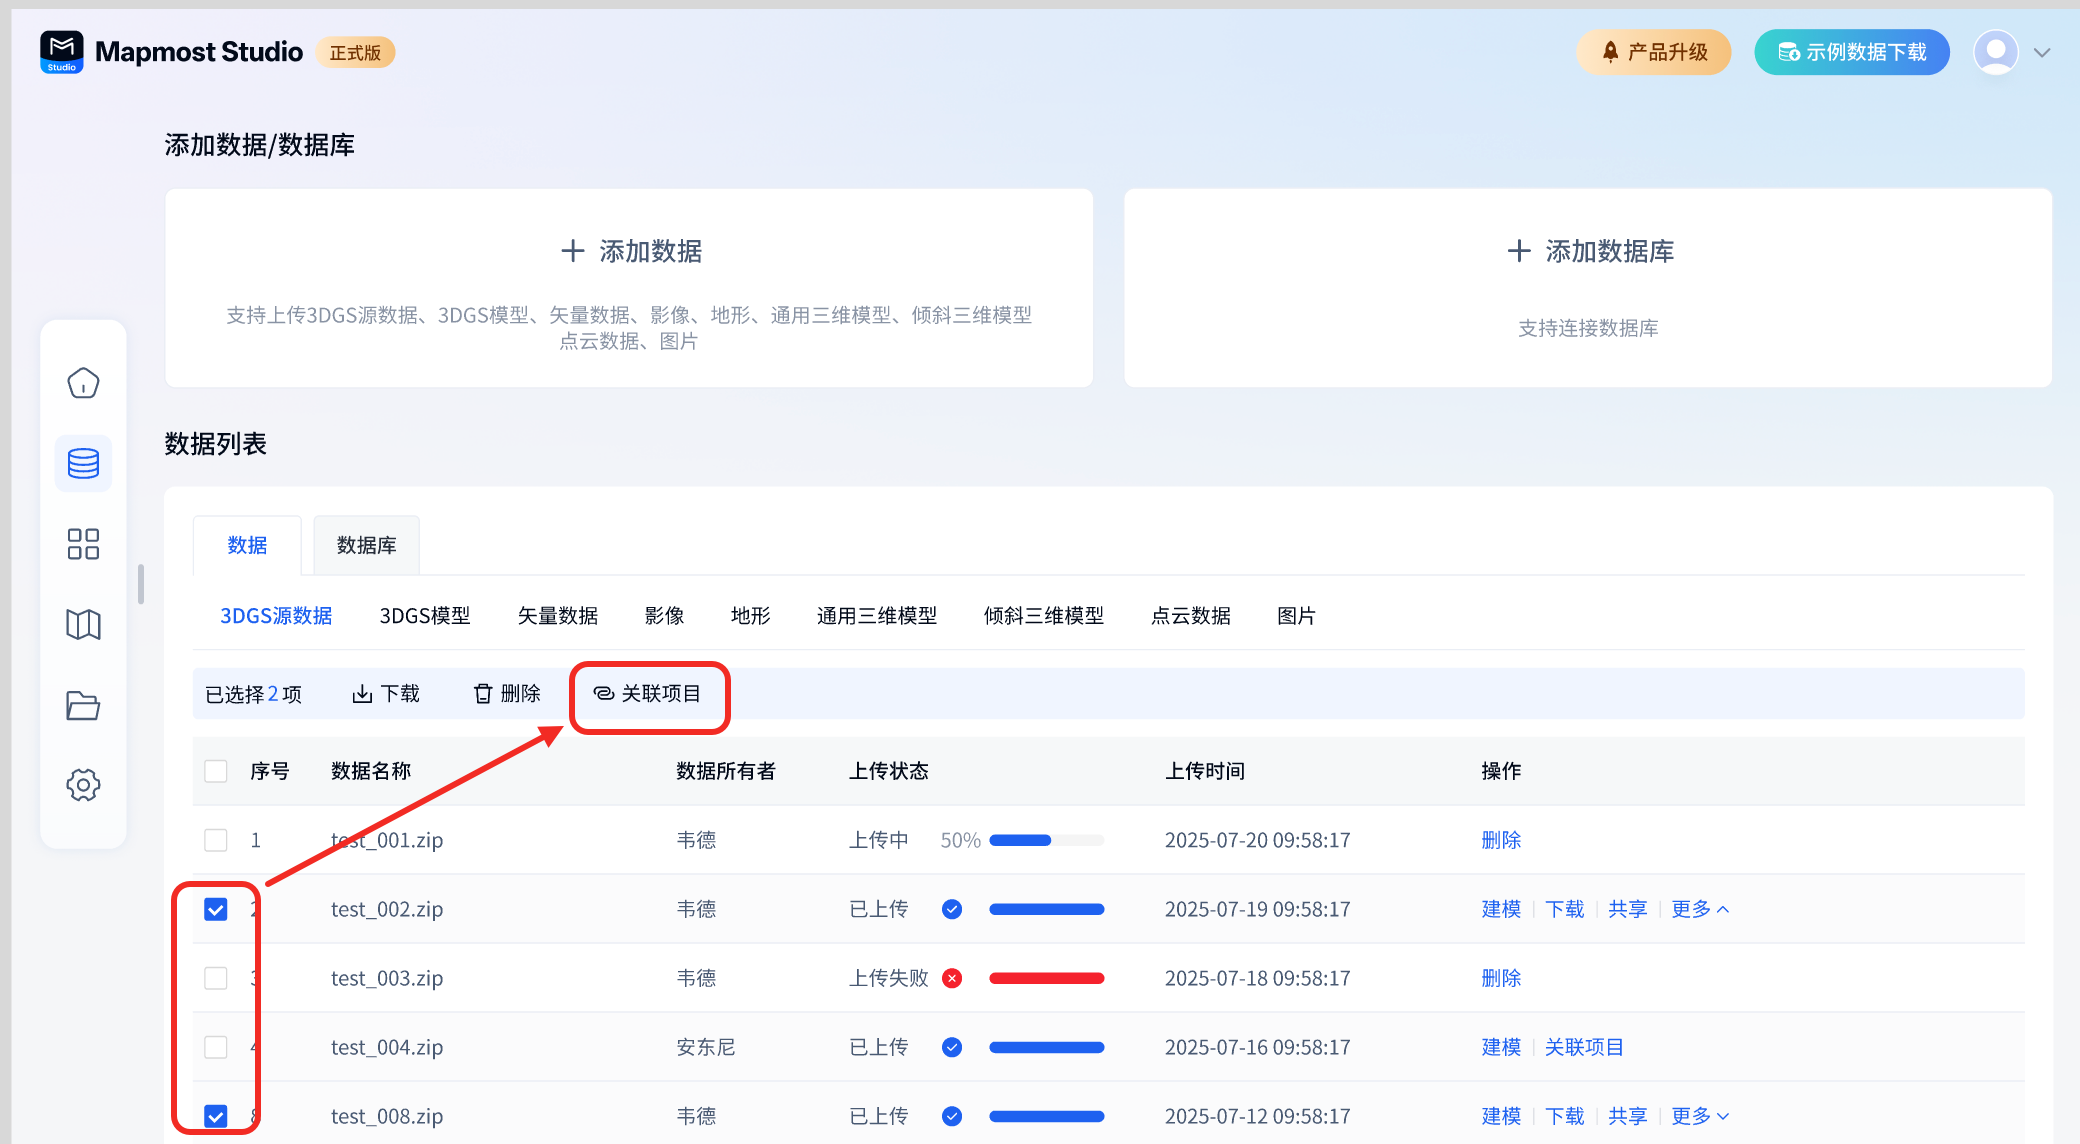
② Batch related projects: Select the data of multiple projects to be related, and click the related project button in the multi-select operation box above the table.
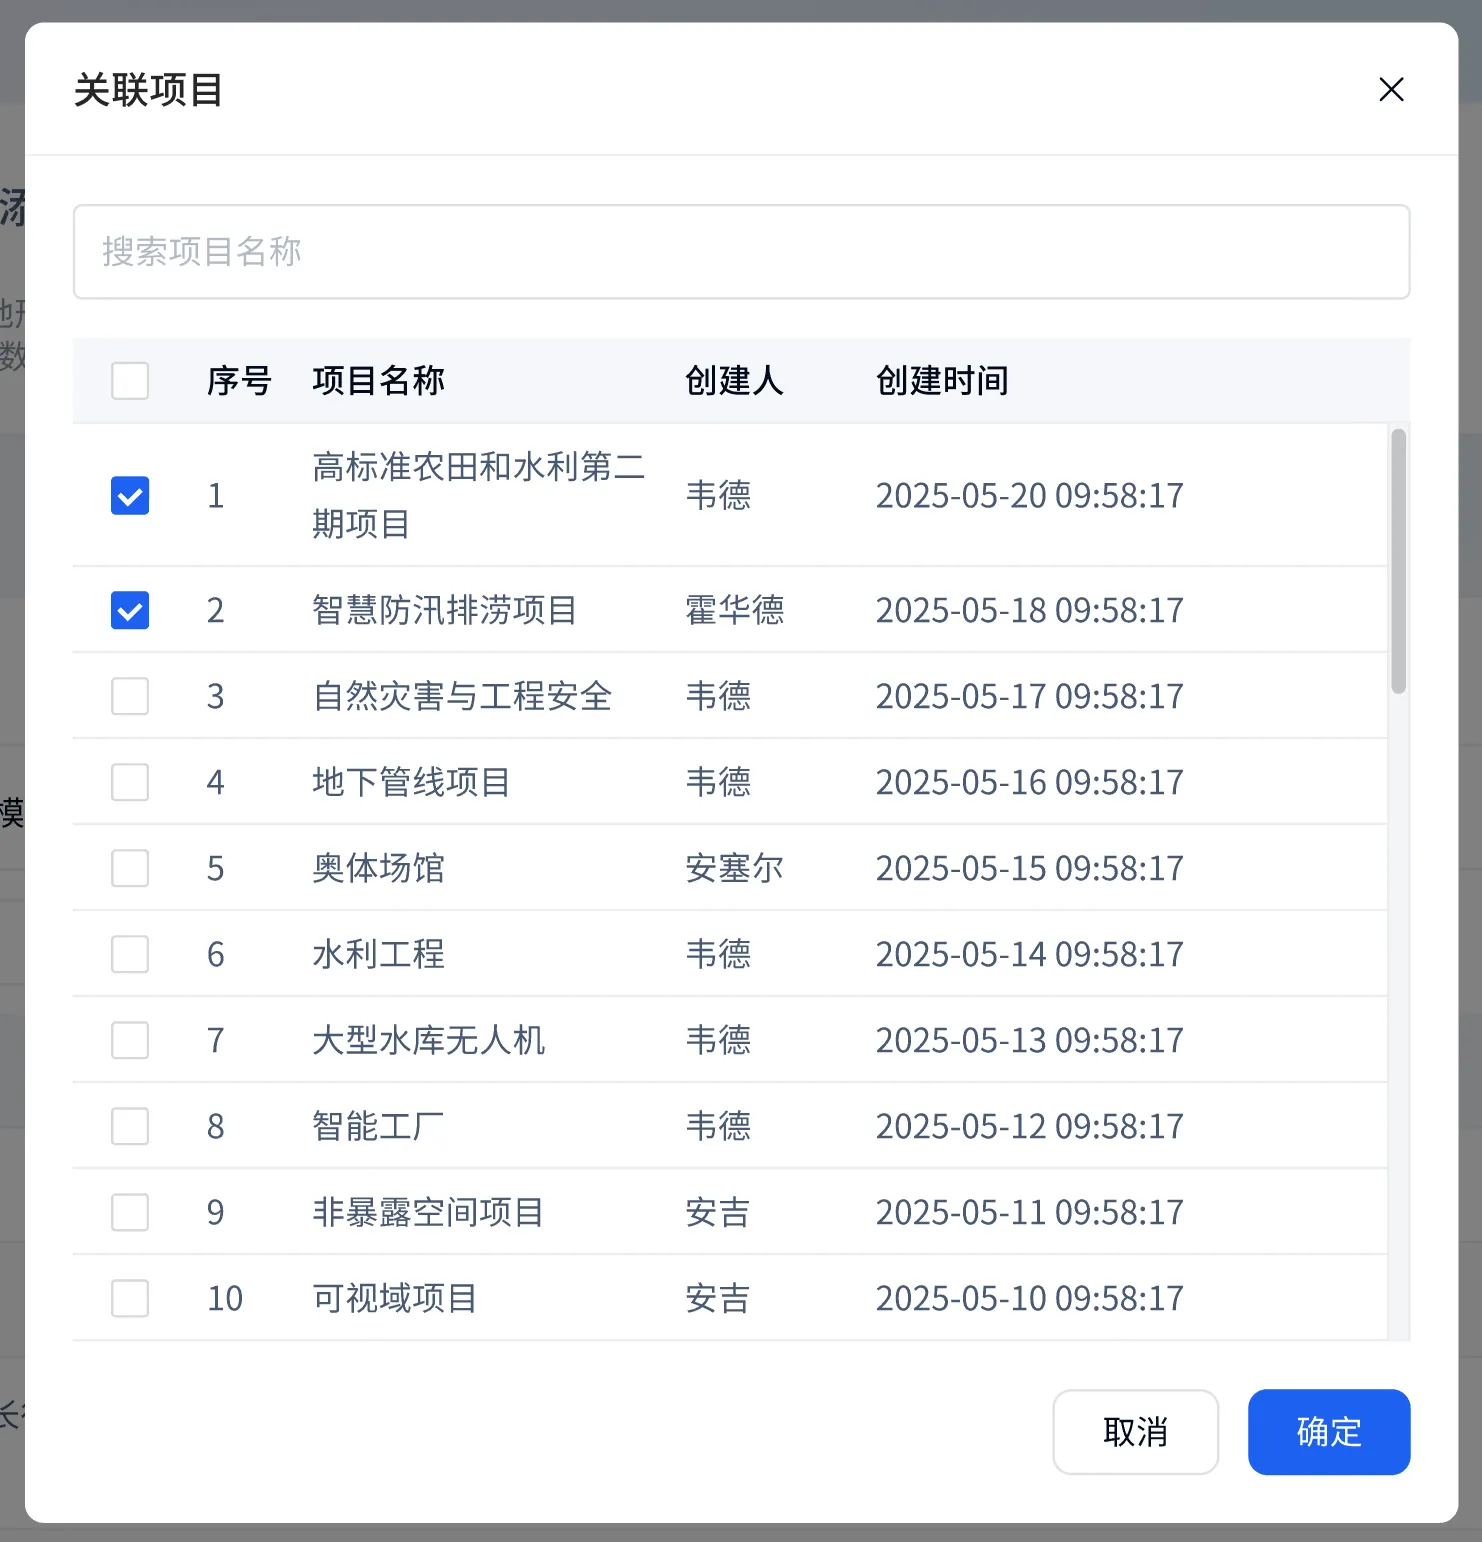
Related projects support searching by project name or table selection, and supporting multiple projects.
1.5.1.6. Filtering
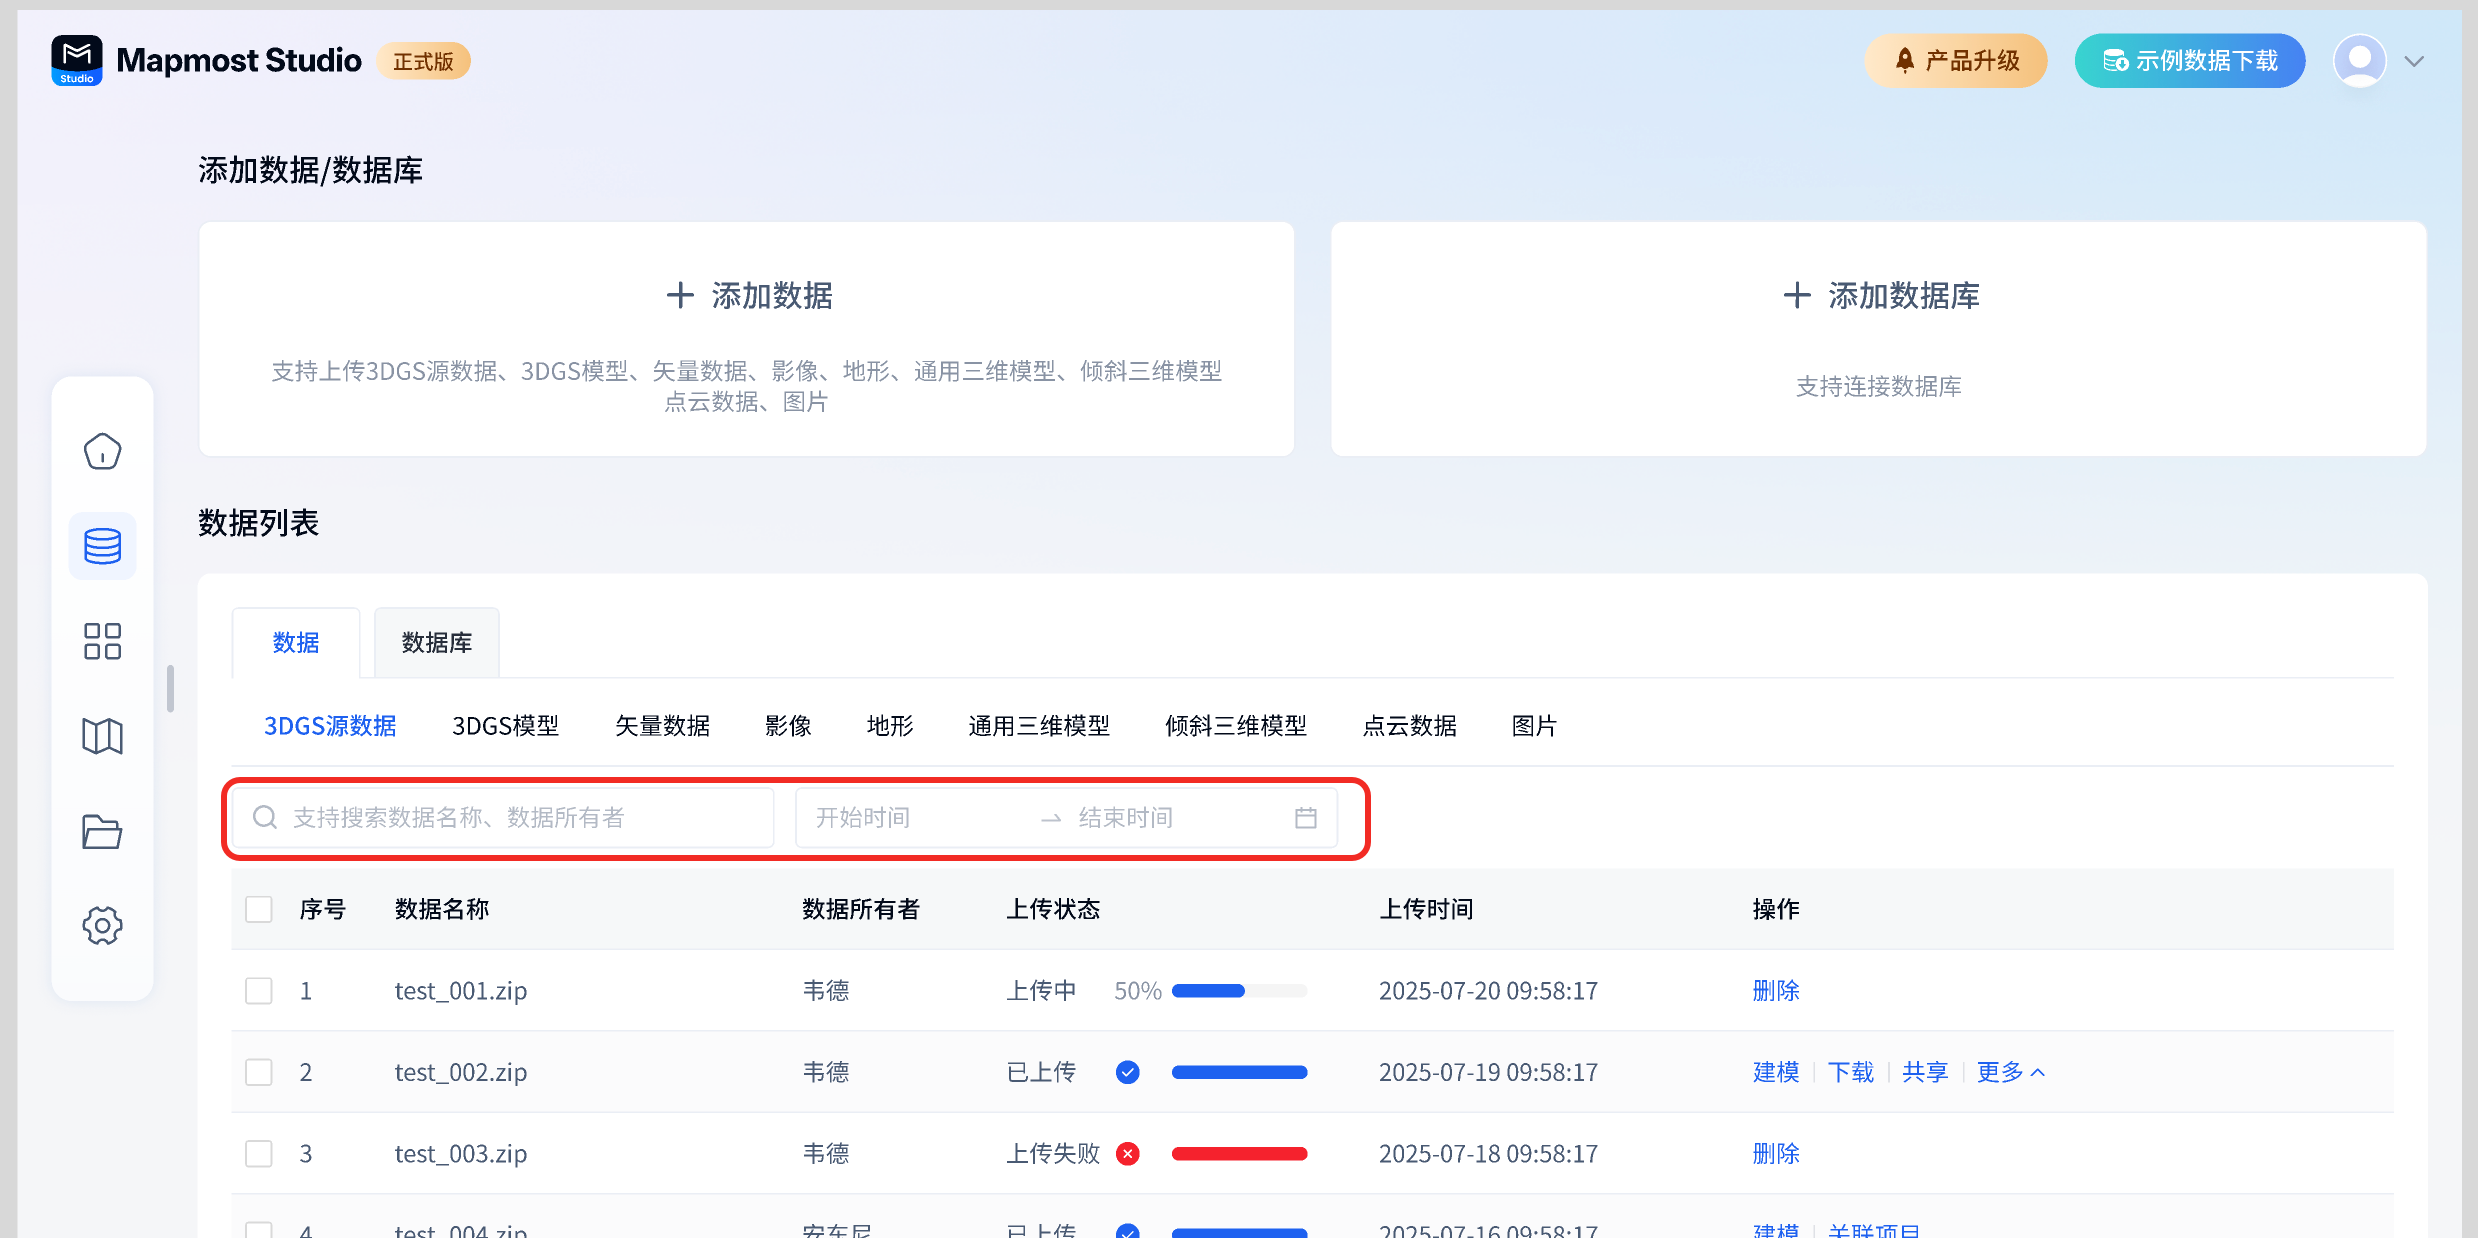
Data list supports filtering
①Supports data filtering by keyword-data name, data owner
②Support filtering by upload time
1.5.2. Data list-3DGS model
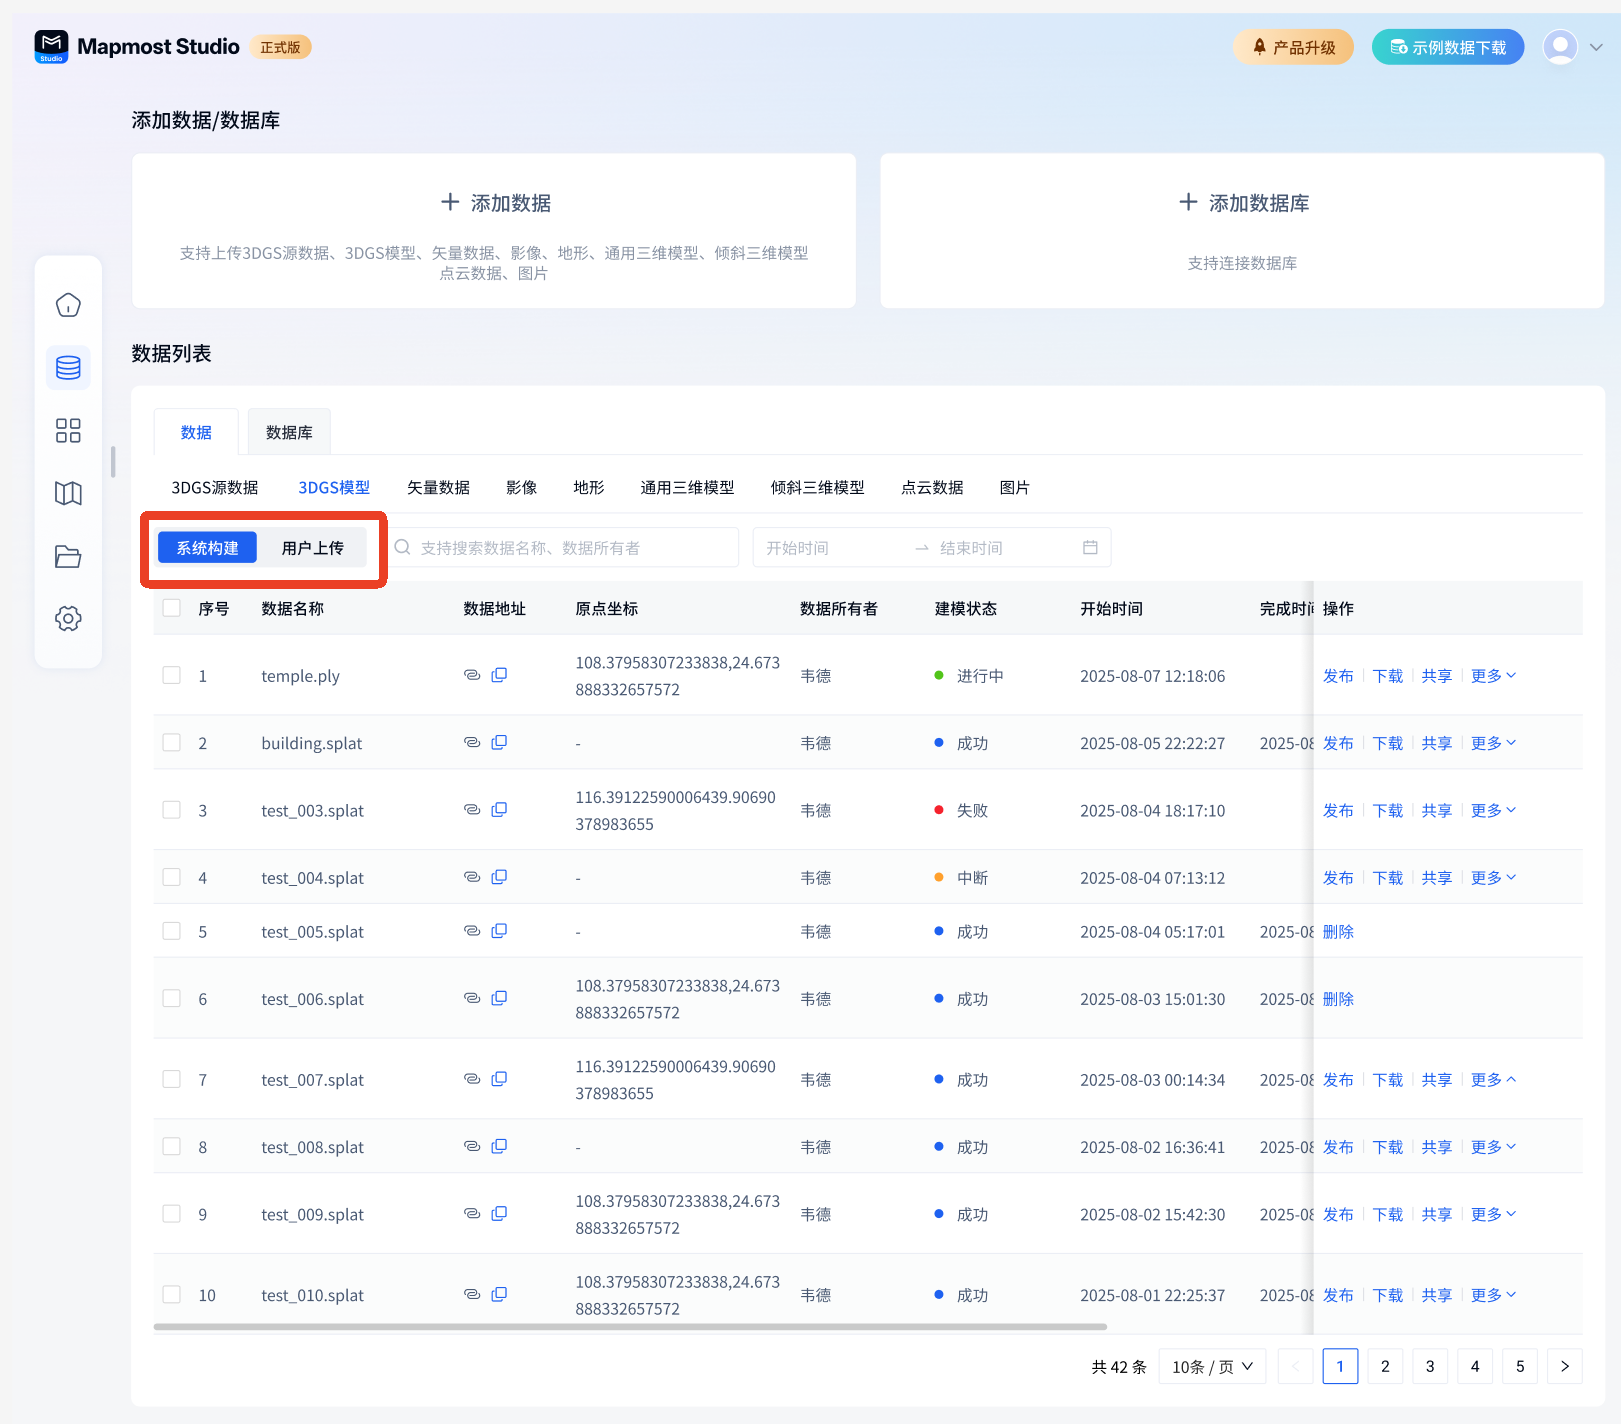
The 3DGS models built in the system (labeled as system build) and 3DGS models uploaded by users (notes are uploaded by users) are managed in the data list - 3DGS model list. The model built by the system is displayed by default in the list. Click tab to support switching.
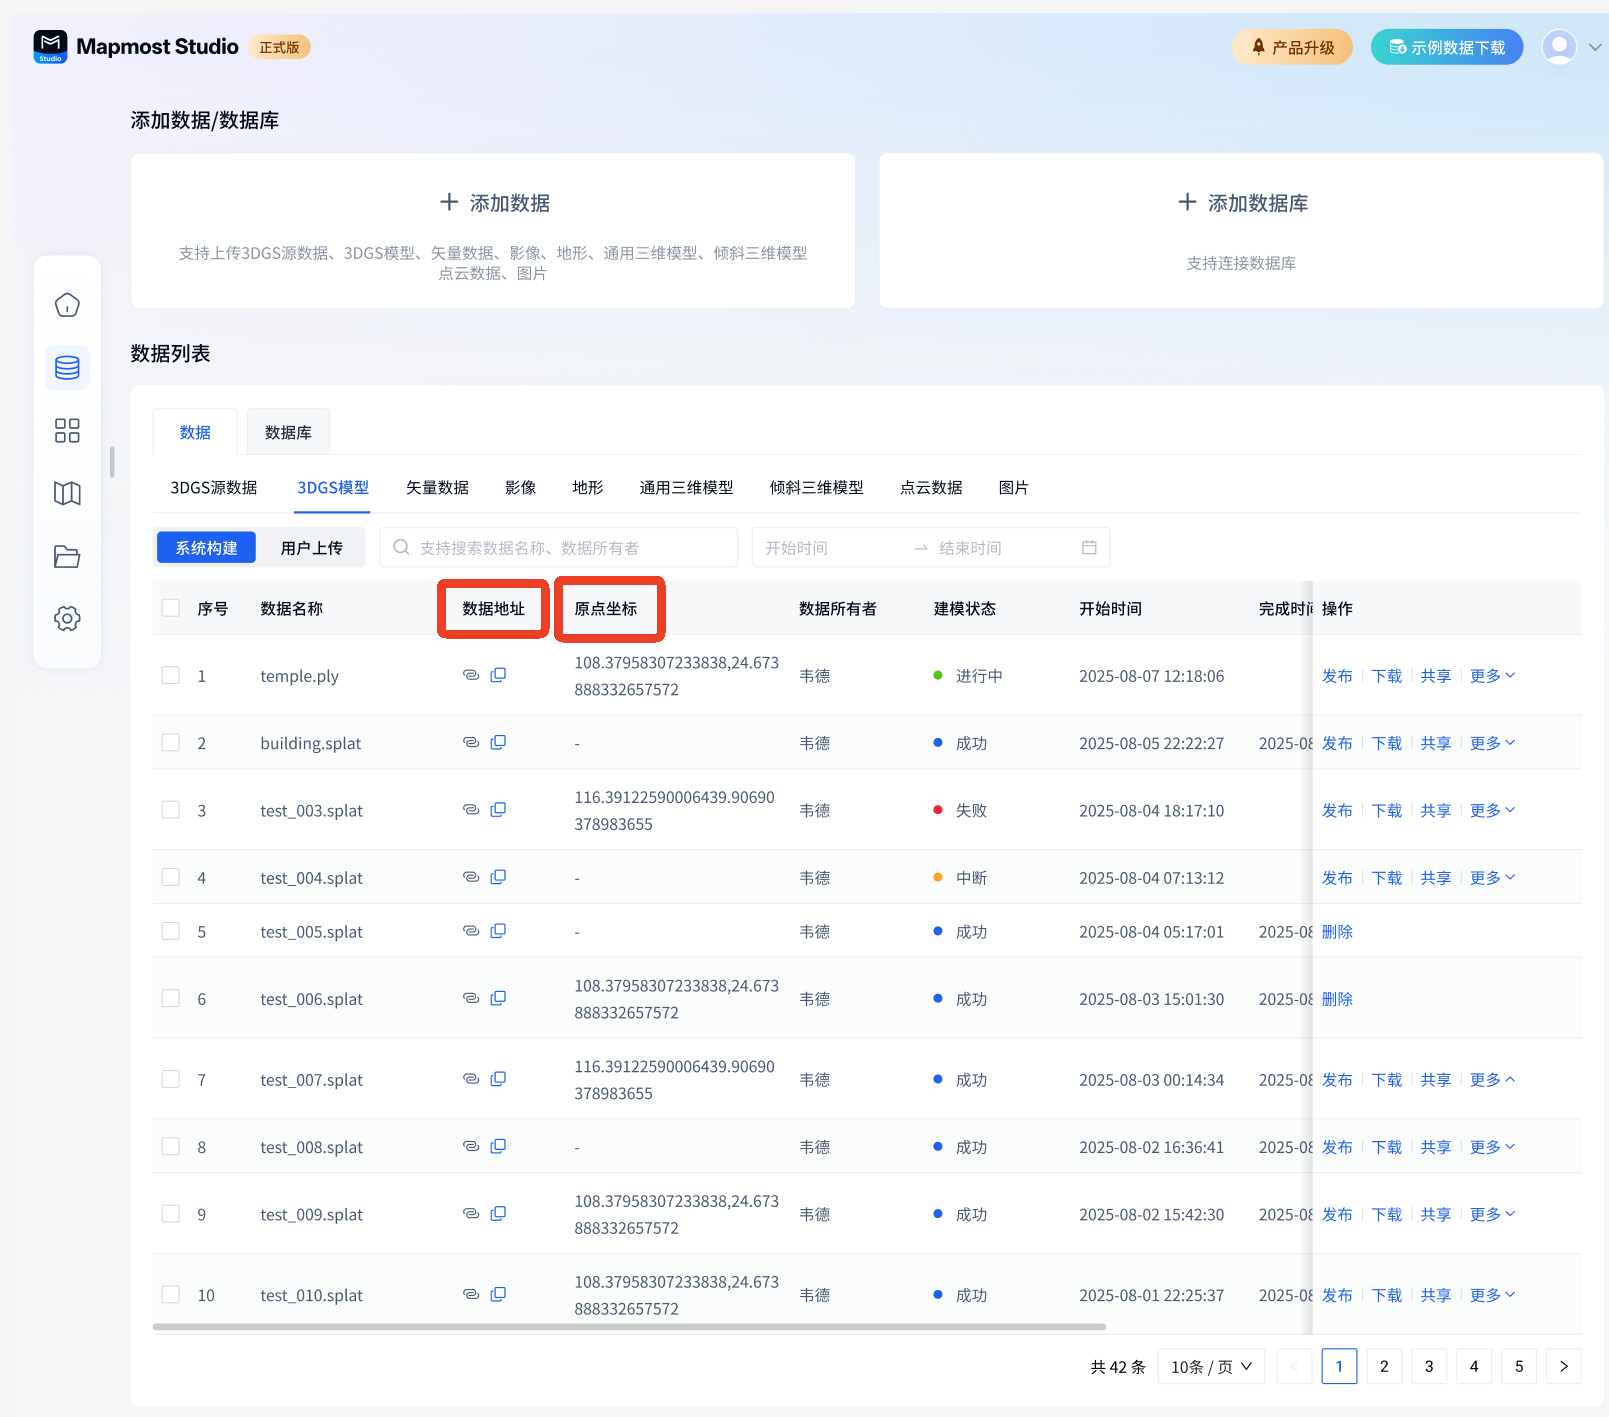
Supports copying the data address and origin coordinates in the list to facilitate loading the 3DGS model in Mapmost SDK for WebGL. For the loading method, see https://www.mapmost.com/mapmost_docs/webgl/latest/docs/demo/3DGS/
When the model note is built by the system, the model status and the operations supported by the corresponding status are described as follows:
| Modeling Status | illustrate | Support operation |
|---|---|---|
| in progress | There is a running modeling process | View, delete |
| interrupt | There is a running modeling process and it is forced to close (for example, click the close button in the upper right corner of the modeling page and exit modeling) | Continue modeling, delete |
| success | Complete modeling and output modeling results | View, publish, share, download, associate projects, delete |
| fail | There is a node modeling failure. | Remodel, download report, delete |
When the model source is uploaded by the user, the model status and the operations supported by the corresponding status are as follows:
| Upload Status | illustrate | Support operation |
|---|---|---|
| Uploading | Data is uploading | delete |
| Uploaded | Data has been uploaded successfully | Publish, share, download, associate projects, delete |
| Upload failed | Data upload failed | delete |
1.5.2.1. View
The model built by the system supports the viewing function. in
- For a 3DGS model whose modeling status is "in progress", click View to jump to the 3DGS modeling page, which displays the running process page. It supports clicking to view the parameter configuration and completed process pages, and supports editing the modeling parameters and re-modeling;
- For a 3DGS model with a "successful" modeling status, click View to jump to the 3DGS modeling page, display the Gaussian modeling results page, and support clicks to view parameter configuration, source data, and process pages such as building aerial triangulation.
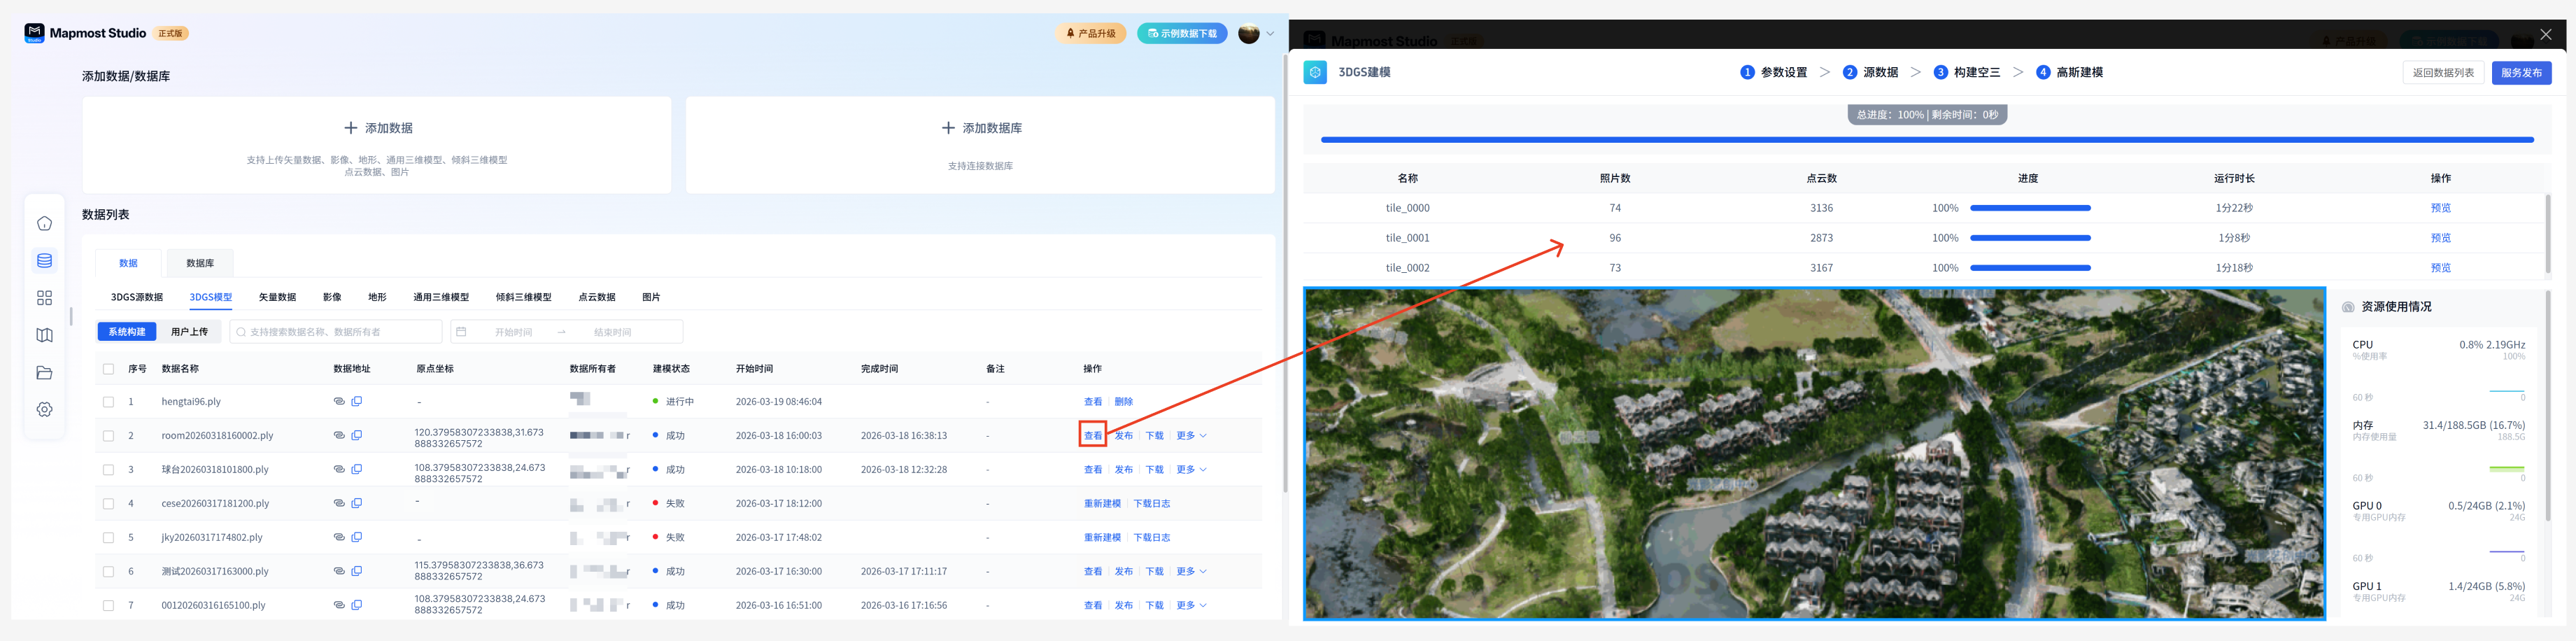
Please note: The modeling function requires the purchase and activation of the 3DGS expansion pack. If not purchased, the modeling function cannot be used, and therefore the viewing function cannot be used.
1.5.2.2. Continue modeling
When the running modeling process is forcibly closed (for example, click the close button in the upper right corner of the modeling page and exit modeling), you can click in the data list to continue the modeling operation and build the model from the terminated part.
Click to continue modeling and jump to the modeling interruption process page. Click on the upper right corner to continue modeling and start modeling, or return to the parameter page to adjust the modeling parameters and then start modeling again.
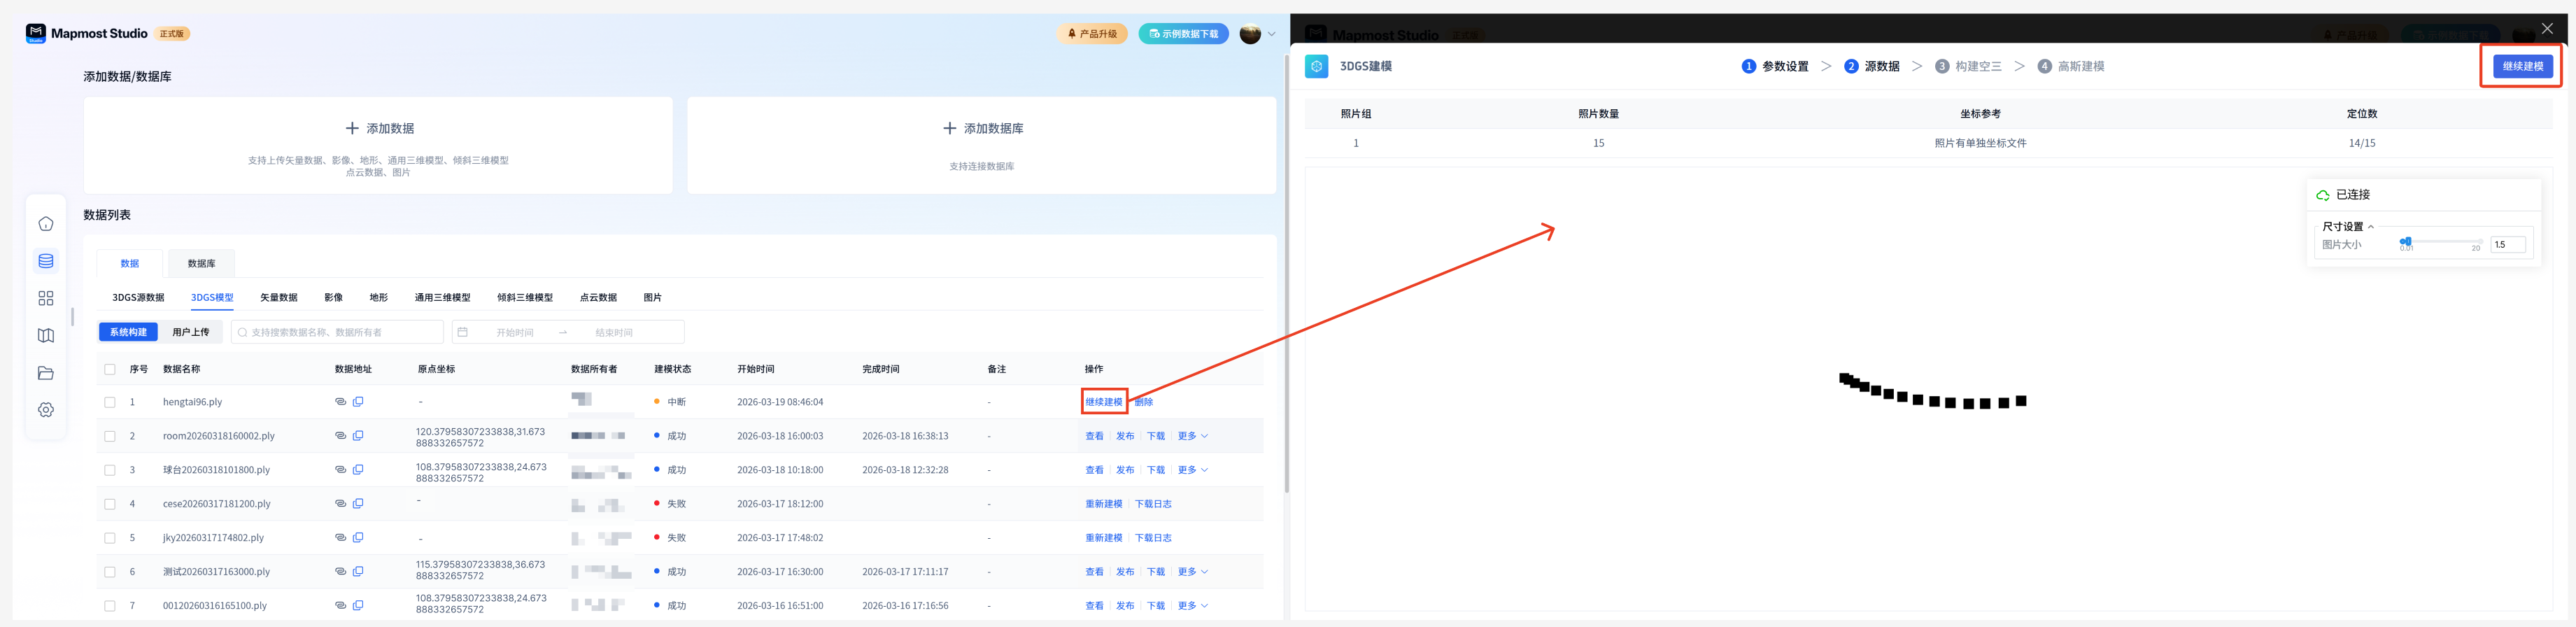
Please note: The modeling function requires the purchase and activation of the 3DGS expansion pack. If you do not purchase it, you will not be able to use the modeling function, so you will not be able to use the continued modeling function.
1.5.2.3. Remodeling
When the 3DGS modeling status is failed, remodeling operations are supported in the data list.
Click Re-model to jump to the modeling failure process page, and click Re-model in the upper right corner to start modeling, or return to the parameter page to adjust the modeling parameters and then re-model.
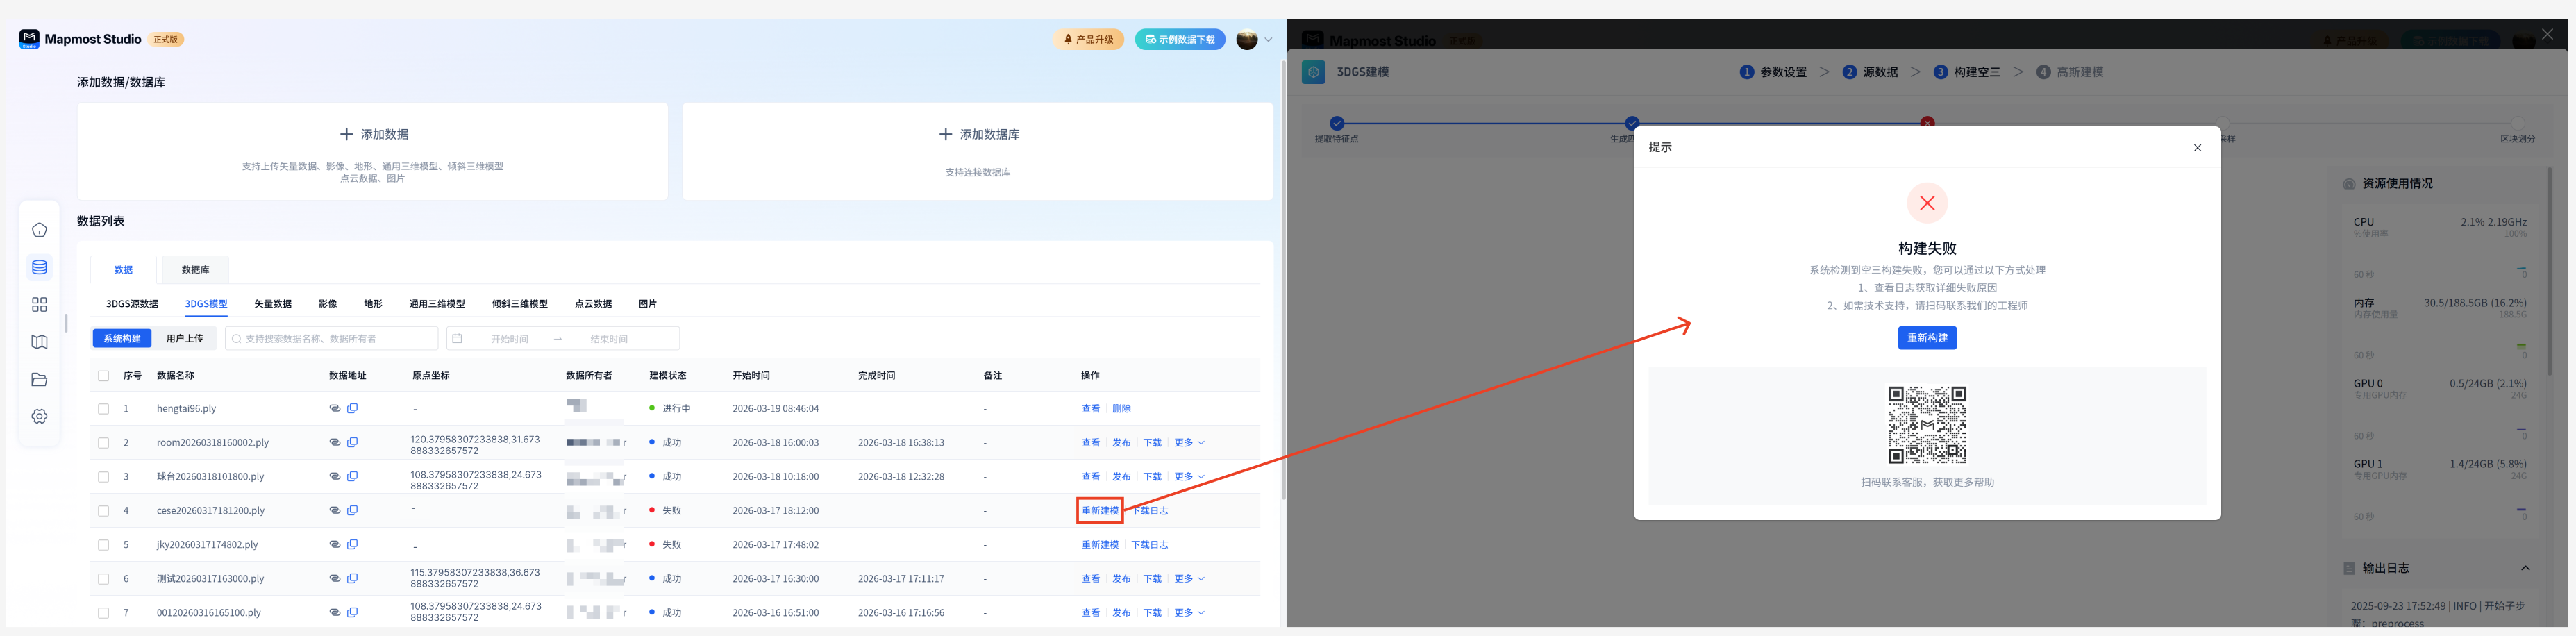
Please note: The modeling function requires the purchase and activation of the 3DGS expansion pack. If you do not purchase it, the modeling function cannot be used, so the re-modeling function cannot be used.
1.5.2.4. Release
Models built by the system and models uploaded by users support publishing operations.
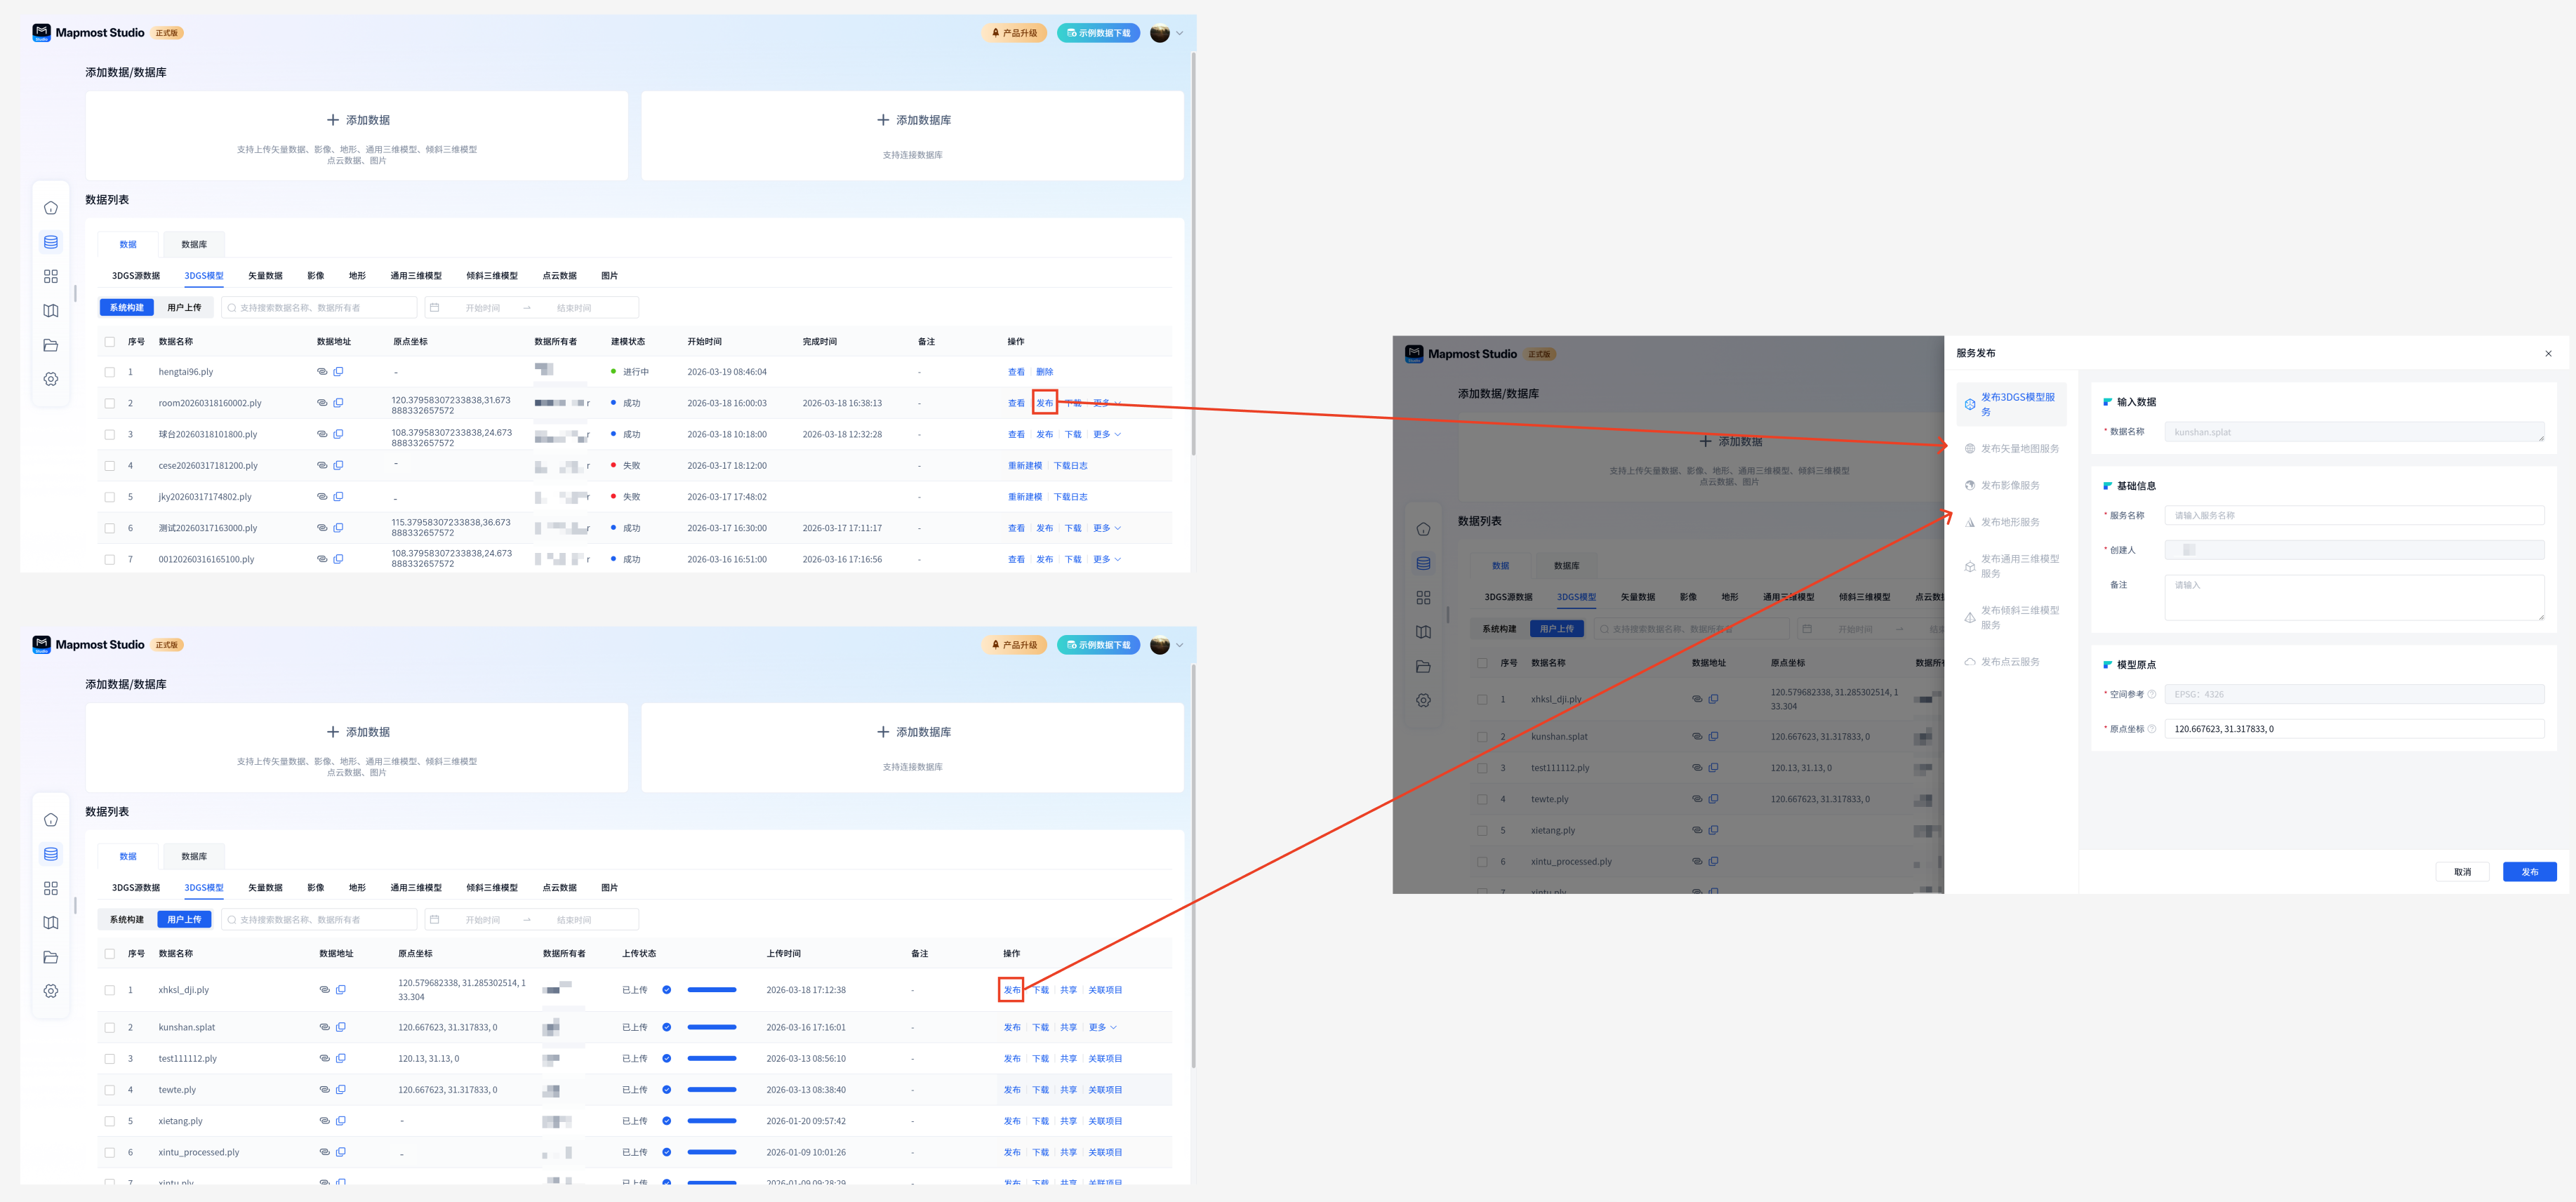
Input data:
| Field | illustrate |
|---|---|
| Data name | Required, automatically filled based on selected input data. If you need to modify it, please exit the data publishing drawer and re-select the data to be published in the data list. |
Basic information:
| Field | illustrate |
|---|---|
| Service name | Required, the name must start with a lowercase letter, be 4-32 characters in length, and consist of letters, numbers, and underscores. |
| Uploader | Required, automatically entered, cannot be modified. |
| Remark | It is not required and can be filled in according to the actual situation. |
Model origin:
| Field | illustrate |
|---|---|
| spatial reference | Required, spatial reference can be vividly compared to the positioning system of geographical data, which defines how to identify and place the specific location of data on the earth. Model origin spatial reference only supports EPSG: 4326 |
| Zero point coordinates | Required, indicating the coordinates (longitude, latitude, altitude) of the model origin in the WGS84 coordinate system. If the model is built within this system and has a coordinate reference, the coordinates will be automatically filled in without modification; if the model does not have a coordinate reference or is a model built by a third-party tool, the system will default to the origin in Suzhou, and the coordinate values can be modified according to the actual situation. |
Special instructions:
- If the 3DGS source data (photo) uploaded by the user has a coordinate reference, when the 3DGS model built based on the data is published as a service, the origin coordinates are automatically configured by the system and the user does not need to process;
- If the 3DGS source data (photo) uploaded by the user has no coordinate reference, when the 3DGS model built based on the data is released as a service, the origin will be placed in Suzhou by default, and the origin coordinate value can be modified according to the actual situation;
- If the user publishes services based on the 3DGS model they uploaded, the system will place the model in Suzhou by default. If the user needs to place the model at an accurate location, he or she needs to set the origin coordinates of the model. The origin coordinates can usually be obtained from the modeling results.
Publish Drawer Action:
| Field | illustrate |
|---|---|
| Cancel | Click Cancel to exit the current data publishing process, and the entered content will not be saved. |
| release | Click Publish, the current content is saved and published into the corresponding service, and the progress can be viewed in the My Services-3DGS Model Service List. |
Please note: The publishing function requires the purchase and activation of the 3DGS expansion pack. If not purchased, the publishing function cannot be used.
1.5.2.5. Download
The detailed operation of downloading the 3DGS model is the same as 3DGS source data download
1.5.2.6. Delete
The detailed operation of deleting 3DGS model is the same as 3DGS source data deleted
1.5.2.7. Sharing
The detailed operation of 3DGS model sharing is the same as 3DGS source data sharing
1.5.2.8. Related projects
The detailed operation of 3DGS model association project is the same as 3DGS source data association project
1.5.2.9. Filtering
3DGS model data whose data source is "system construction" or "user upload" can be screened as needed. The detailed operation is the same as 3DGS source data screening
1.6. Project-based resource management
Supports management of 3DGS data resources on a project basis. Turn on the editing status on the project details page and click the Associate Resource button to associate the successfully constructed/uploaded 3DGS model data and the successfully uploaded 3DGS source data to the project. Other project members can use the associated 3DGS data for modeling or service release.
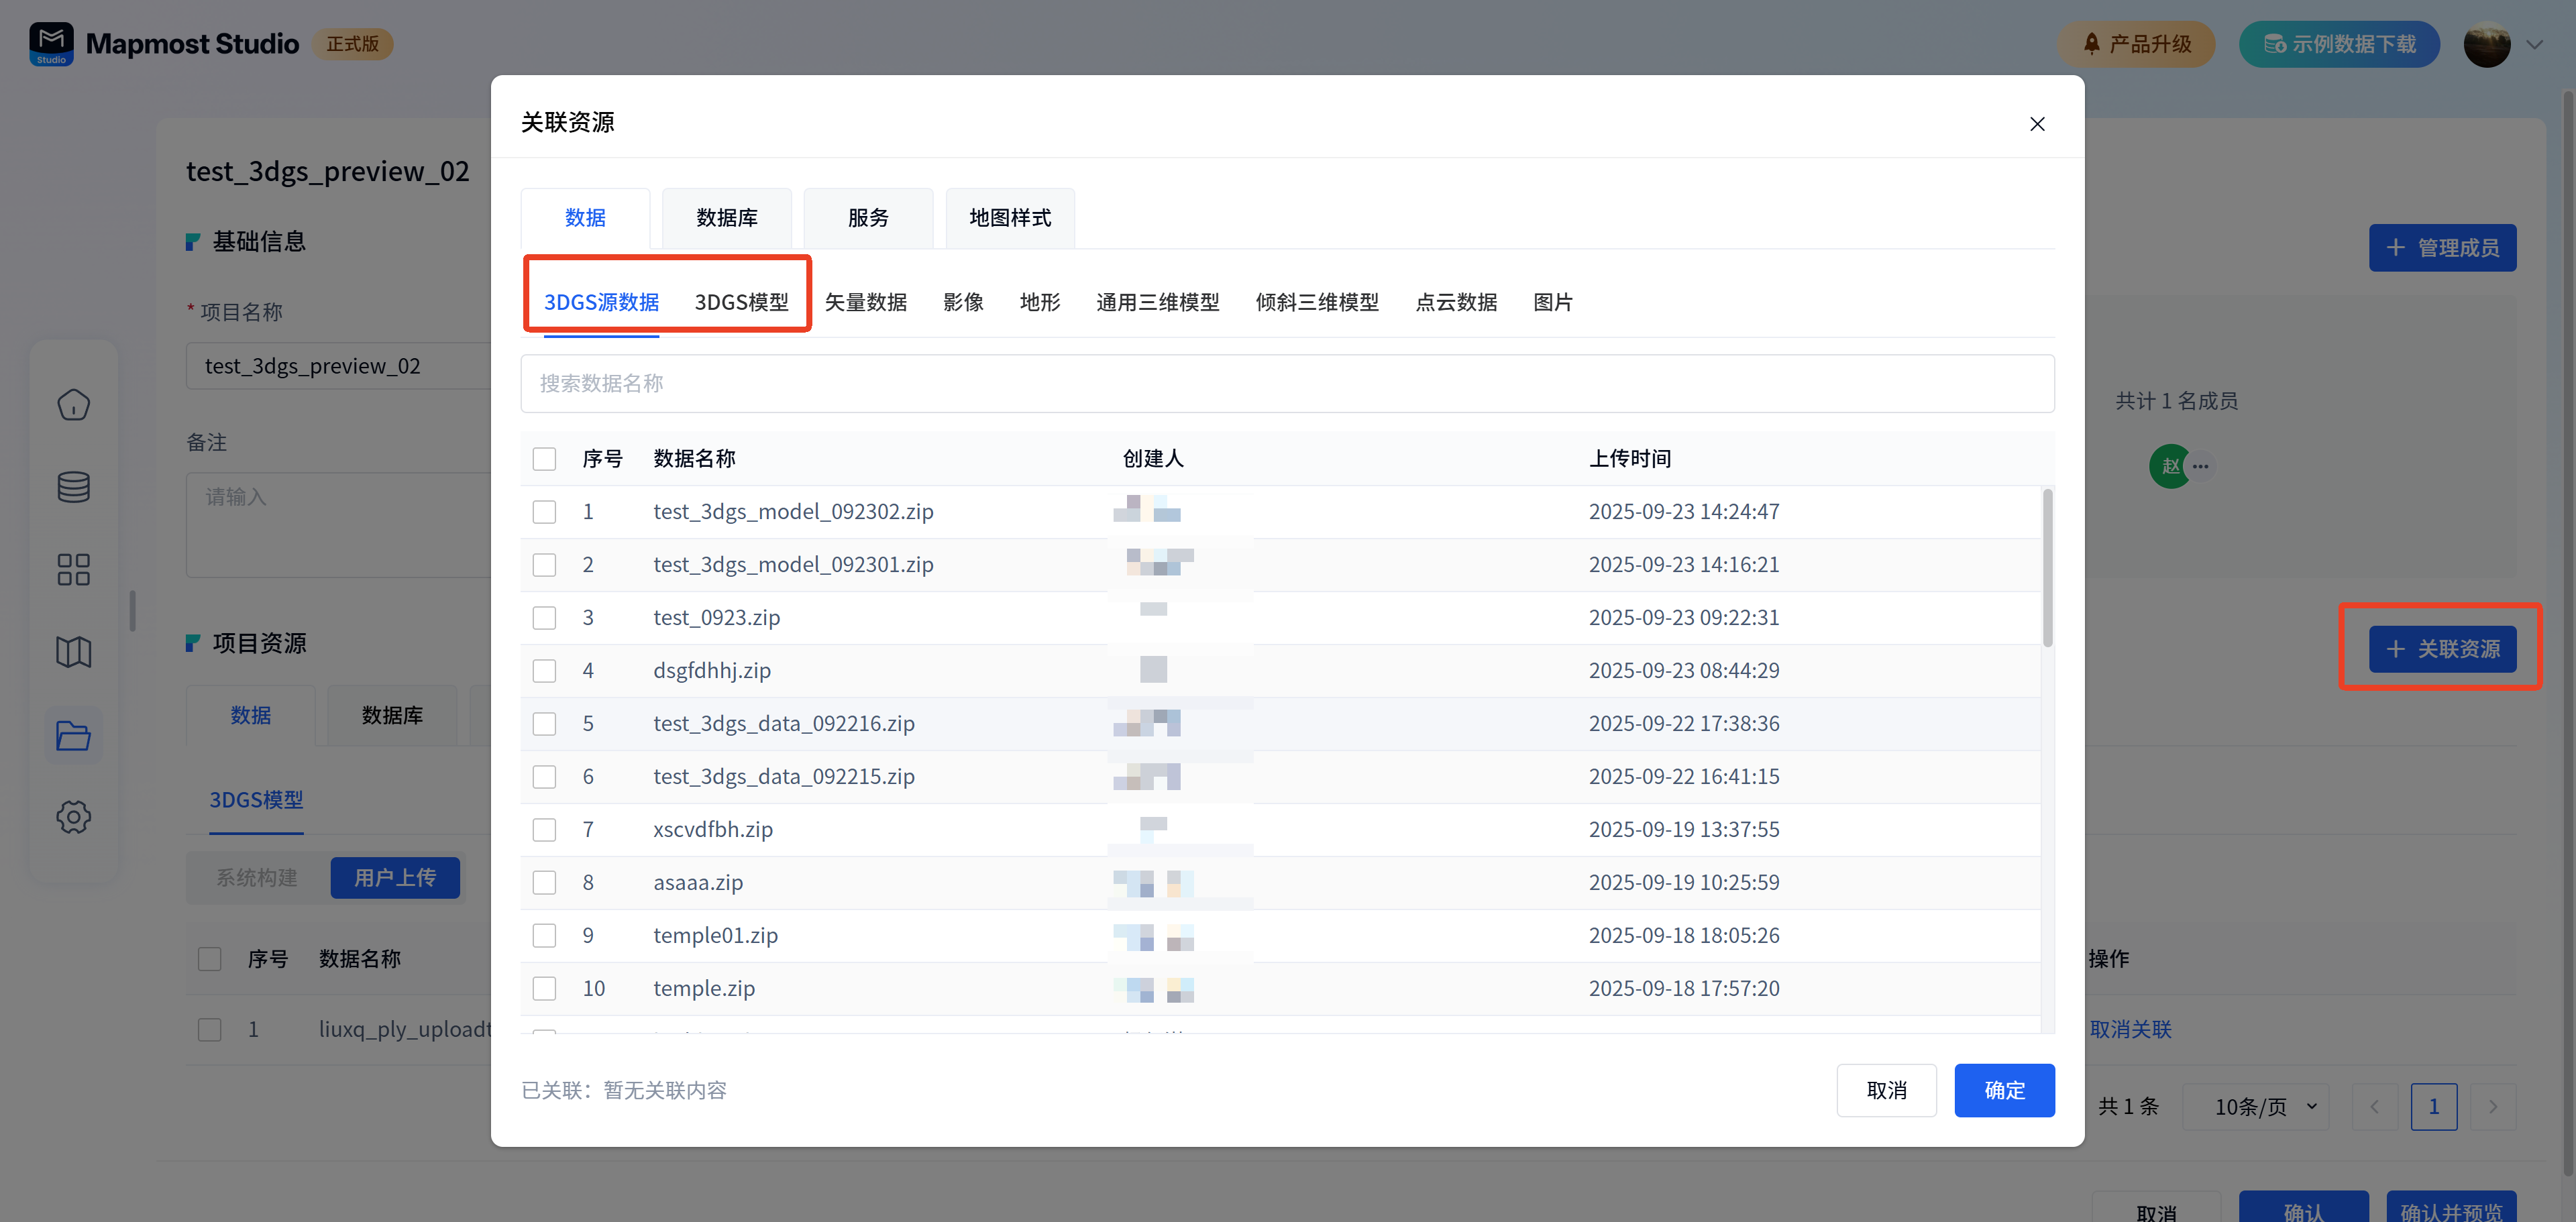
2. Publish 3DGS model service
2.1. New
There are two ways to enter the 3DGS model service publishing function:
- Method 1: Open the "Mapmost Studio" software, switch to the "Home" module in the left navigation bar, and click "Publish 3DGS Model Service" to enter the corresponding service release page.
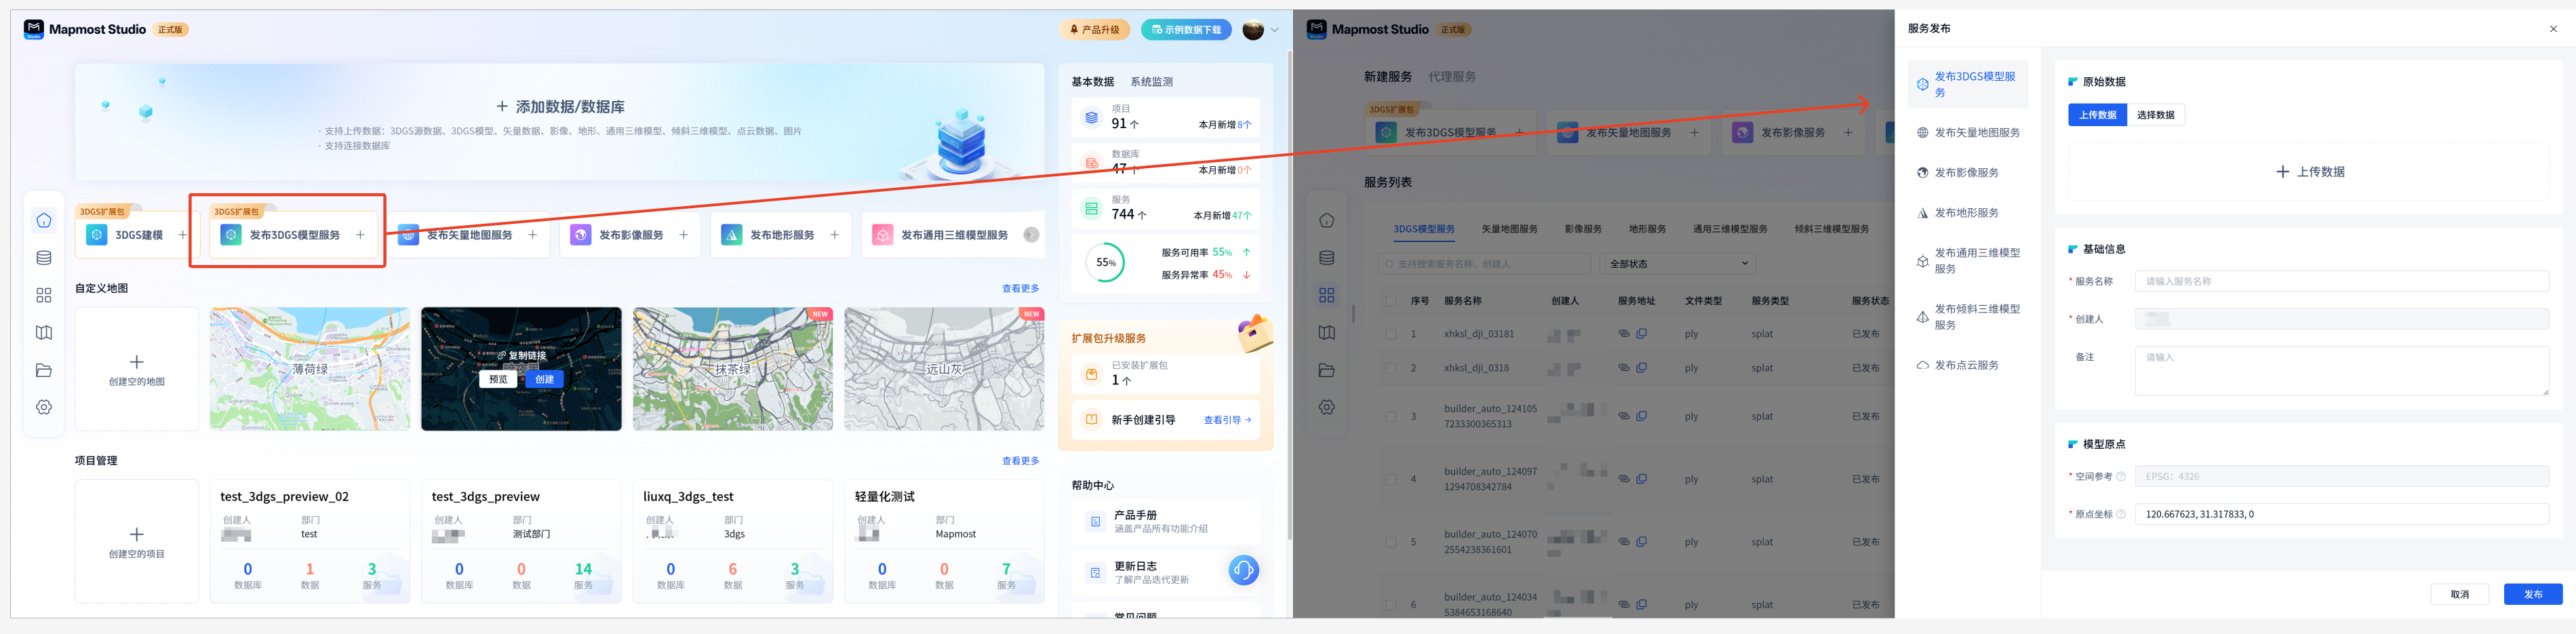
- Method 2: Open the "Mapmost Studio" software, switch to the "My Data" module in the left navigation bar, and click the "Publish" operation of the Data List-3DGS Model classification list (you must have uploaded or used the system to build a 3DGS model before there will be records in the data list).
For detailed publishing operations, please refer to Data List-3DGS Model-Publish
2.2. Publishing
Raw data:
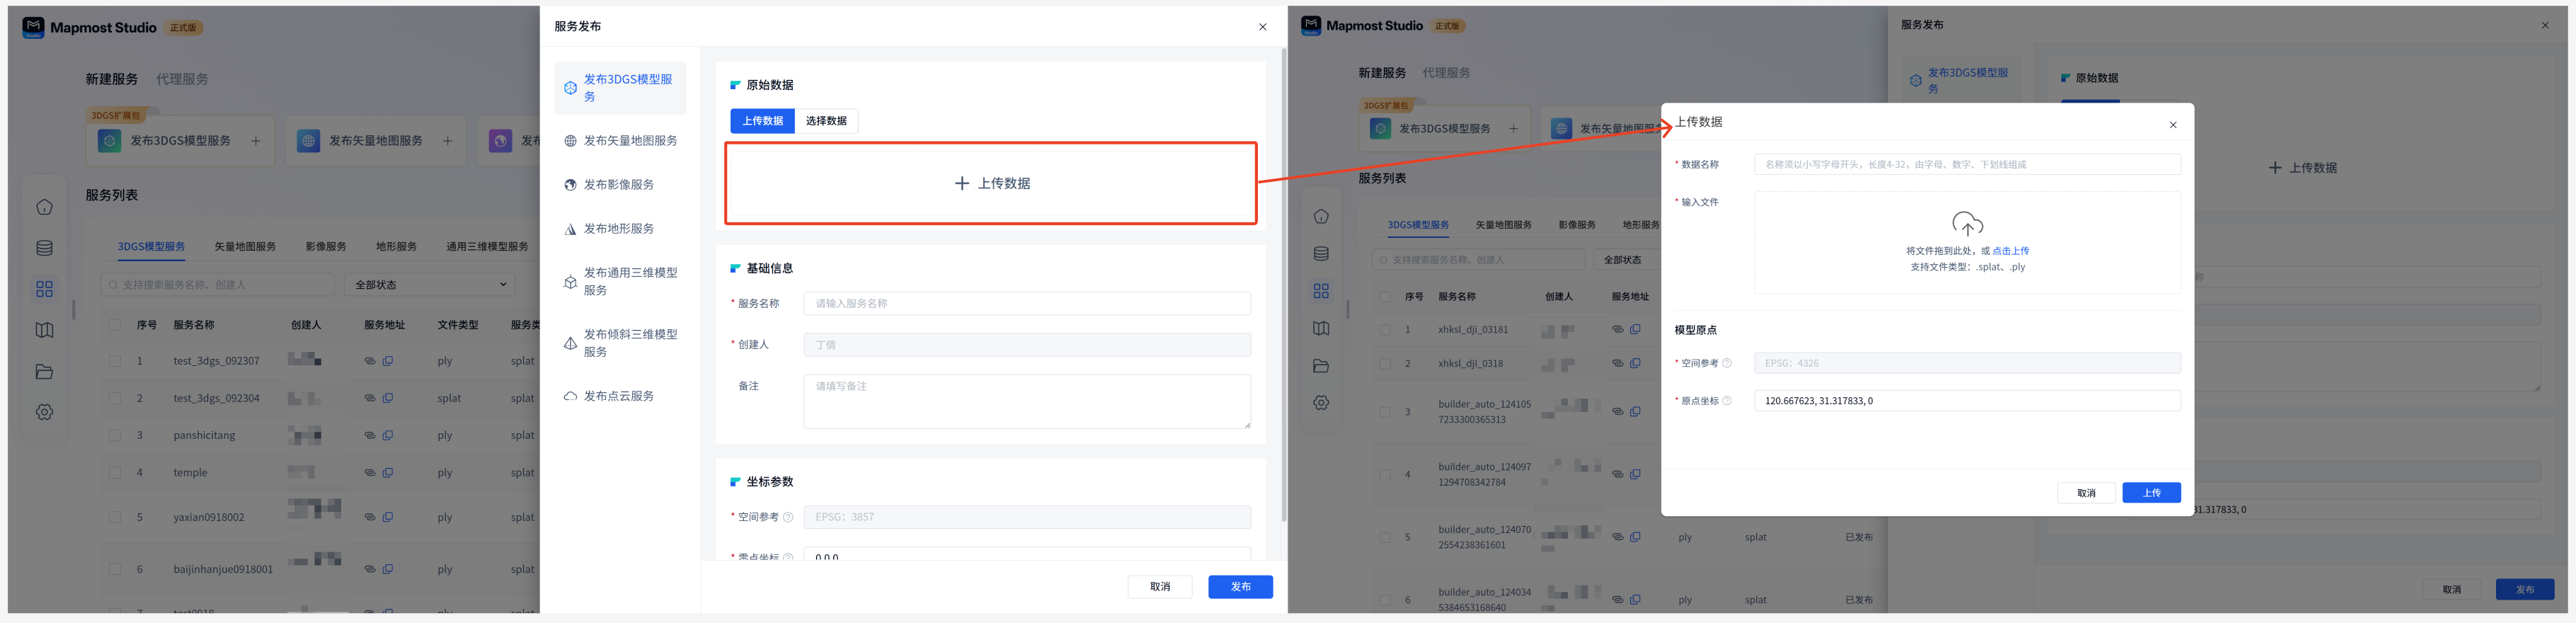
(1) Upload data: Support users to upload local 3DGS model data. The data format supports splat and ply. When uploading data, you need to fill in the data name and model origin information. The model origin coordinates here represent the coordinate values of the model origin in the WGS84 coordinate system (longitude, latitude, height). The system defaults to the origin in Suzhou, and users can modify it according to the actual origin coordinates of the model. The origin coordinates filled in here will be synchronized to the model list and model service release page.
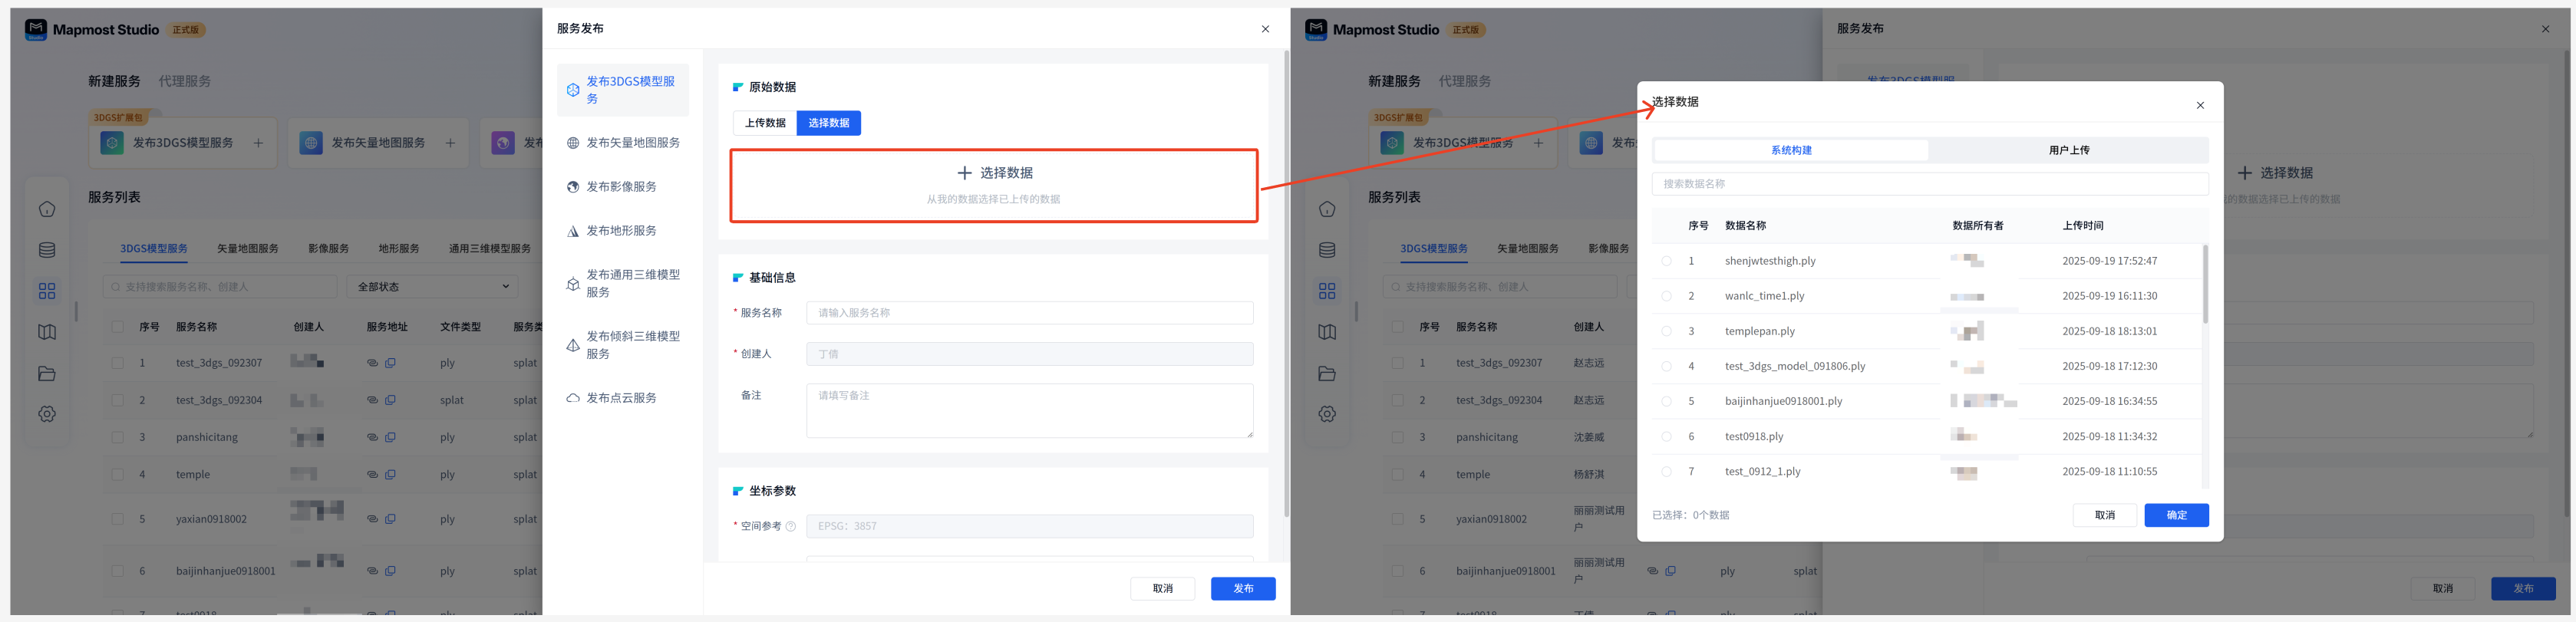
(2) Select data: Select the uploaded 3DGS model data from "My Data - Data List".
Basic information:
| Field | illustrate |
|---|---|
| Service name | Required, the name must start with a lowercase letter, be 4-32 characters in length, and consist of letters, numbers, and underscores. |
| Creator | Required, automatically entered, cannot be modified. |
| Remark | It is not required and can be filled in according to the actual situation. |
Model origin:
| Field | illustrate |
|---|---|
| spatial reference | Required, spatial reference can be vividly compared to the positioning system of geographical data, which defines how to identify and place the specific location of data on the earth. Model origin spatial reference only supports EPSG: 4326 |
| Zero point coordinates | Required, indicating the coordinates (longitude, latitude, altitude) of the model origin in the WGS84 coordinate system. If the model is built within this system and has a coordinate reference, the coordinates will be automatically filled in without modification; if the model does not have a coordinate reference or is a model built by a third-party tool, the system will default to the origin in Suzhou, and the coordinate values can be modified according to the actual situation. |
Special instructions:
- If the 3DGS source data (photo) uploaded by the user has a coordinate reference, when the 3DGS model built based on the data is published as a service, the origin coordinates are automatically configured by the system and the user does not need to process;
- If the 3DGS source data (photo) uploaded by the user has no coordinate reference, when the 3DGS model built based on the data is released as a service, the origin will be placed in Suzhou by default, and the origin coordinate value can be modified according to the actual situation;
- If the user publishes services based on the 3DGS model they uploaded, the system will place the model in Suzhou by default. If the user needs to place the model in an accurate location, he needs to set the origin coordinates of the model by himself.
Publish Drawer Action:
| Field | illustrate |
|---|---|
| Cancel | Click Cancel to exit the current publishing process, and the entered content will not be saved. |
| release | Click Publish, the current content is saved and published into the corresponding service, and the progress can be viewed in the My Services-3DGS Model Service List. |
2.3. Service list
The service list displays published 3DGS model services and supports preview, resend, share, associate projects, view logs, filter, copy service address, delete and other operations.
2.3.1. Preview
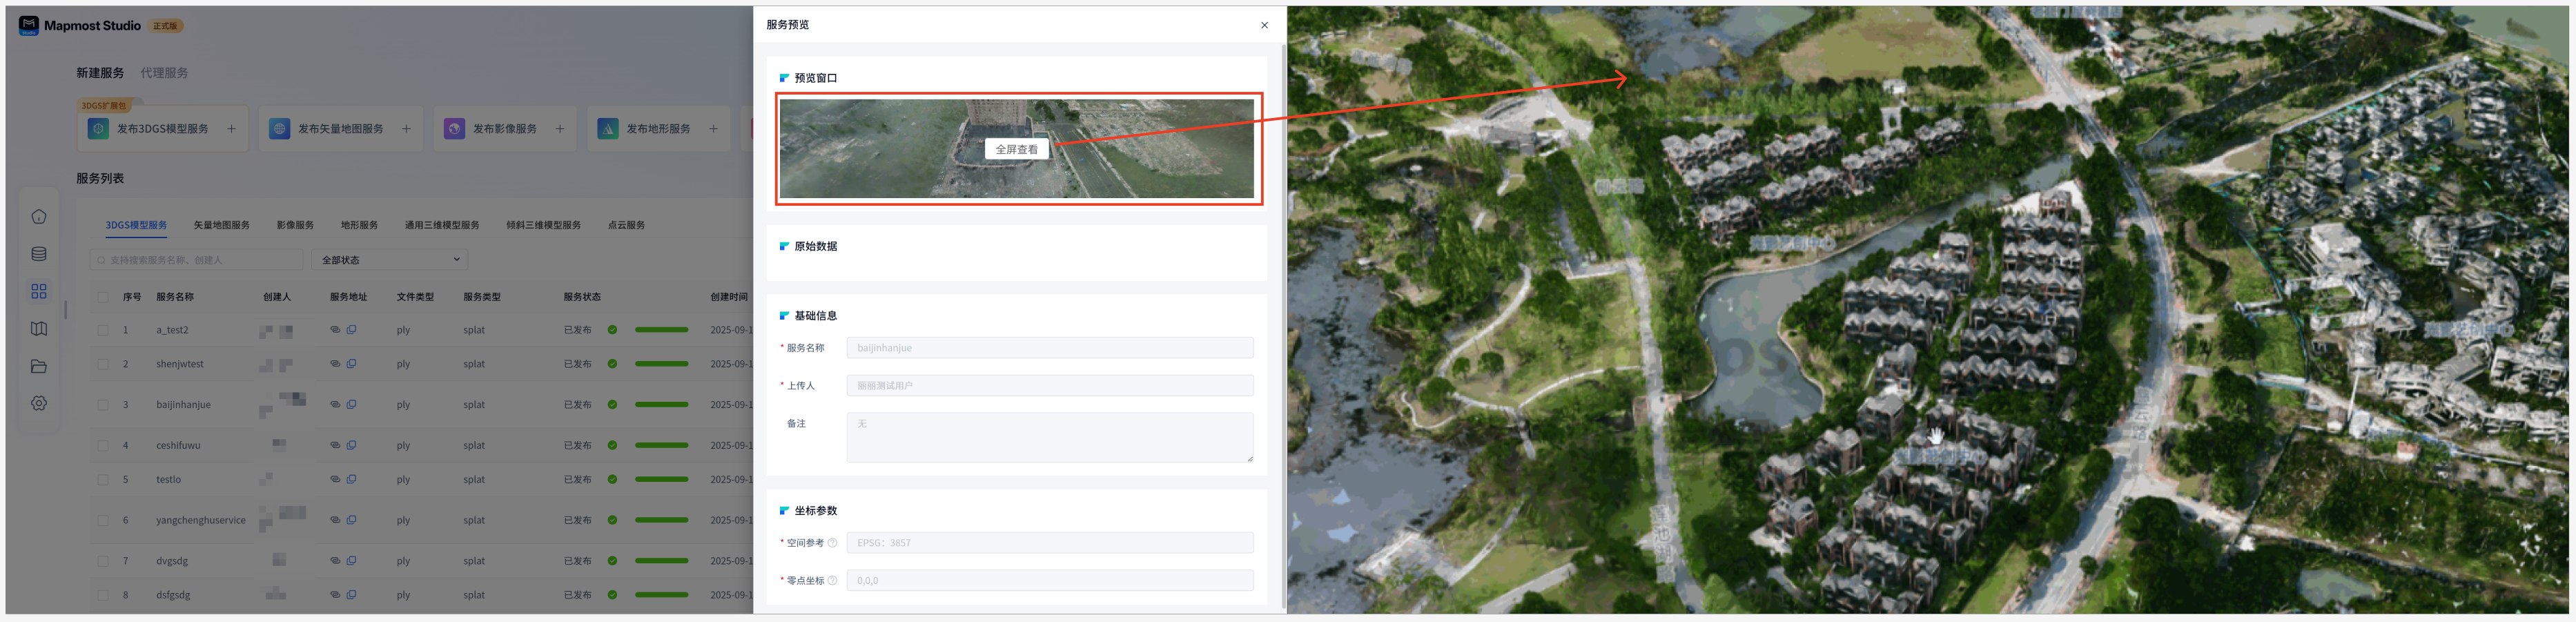
Publish a successful service support preview. Click Preview to preview the current service and the parameters released by the service.
Click "View Full Screen" to view the service effects in full screen on the new page.
2.3.2. Resend
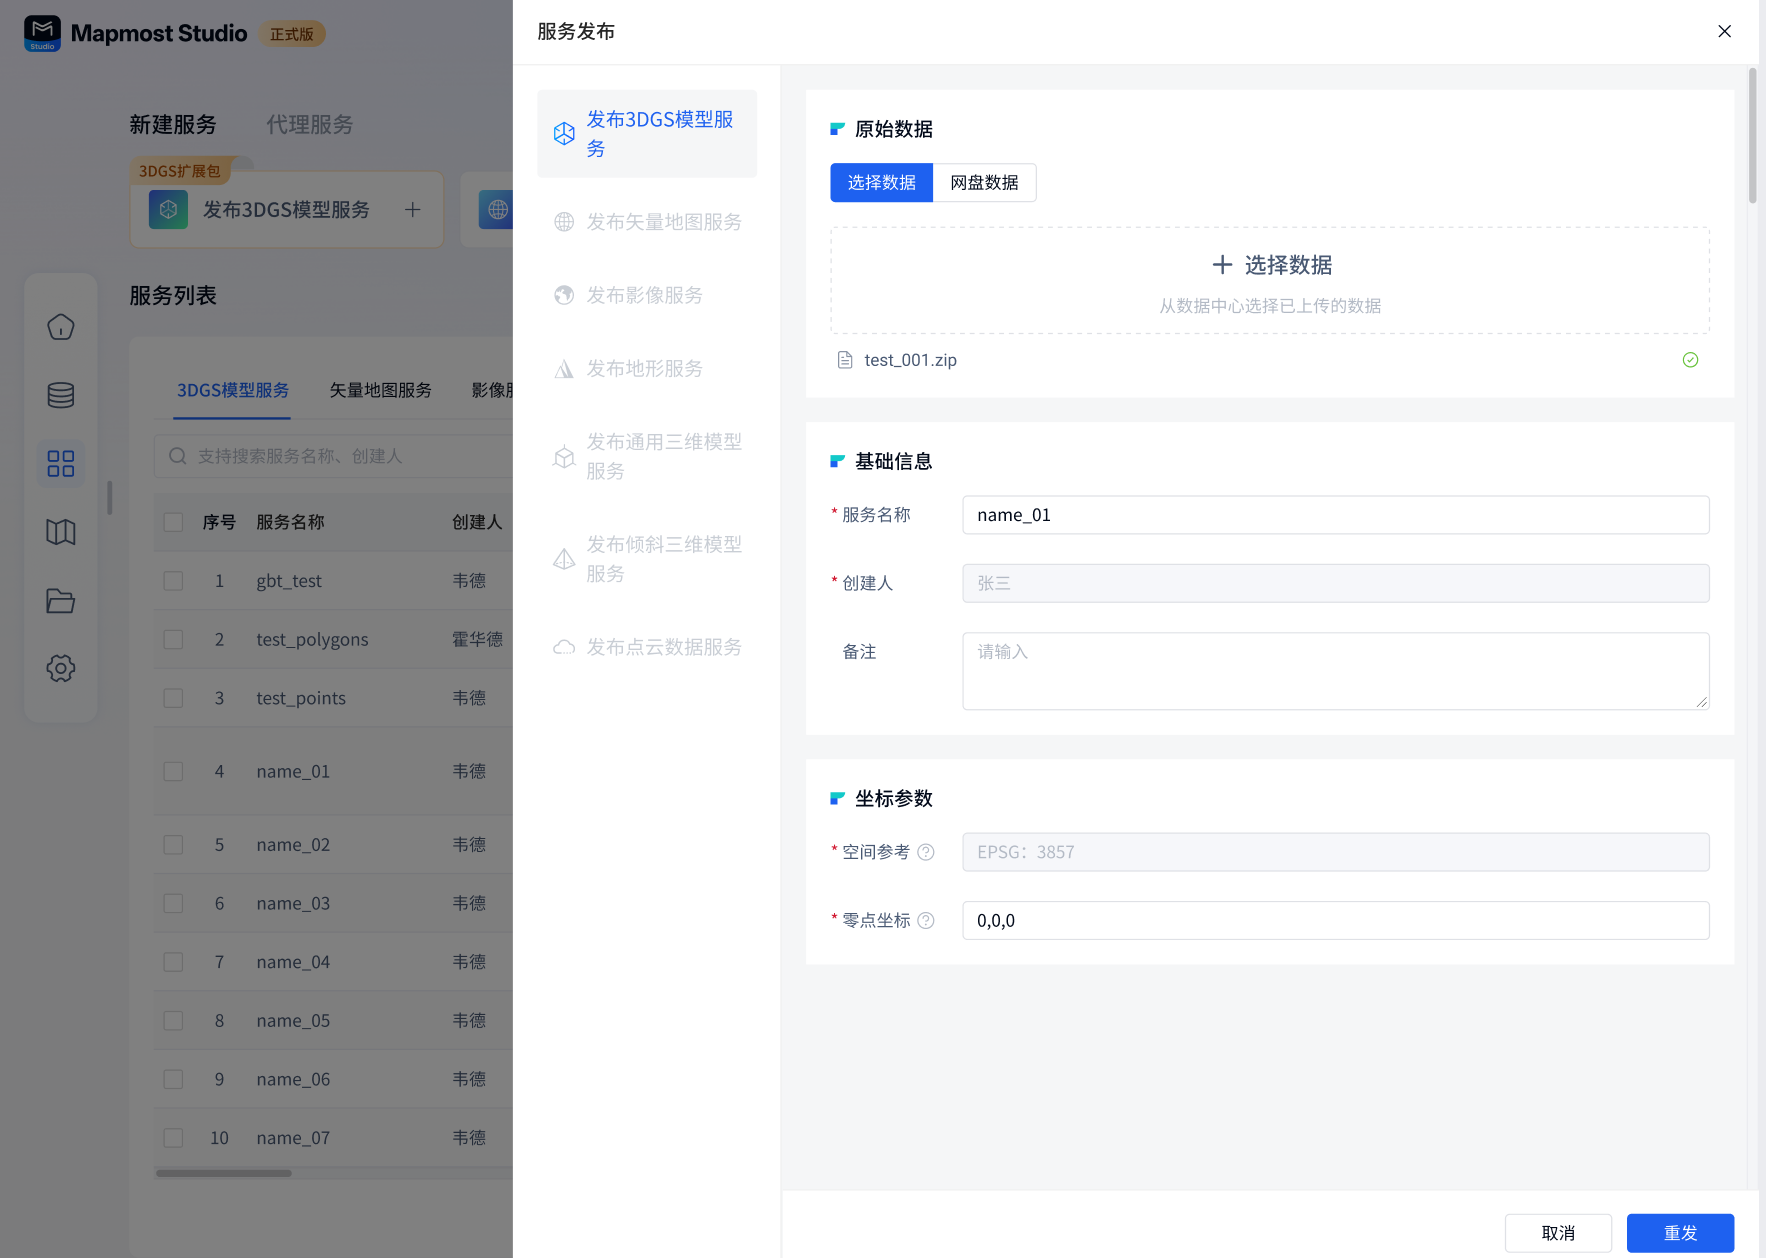
Publish failed 3DGS model service and support re-issuance.
Click "Resend" to display the publishing drawer, where you can reselect the data, adjust the parameters and publish again.
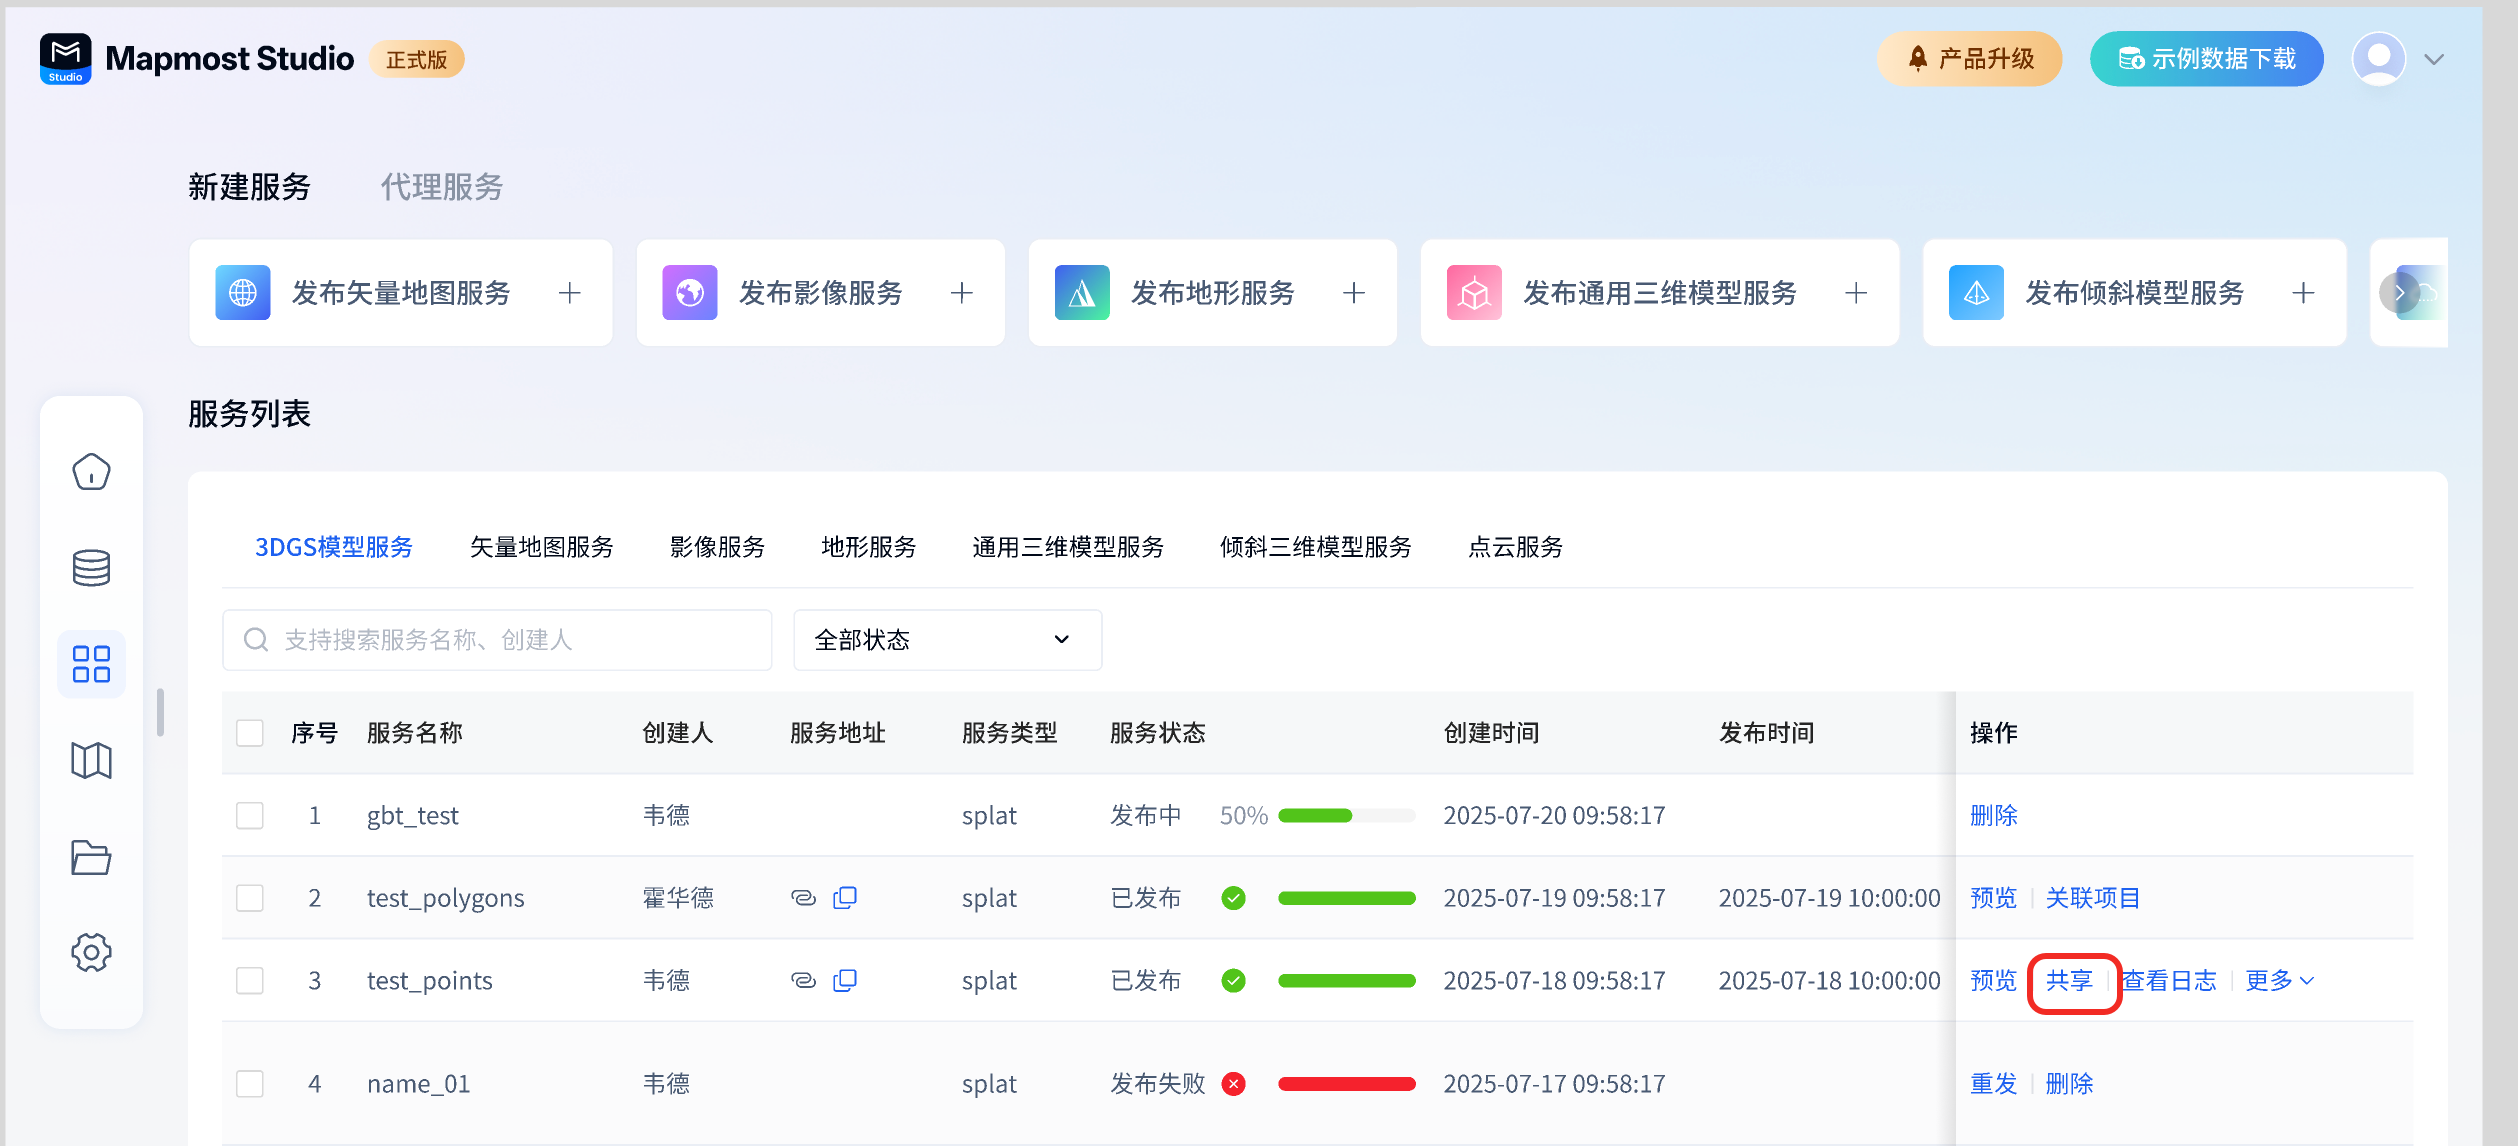
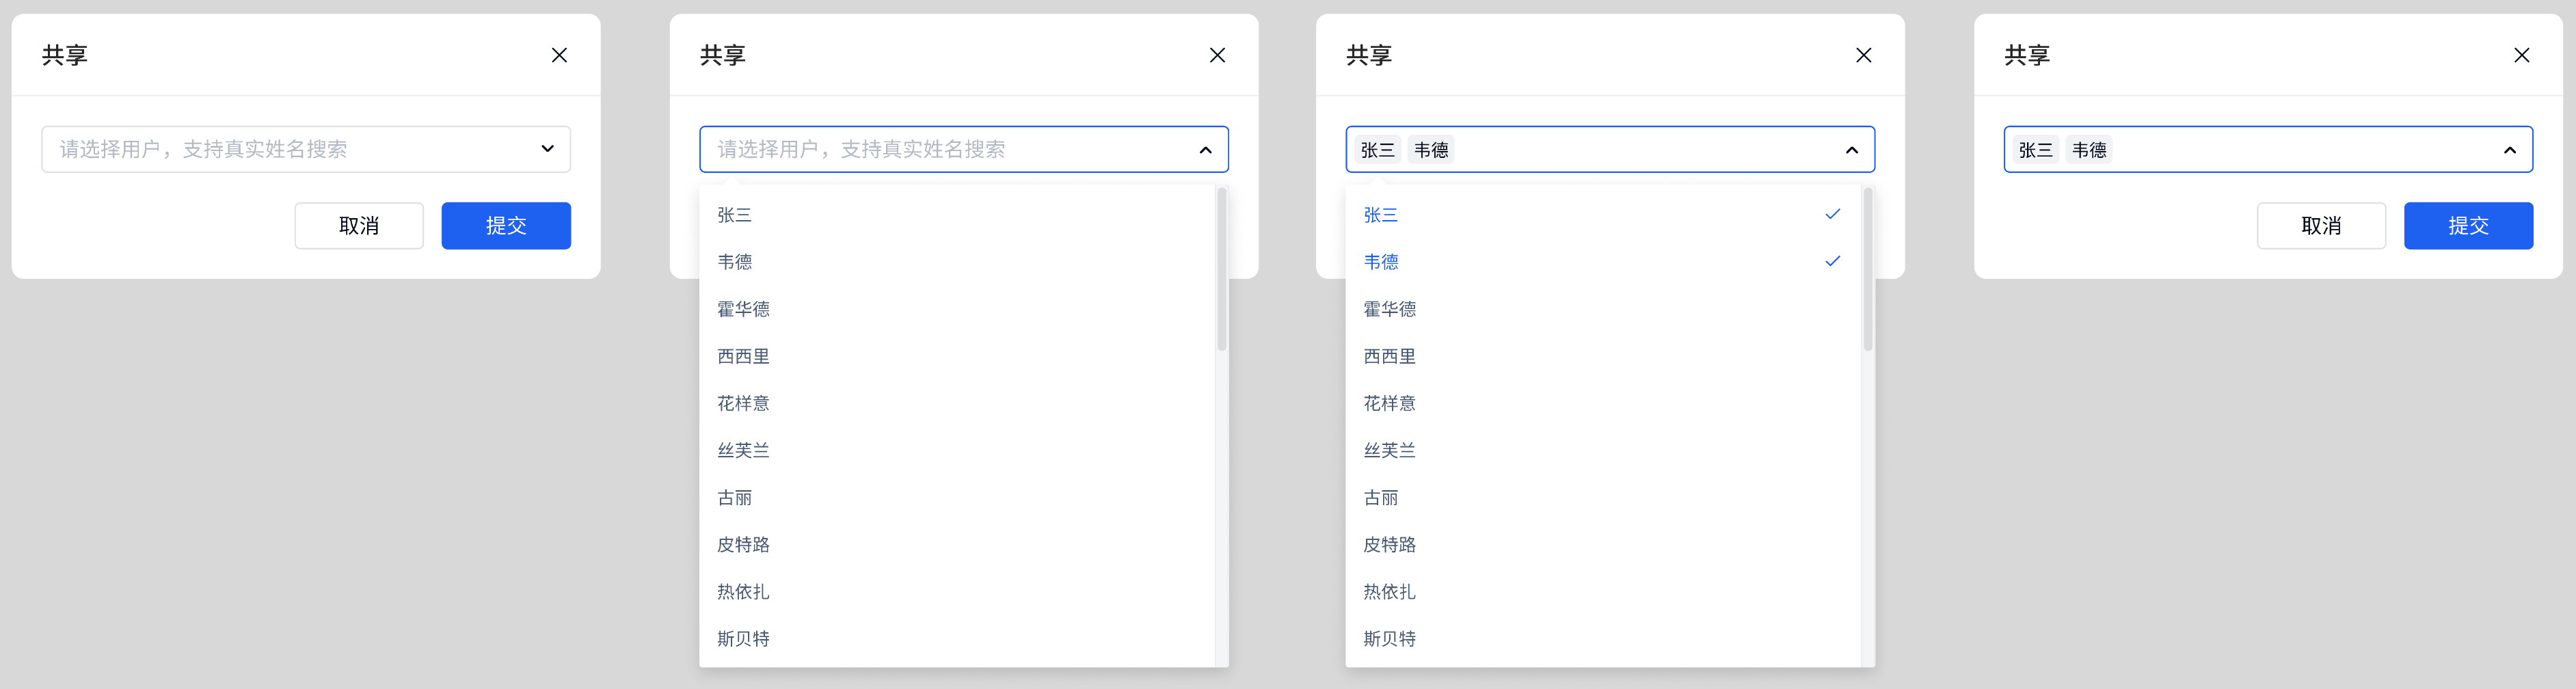
2.3.3. Sharing
Only services successfully published by myself support sharing. The operation path is: table operation-sharing.
Sharing supports sharing by typing or searching for members' real names. The names of members who have been shared will be displayed in the sharing pop-up window.
2.3.5. Related projects
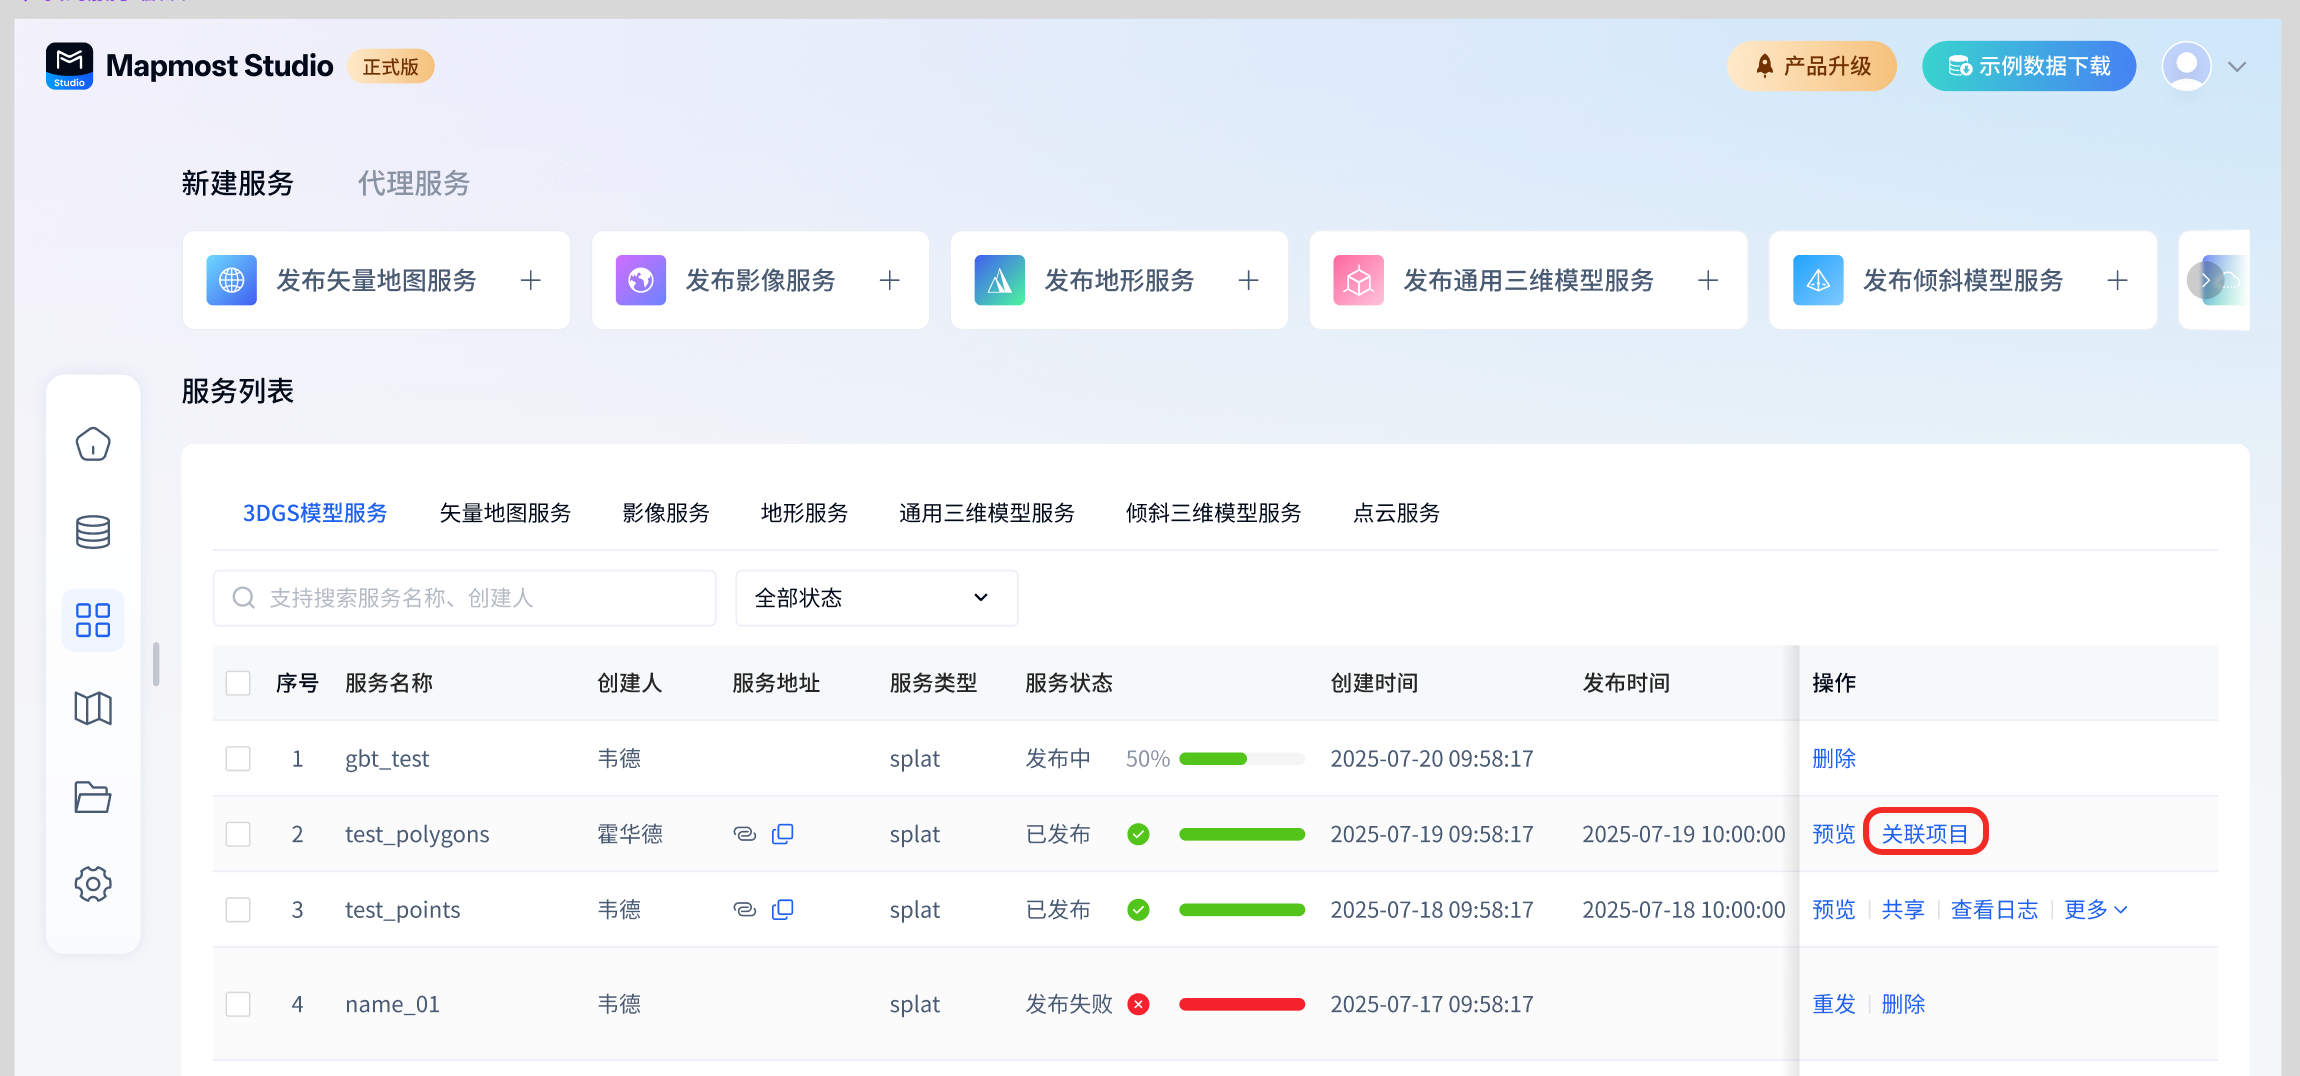
①Single associated project: table operation-associated project, supports single service association.
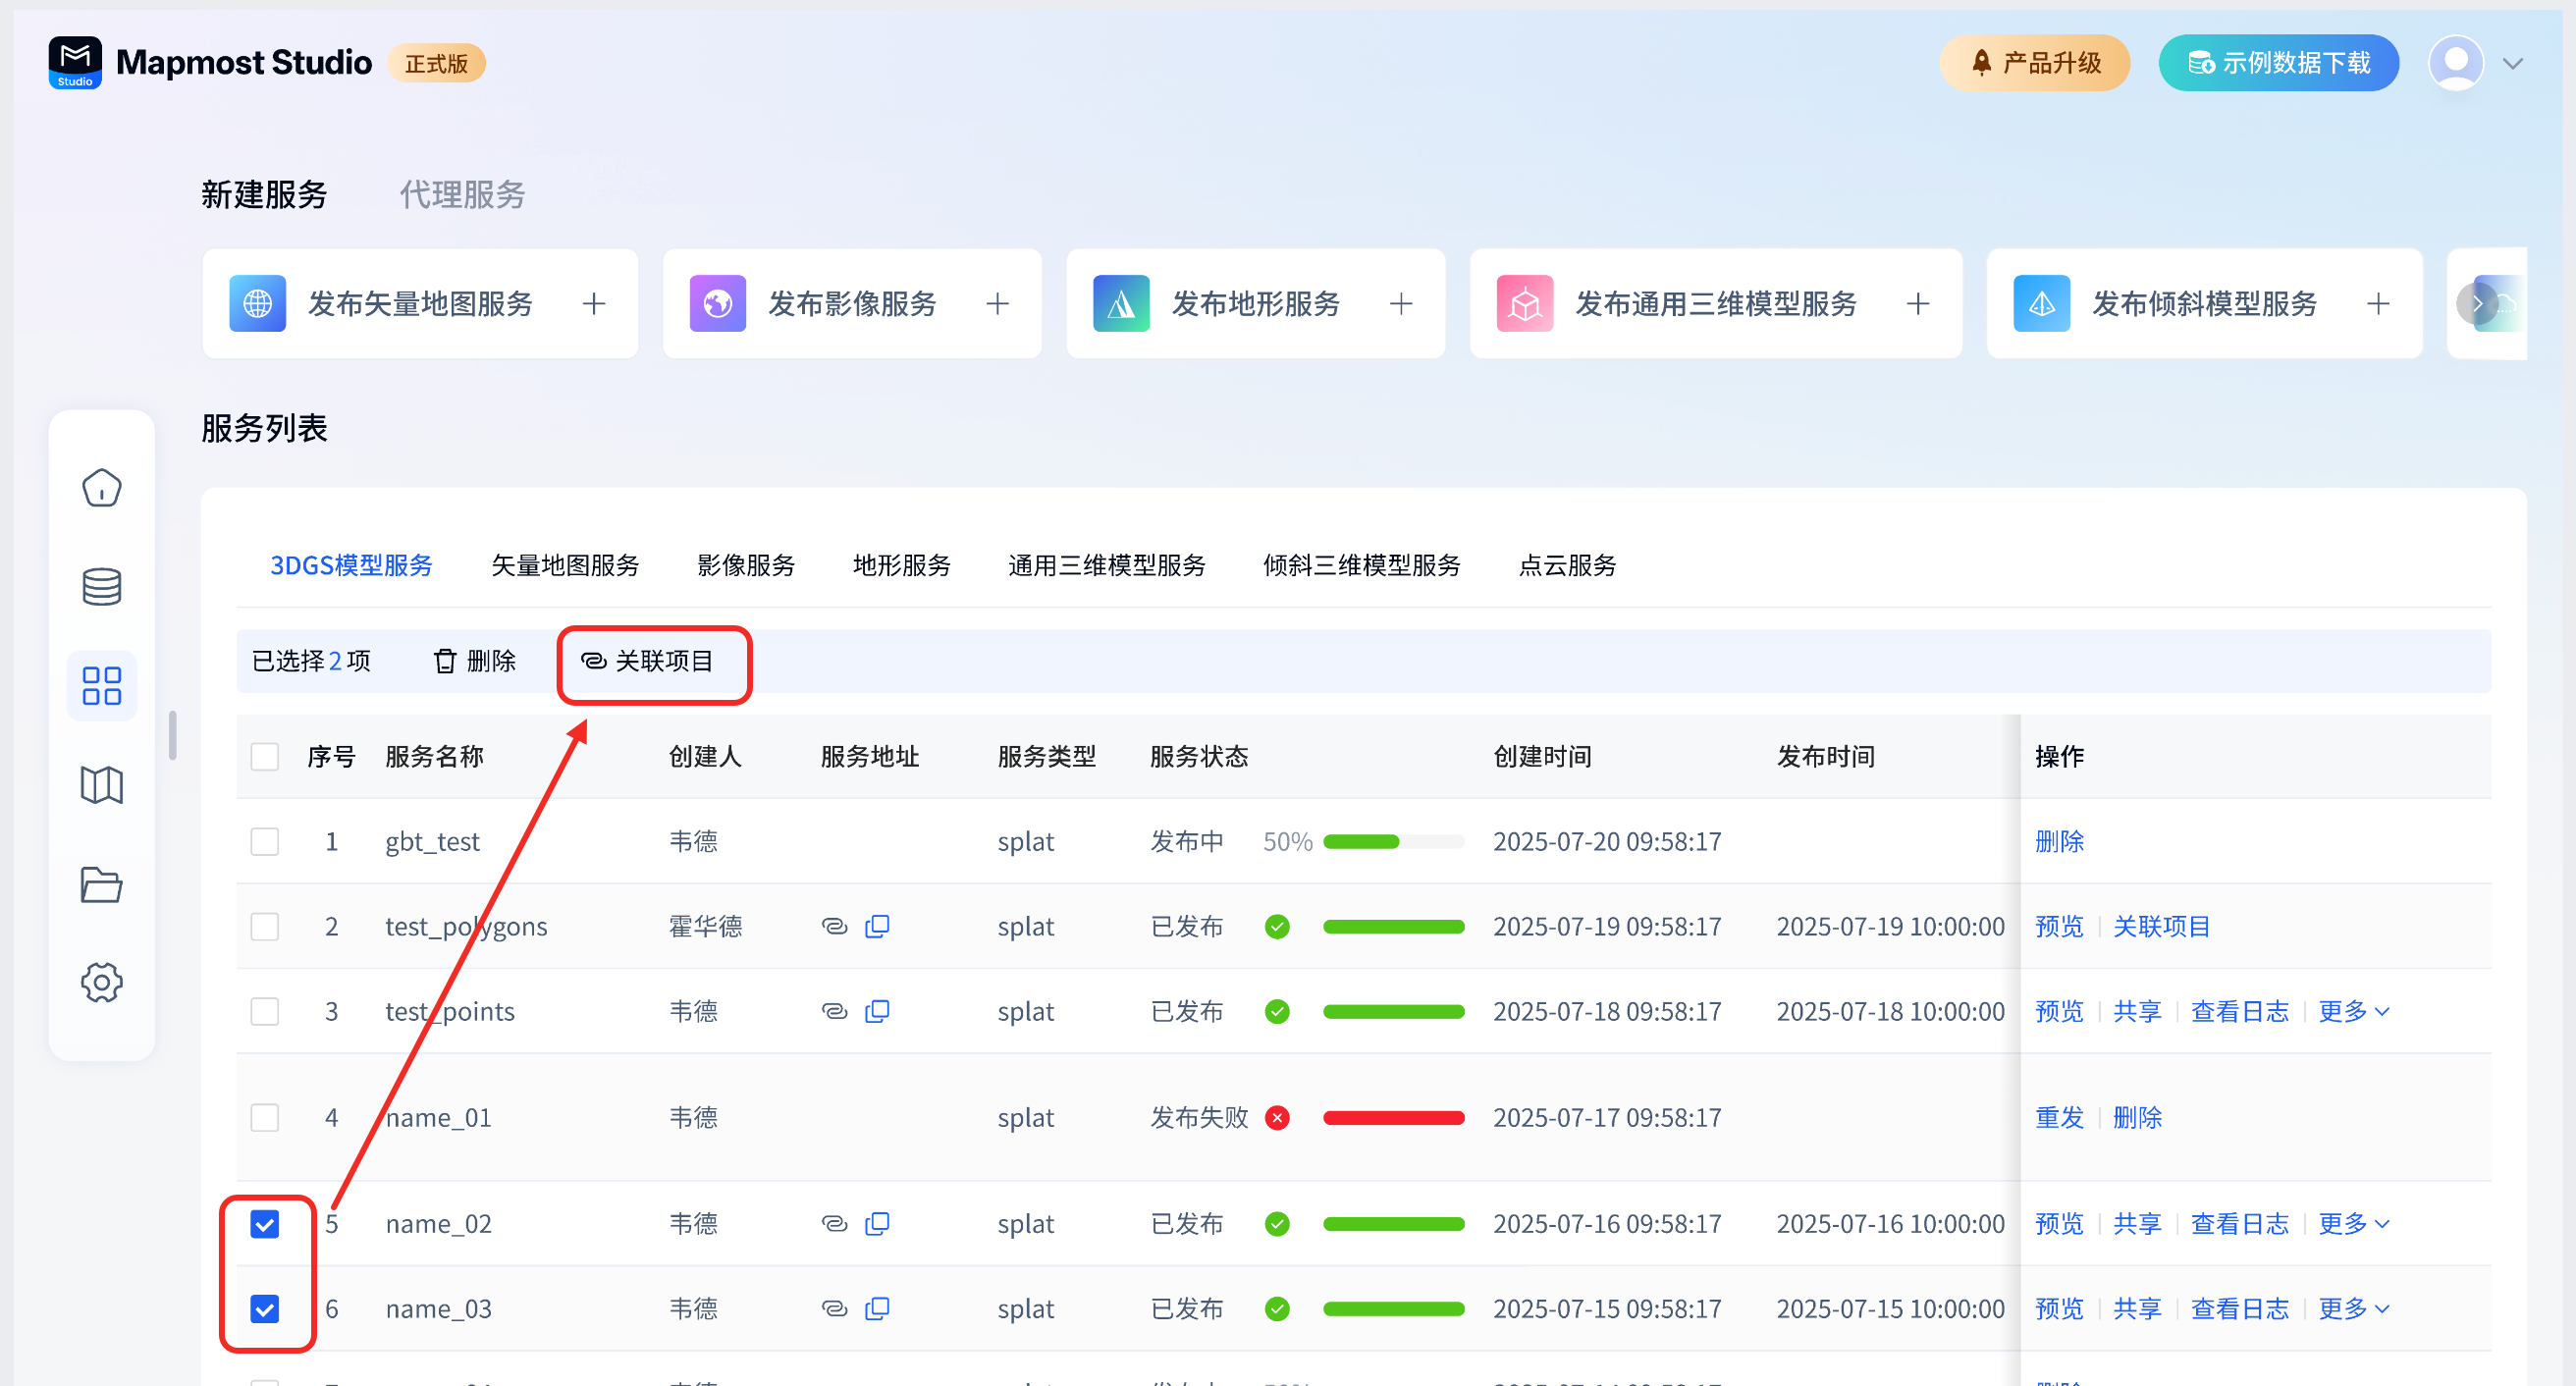
② Batch associated projects: Select multiple services to be associated with projects, and click the Associate Projects button in the multi-select operation box above the table.
2.3.6. Delete
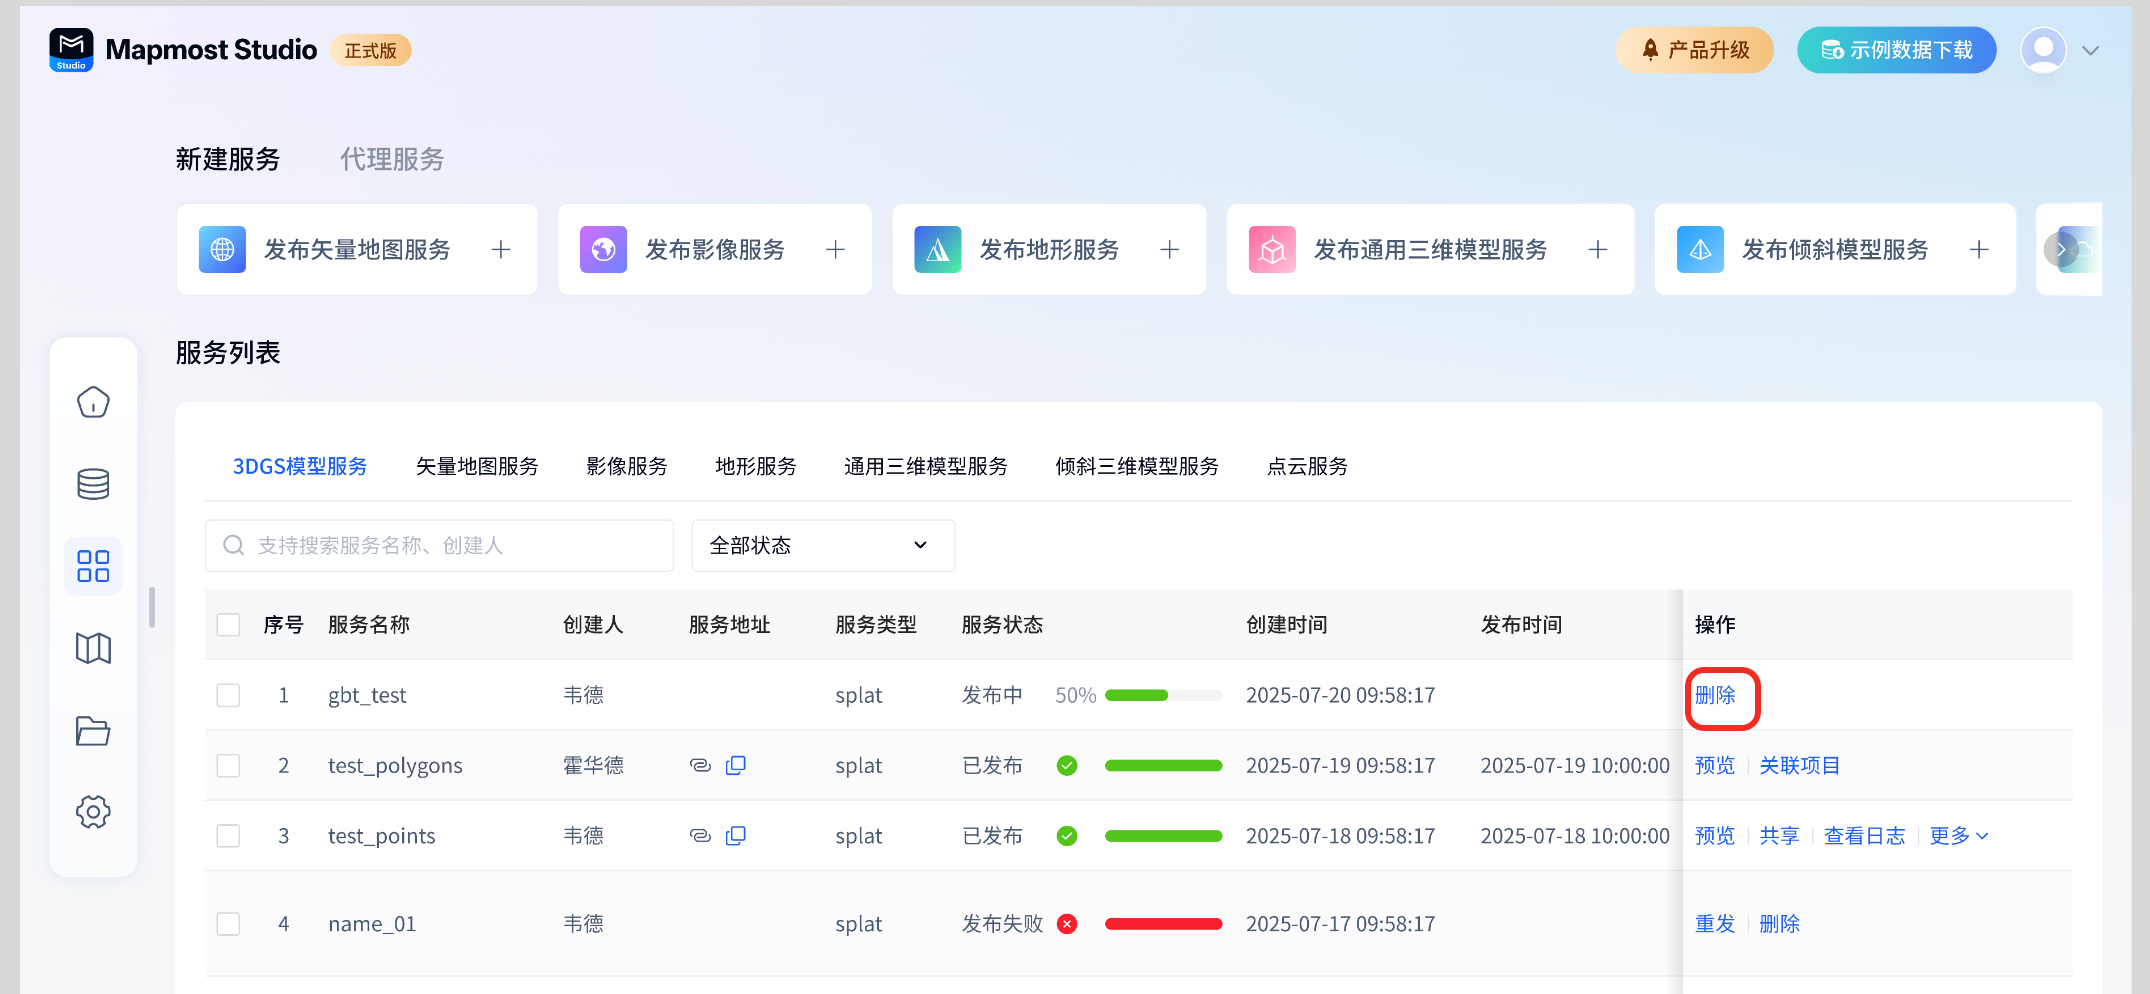
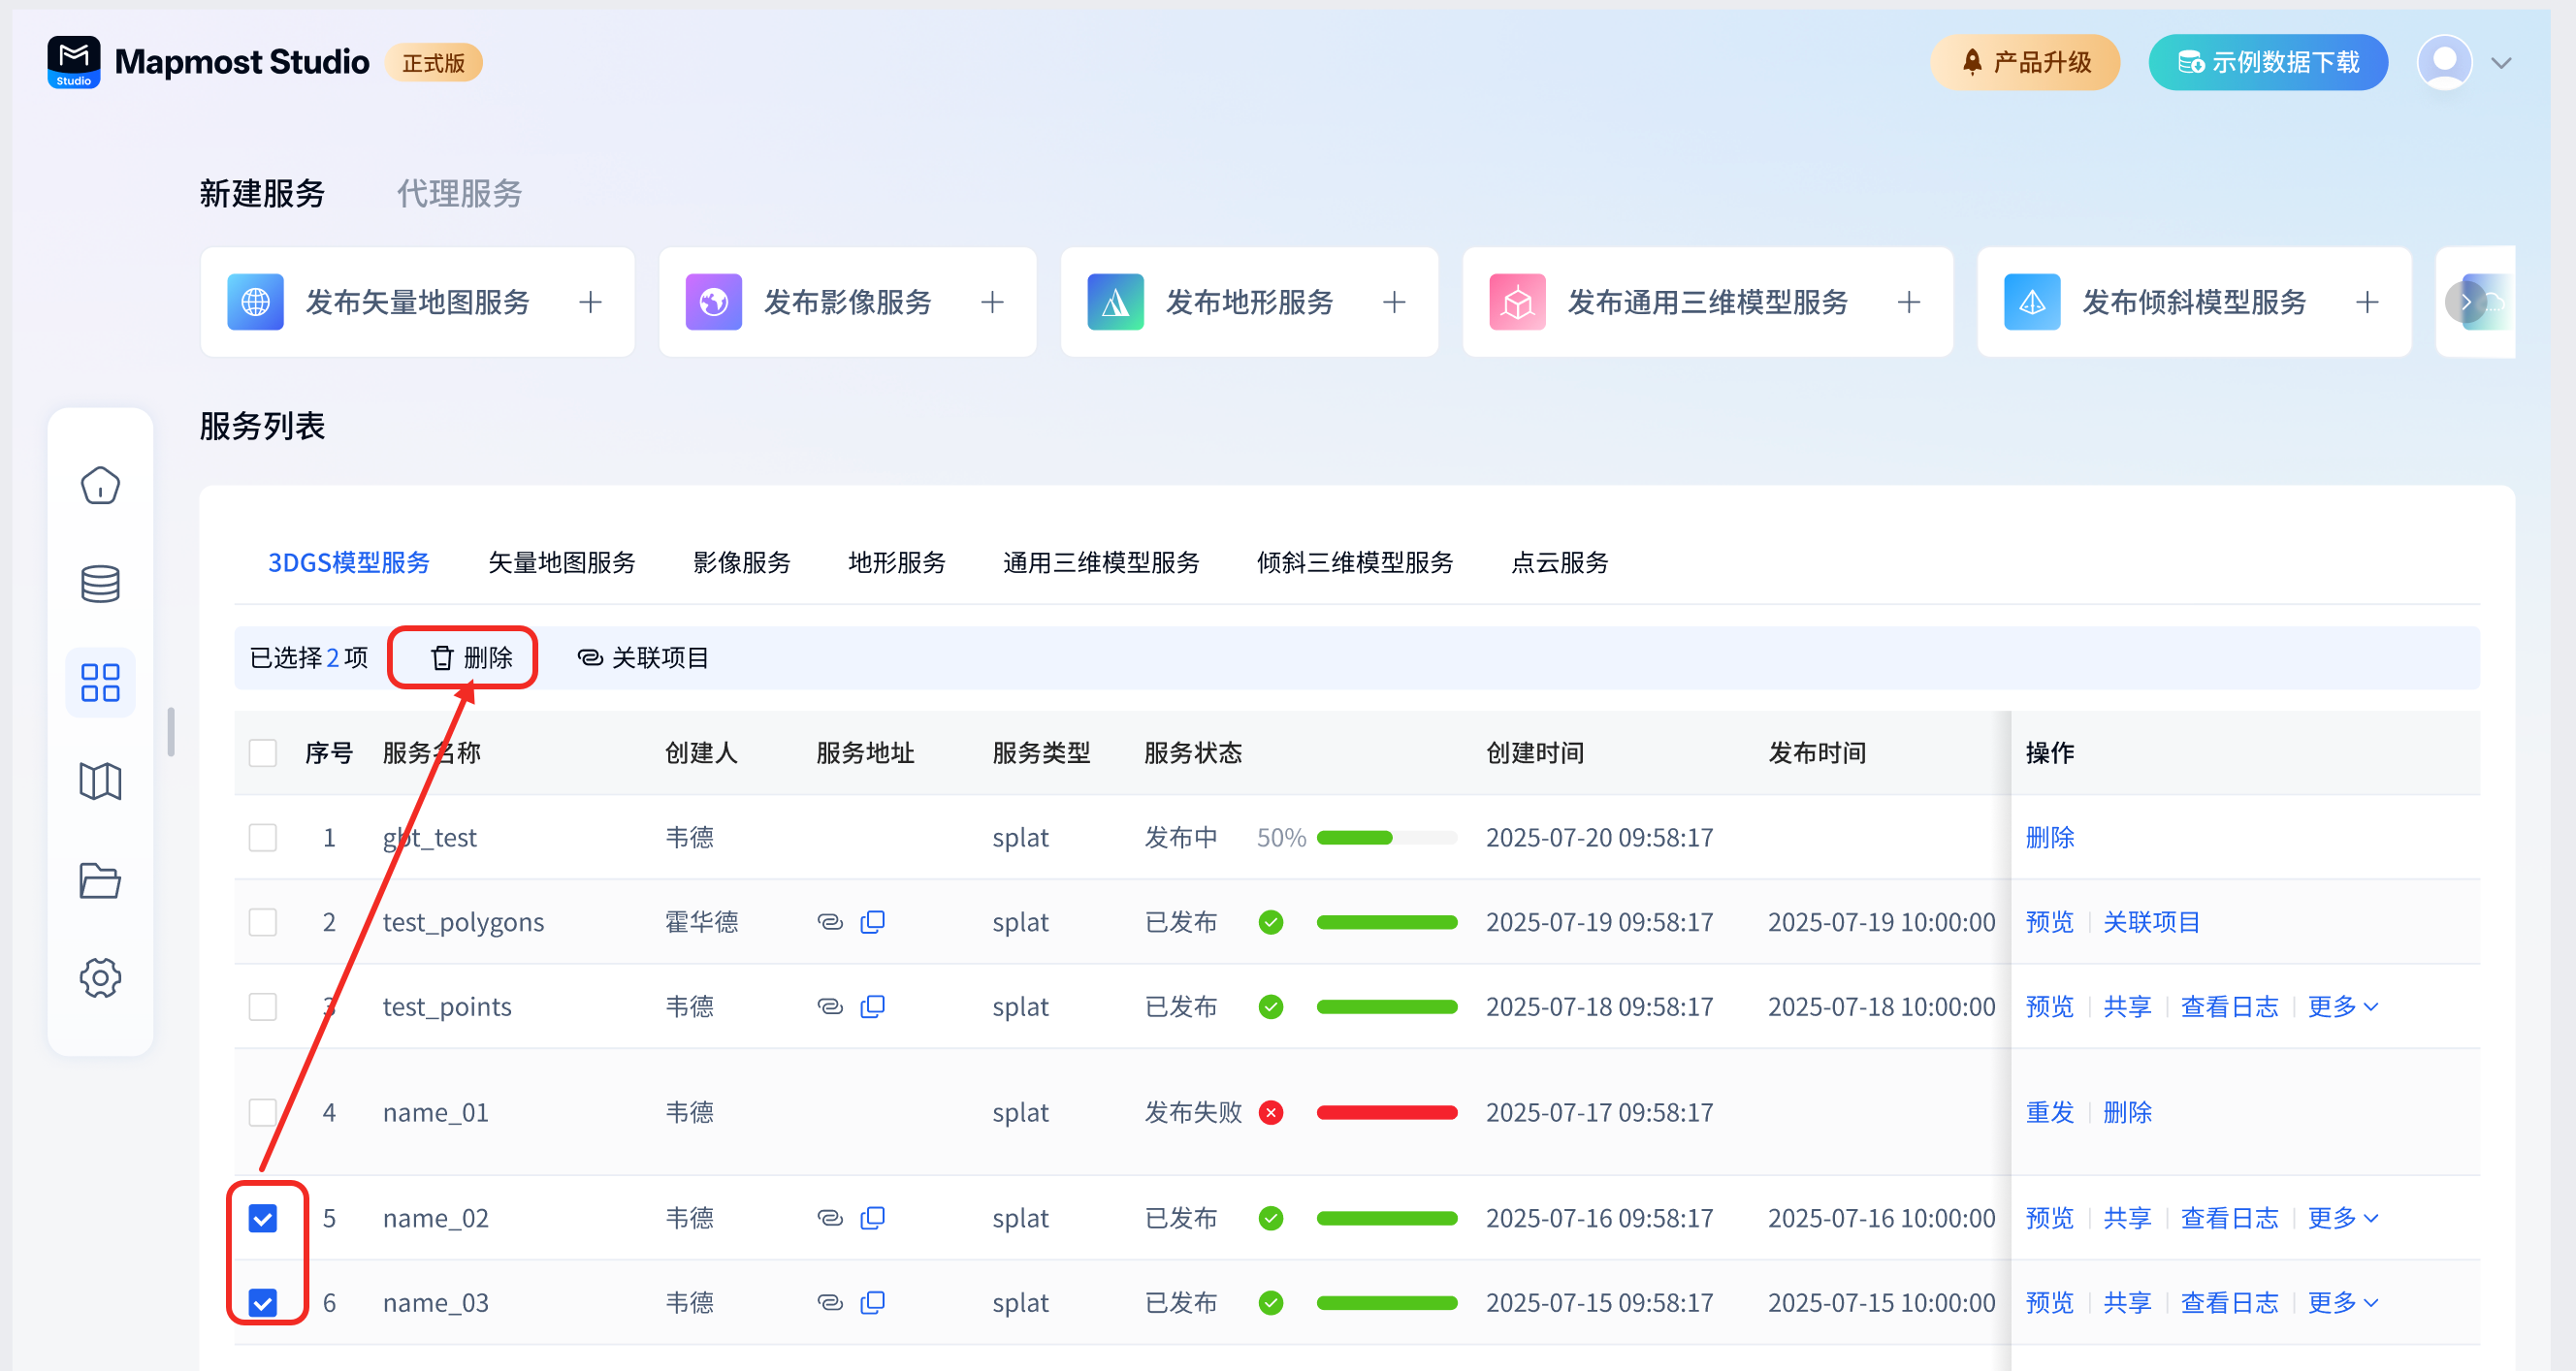
You can only delete services published by yourself, not services published by others.
①Single deletion: table operation-deletion, supports single service deletion.
② Batch deletion: Select multiple services to be deleted and click the delete button in the multi-select operation box above the table.
2.3.7. Filtering
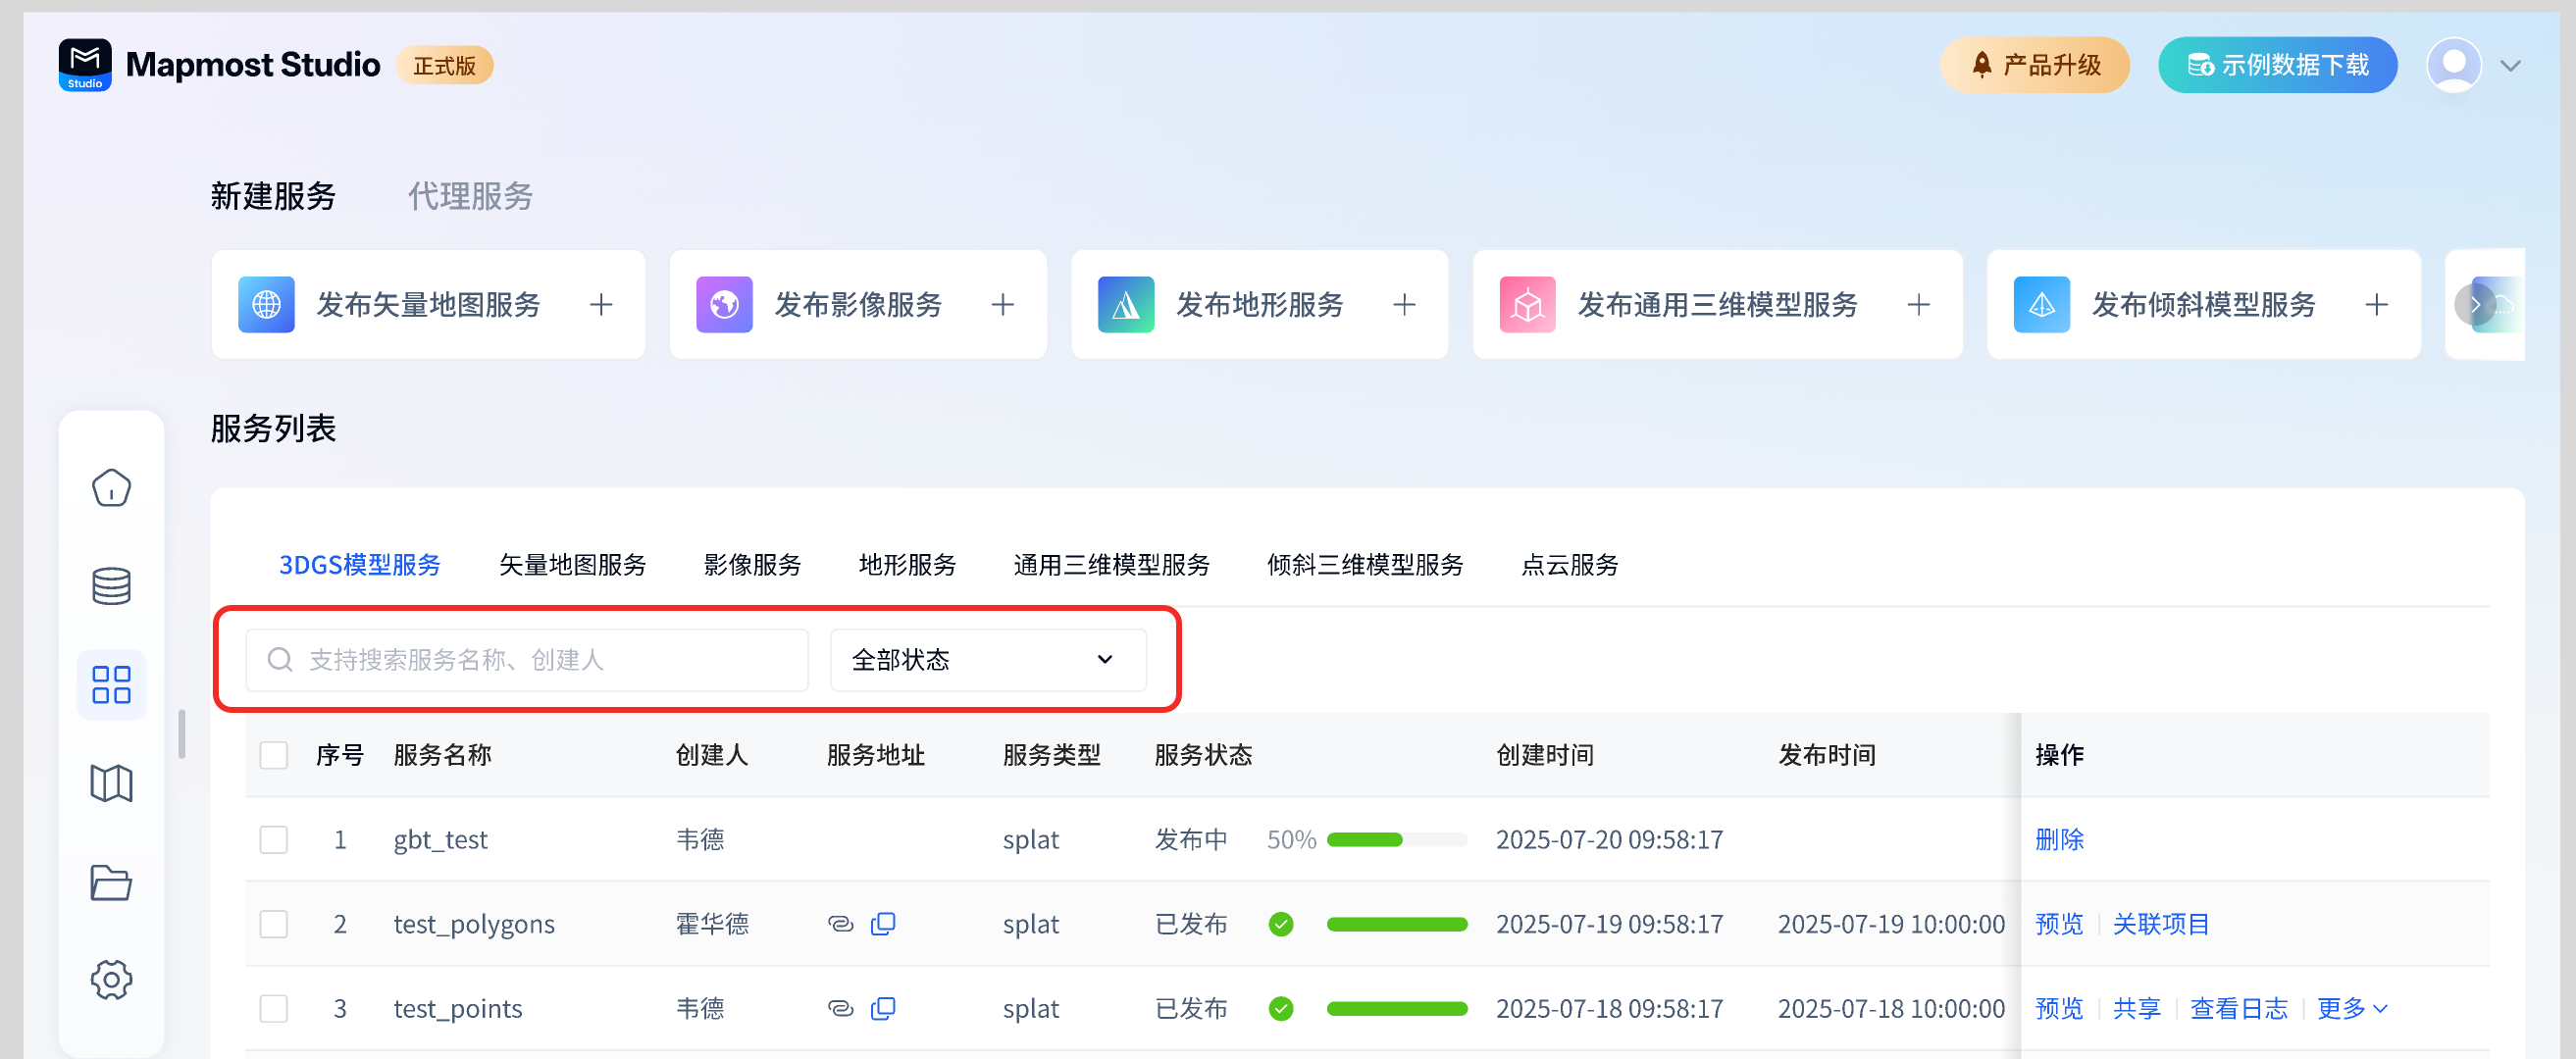
Service list supports filtering
①Support filtering services by keyword-service name, creator
②Support filtering services by service status
2.3.8. Copy service address
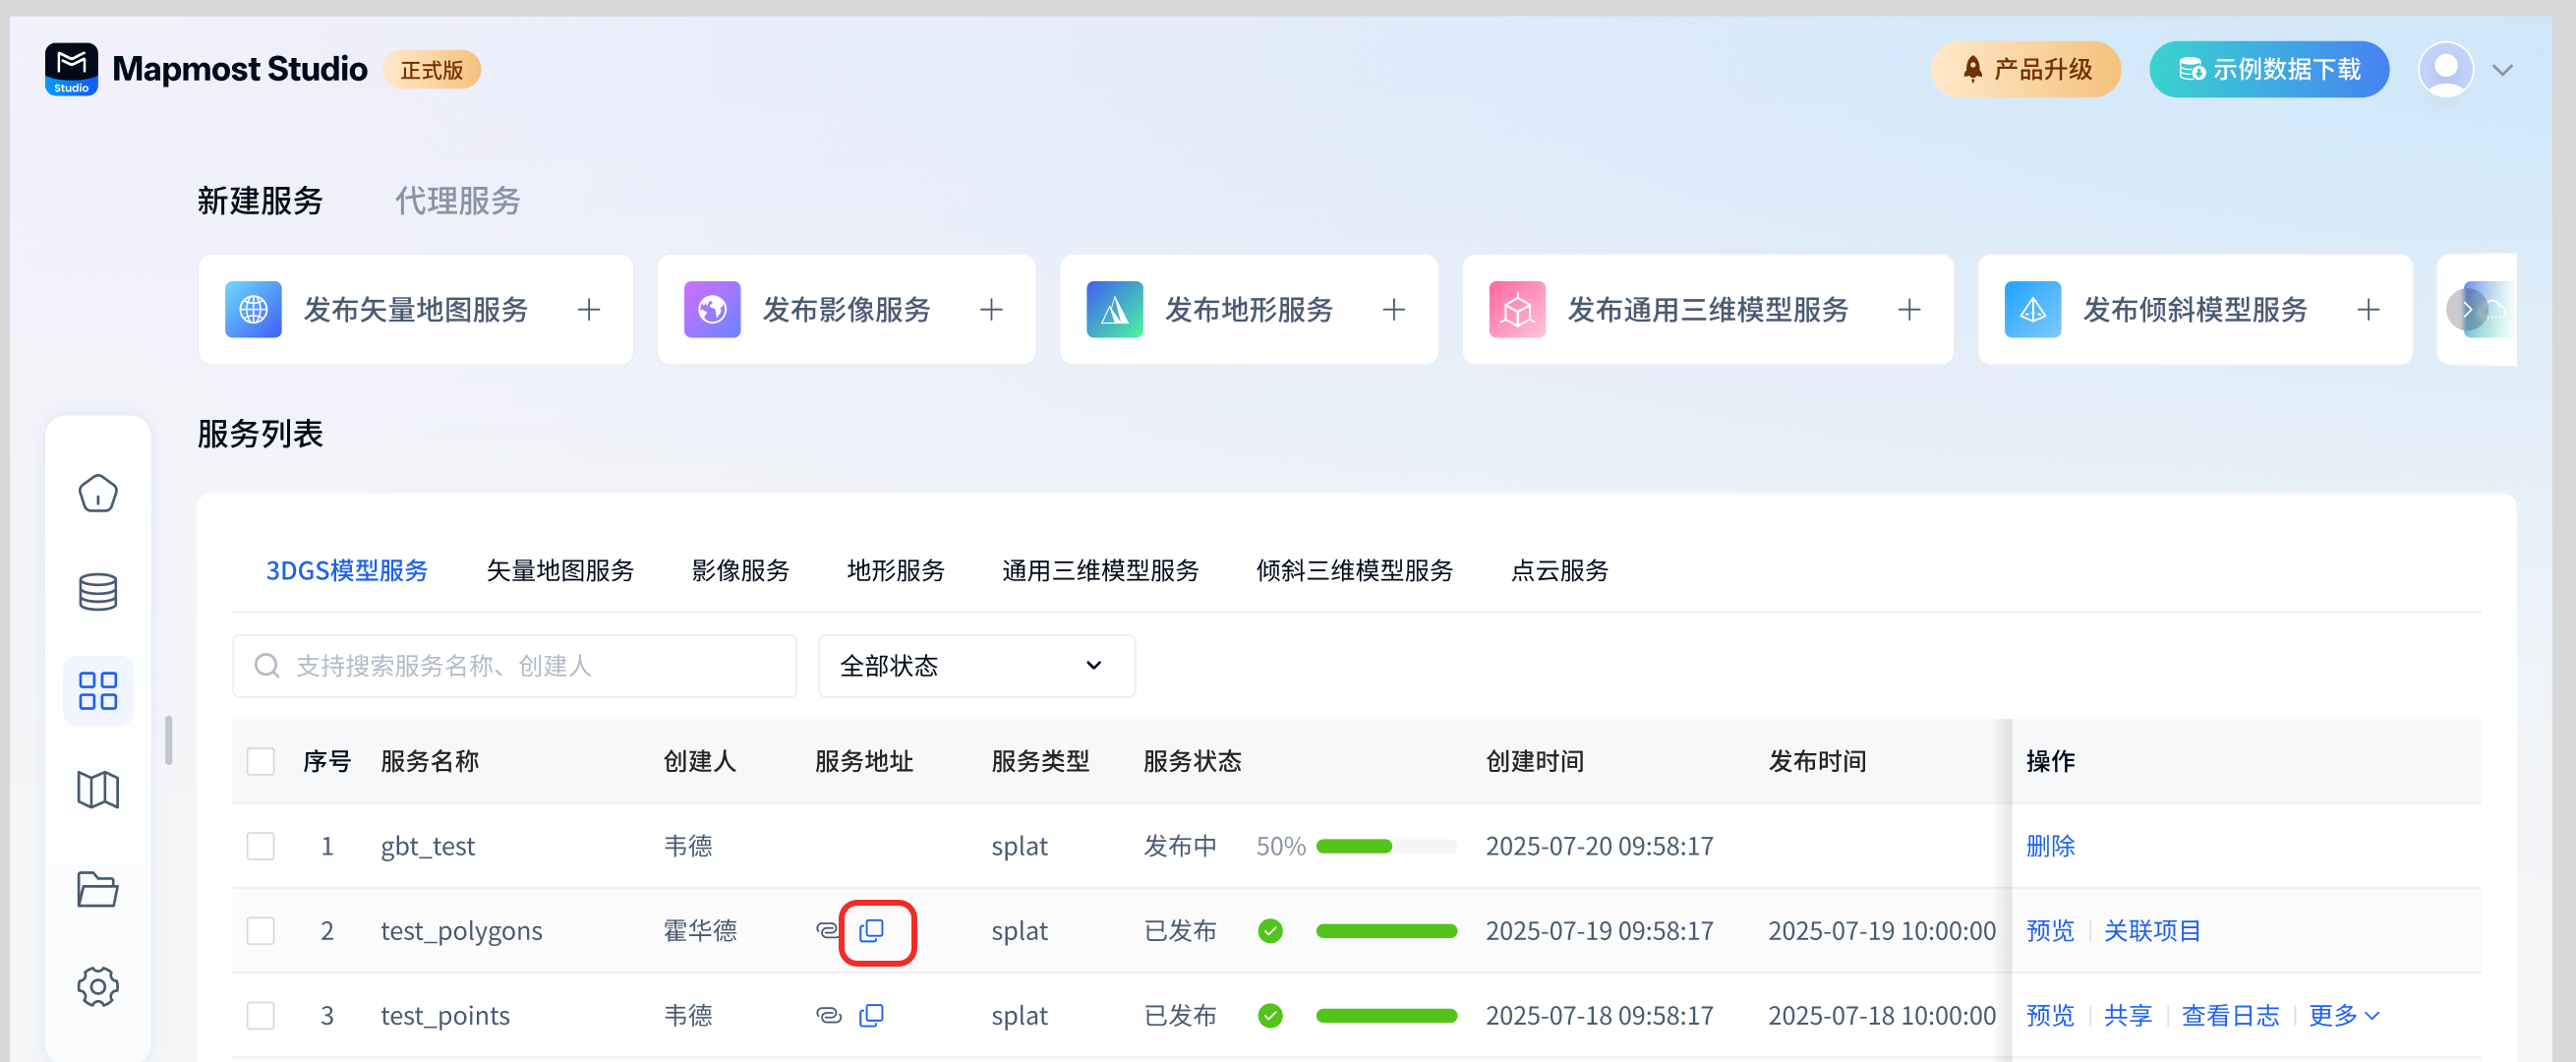
Successfully published services support copying. Click the copy button to copy the service address to the clipboard. The service address supports loading in Mapmost SDK for WebGL.
2.3.9. Center point coordinates
Successfully published services support obtaining center point coordinates and using supporting service addresses to facilitate accurate loading and positioning of models in Mapmost SDK for WebGL.

2.4. Project-based resource management
Supports management of service resources on a project basis. Turn on the editing status on the project details page and click the associated resource button to associate the successfully released 3DGS model service to the project. Other project members can preview and use the 3DGS model service results.