my services
My service module supports two types of service publishing, namely new service and agent service. The detailed service release types are shown in the table below. Click the blue words below to jump directly to the corresponding instructions.
1. vector map service
1.1. New
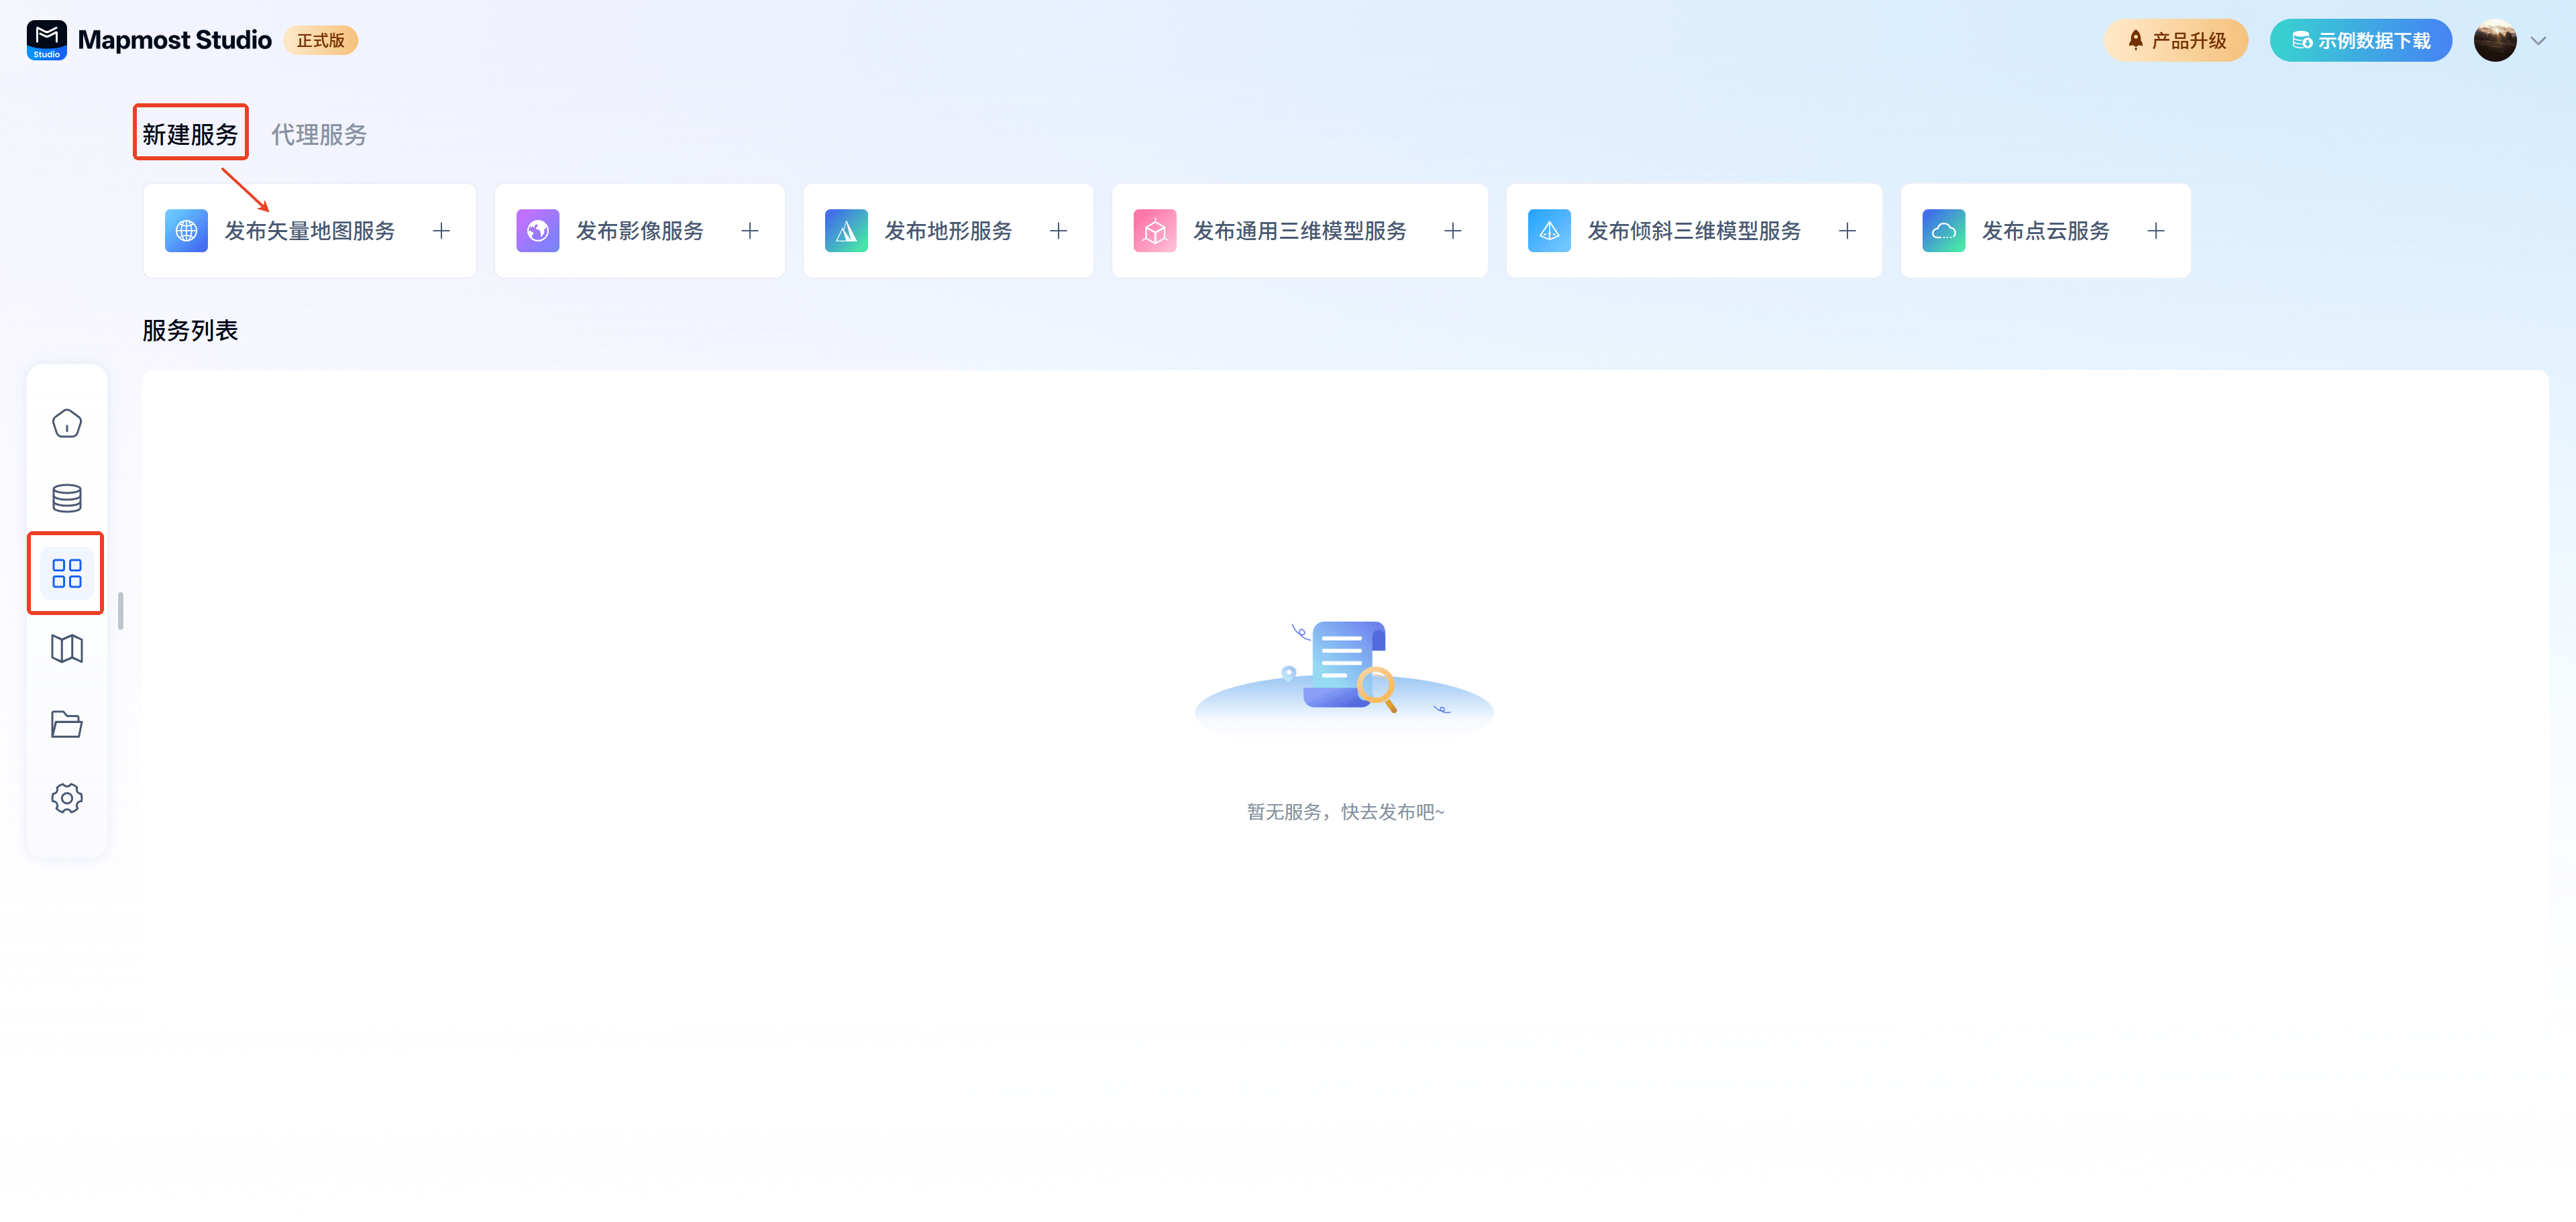
Open the "Mapmost Studio" software, switch to the "My Services" module in the left navigation bar, and under the "New Service Release" category, click "Publish Vector Map Service" to enter the corresponding service release page.
1.2. Release
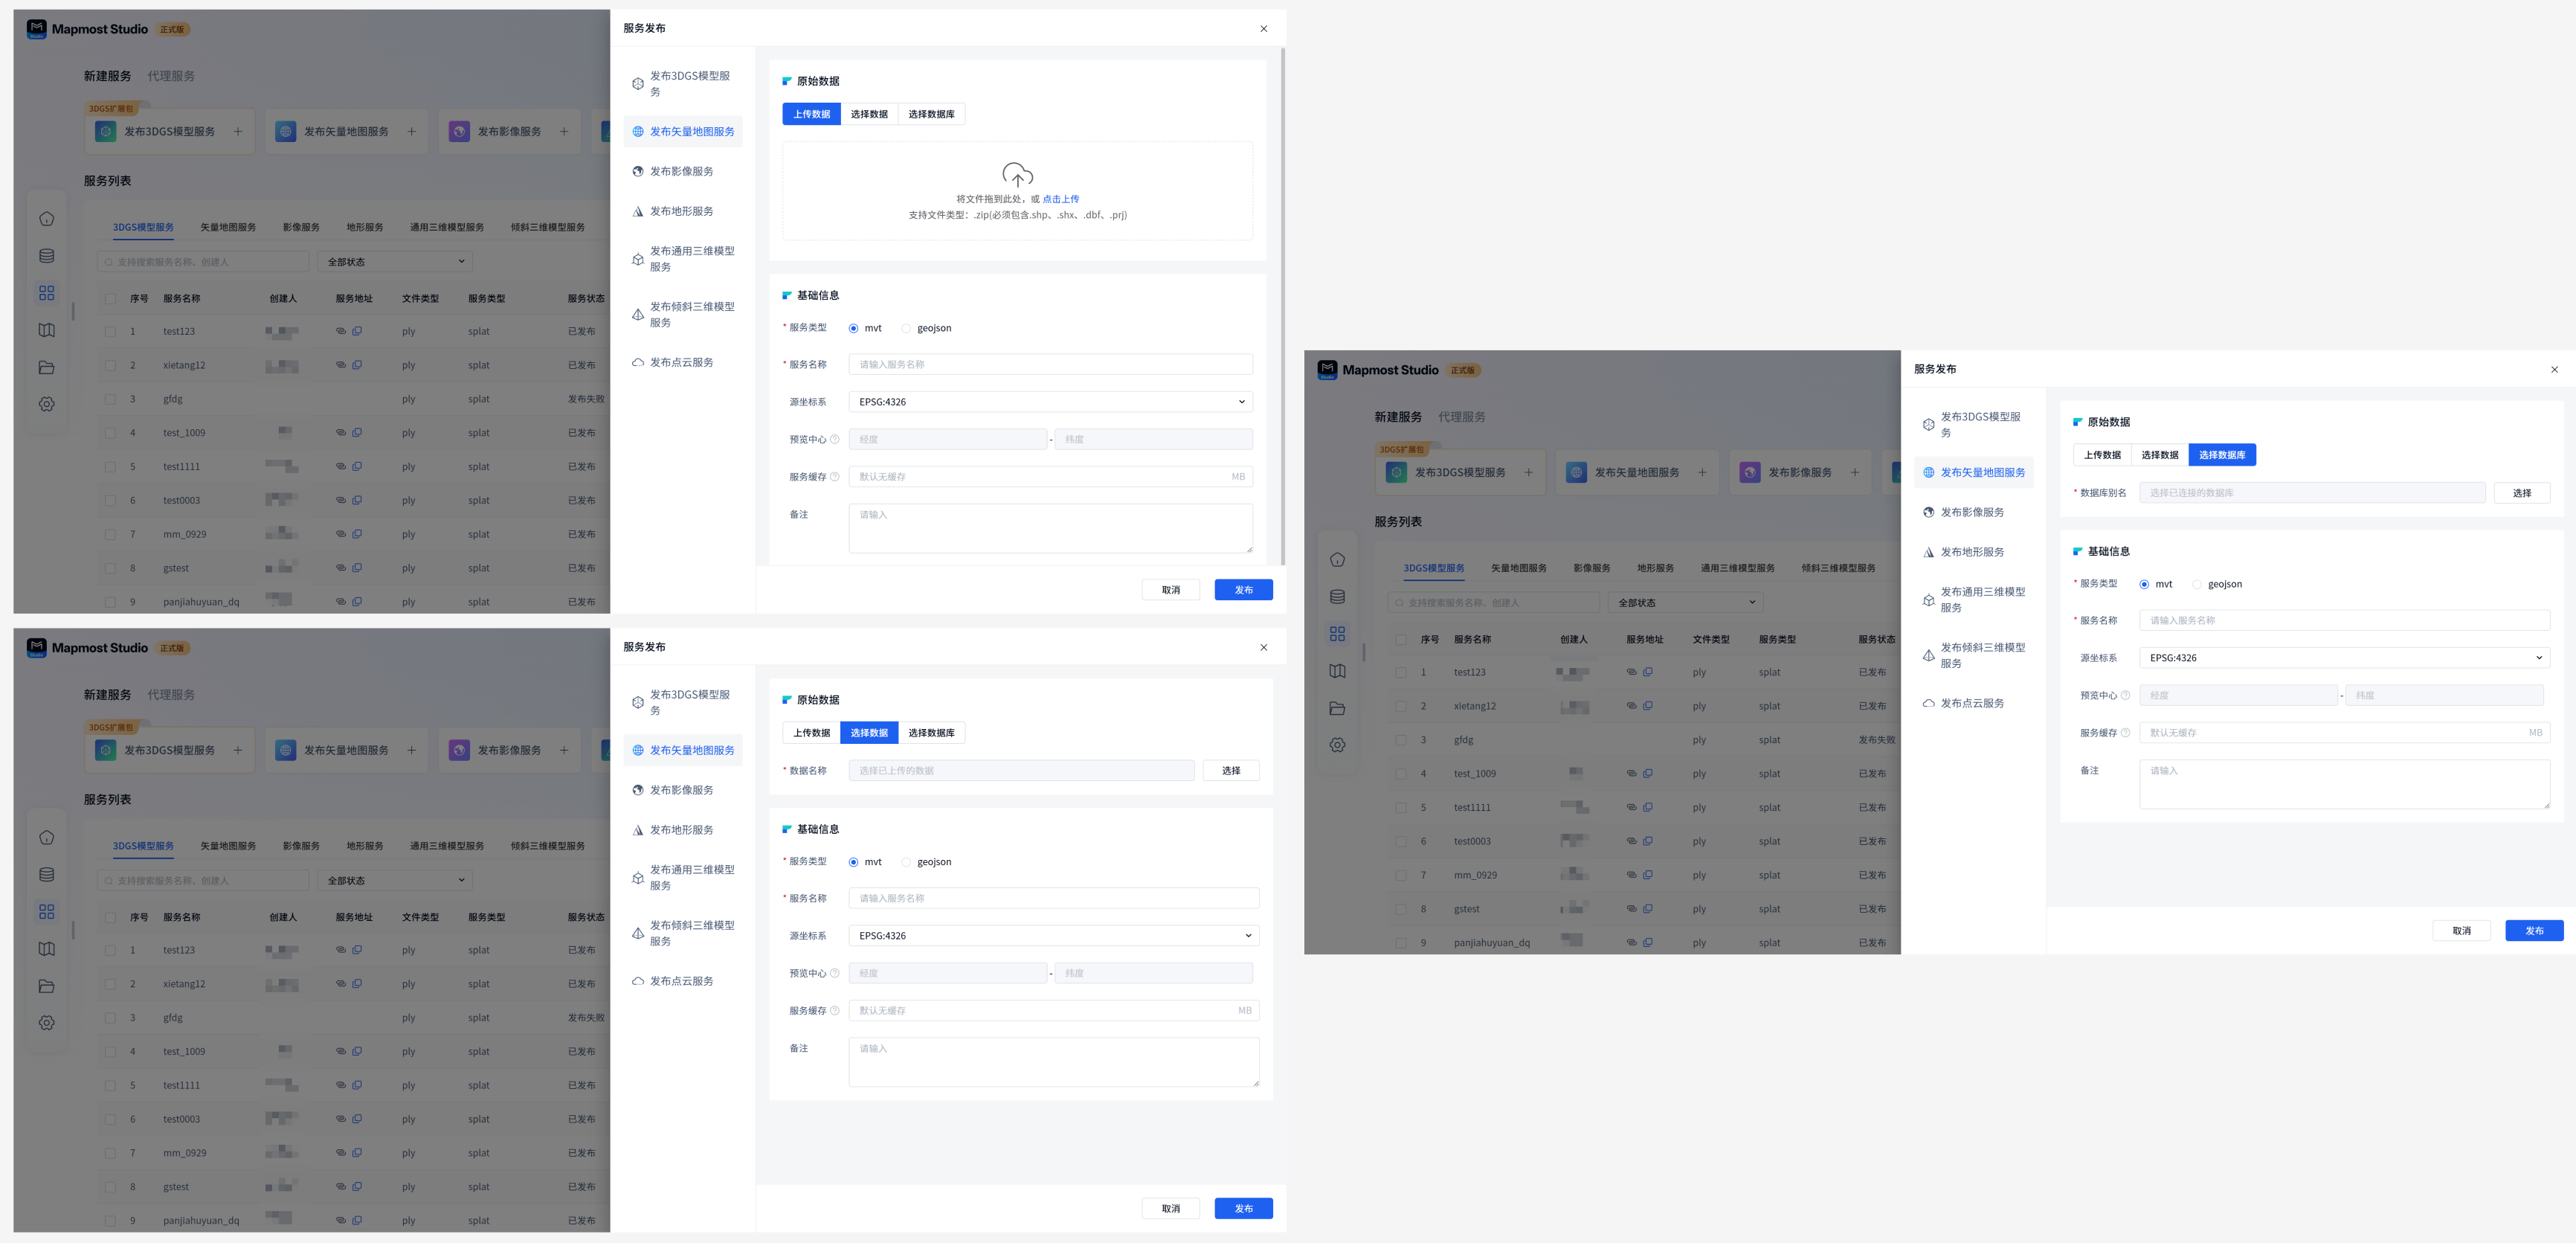
Original data addition: supports three data addition methods
① Directly upload local data. The uploaded data will be displayed in the upload list. It supports filling in notes, deleting and renaming; supports uploading multiple zip packages. When there are multiple shp data in the uploaded data, only mvt type services can be published; when there is only one shp data in the uploaded data, mvt type and geojson type services can be published.

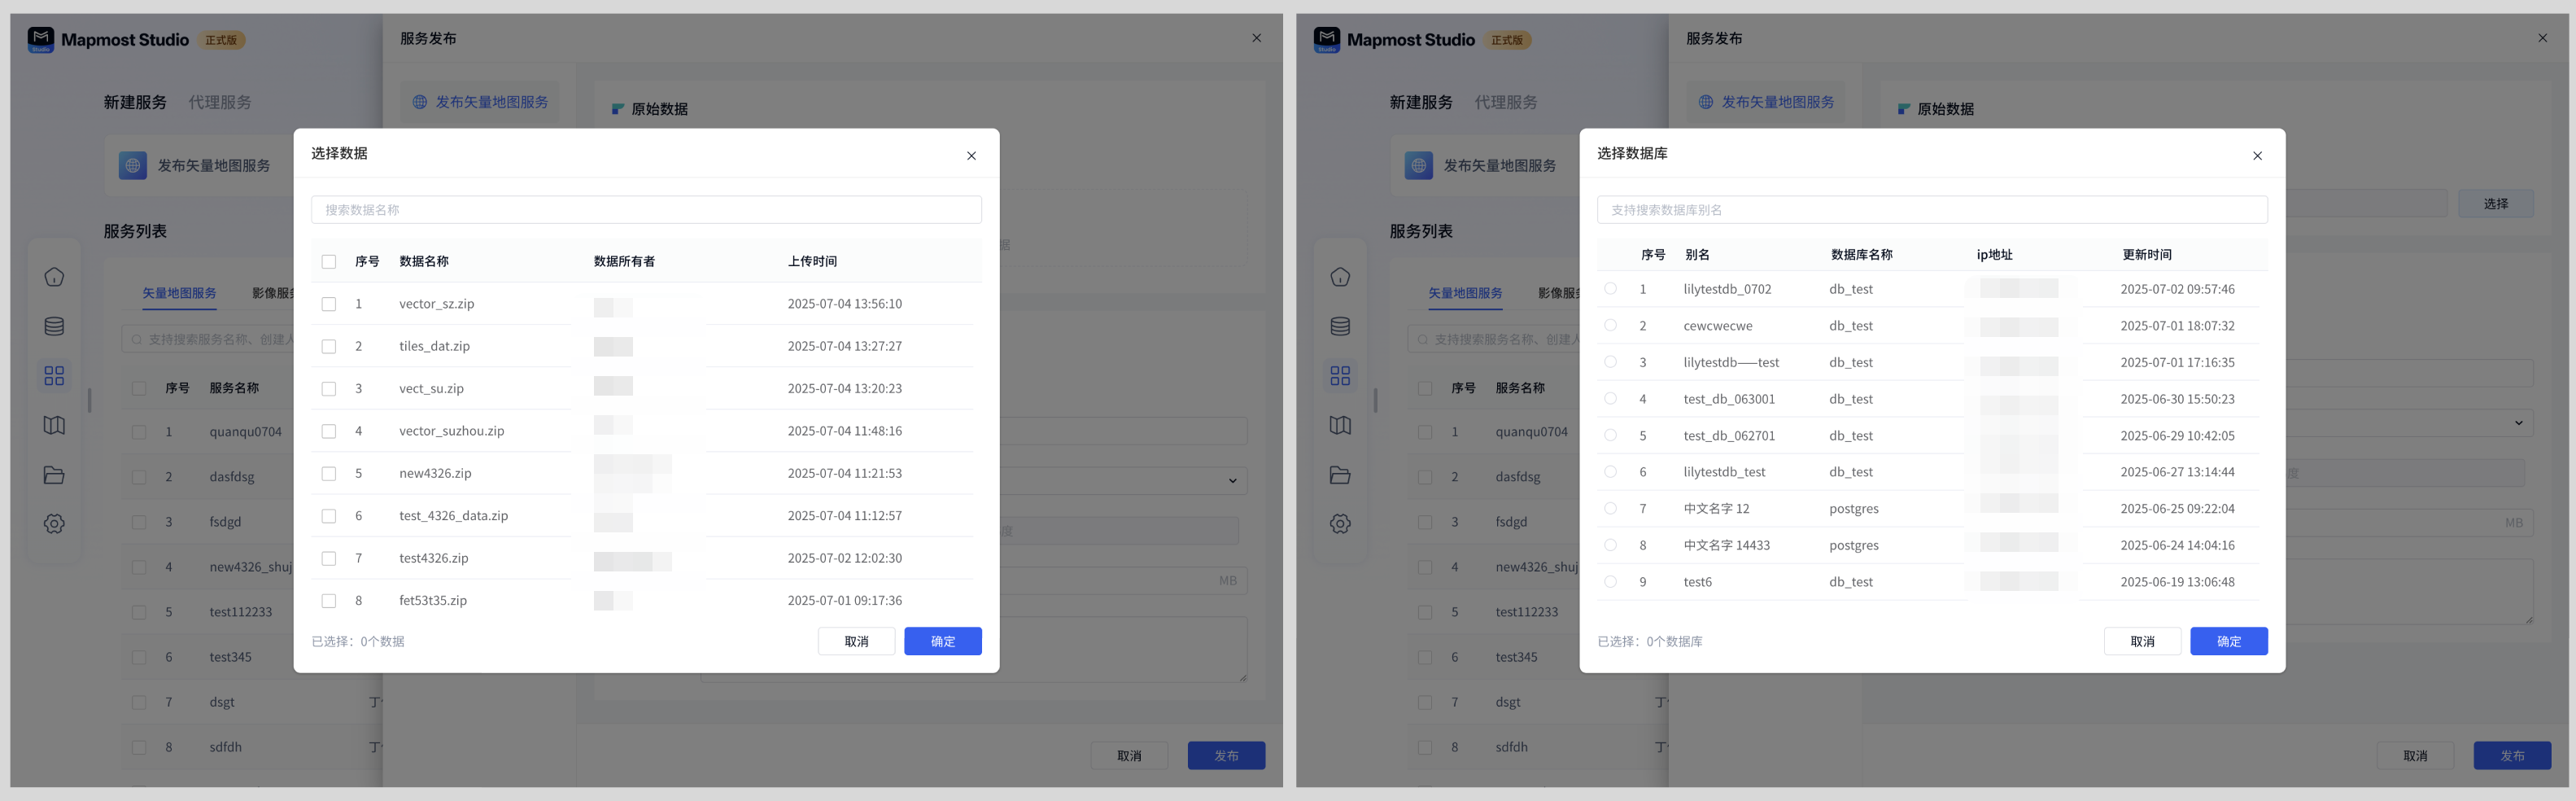
②Select the uploaded data from My Data. When selecting data, it supports selecting multiple or single data at one time. When there are multiple shp data in the selected data, only mvt type services can be published; when there is only one shp data in the selected data, mvt type and geojson type services can be published.
③Select the connected database from Database. When selecting a database, you can only select a single database. You can select mvt type or geojson type services as needed.
Basic information:
| Field | illustrate |
|---|---|
| Service type | Required, the two service types are mvt and geojson respectively. Among them, if you publish the mvt vector map service, you need to regenerate the slices after the data is updated, and the service content will not automatically change with the changes in the original data; if you publish the geojson dynamic data service, it will directly respond to the real-time query results, and the service content will be automatically updated as the underlying data changes. |
| Service name | Required, the name must start with a lowercase letter, be 4-32 characters in length, and consist of letters, numbers, and underscores. |
| Source coordinate system | Optional, supported source coordinate systems include EPSG:4326, EPSG:3857, EPSG:4528, EPSG:4490, EPSG:4549, Suzhou 2000 |
| preview center | Optional, the latitude and longitude are automatically calculated based on the selected spatial field and table name. |
| Service cache | Optional, can only be set under mvt type. Setting the service cache for data that changes infrequently can improve service loading performance. It is recommended to start with a value of 256MB and the maximum value should not exceed 1024MB. |
| cache type | Optional, only displayed under mvt type, you can select memory or disk. Among them, the memory cache supports extremely fast response but fails to restart, which is suitable for high-frequency access and small data volume scenarios; the disk cache supports persistent storage but is slightly slower, and is suitable for large-capacity or long-term stable data services. |
| Remark | It is not required and can be filled in according to the actual situation. |
Layer information:
| Field | illustrate |
|---|---|
| table name | Required, automatically populated when raw data comes from My Data, select from dropdown box or search table when coming from Database. |
| Layer name | Required, only mvt type is displayed, the default is the same as the table name; length 4-32, letters/numbers/underscores, starting with a lowercase letter. |
| spatial field | Required, automatically read the table space field, display geom, click to select; no space field cannot be published, please replace the table. |
| Space ID | Required, just select the id field generated by importing the pg library. |
| Hierarchy scope | Required, set the minimum/maximum level of vector data slicing. Only slice within this range to improve slicing and loading performance. Default is 0-24. |
| attribute field | Optional, check the attribute fields required for mapping, support single selection/multiple selection/select all/no selection. |
| Add new layer | It is not required. Only the database source + mvt type supports adding new layers. A map service can add up to 25 layers. |
Publish Drawer Action:
| Field | illustrate |
|---|---|
| Cancel | Click Cancel to exit the current service publishing process, and the entered content will not be saved. |
| release | Click Publish, the current content is saved and published into the corresponding service, and the progress can be viewed in the service list. |
1.3 Cartography
Supports mapping directly from the service list. Add the layer data of the vector map service to the mapping platform with one click. Then you can perform mapping operations such as visual style configuration, text and icon configuration on the layer on the mapping platform.
①Select a single vector map service for mapping
Click the mapping operation button in the service list, select the layer required for mapping in the pop-up "Layer Selection" pop-up window, and click OK to add the data directly to the mapping platform.
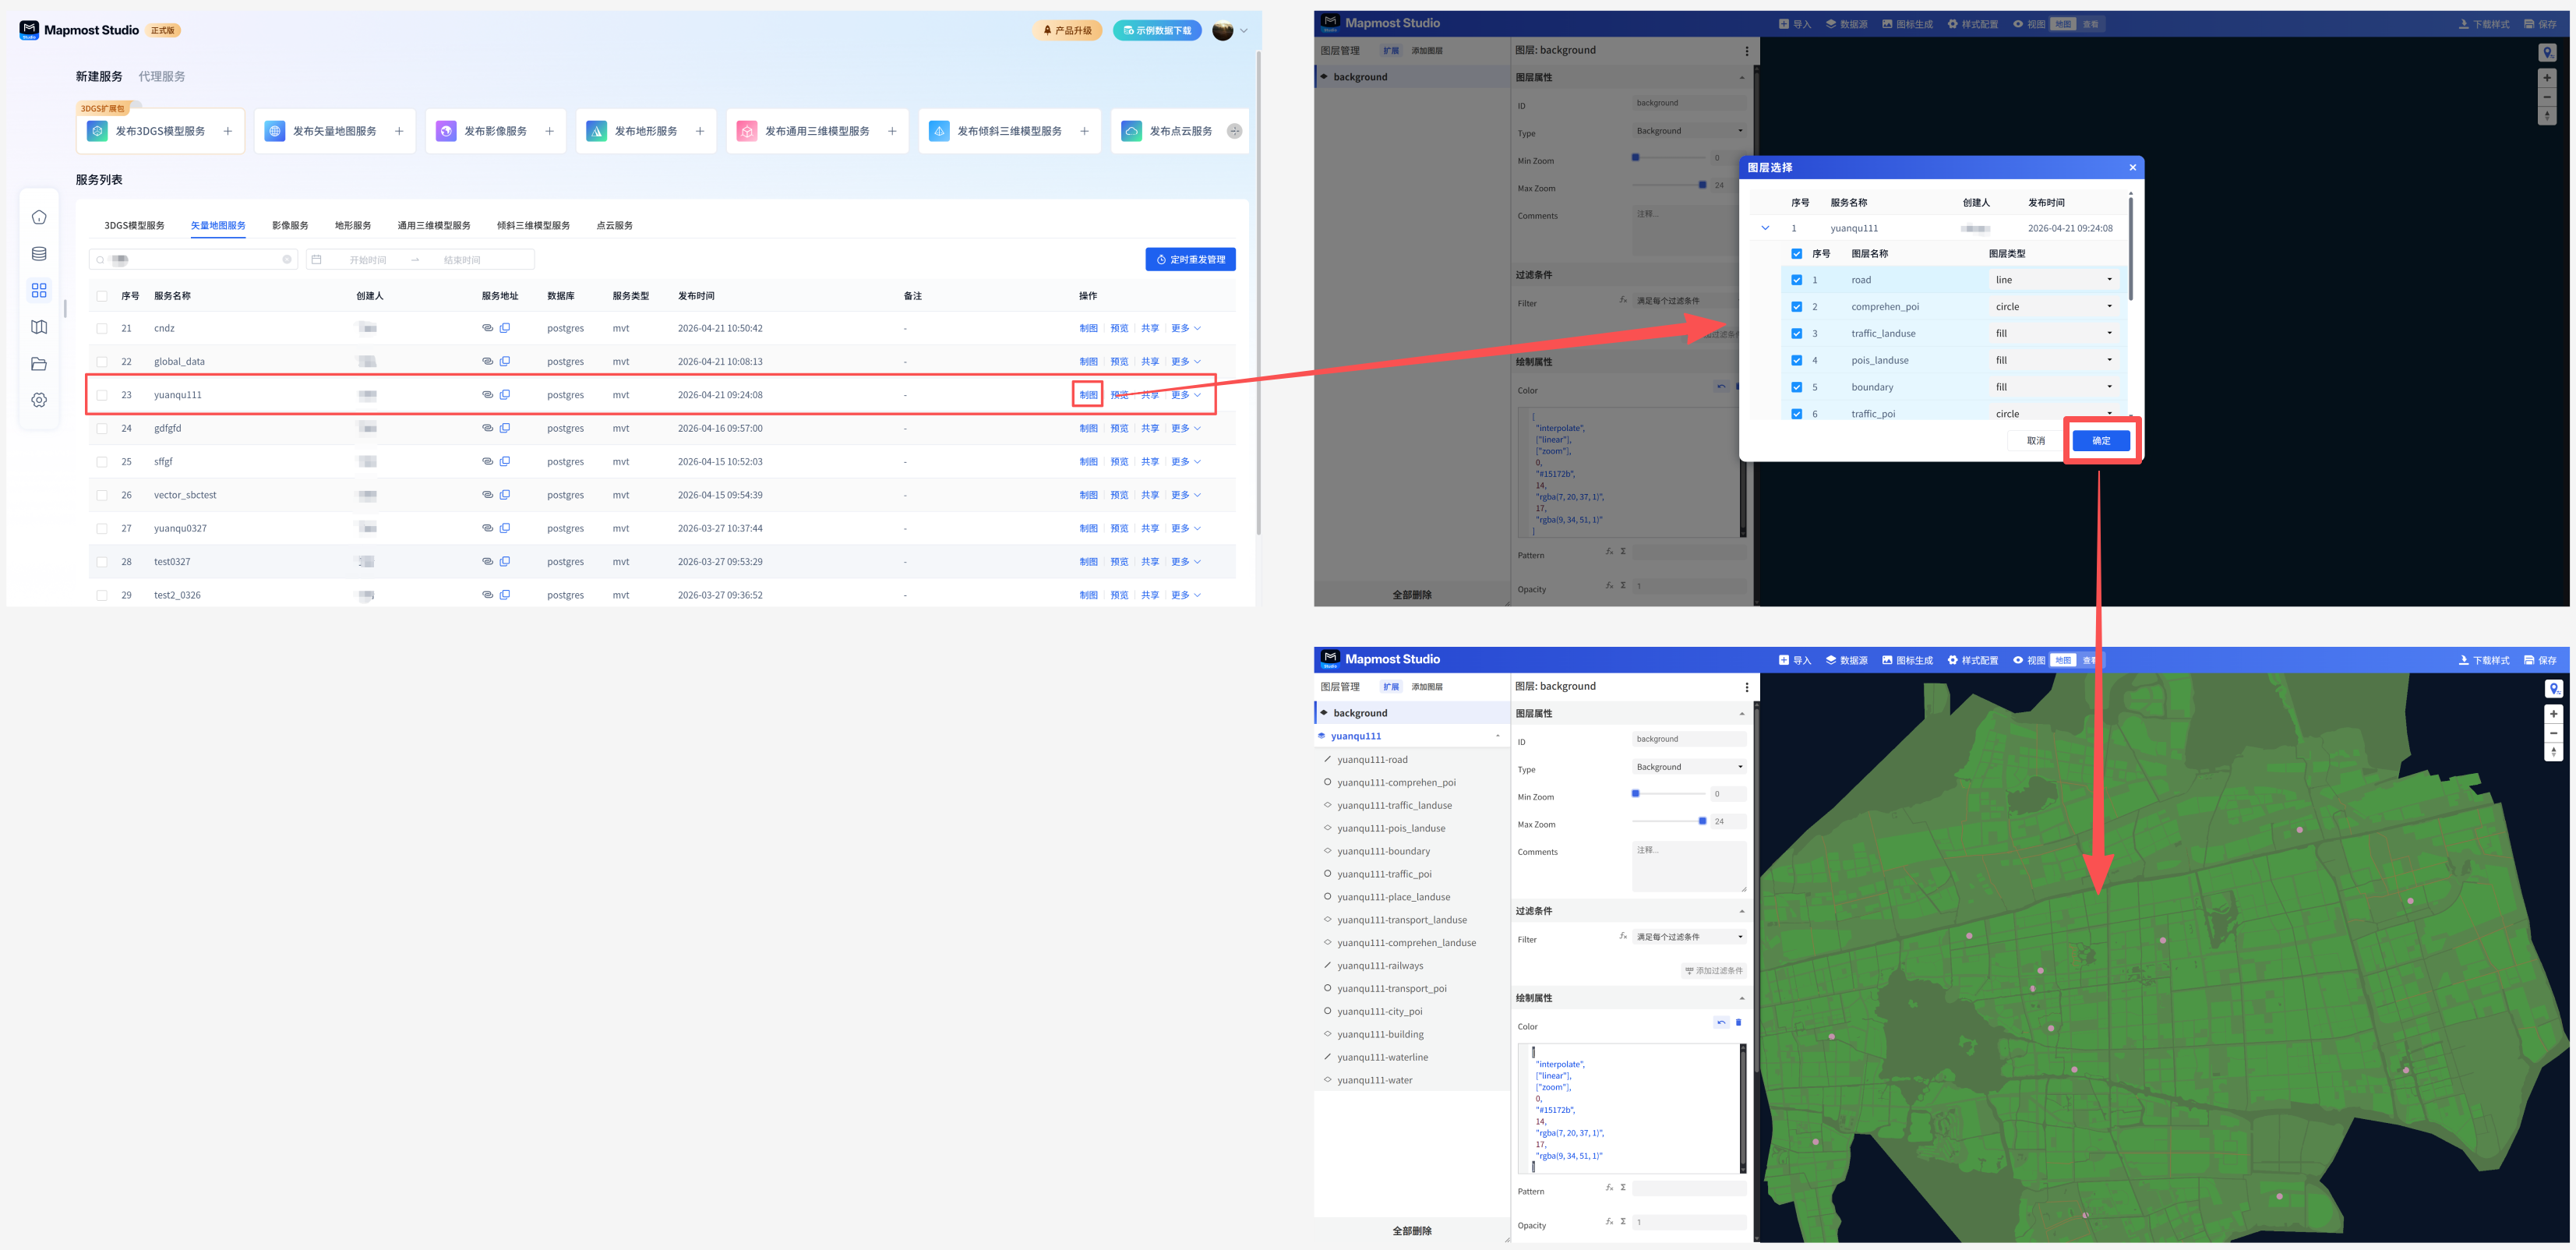
②Select multiple vector map services for mapping
Check multiple vector map services, click the mapping button above the list, select the layers required for mapping in the pop-up "Layer Selection" pop-up window, and click OK to add the data directly to the mapping platform.
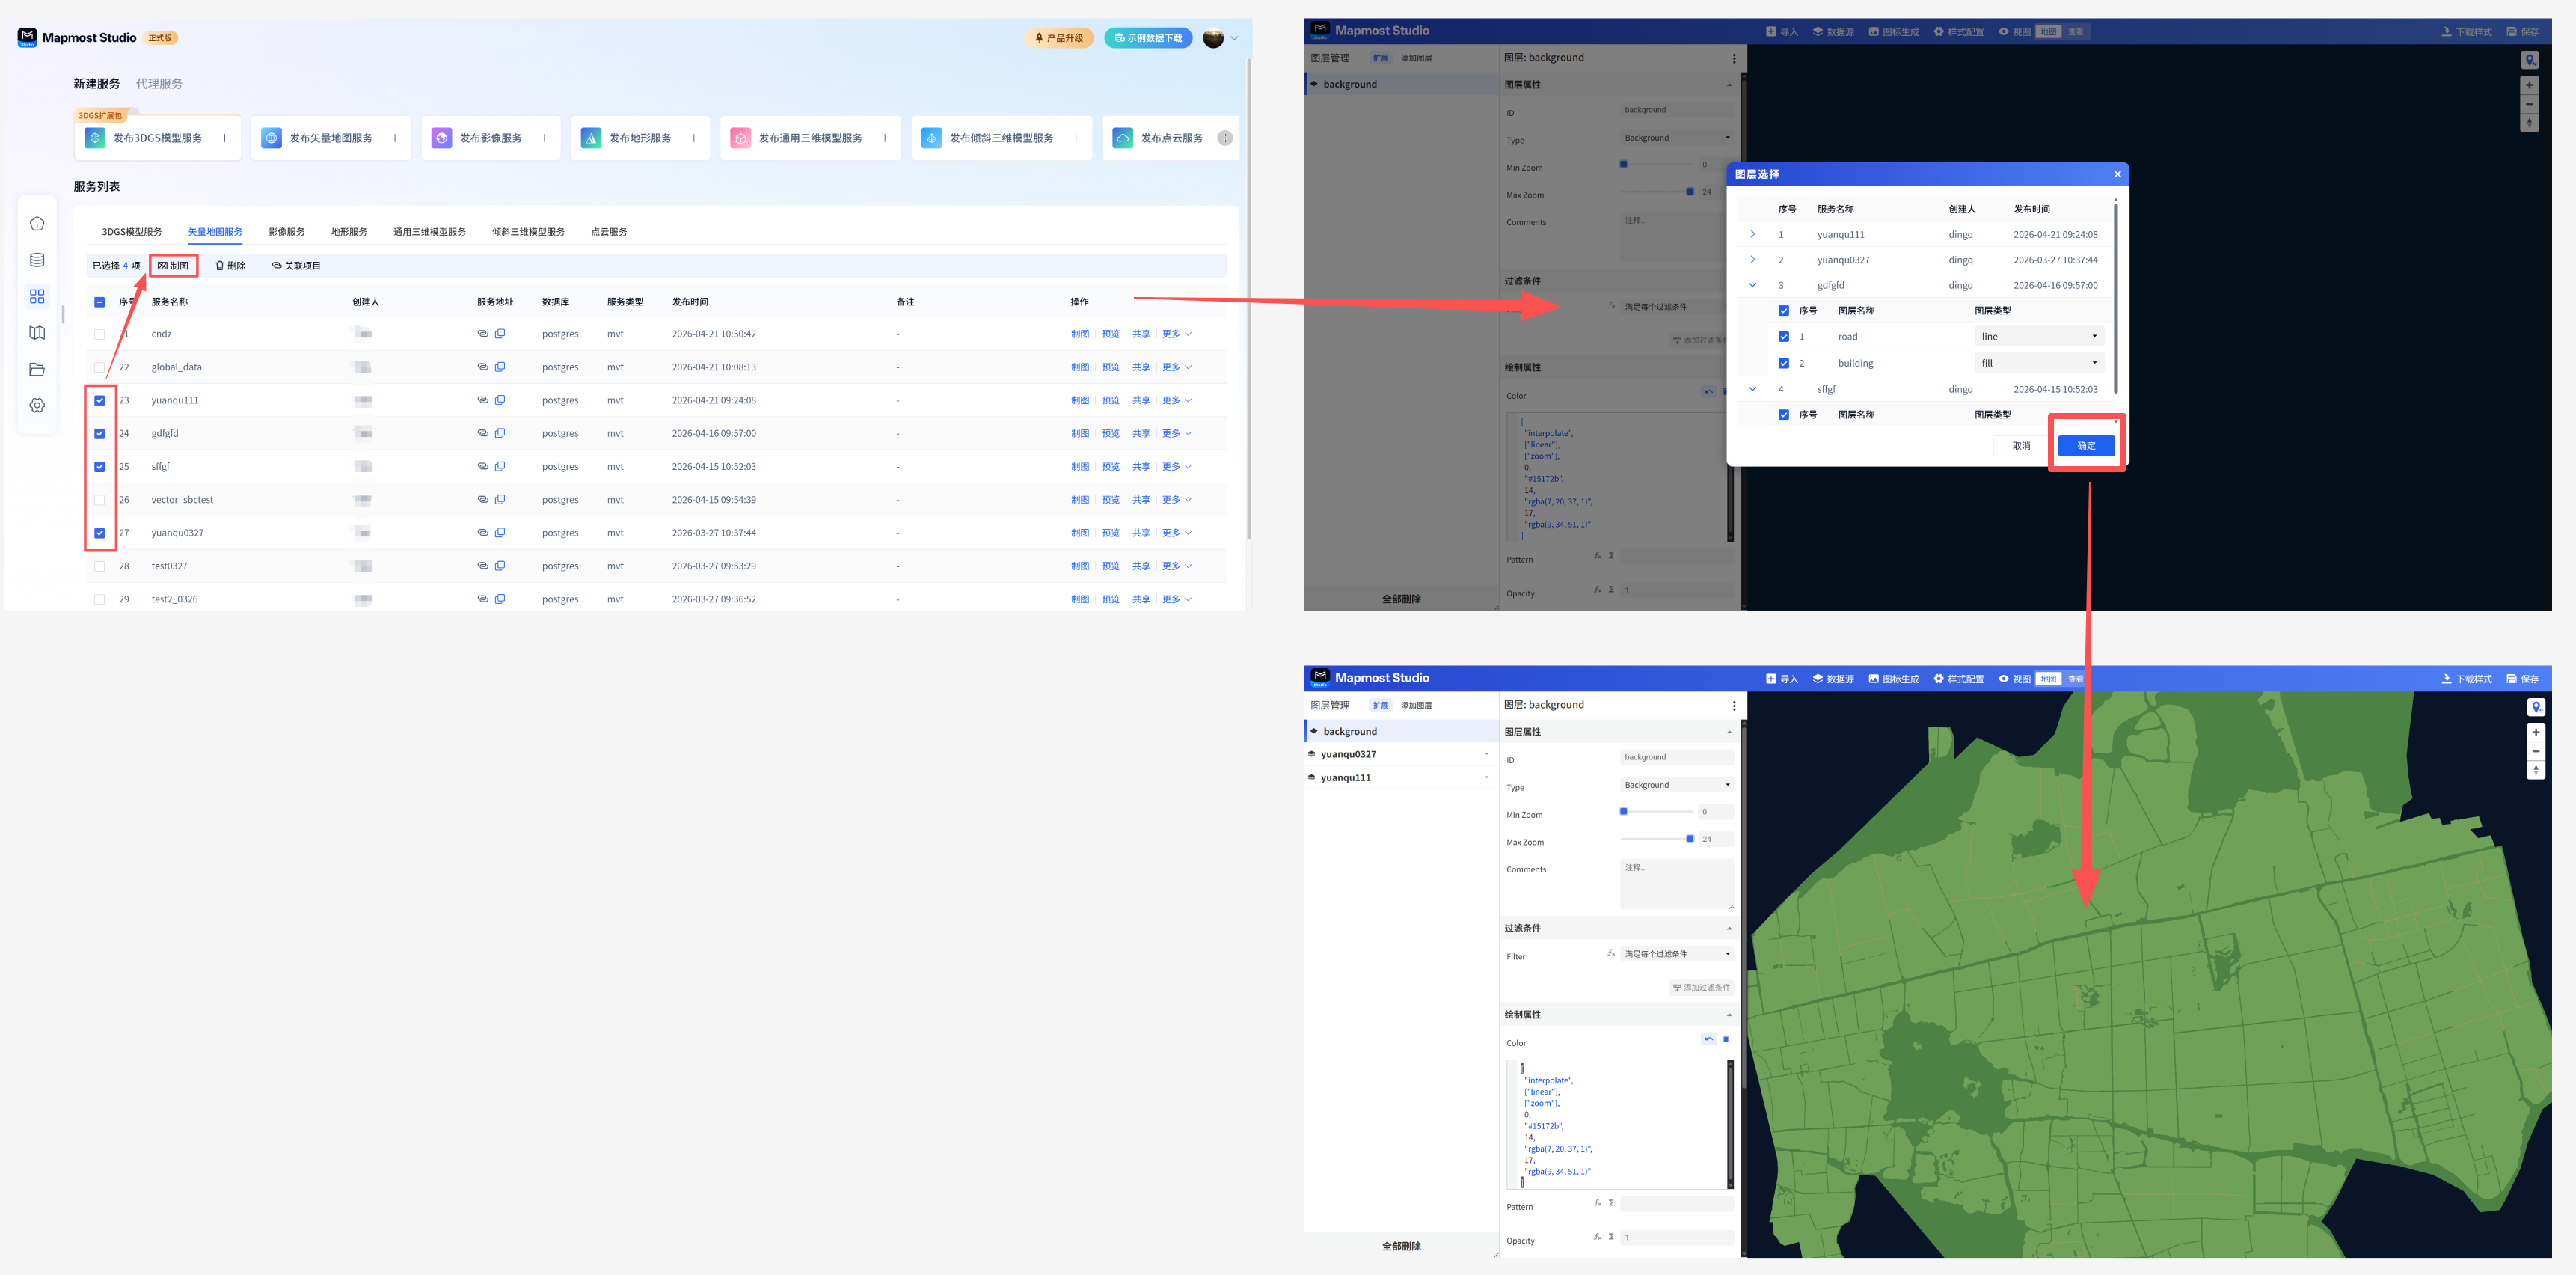
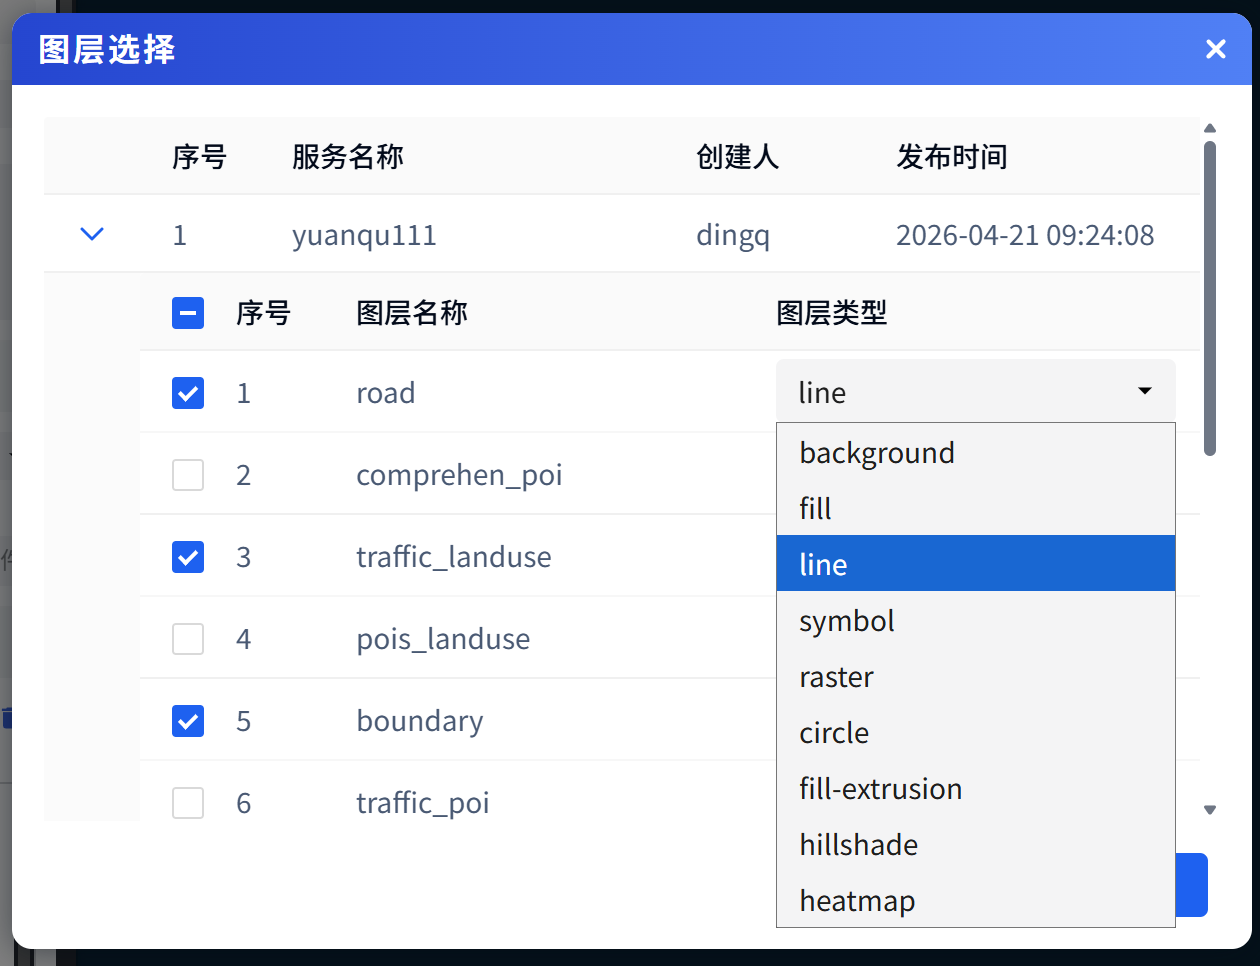
Note: When selecting a layer, the system sets the default types for point, line, and surface data to circle, line, and fill respectively. Users need to modify the layer type according to the actual situation, or modify it in the mapping platform.
1.4. Preview
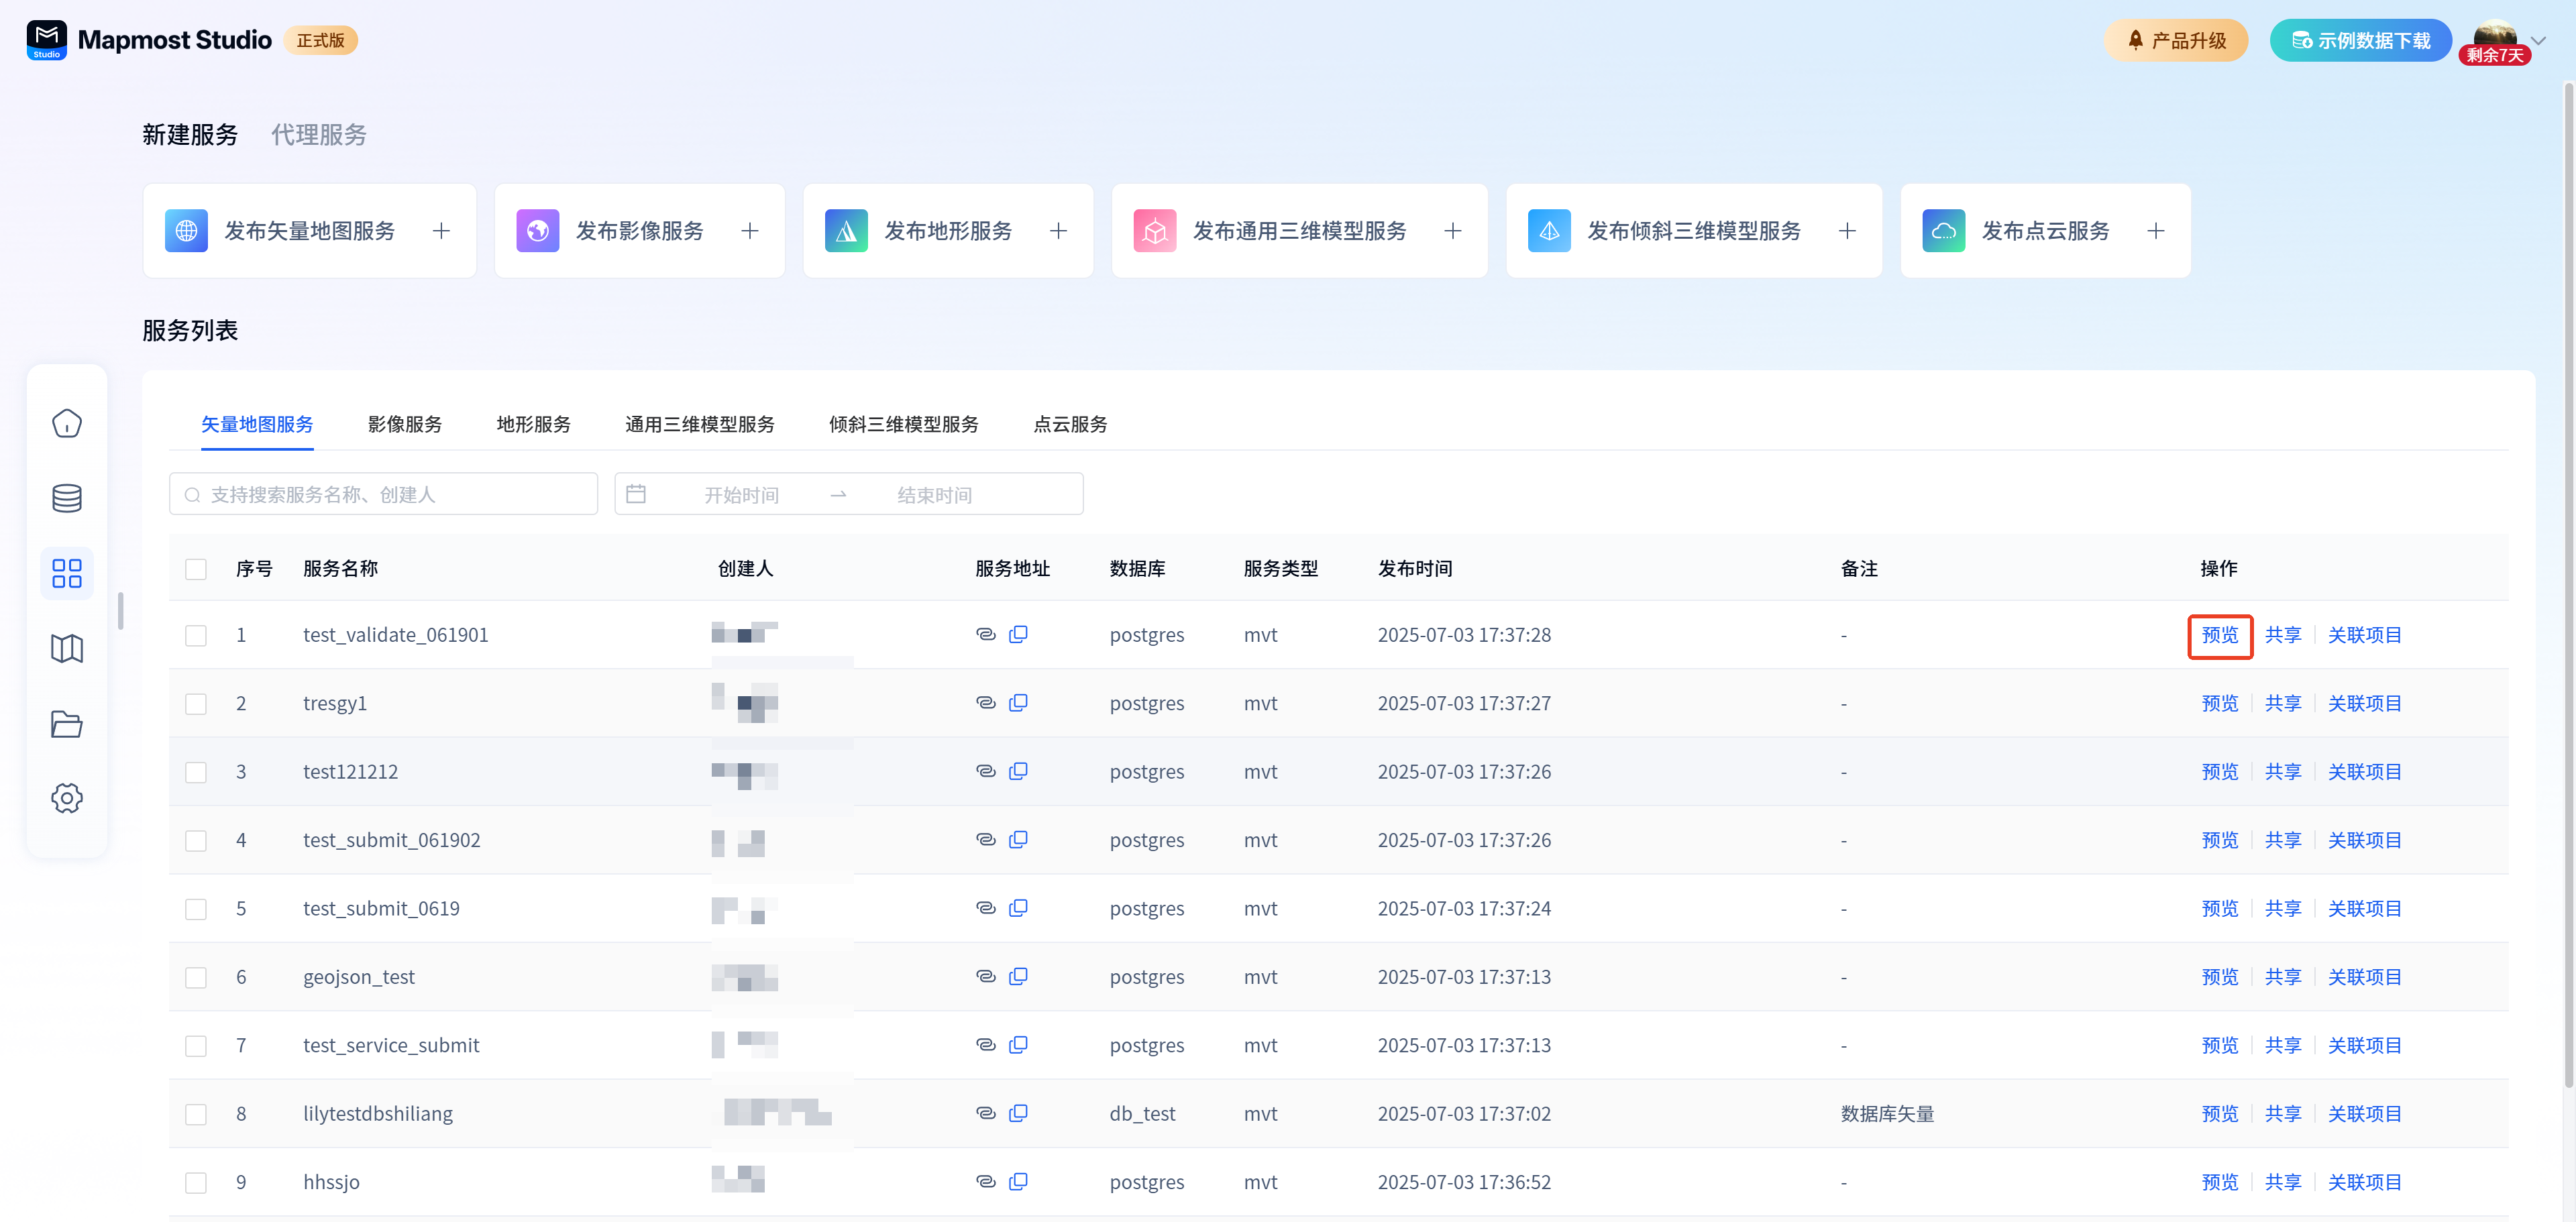
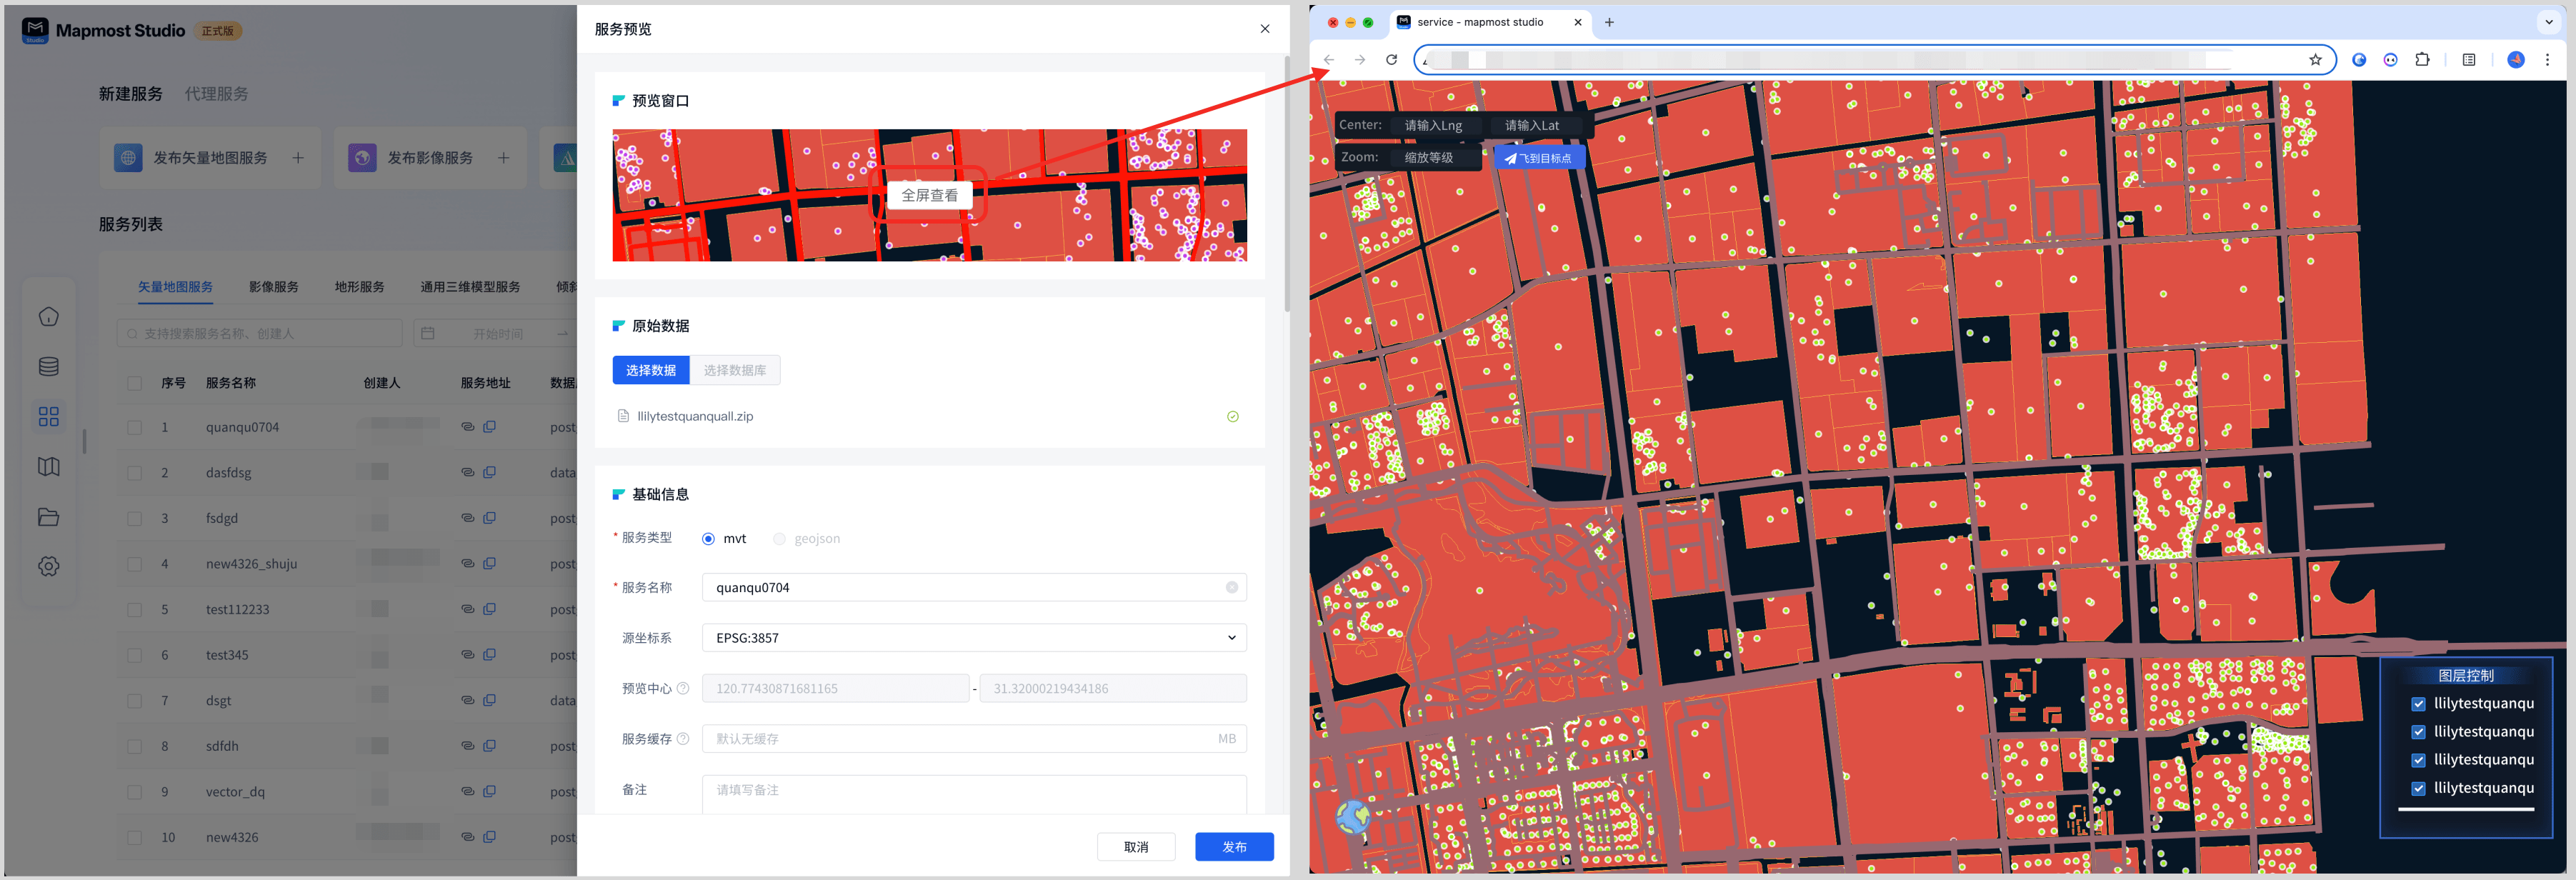
Click Preview to preview the current vector map service effect and service release parameters.
Vector data publishing supports reselecting data and re-publishing after adjusting parameters. Note that you can only resend your own data.
Click "View Full Screen" to view the service effects in full screen on the new page.
1.5. Delete
You can only delete services published by yourself, not services published by others.
①Single deletion: table operation-deletion, supports single service deletion.
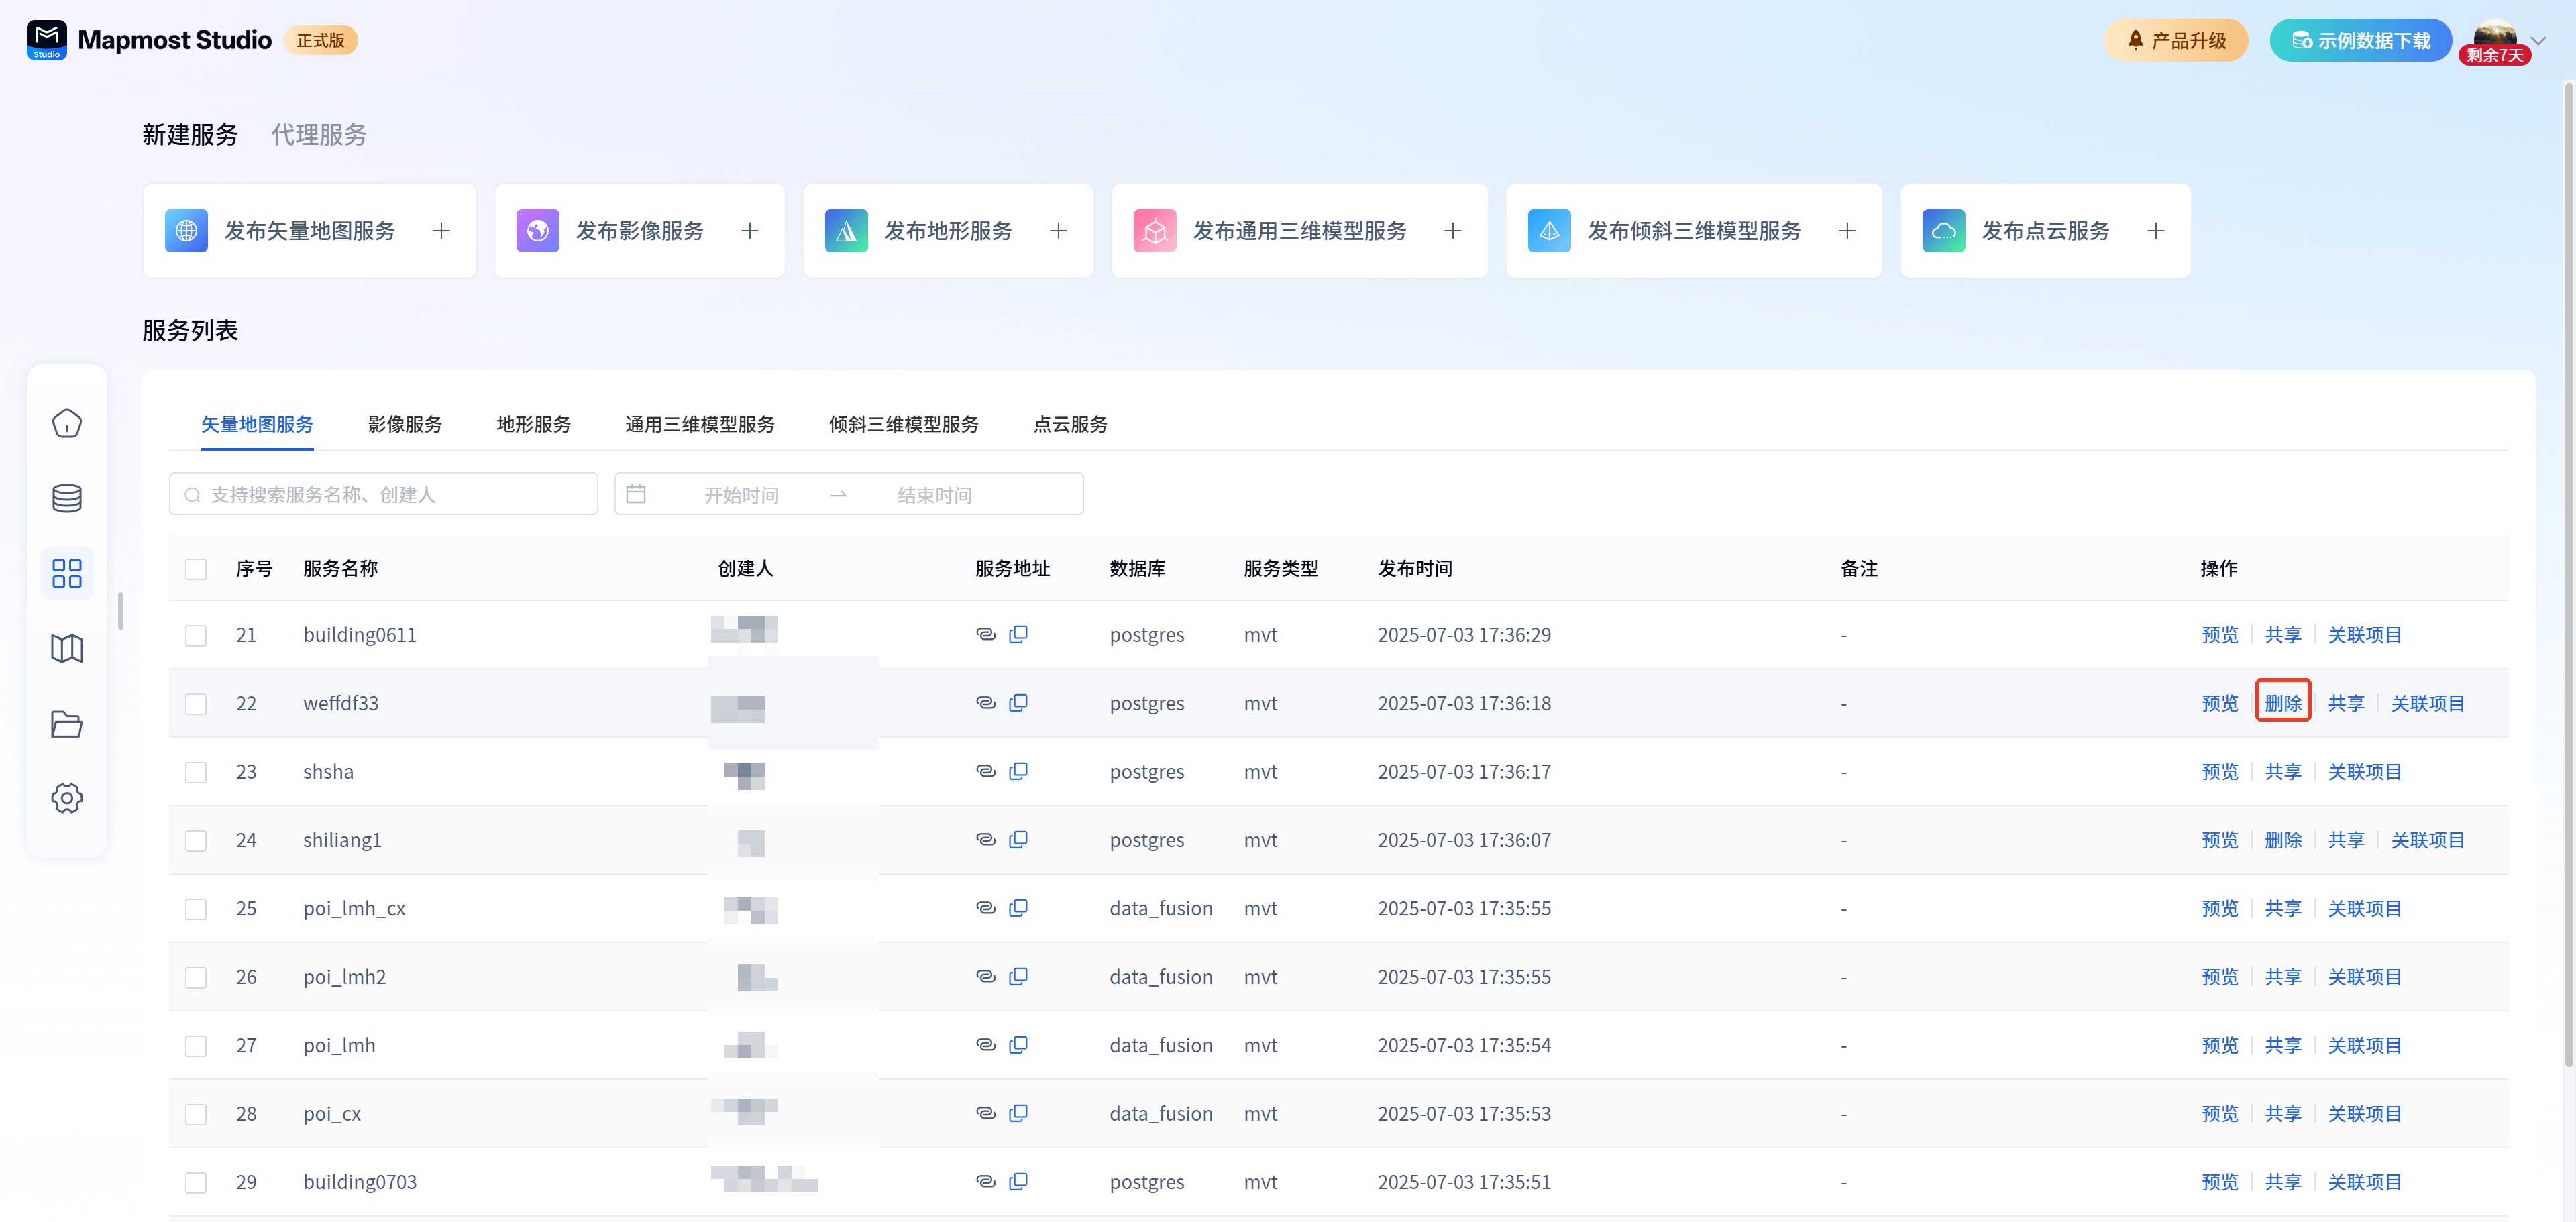
② Batch deletion: Select multiple services to be deleted and click the delete button in the multi-select operation box above the table.
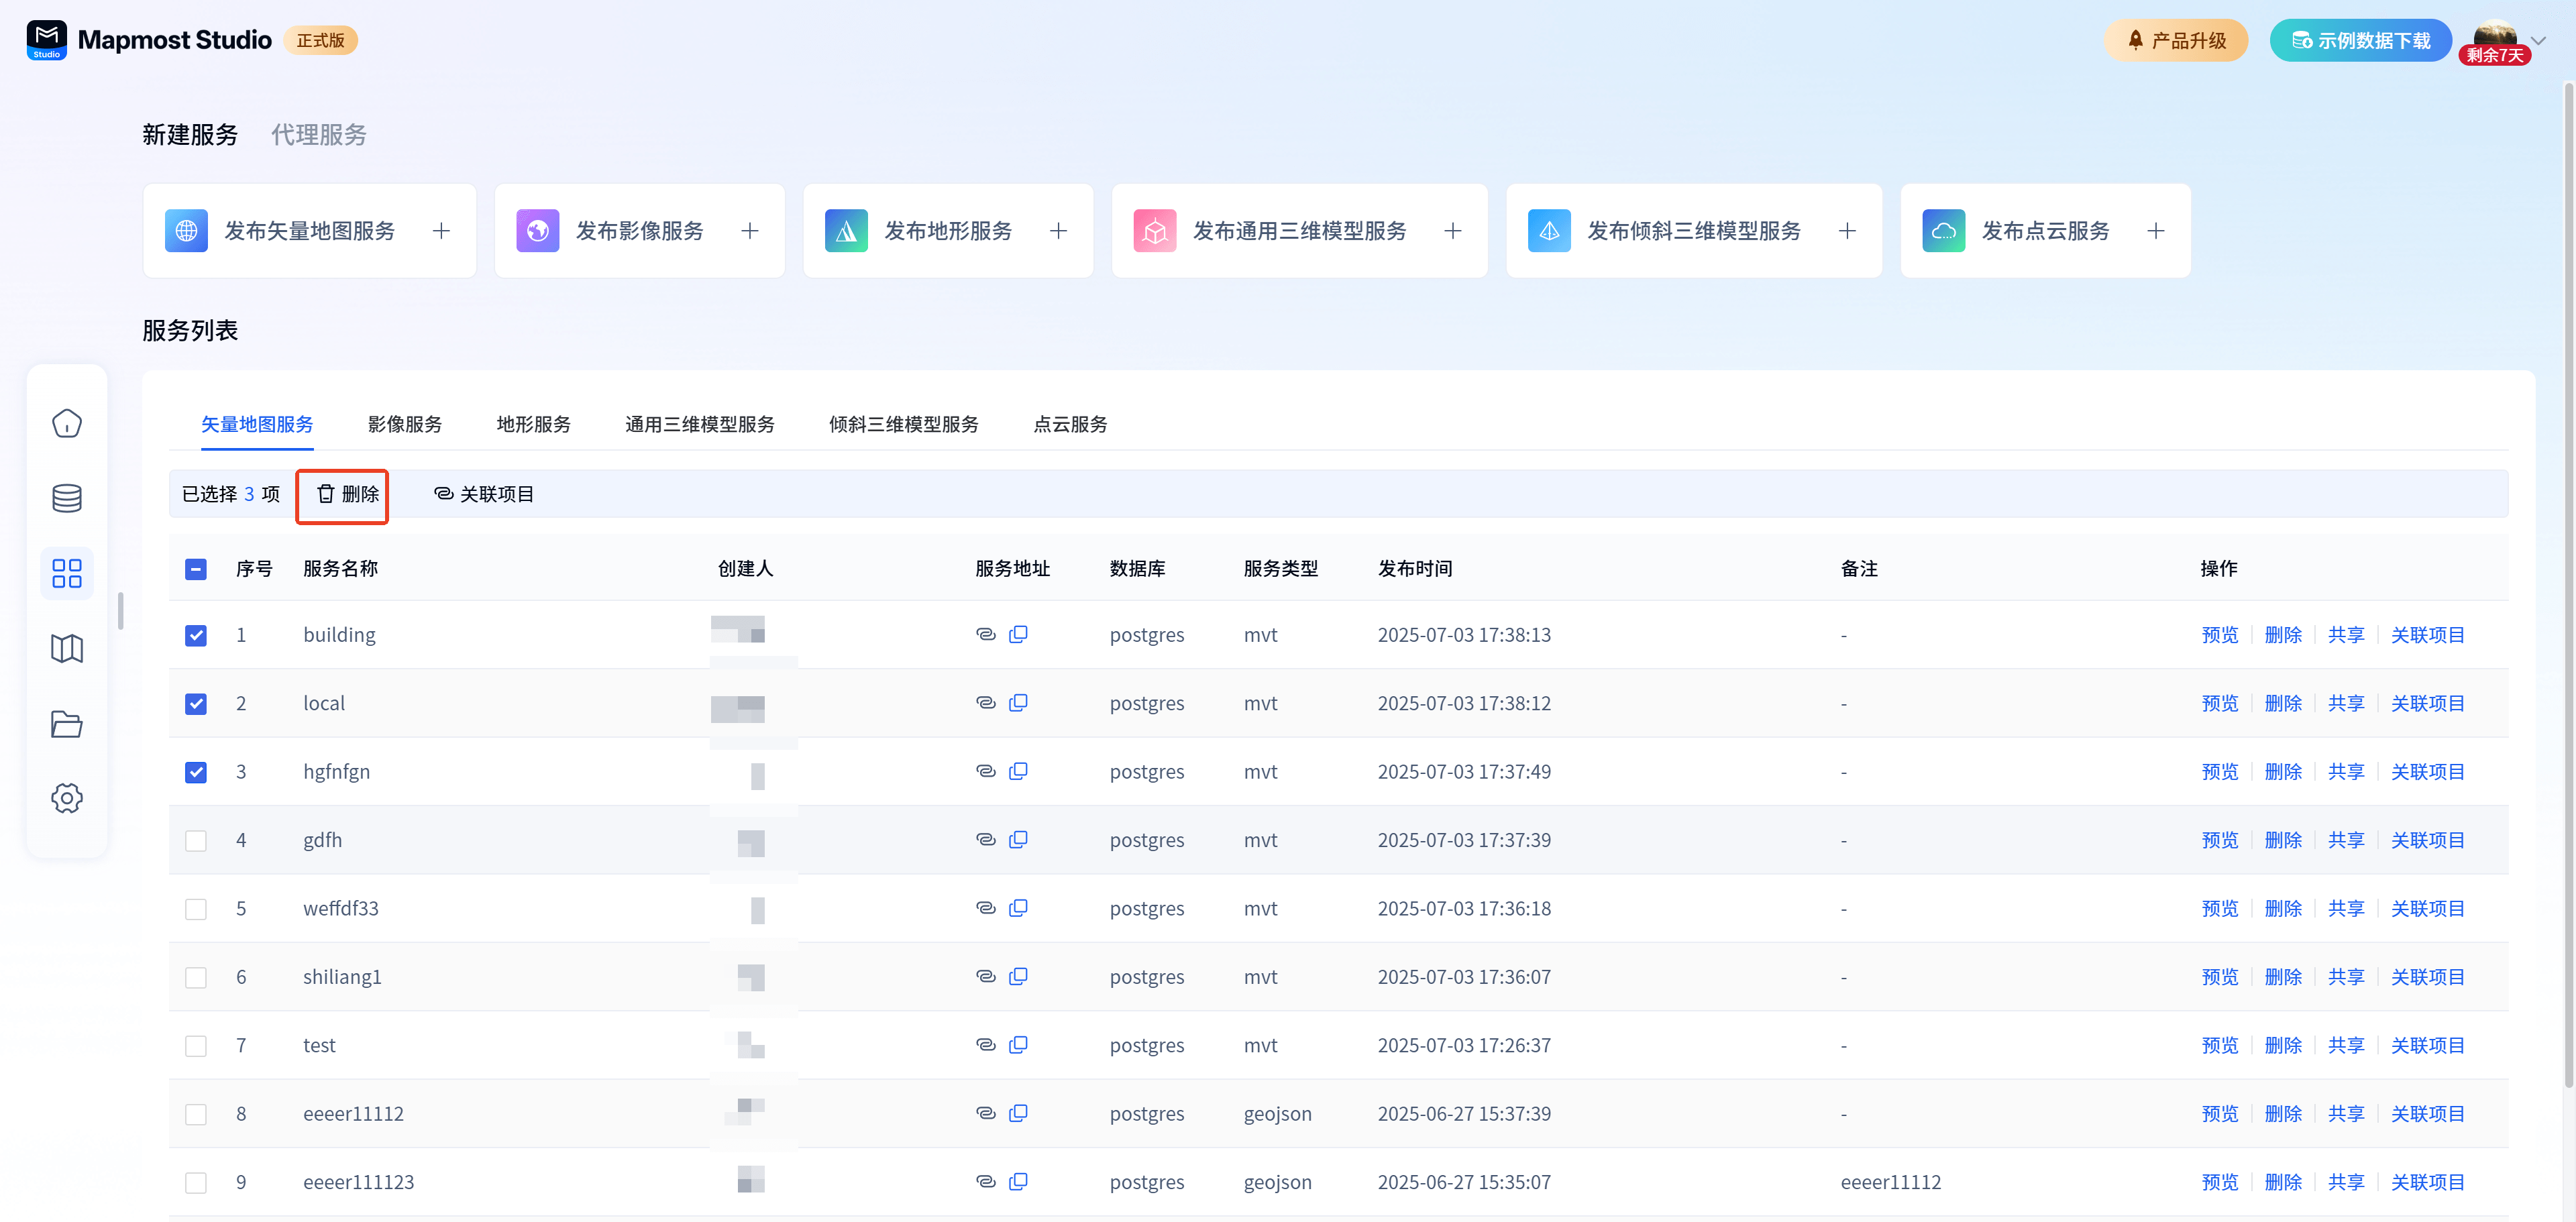
Note: Services associated with projects do not support deletion.
1.6. Sharing
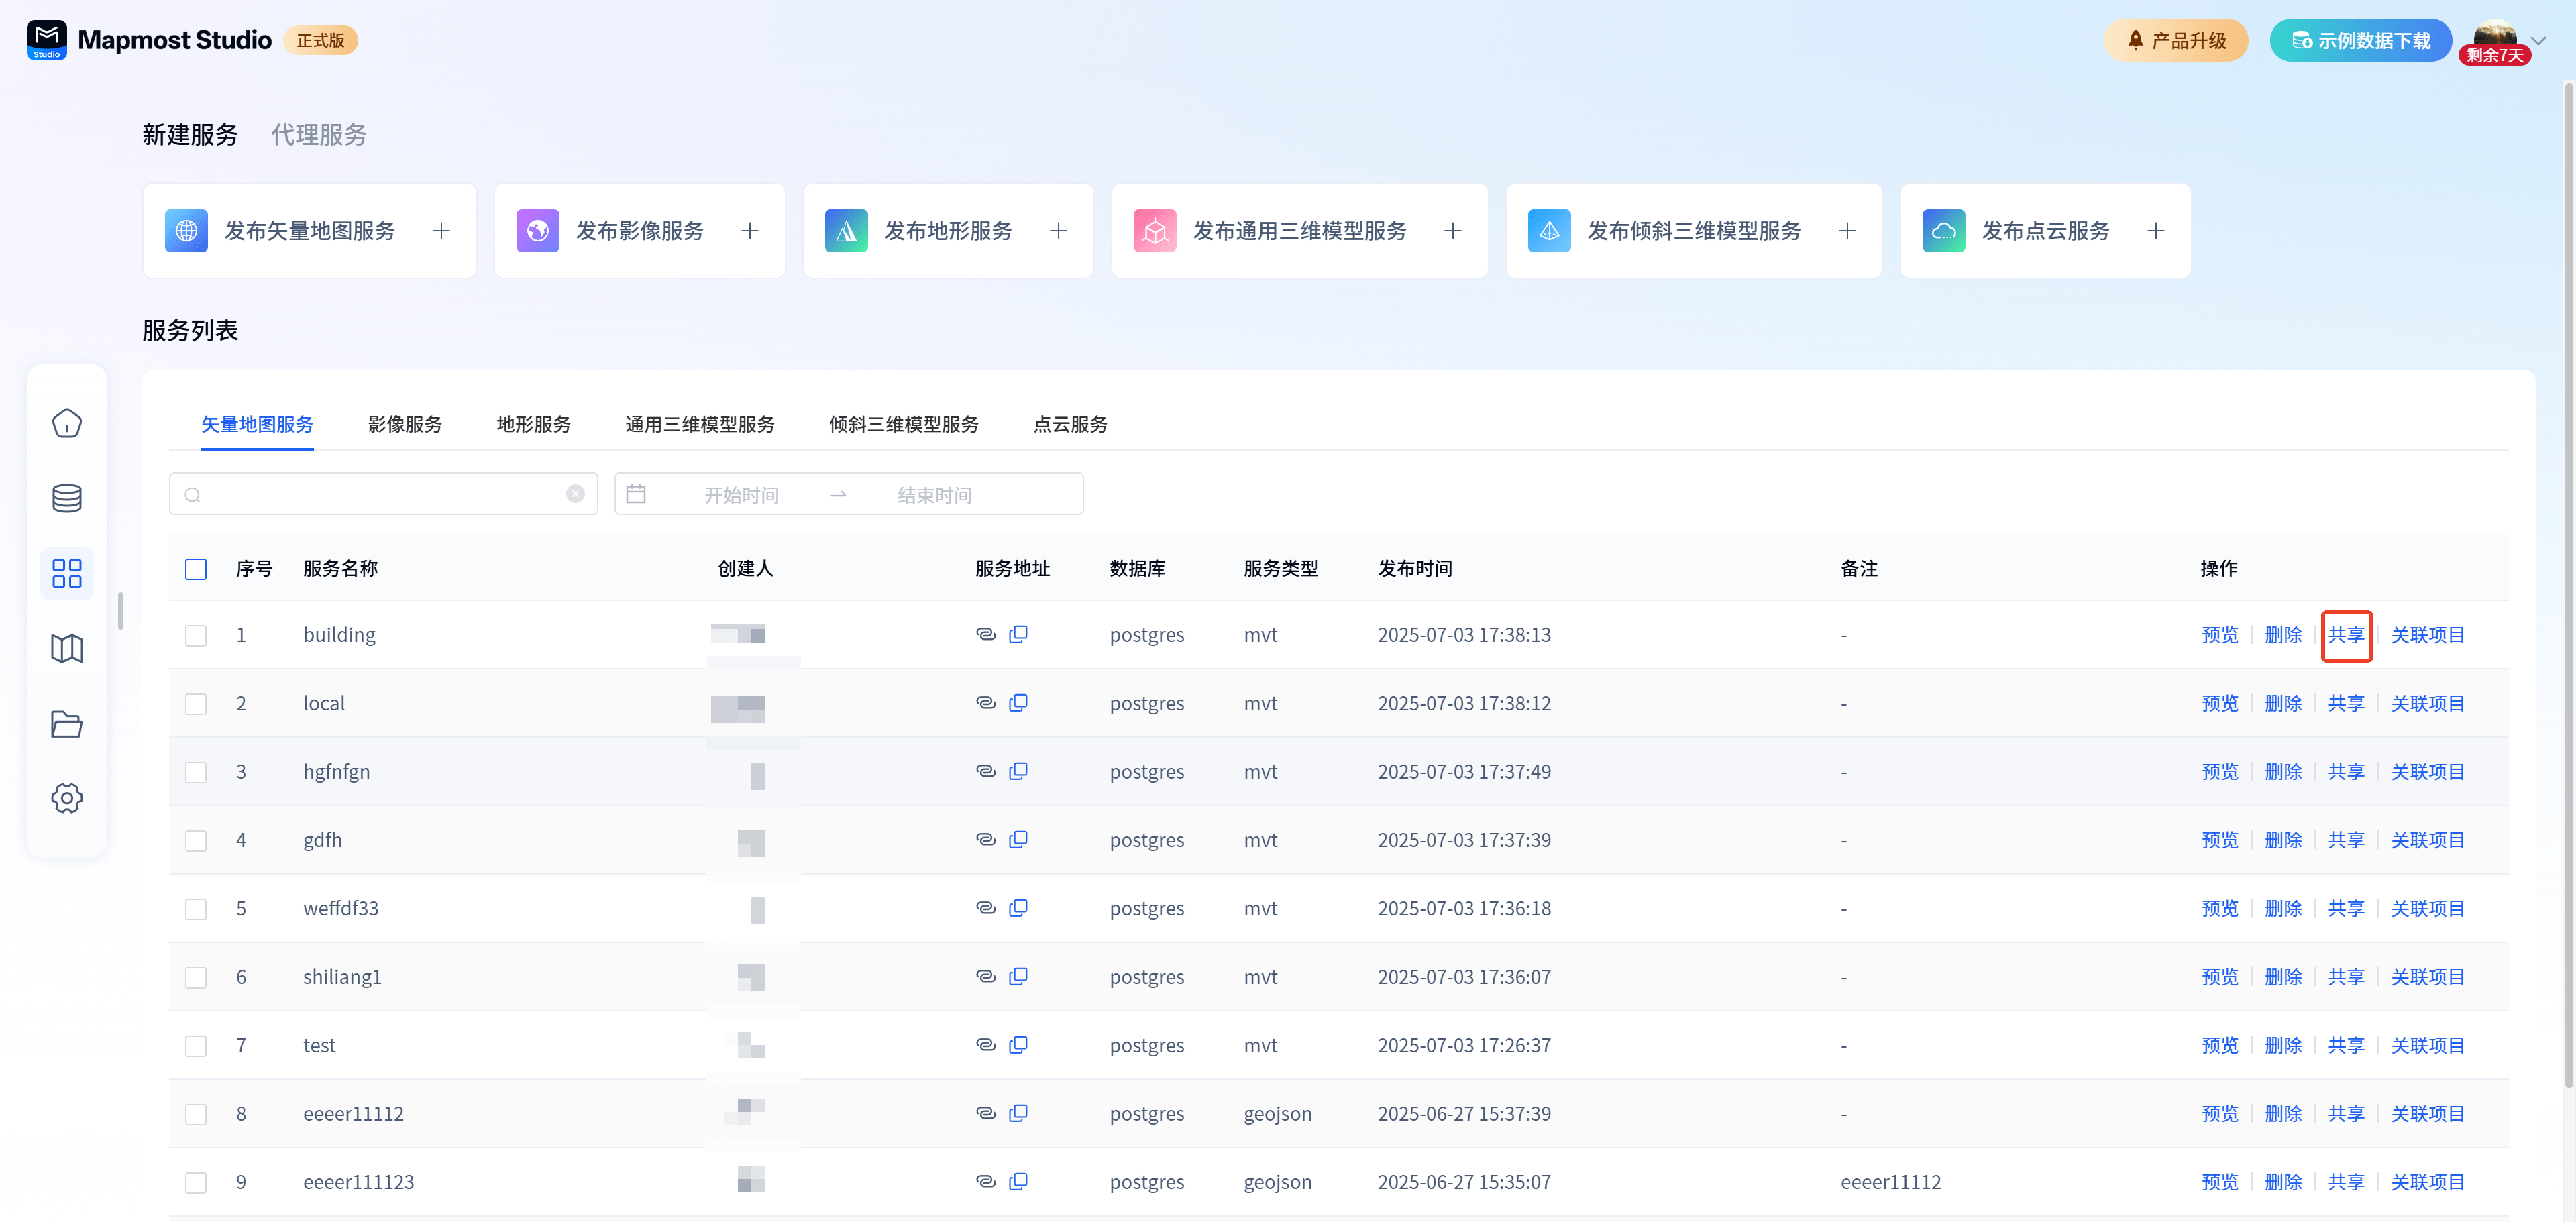
Only services successfully published by myself support sharing. The operation path is: table operation-sharing.
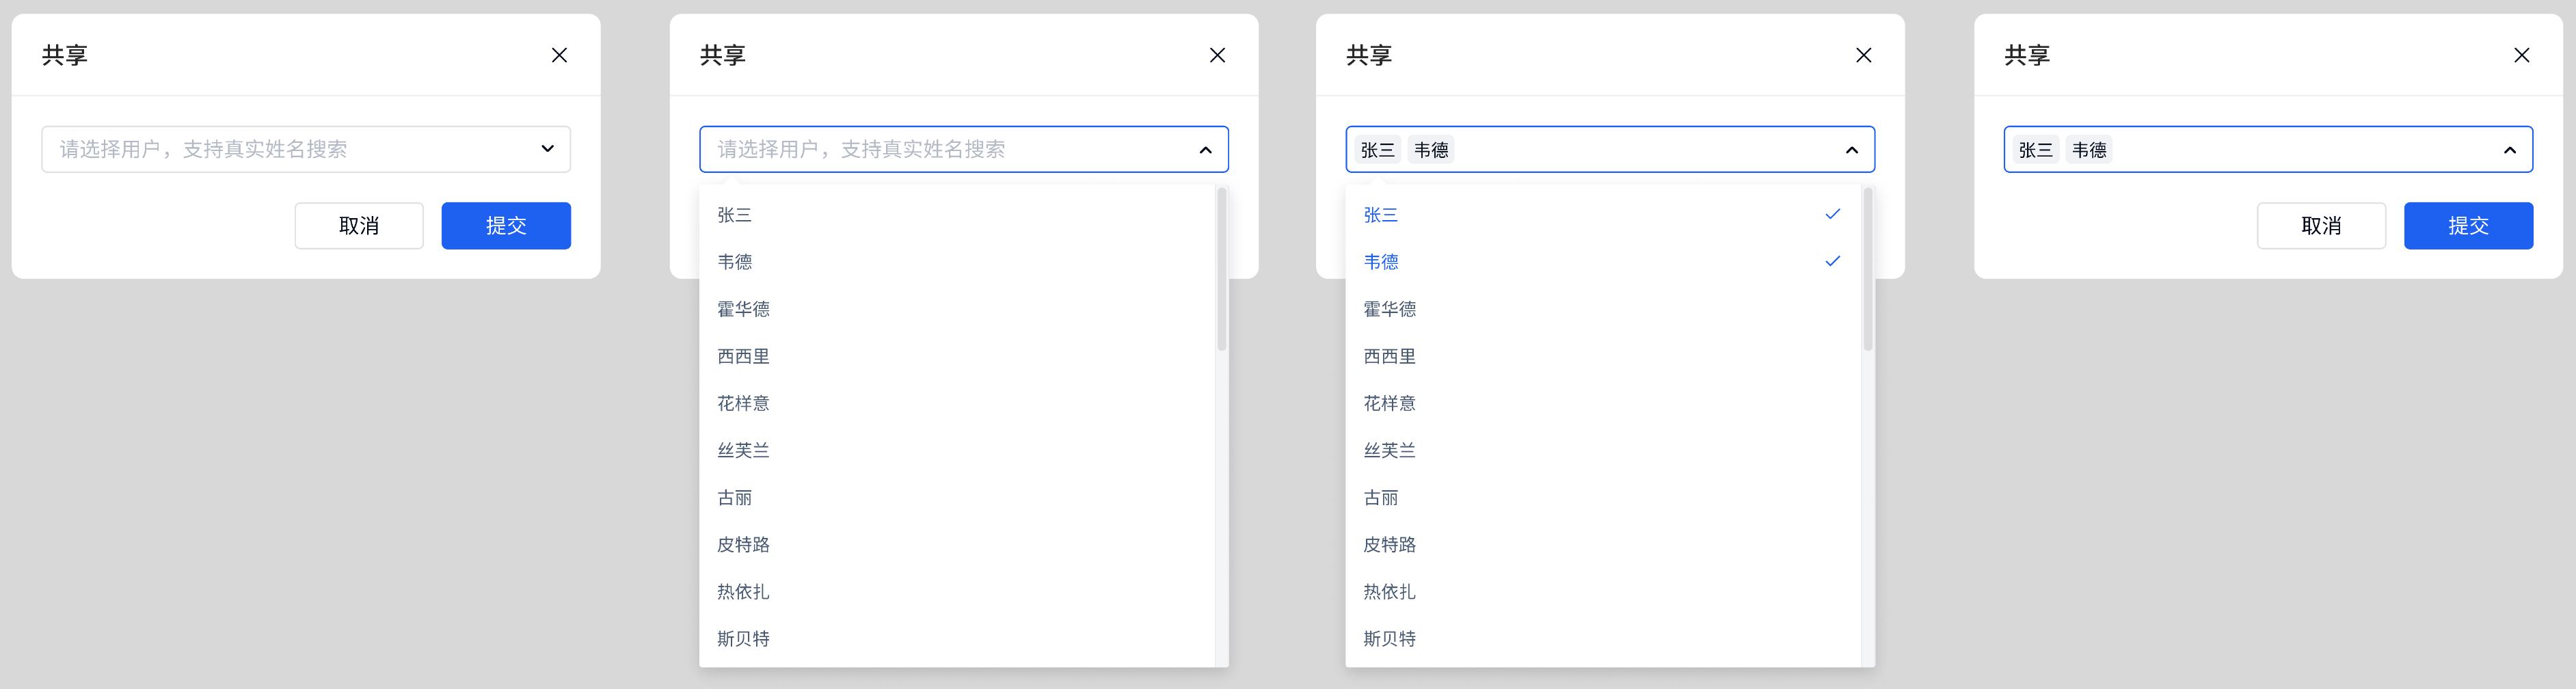
Sharing supports sharing by typing or searching for members' real names. The names of members who have been shared will be displayed in the sharing pop-up window.
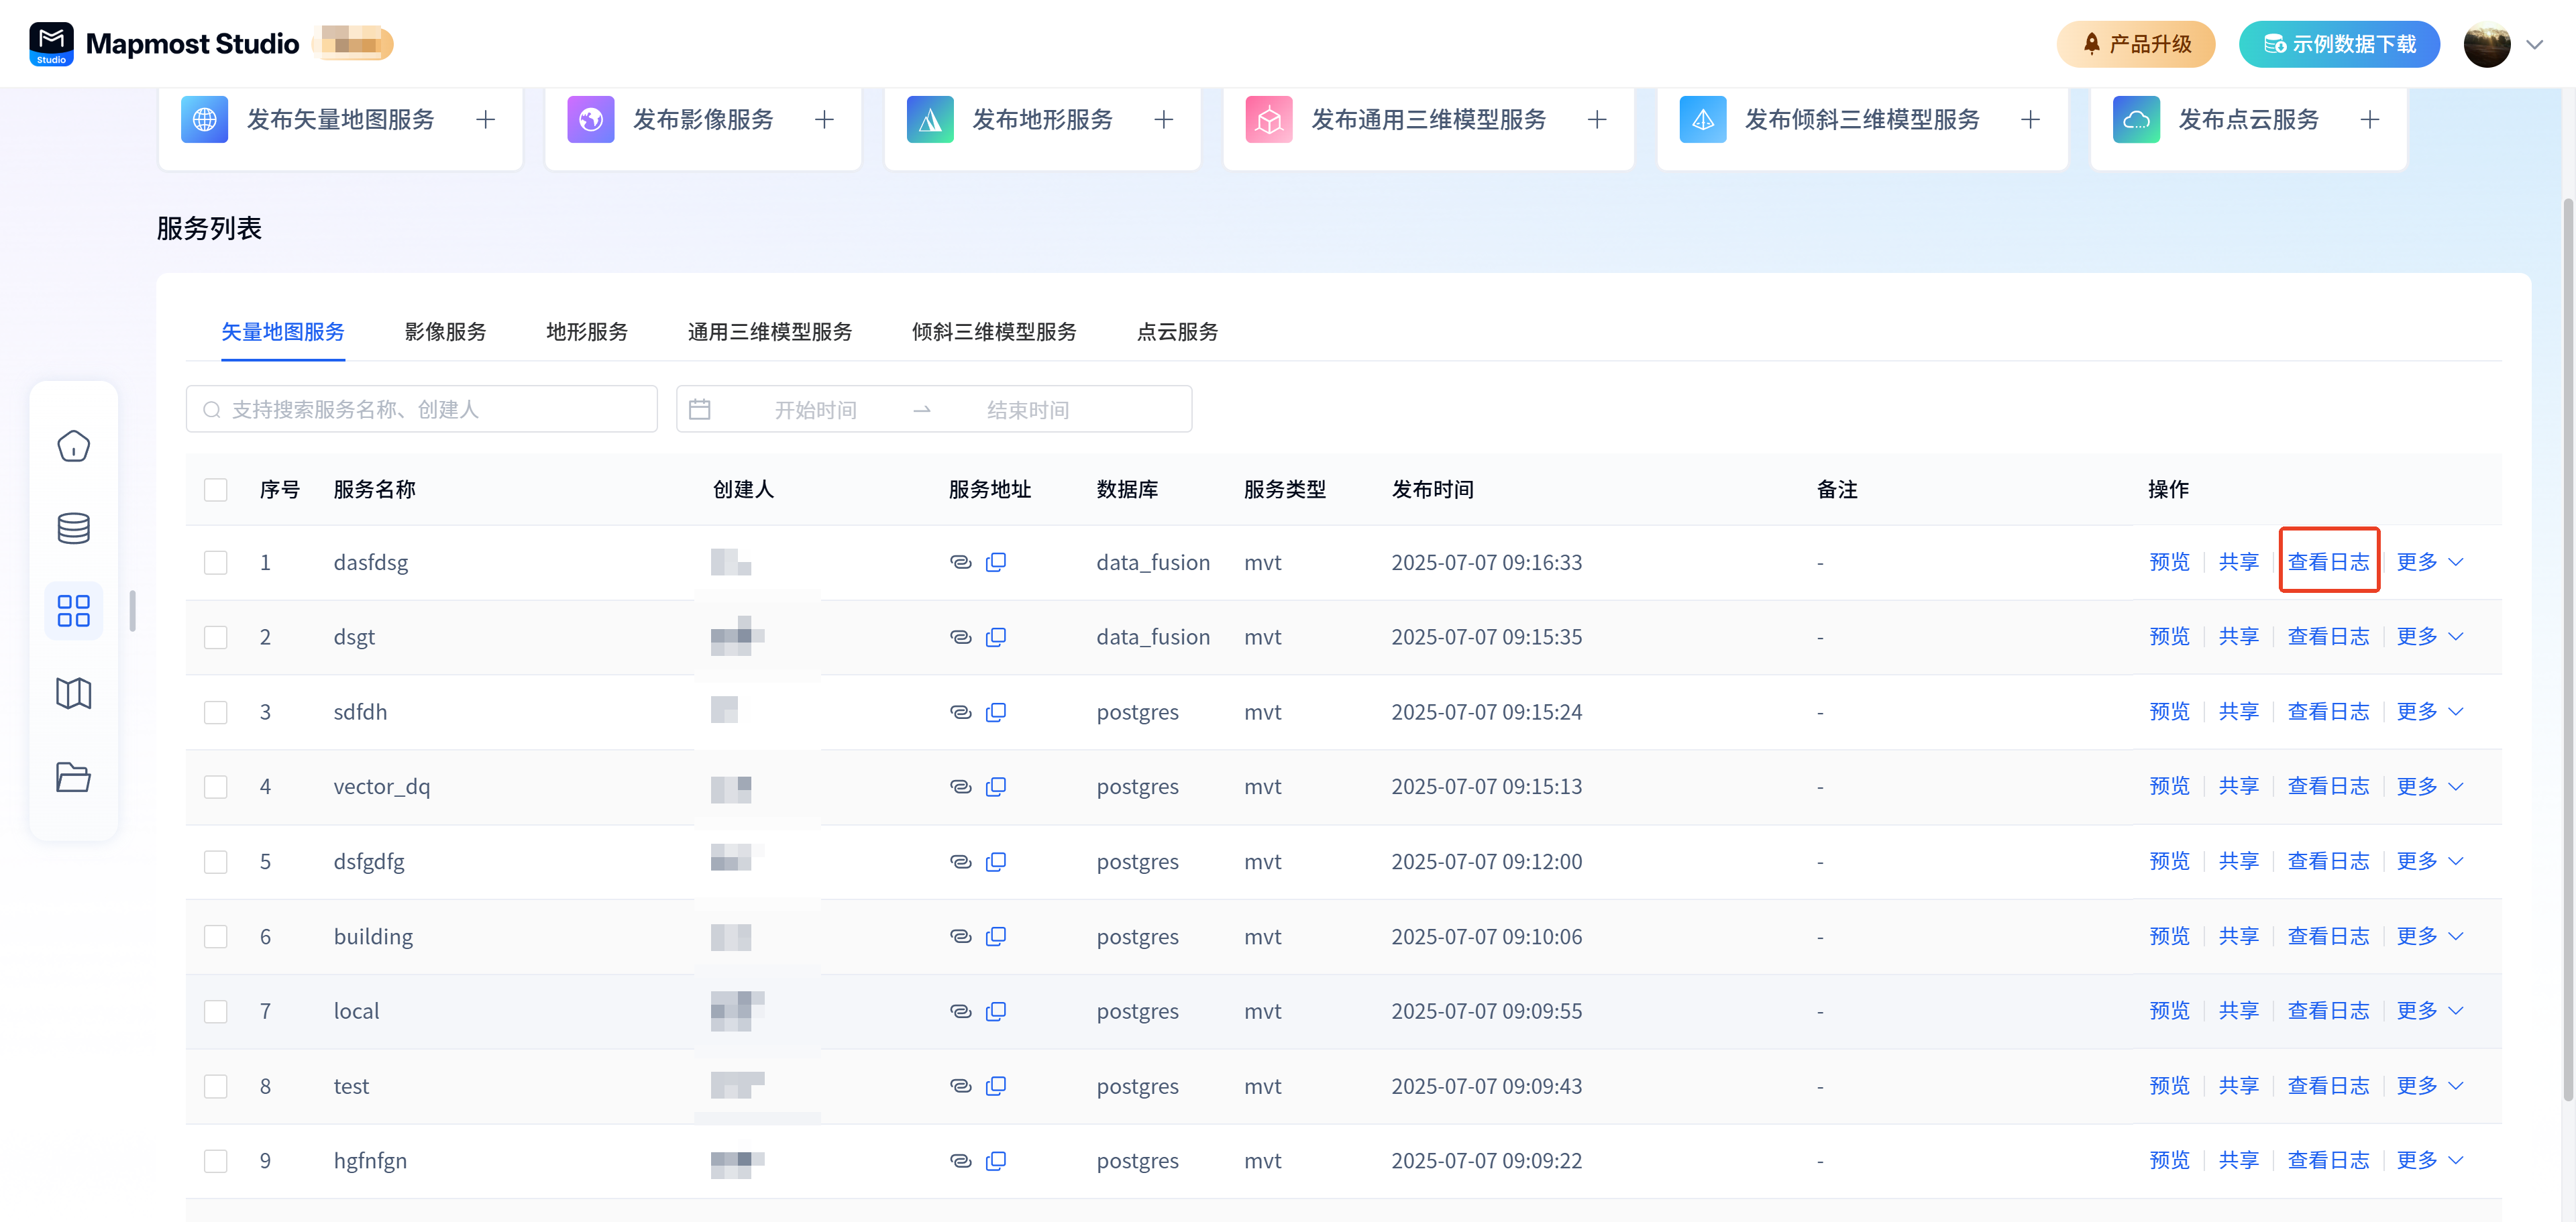
1.7. View logs
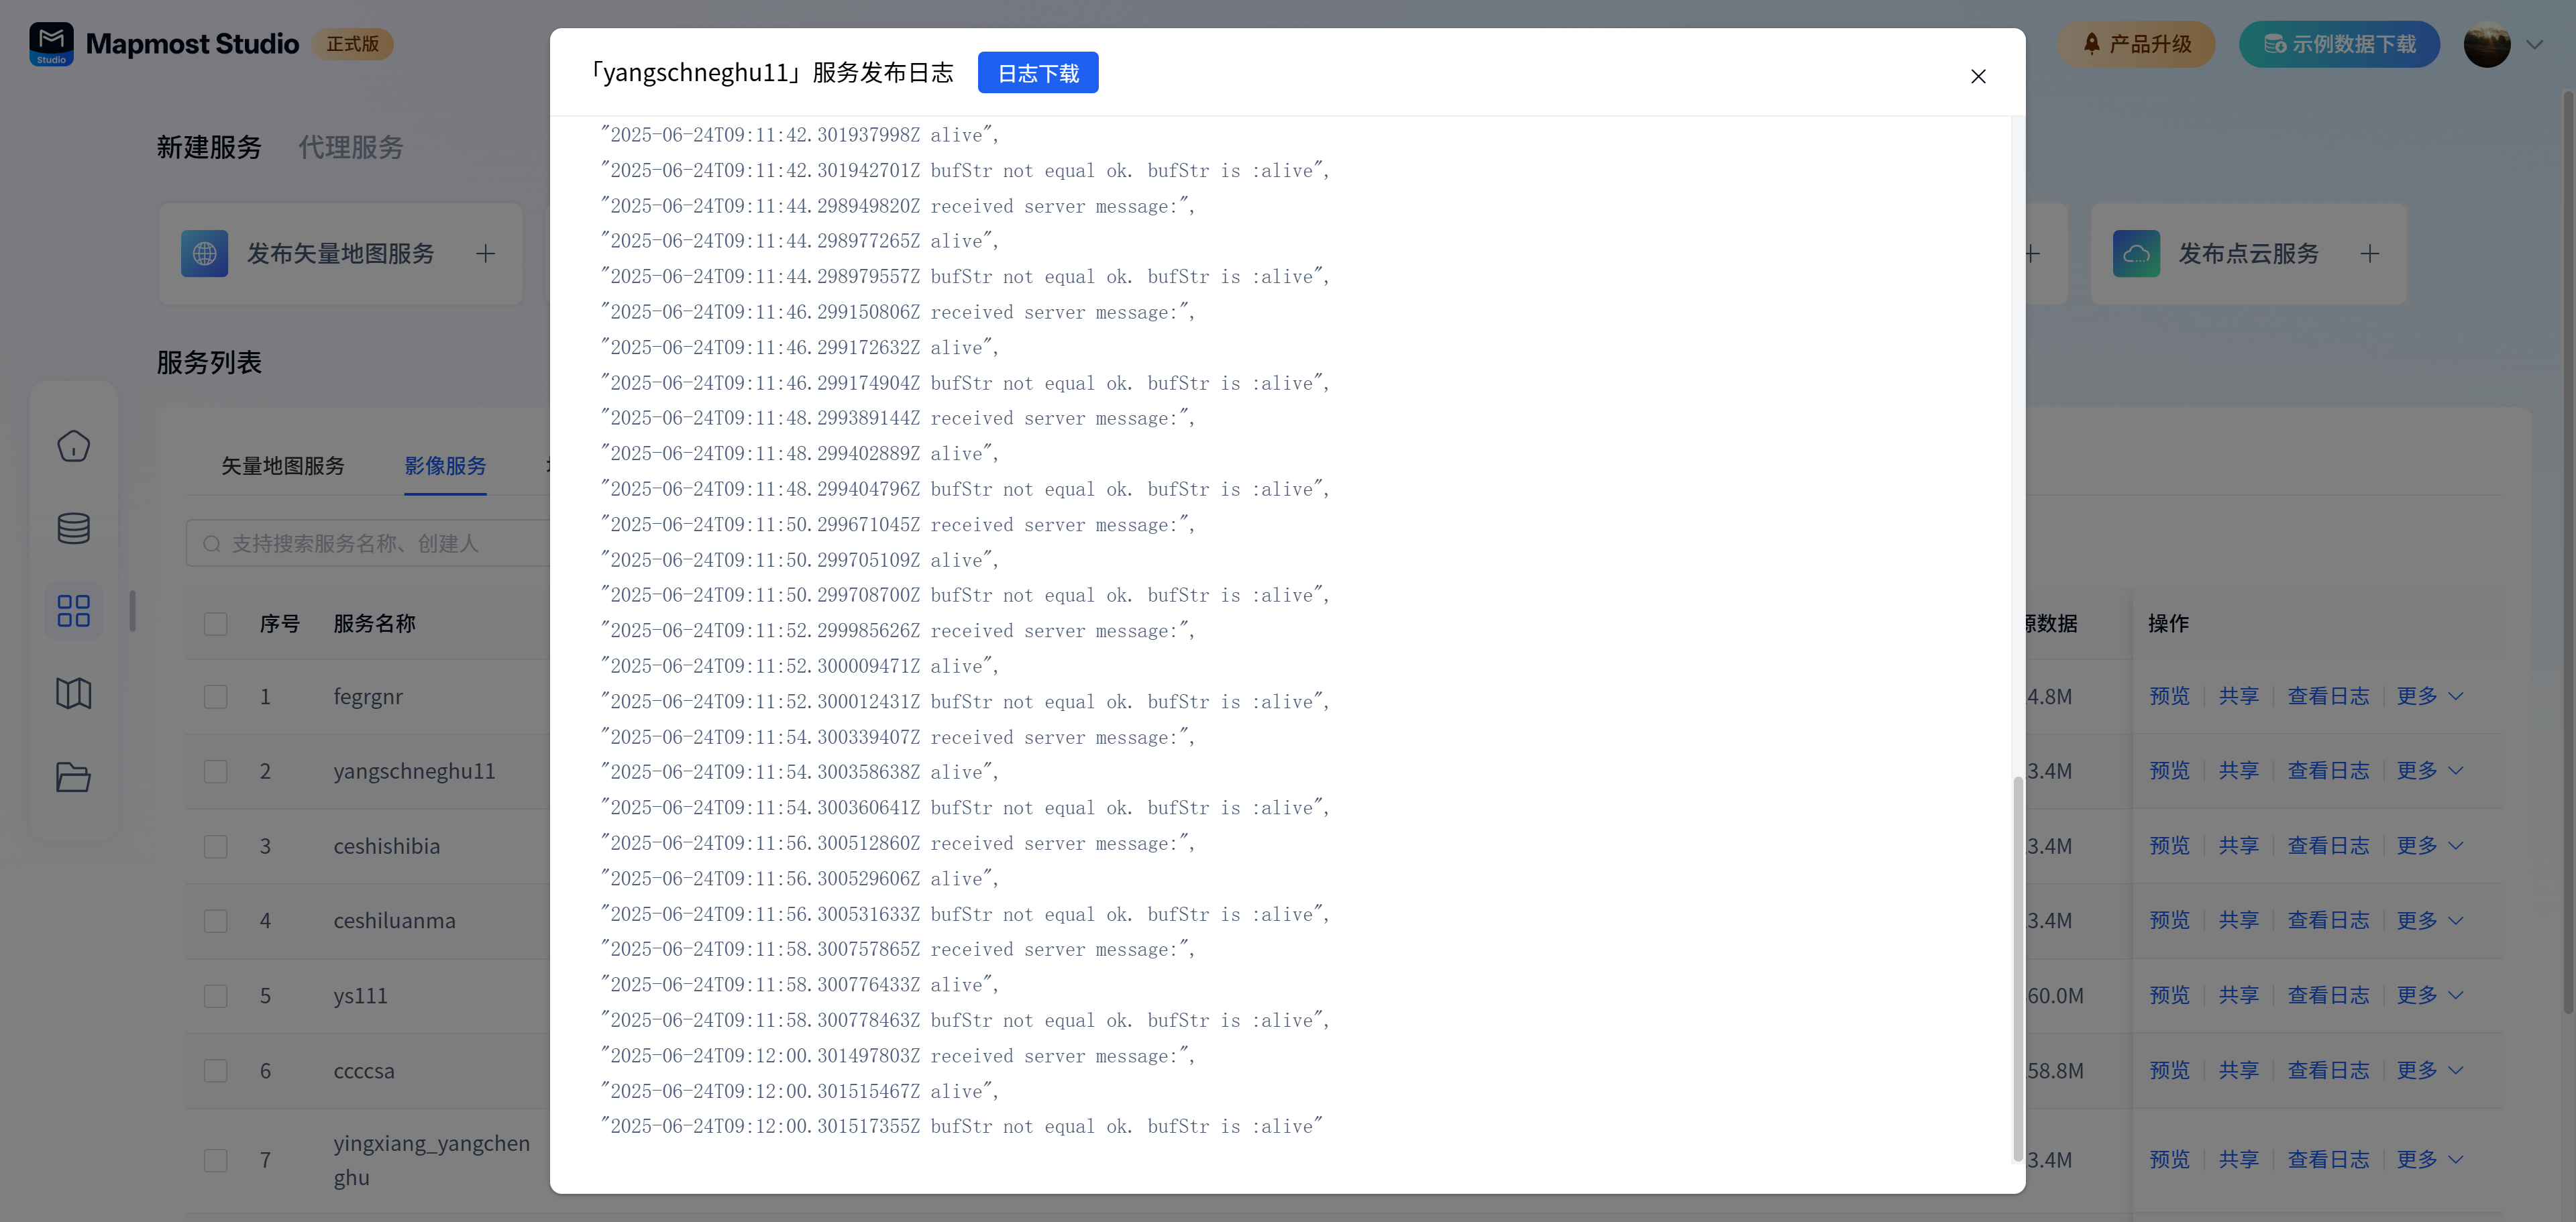
The service I published supports viewing and downloading logs. The operation path is: table operation-view logs.
Click Log Download to support downloading service release logs to the local.
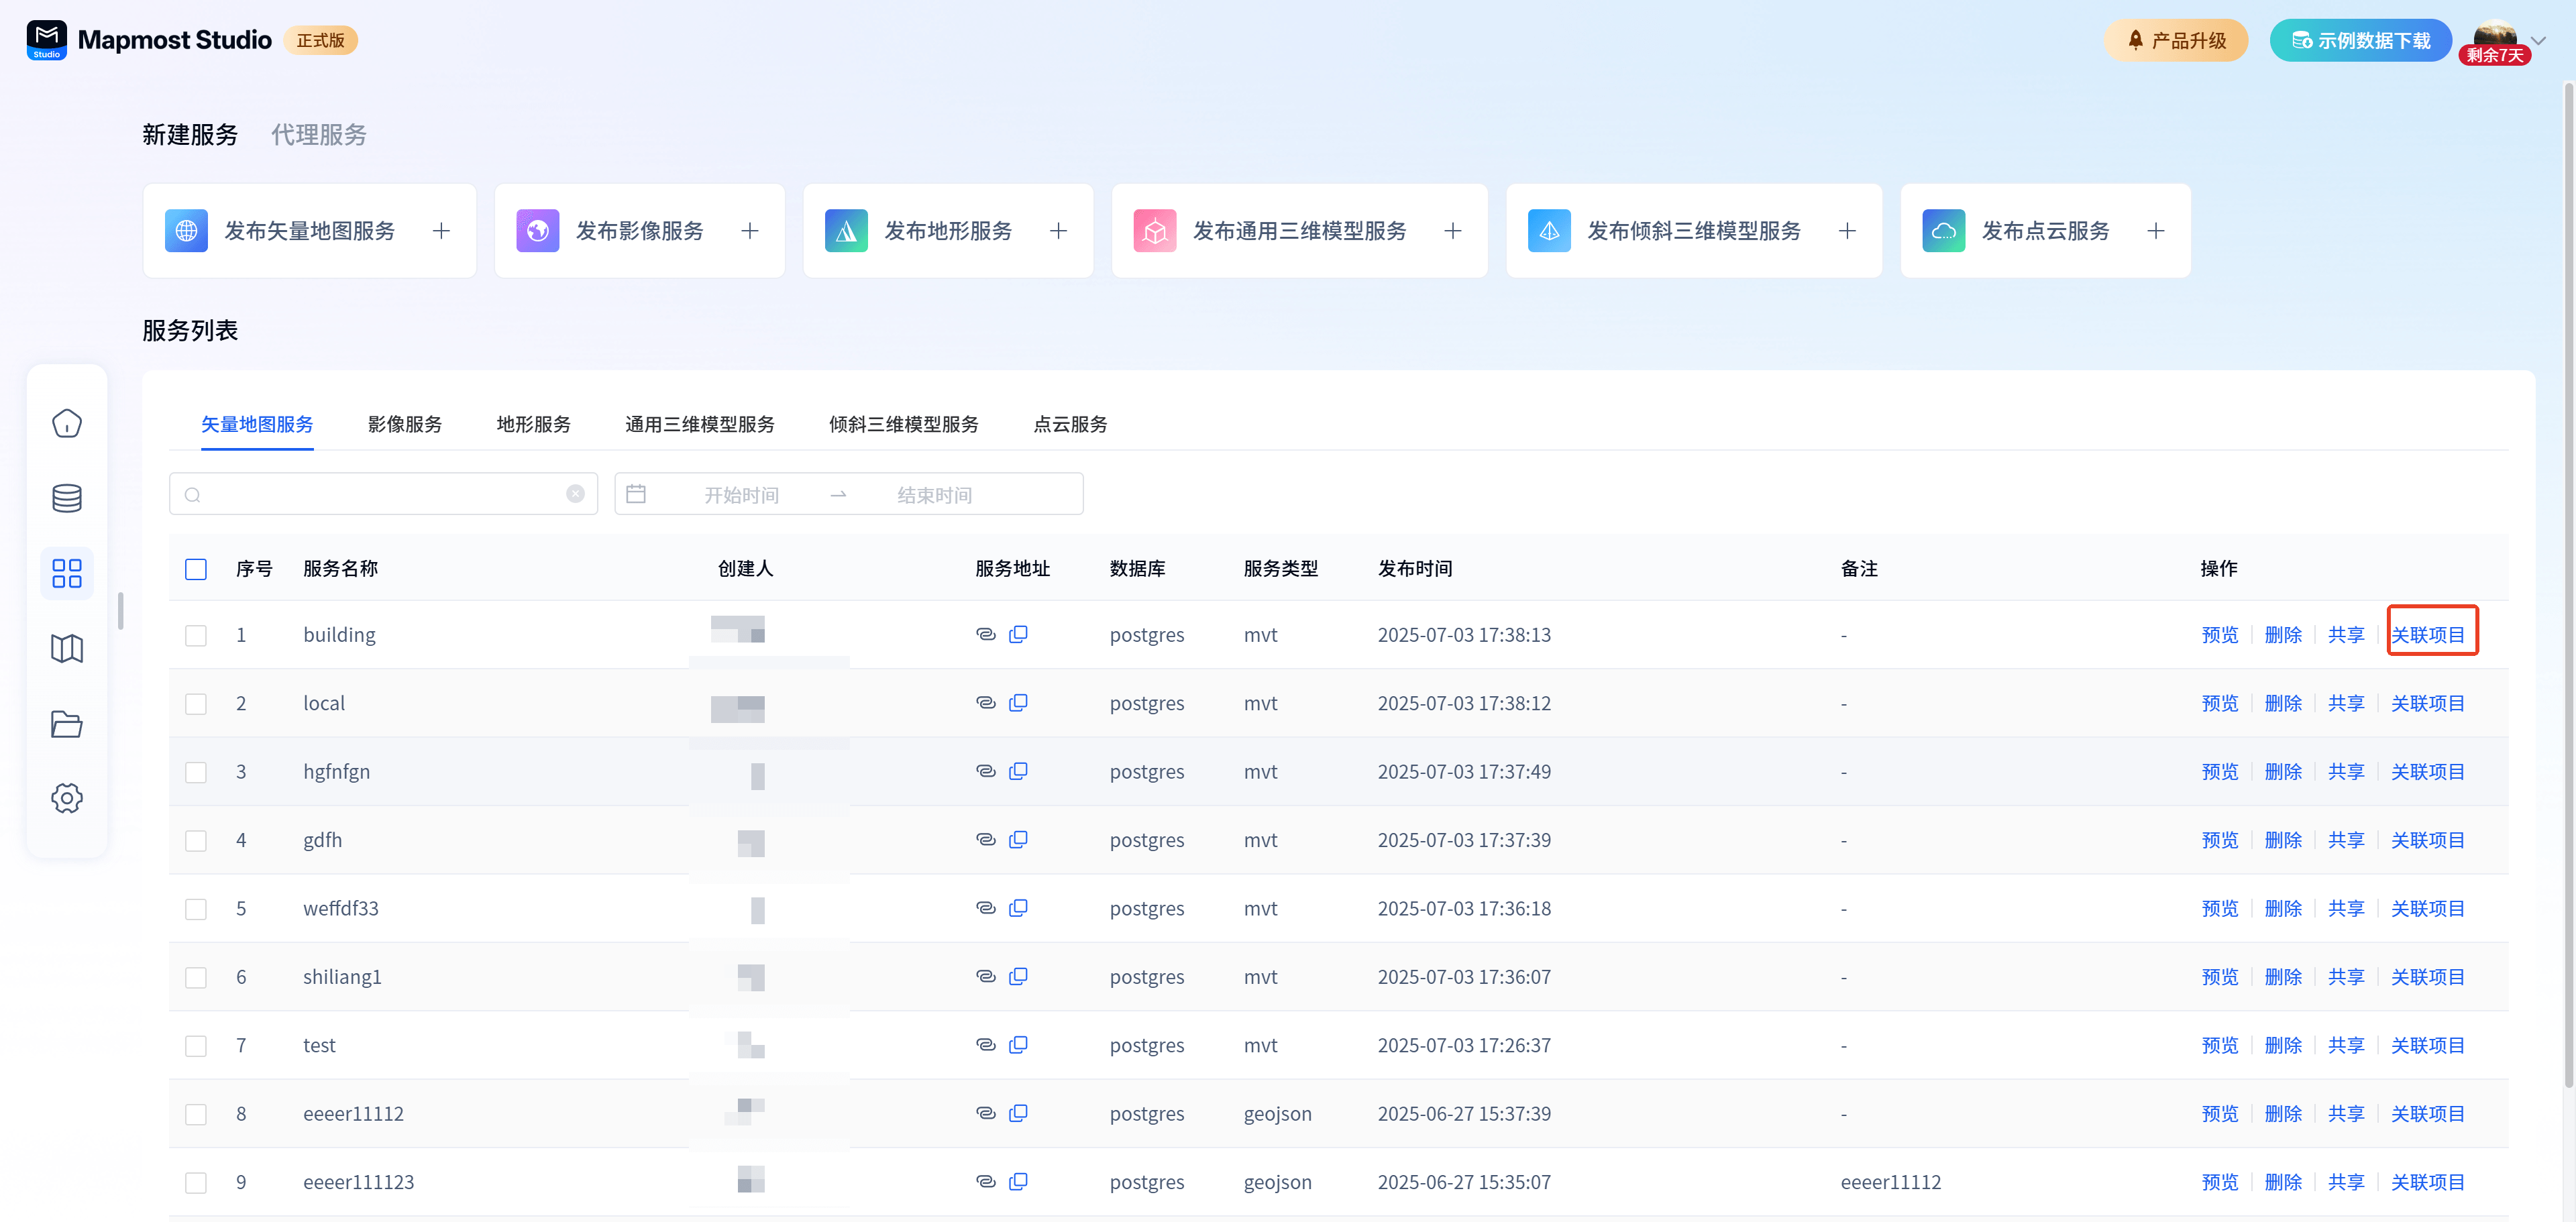
1.8. Related projects
①Single associated project: table operation-associated project, supports single service association.
② Batch associated projects: Select multiple services to be associated with projects, and click the Associate Projects button in the multi-select operation box above the table.
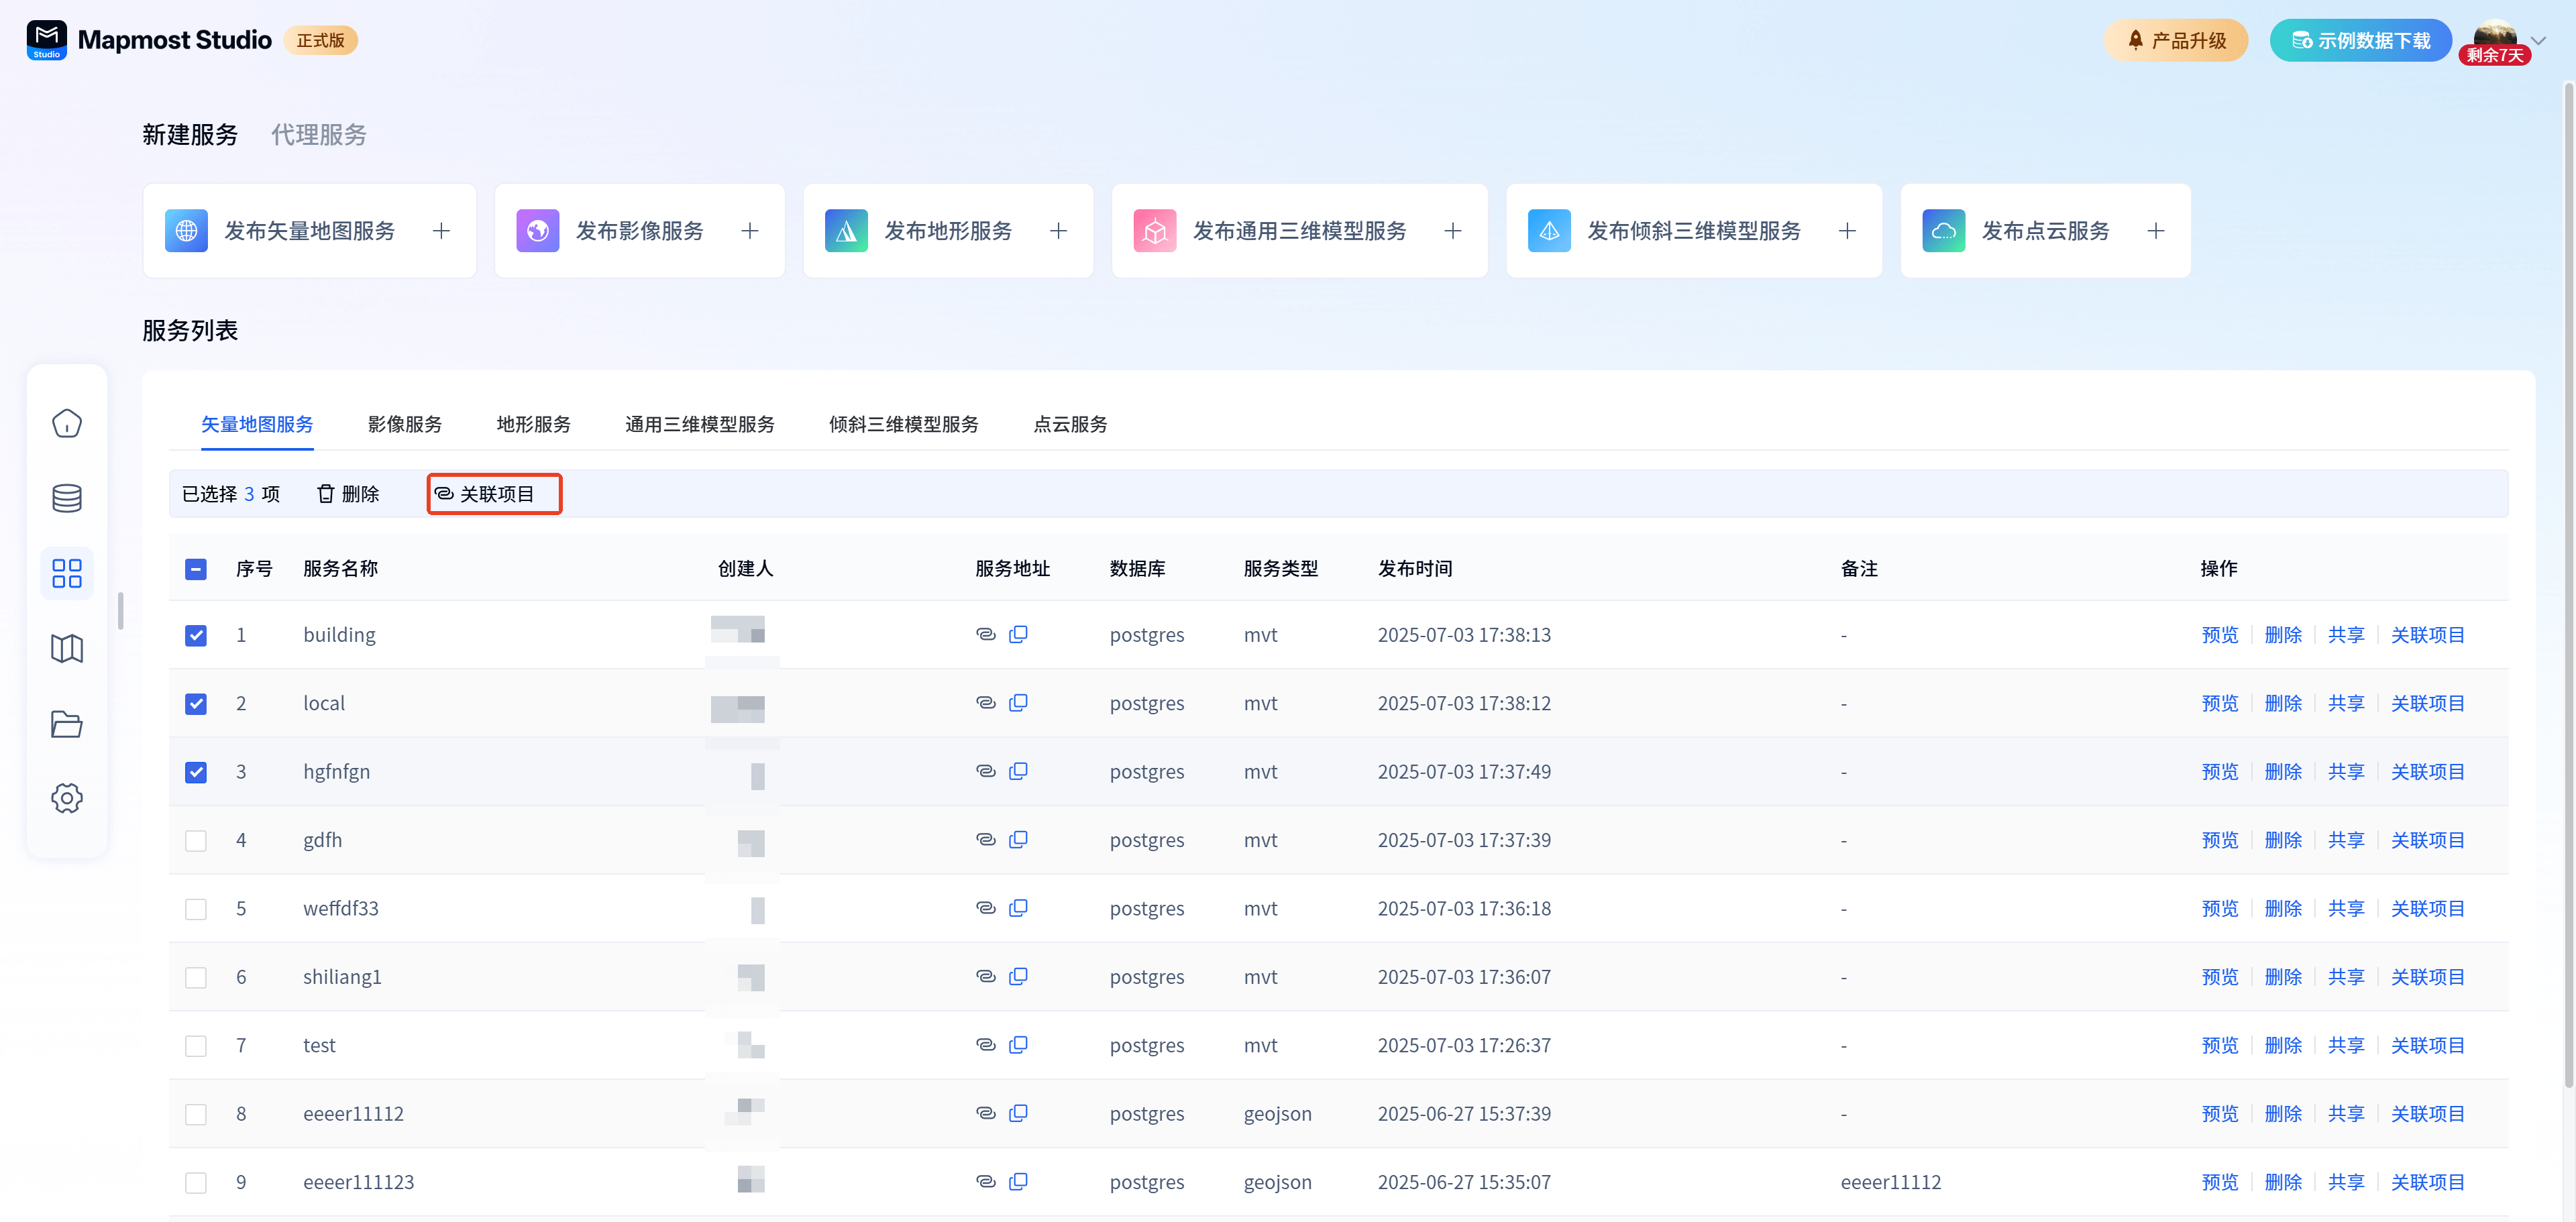
Related projects support searching by project name or table selection, and supporting multiple projects.

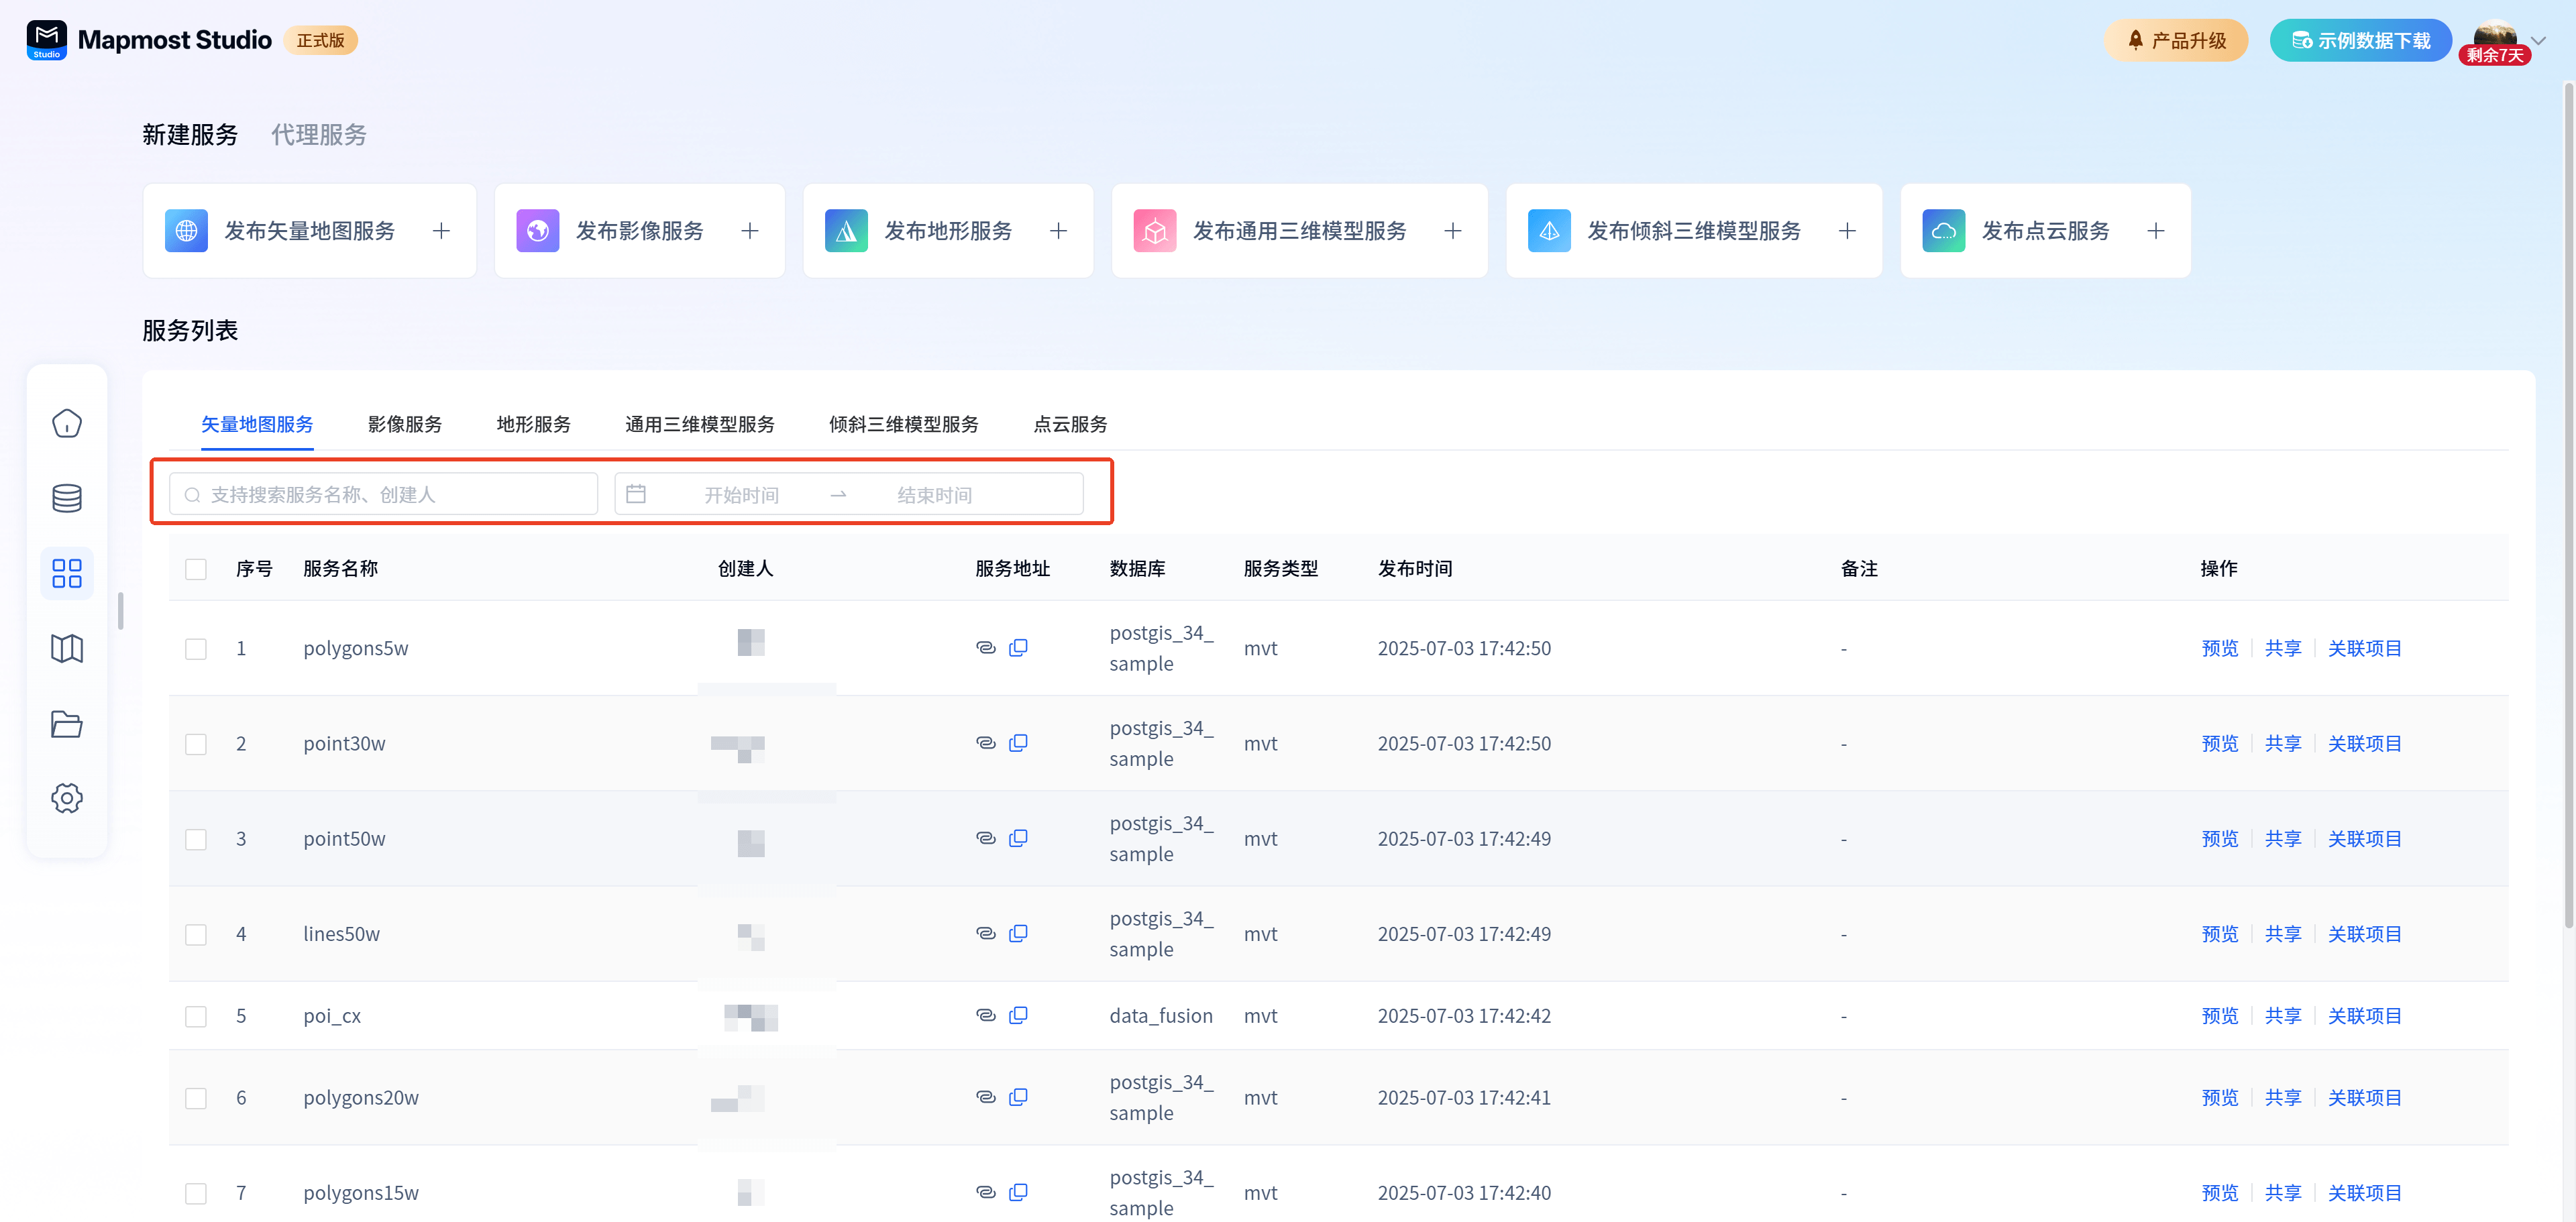
1.9. Filtering
Service list supports filtering
①Support filtering services by keyword service name and creator
②Support filtering services by release time
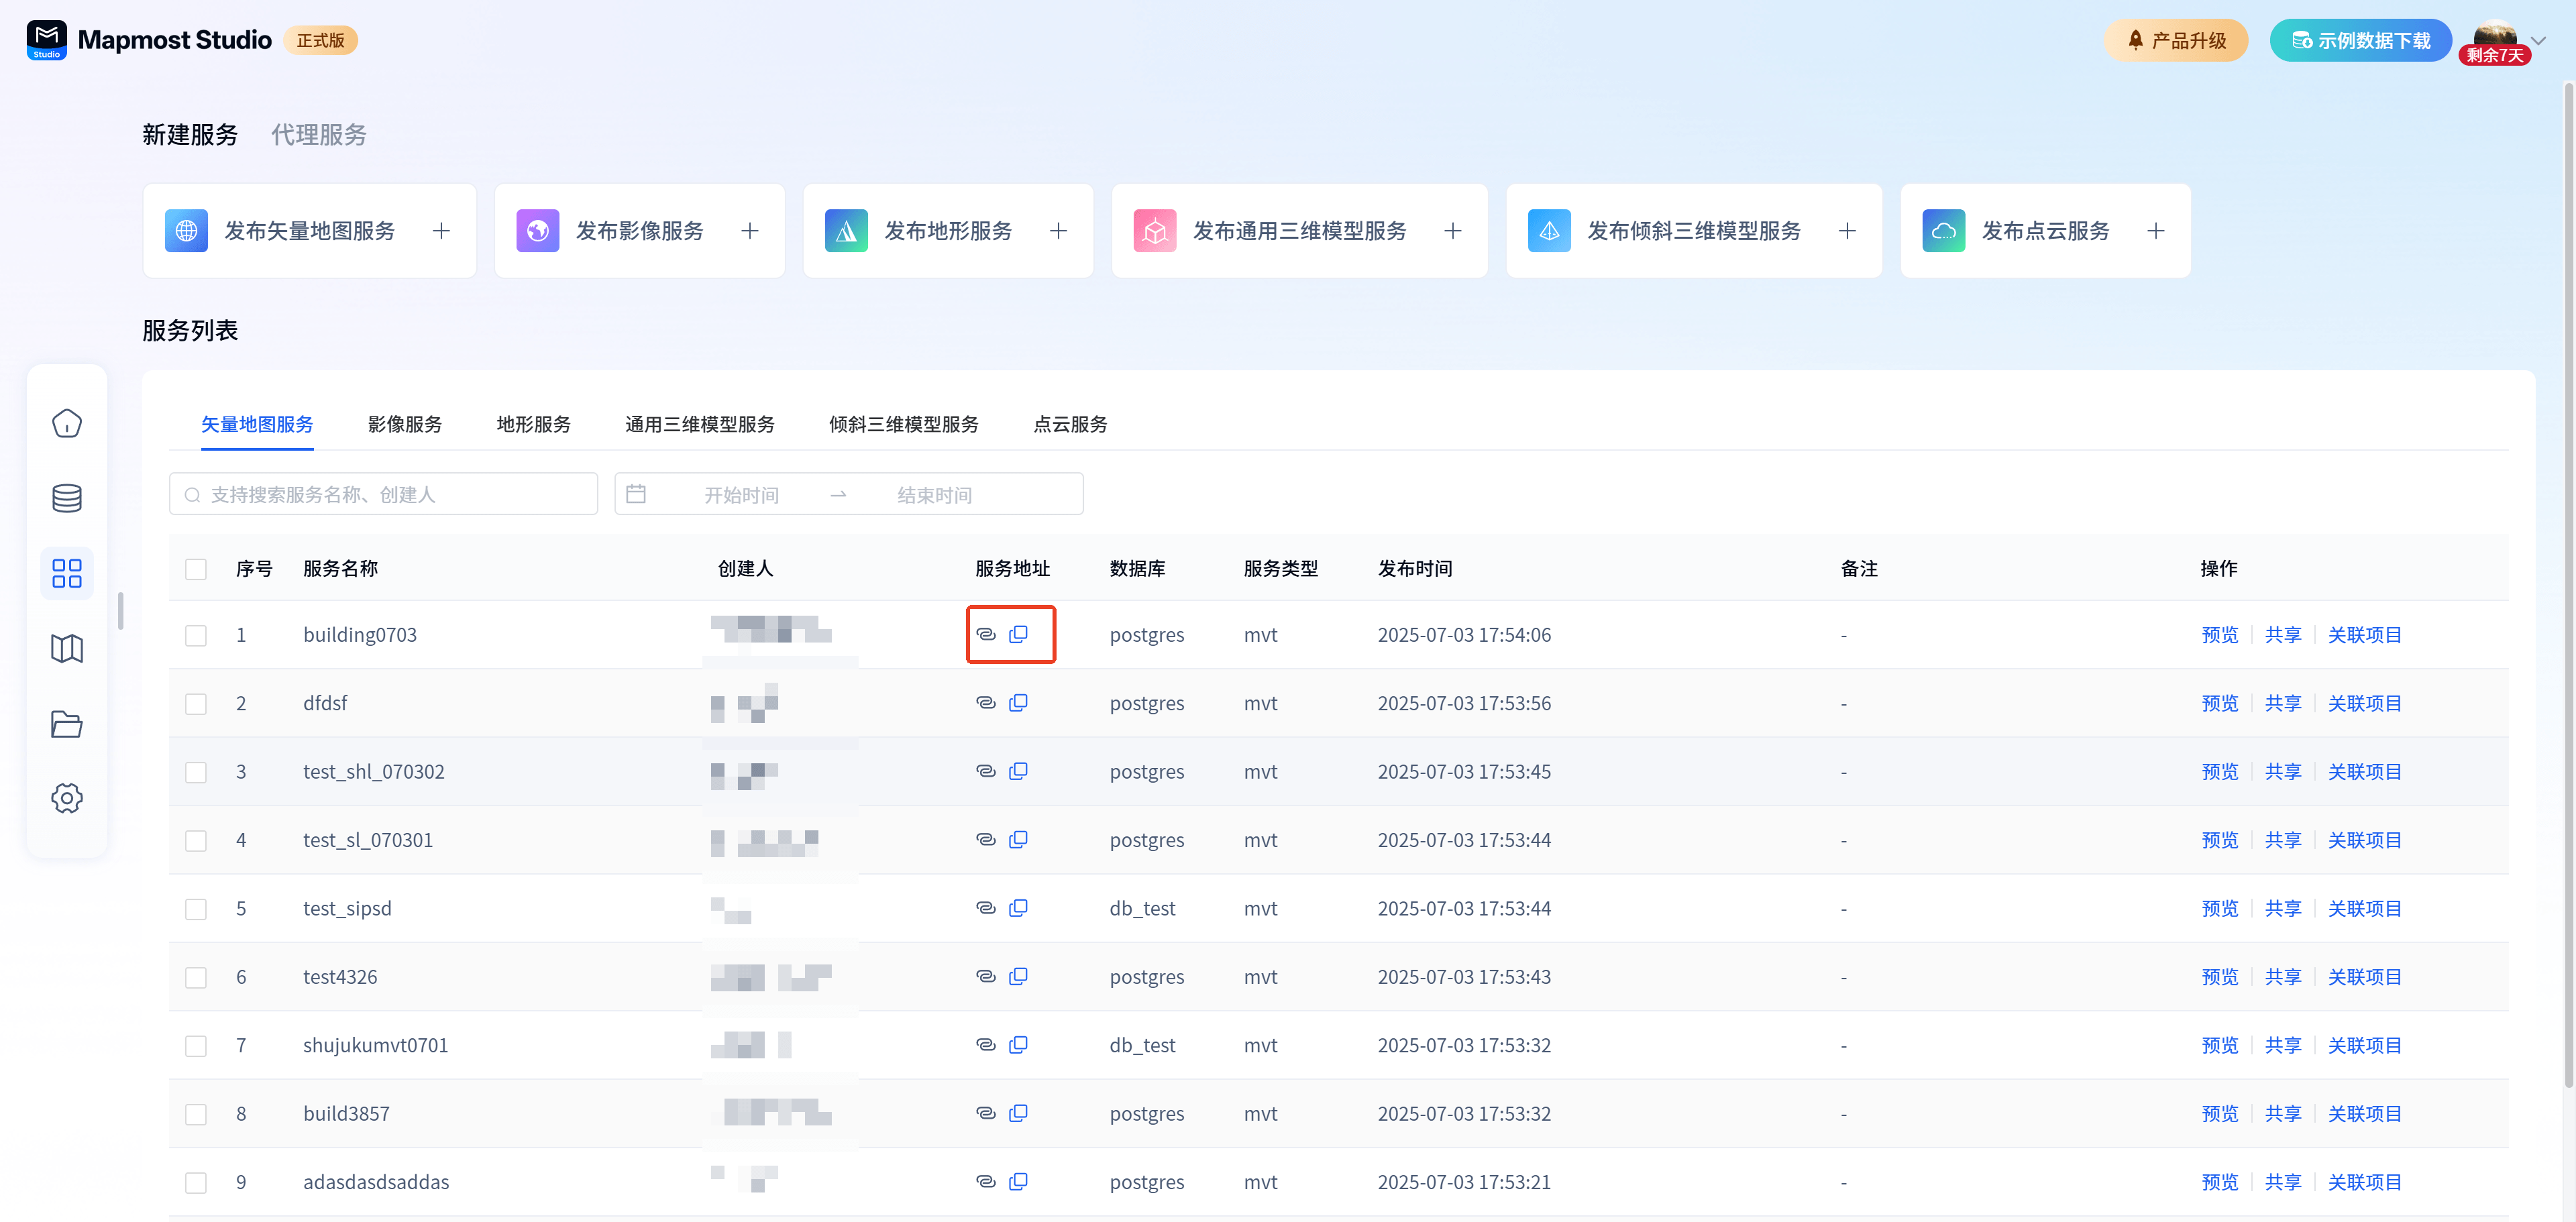
1.10. Copy service address
Successfully published services support copying. Click the copy button to copy the service address to the clipboard. The service address supports loading in Mapmost SDK for WebGL.
1.11. Scheduled retransmission
The vector map service supports scheduled retransmission, and users can dynamically update vector map service data at customized intervals.
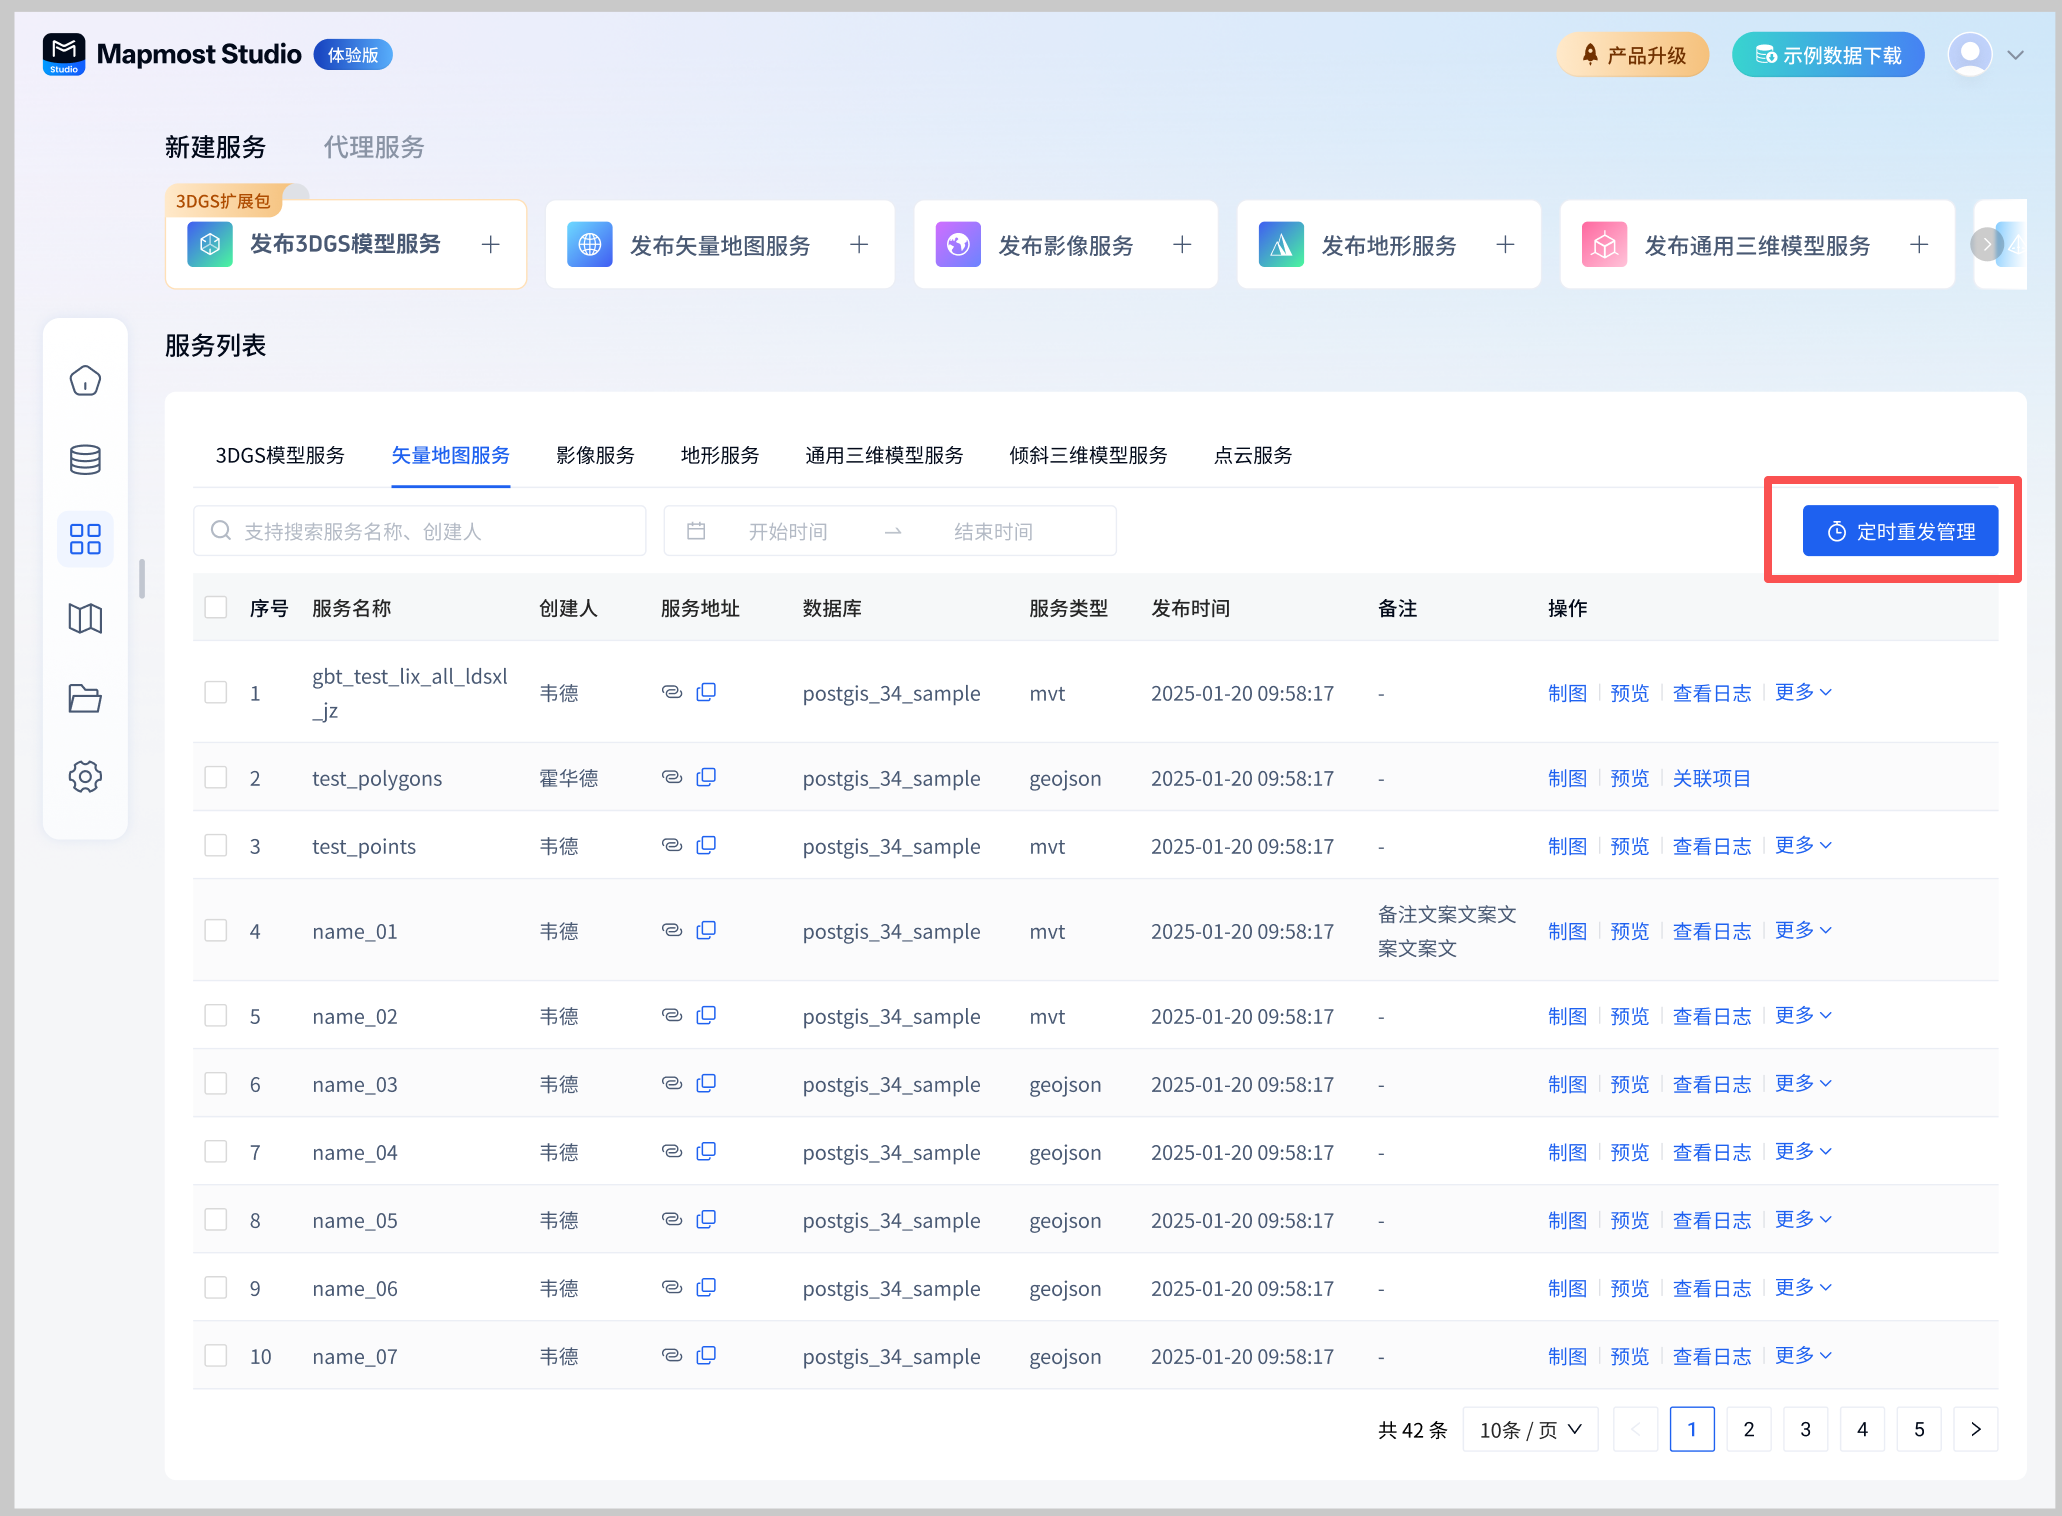
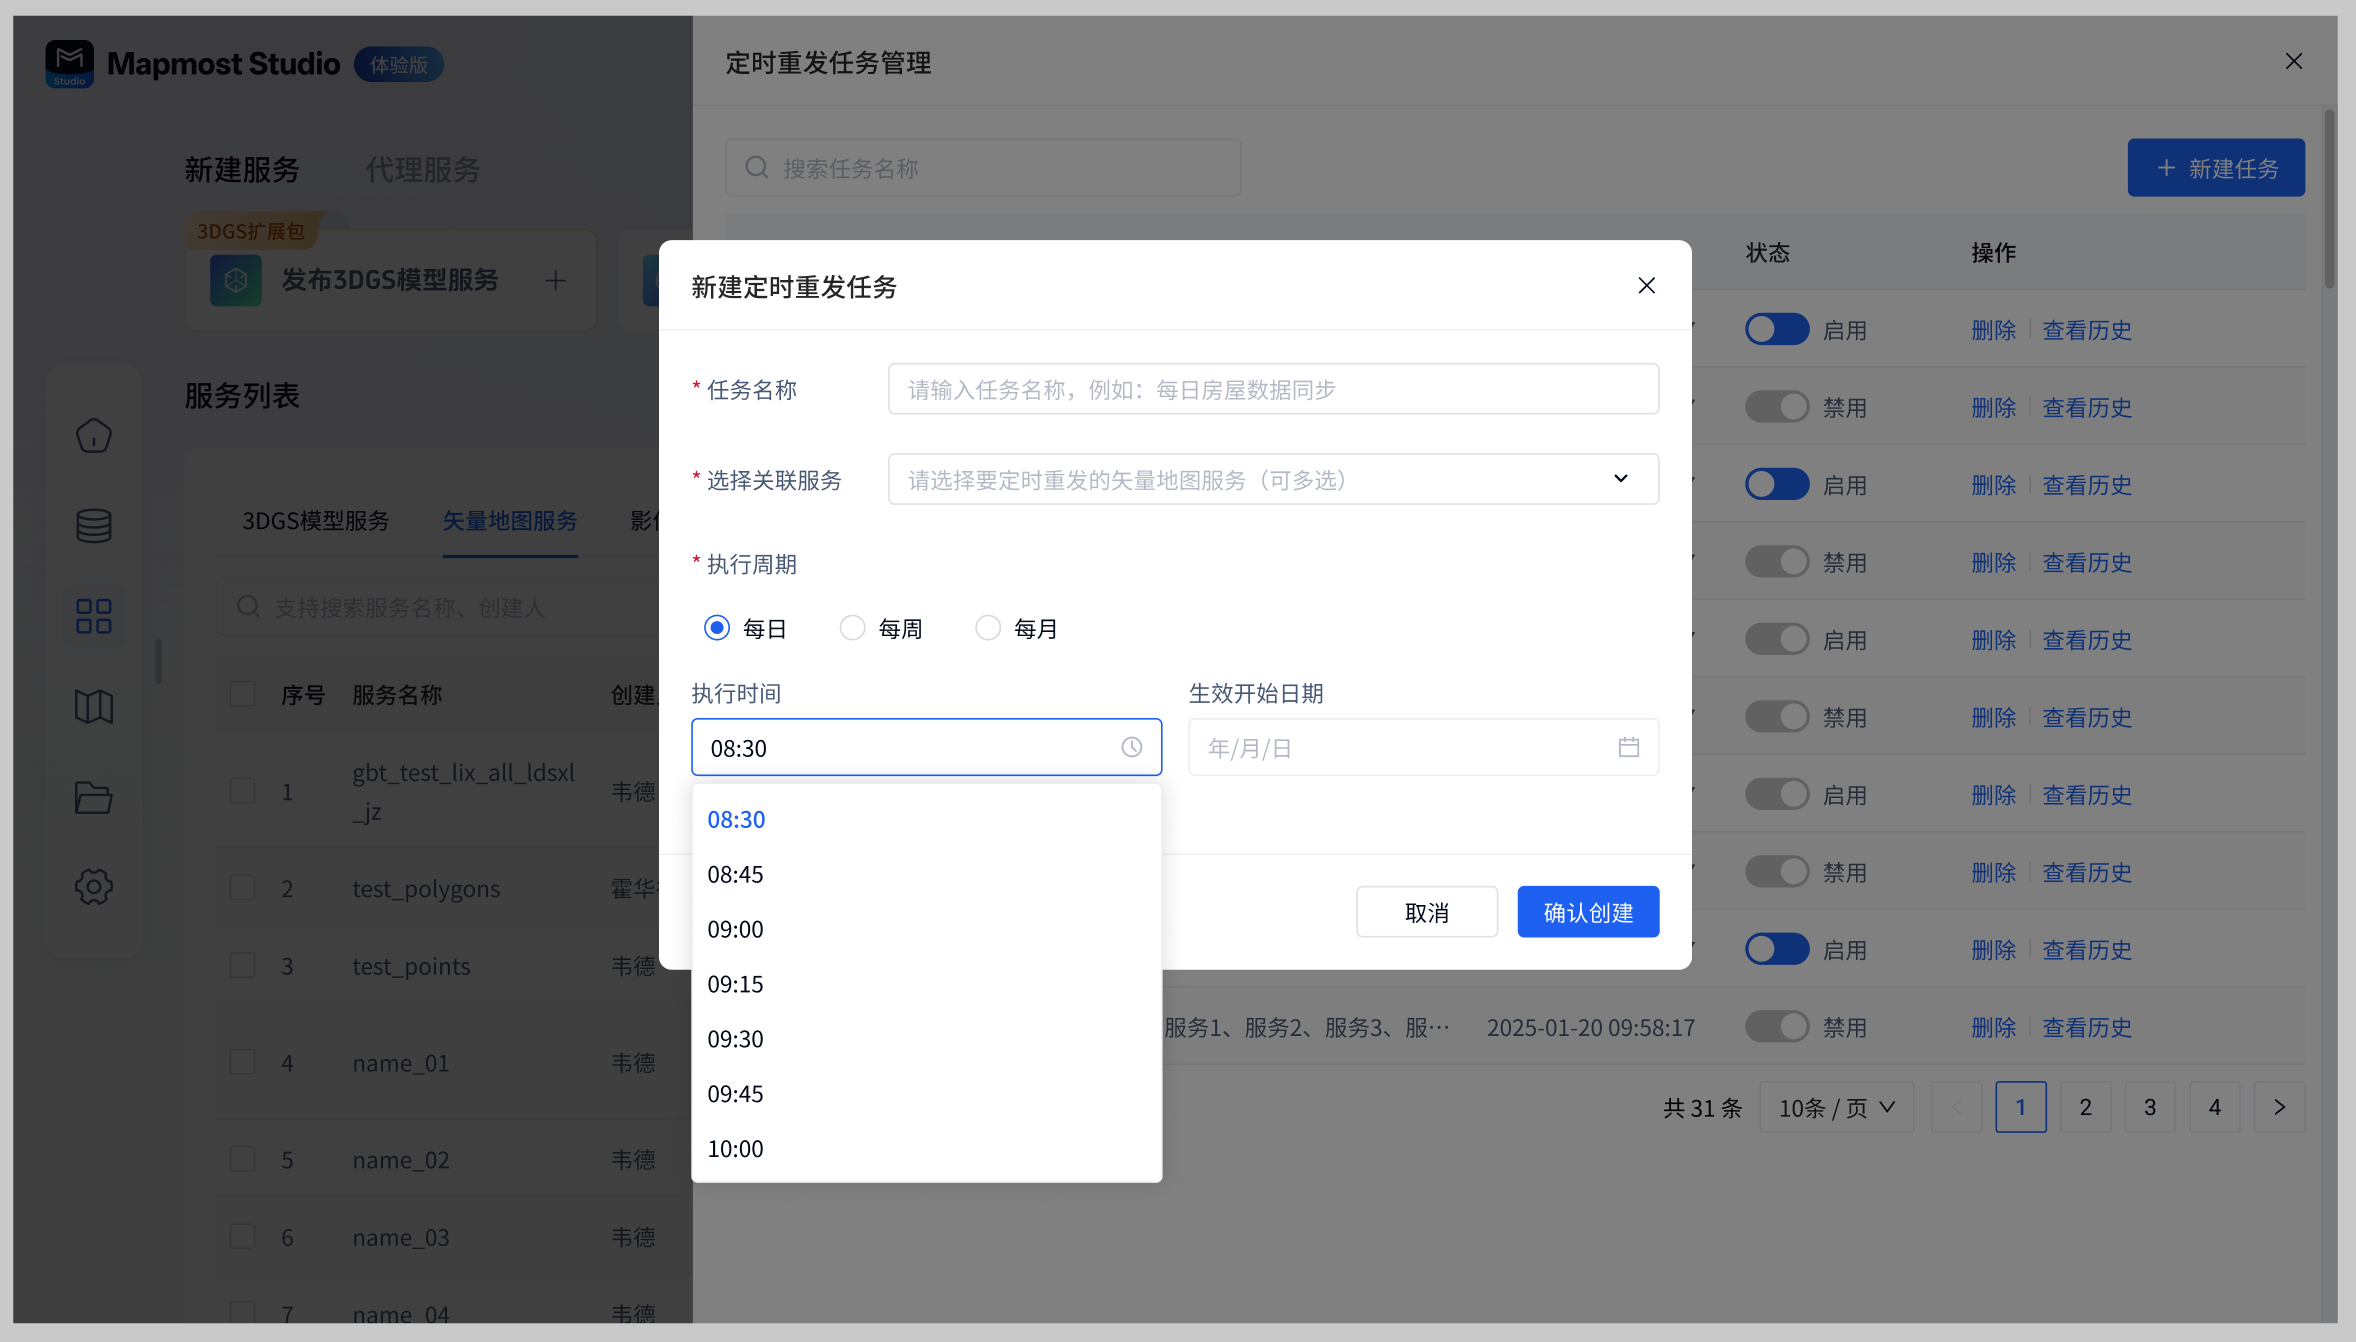
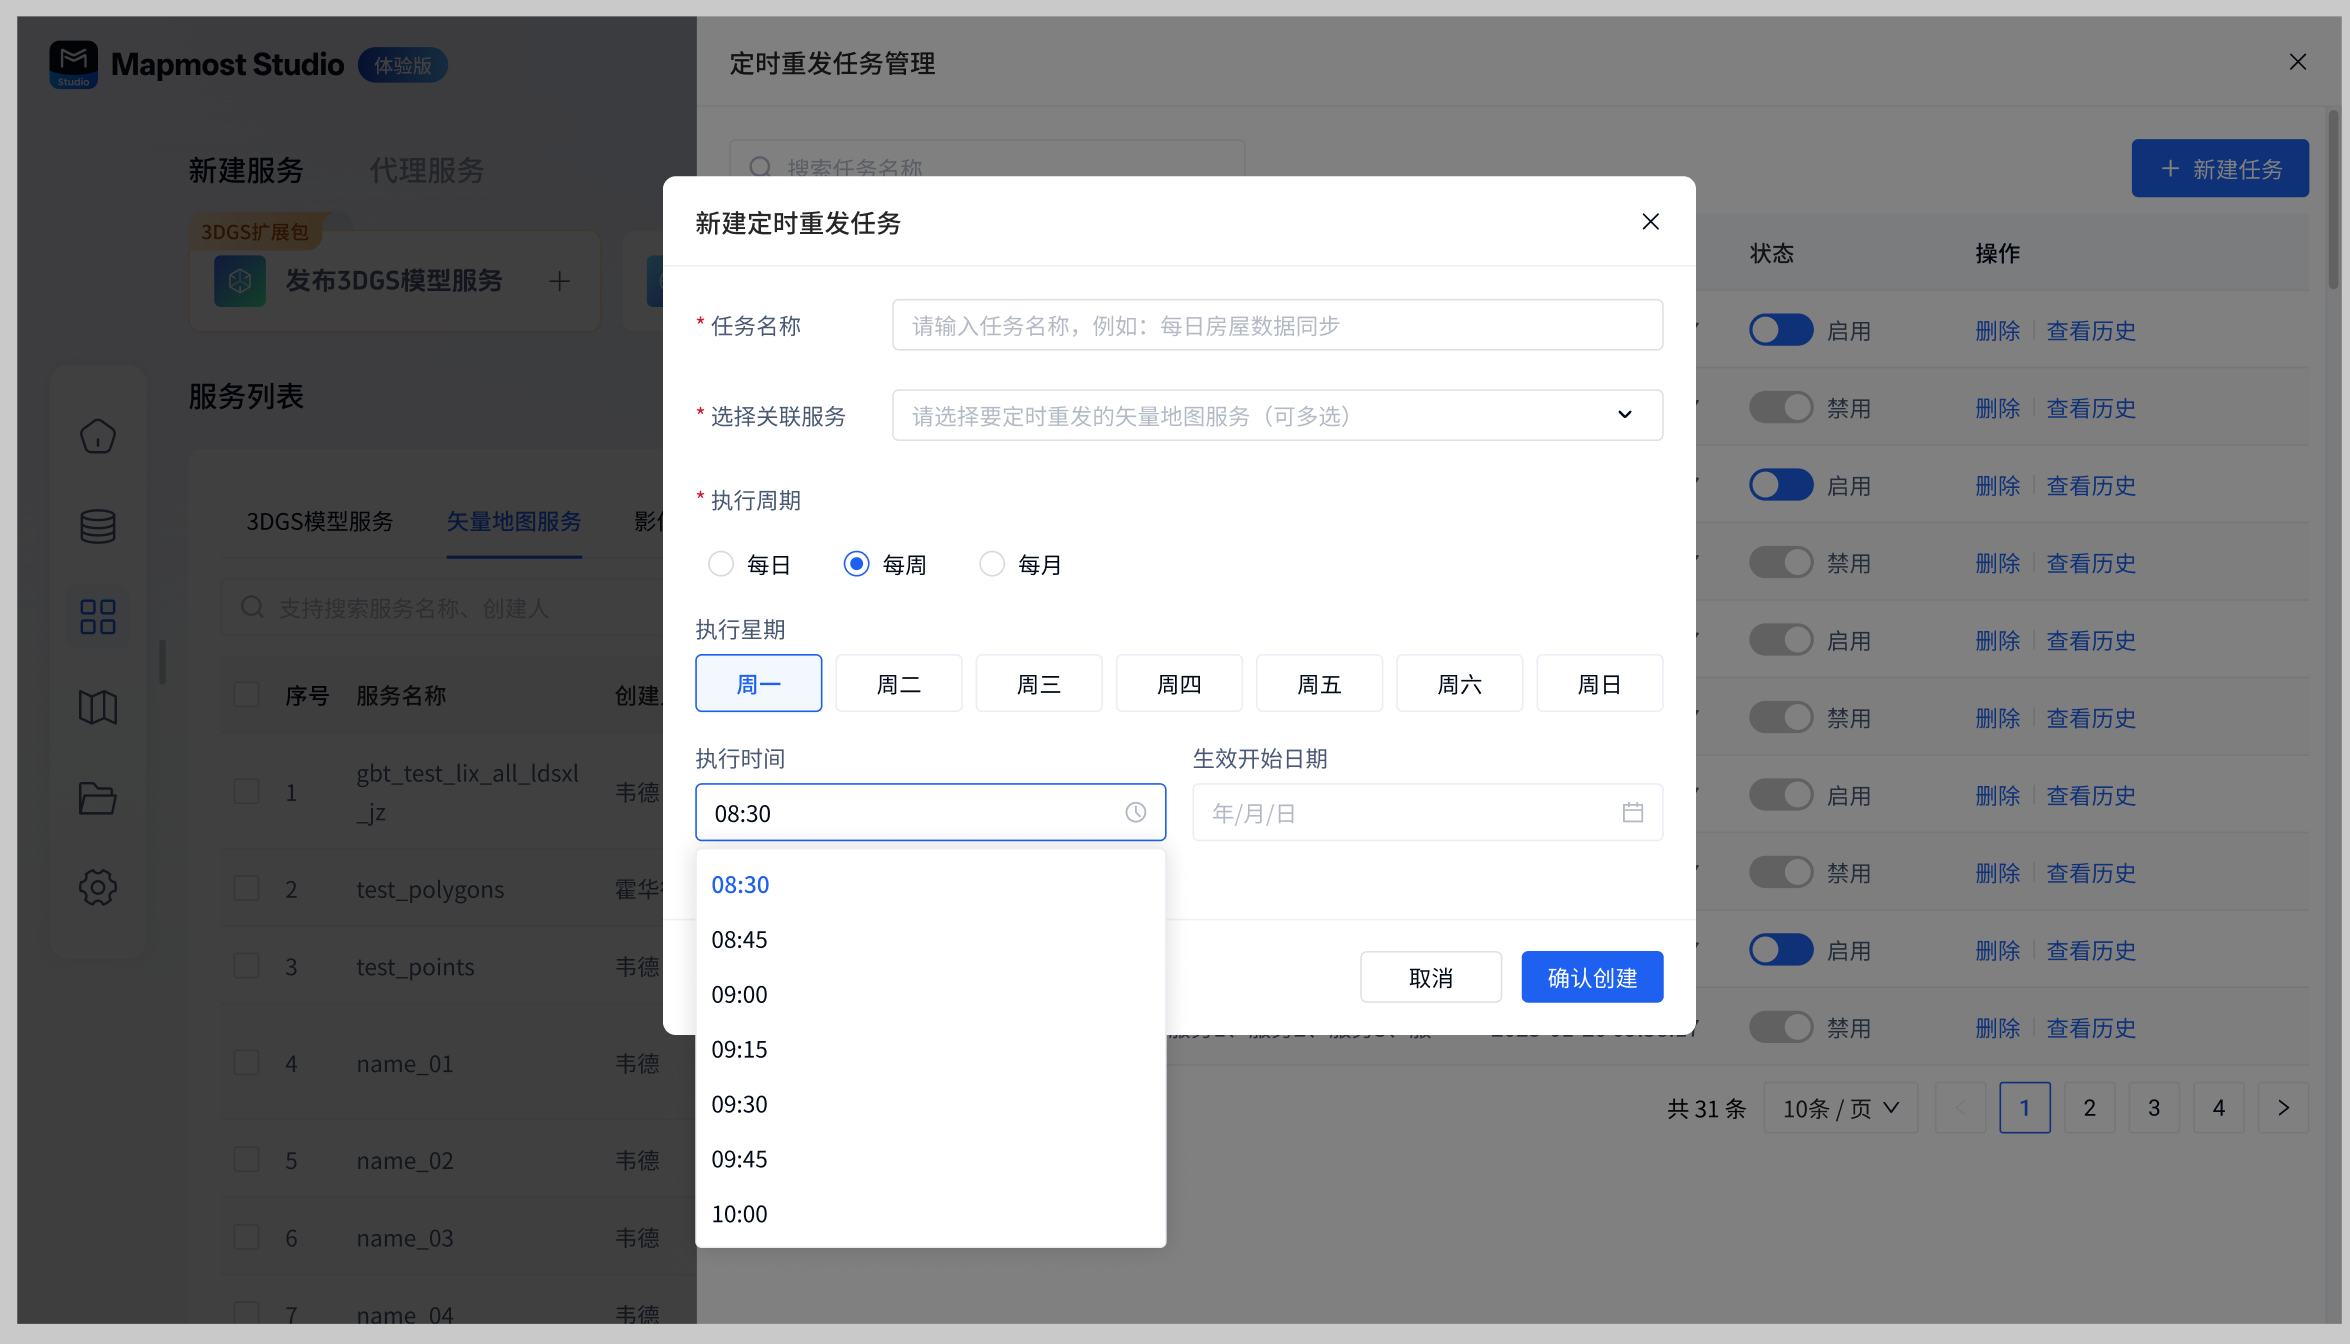
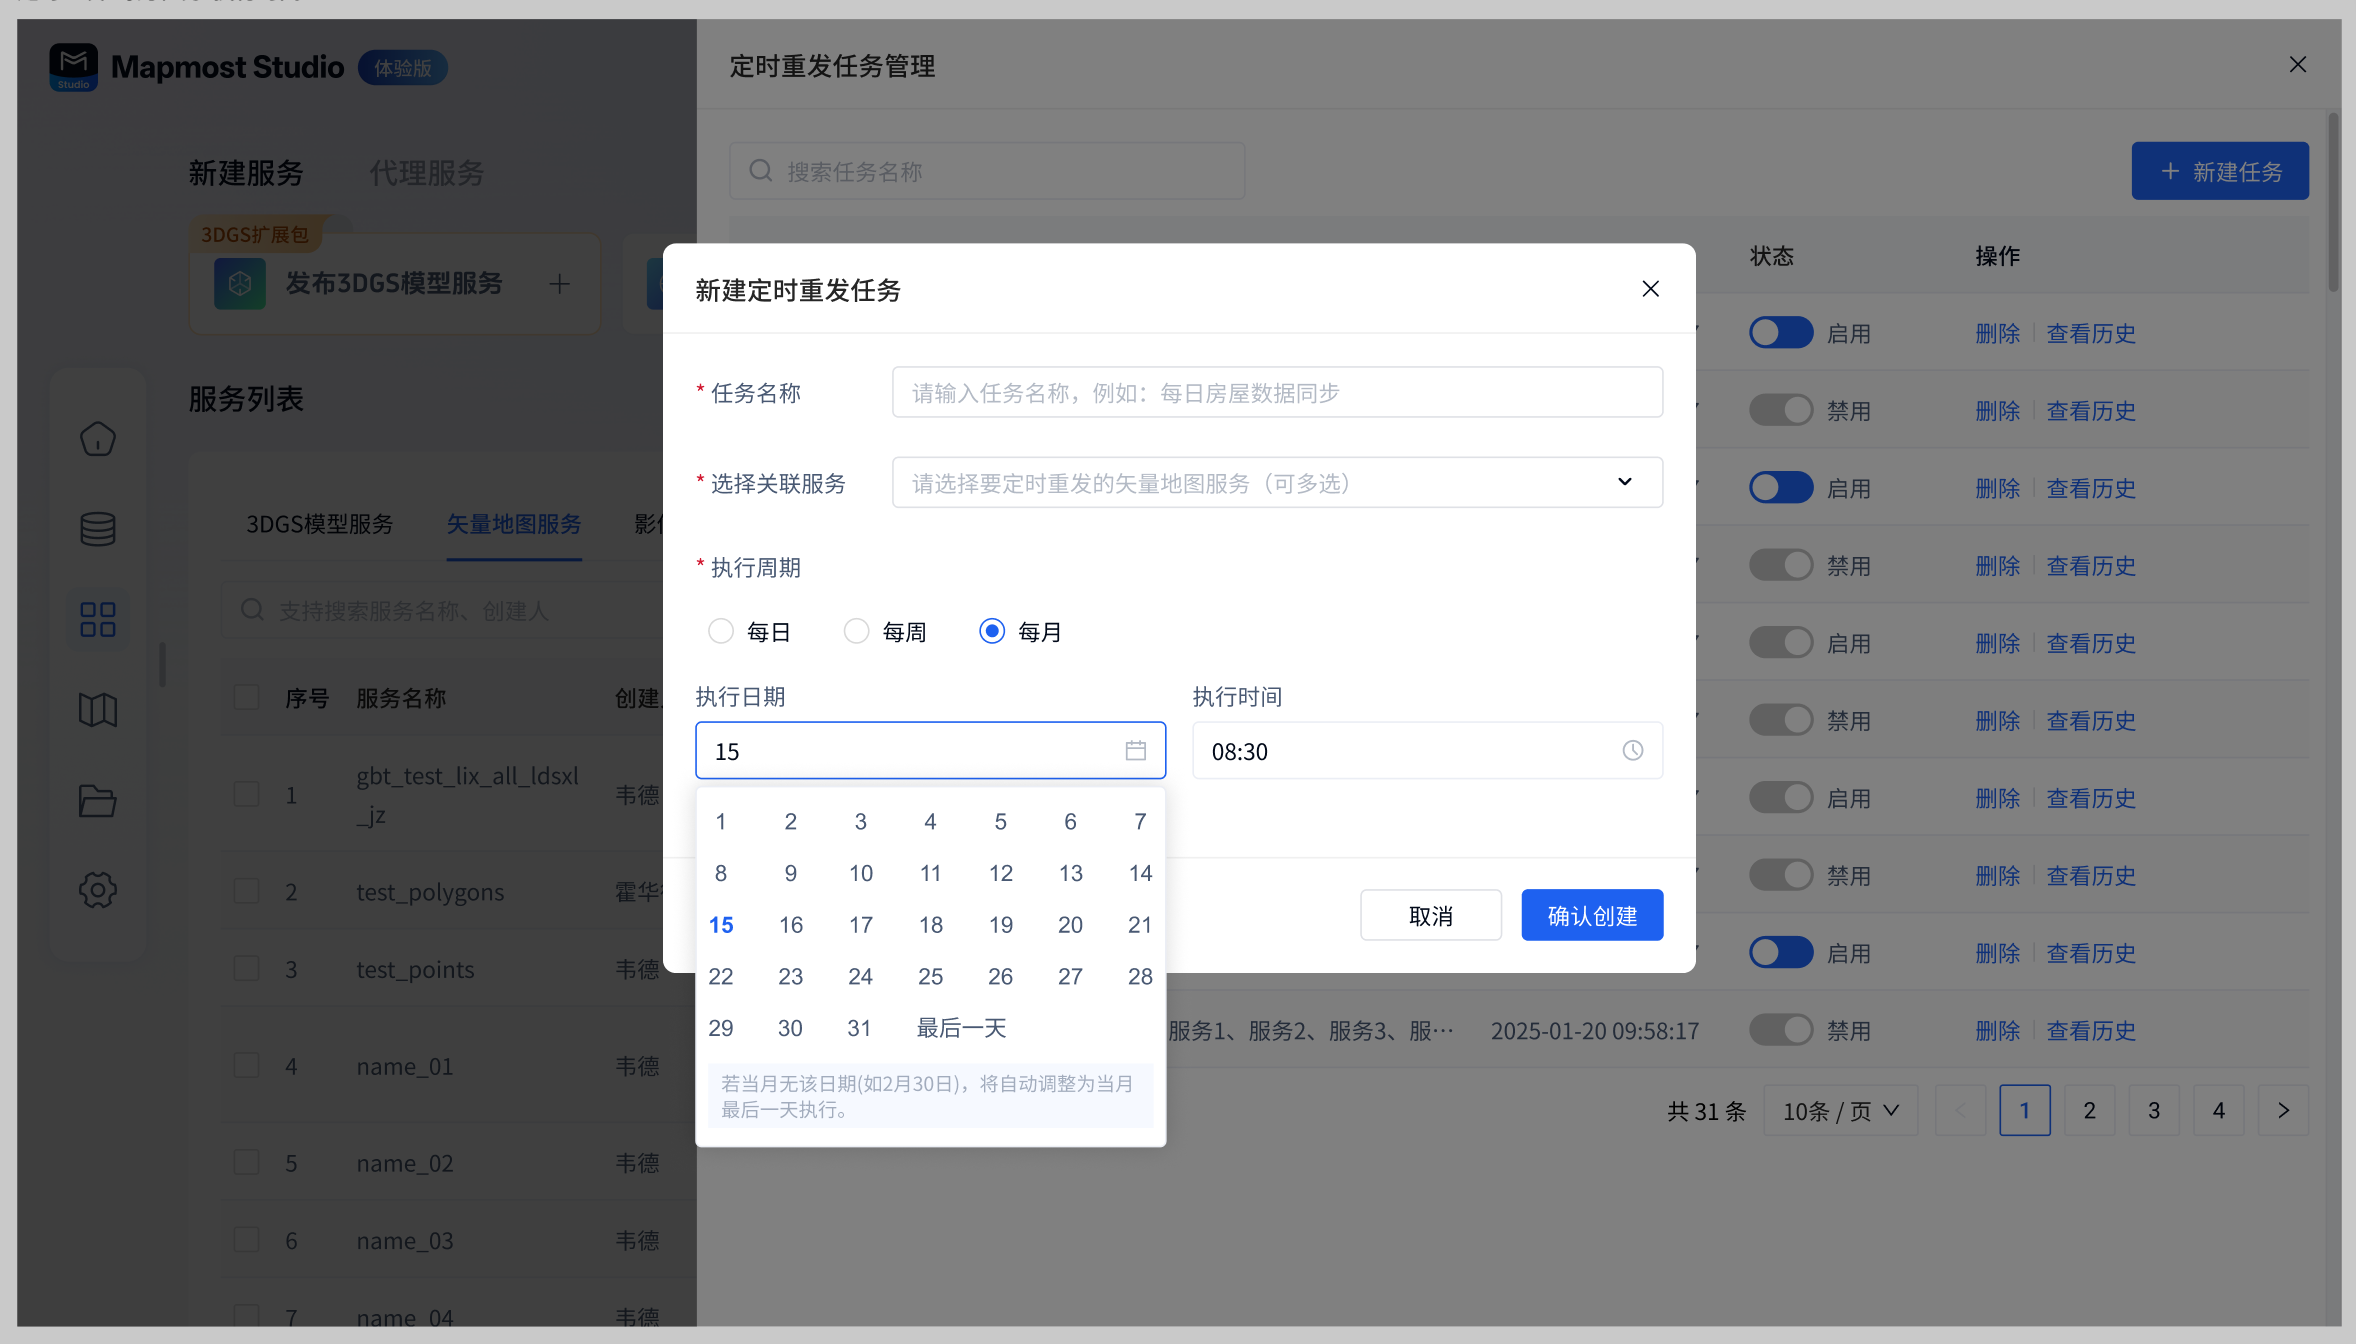
Click the scheduled resend management button to open the "scheduled resend task management" pop-up window, which supports viewing the scheduled resend task list in the pop-up window, including task name, associated services, execution cycle, next execution time, status, and task execution history. It supports creating and deleting scheduled resend tasks.
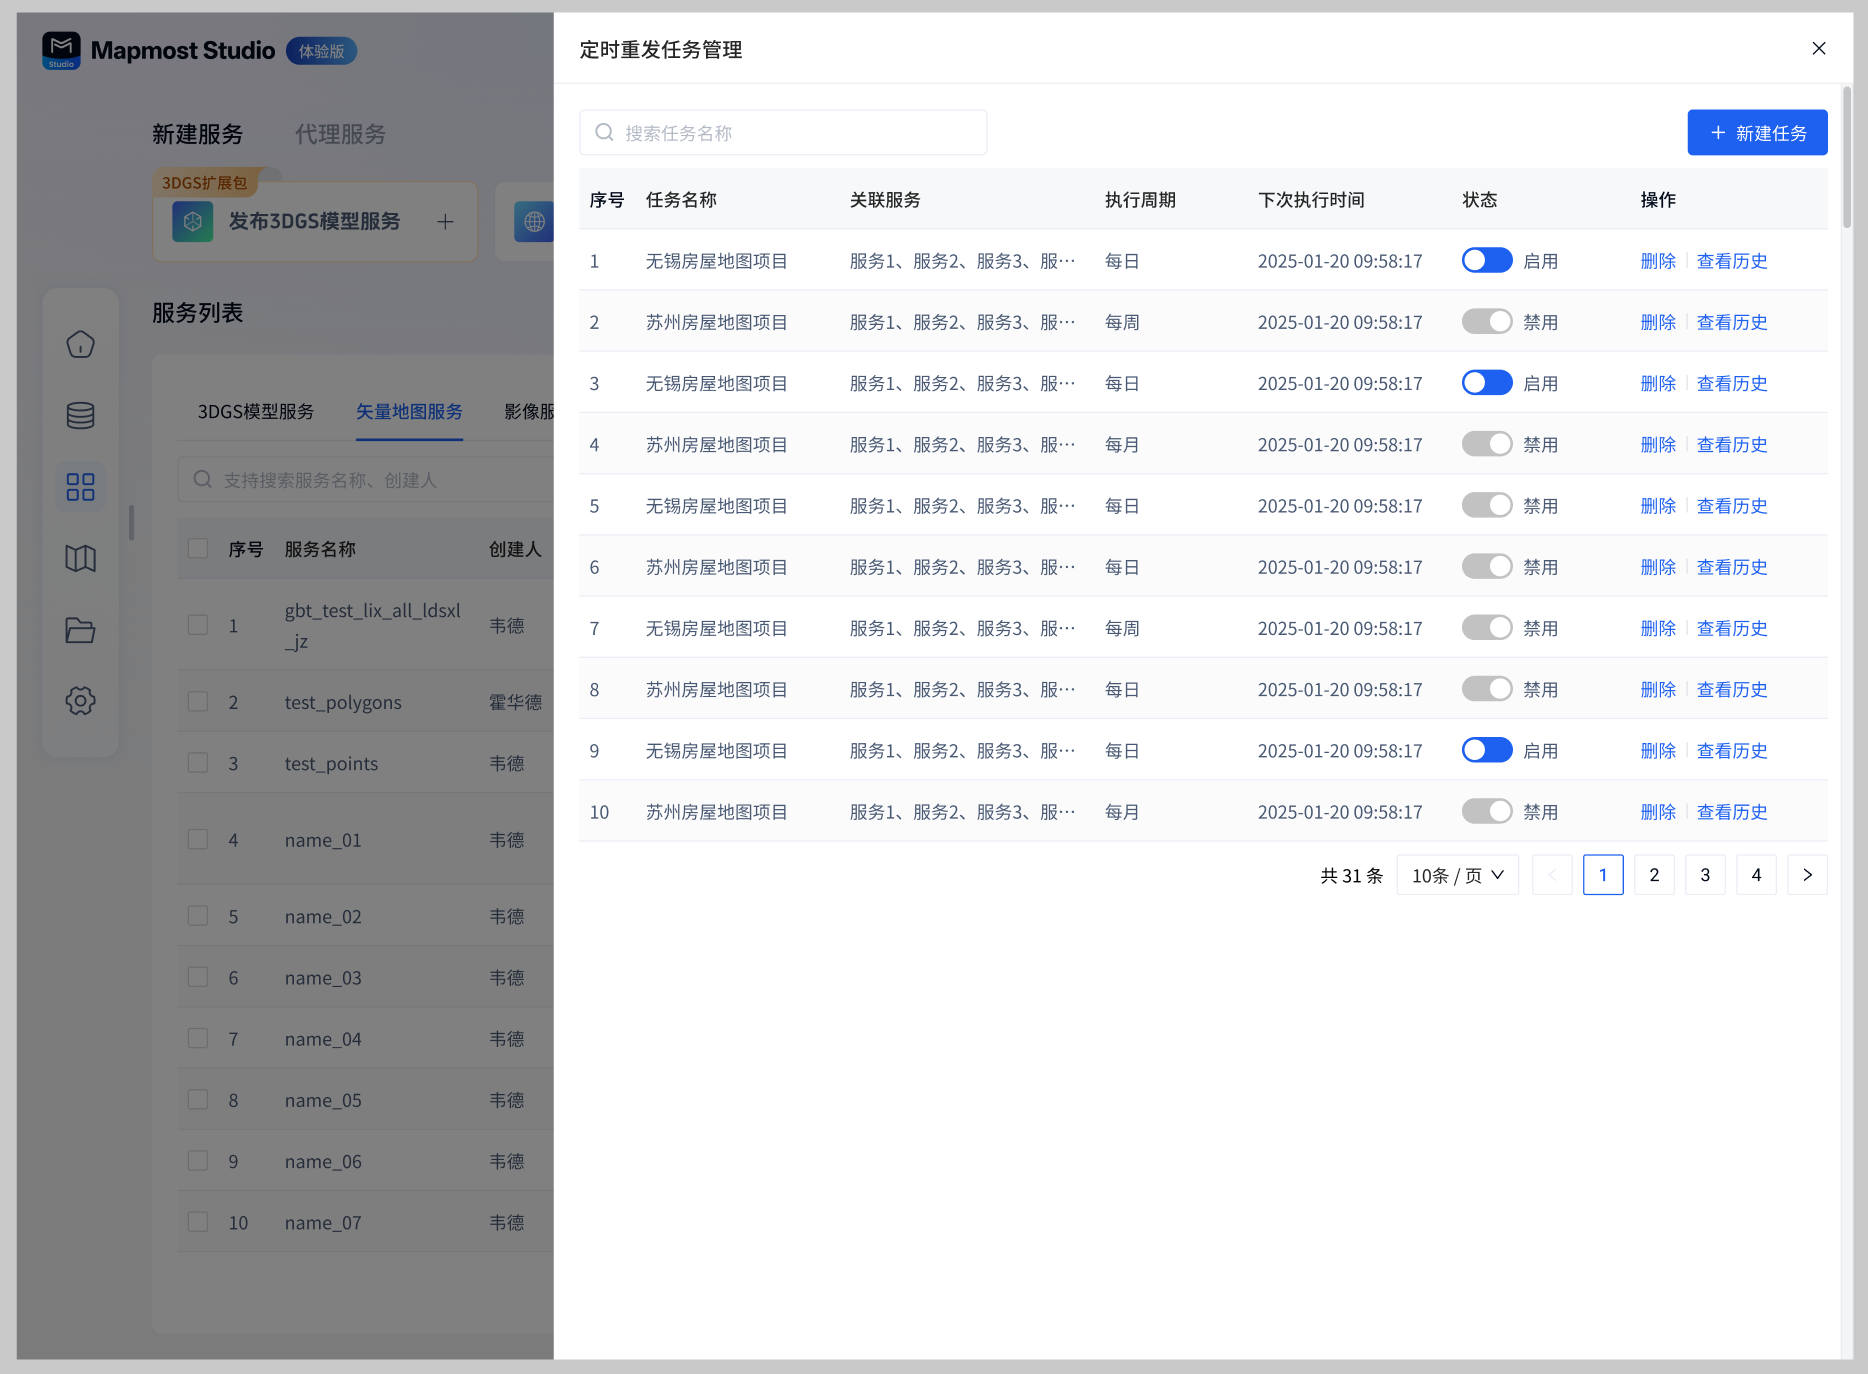
When creating a new scheduled resend task, you can set the task name, associated services, execution cycle, execution time and other information.
- Daily scheduled resend: Set the service to resend at a specified time point. It supports setting it to any time point every day and specifying the start execution time.
- Weekly scheduled resend: Set the service to resend at a specified time point. It supports setting it to any time point every week and specifying the start execution time.
- Monthly scheduled resend: Set the service to resend at a specified time point, and support setting it to any time point every month.
2. imaging services
2.1. New
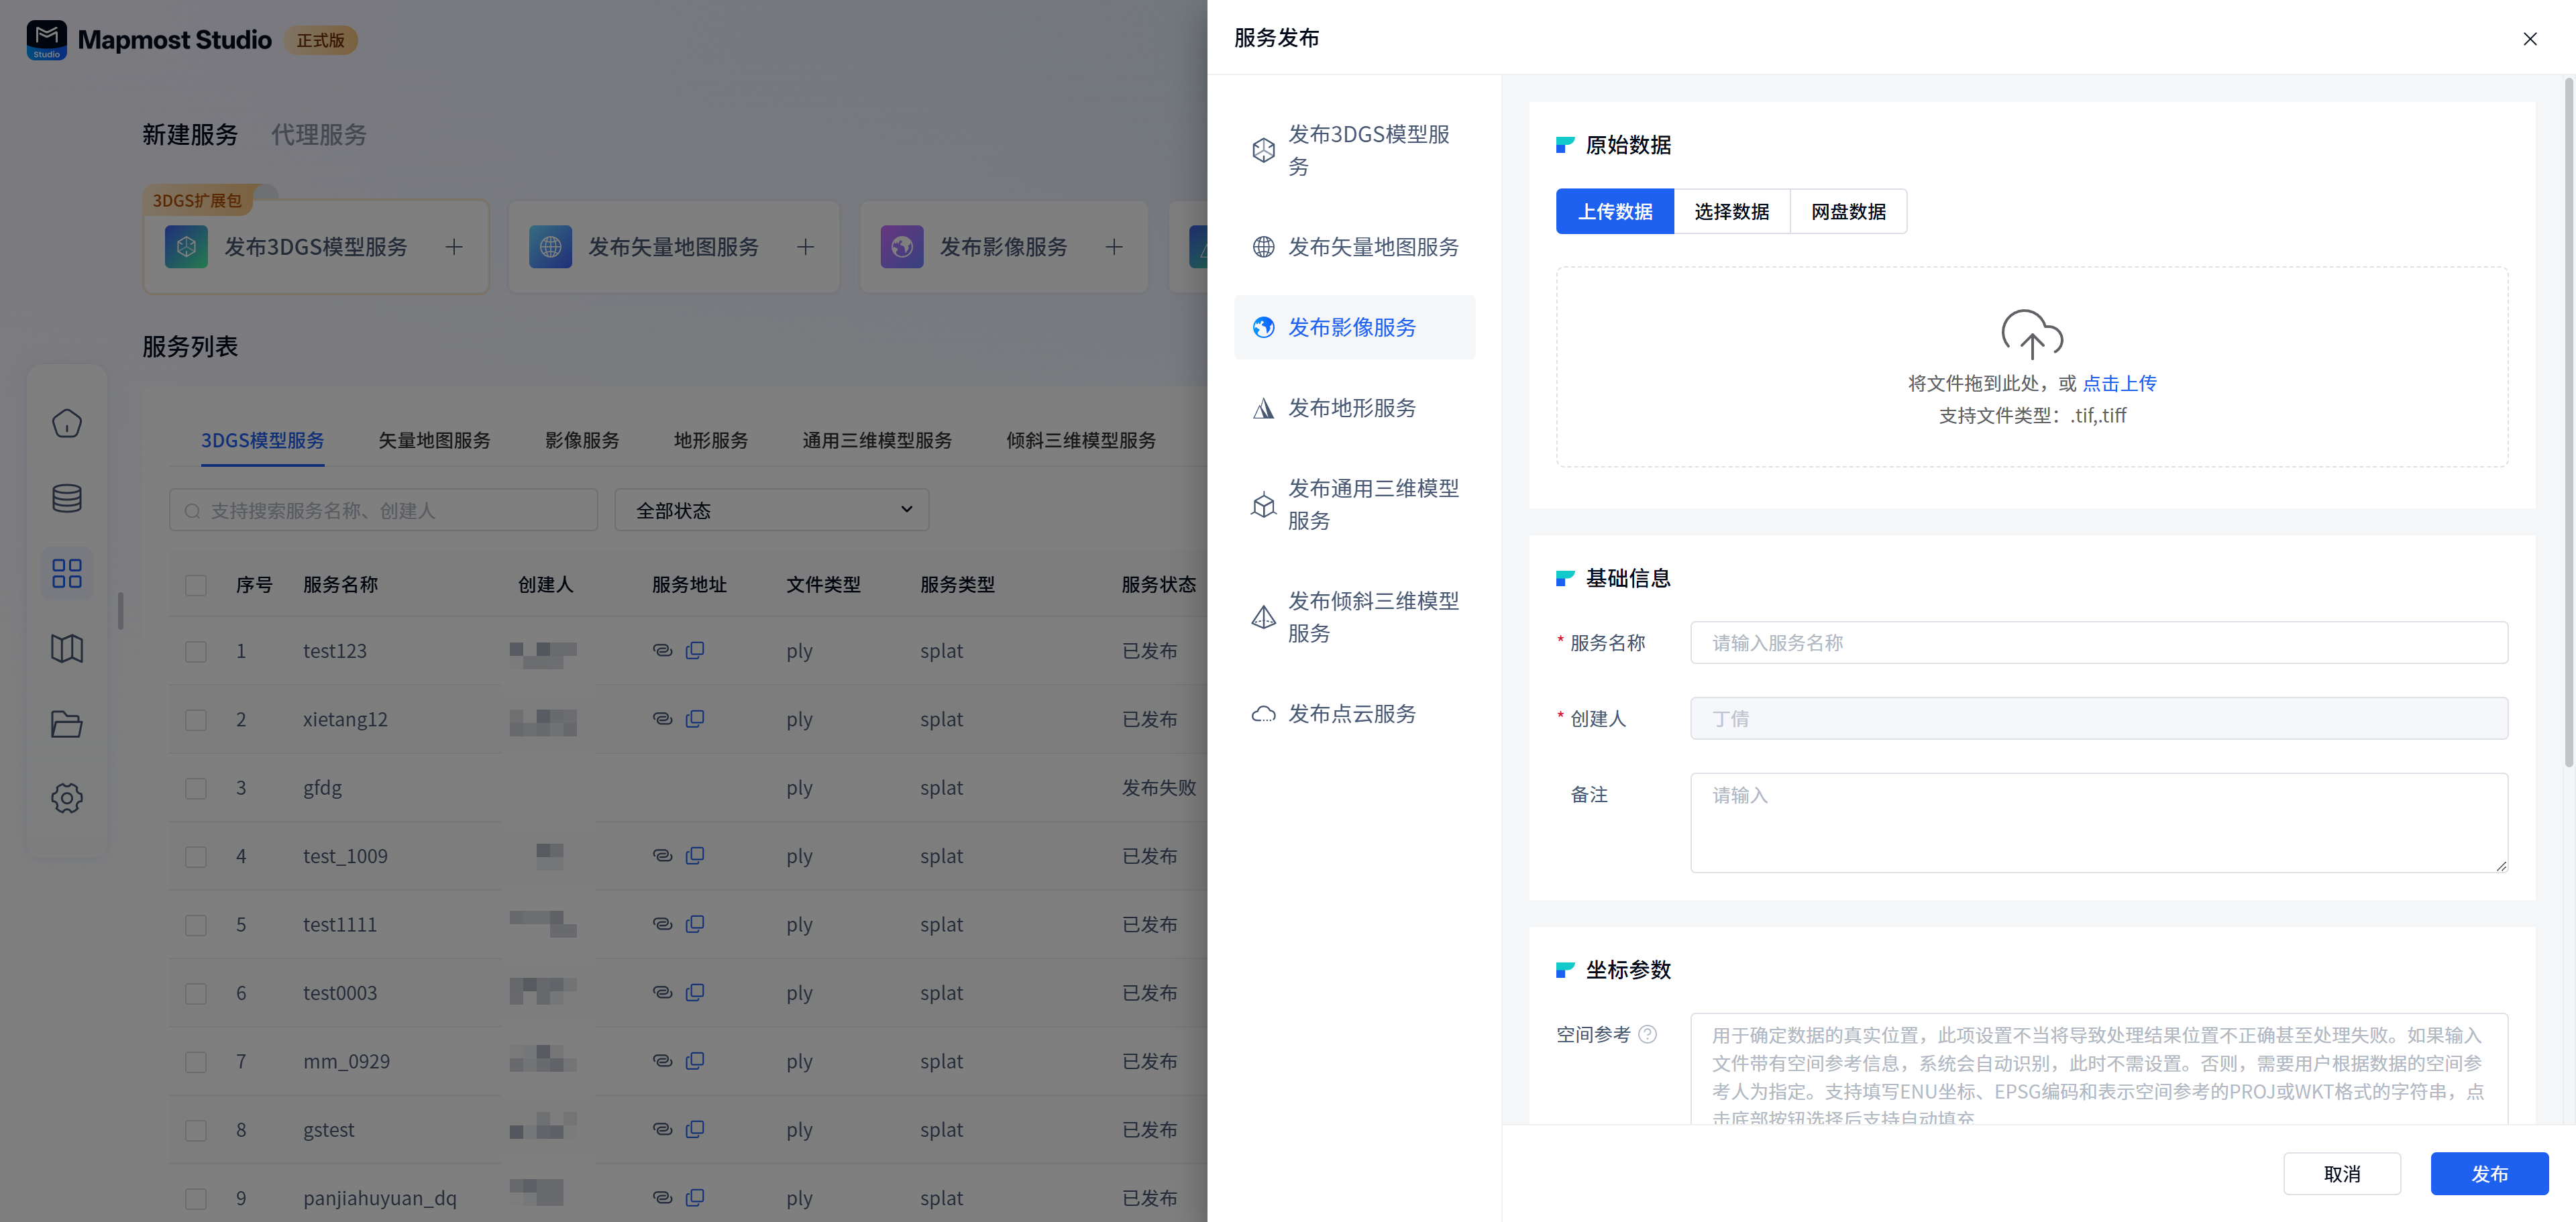
Open the "Mapmost Studio" software, switch to the "My Services" module in the left navigation bar, and click "Publish Image Service" under the "New Service Release" category to enter the corresponding service release page.
2.2. Publishing
Original data: Supports three data adding methods:
① Directly upload local data. The uploaded data will be displayed in the upload list. It supports filling in notes, deleting and renaming; supports uploading multiple image data.
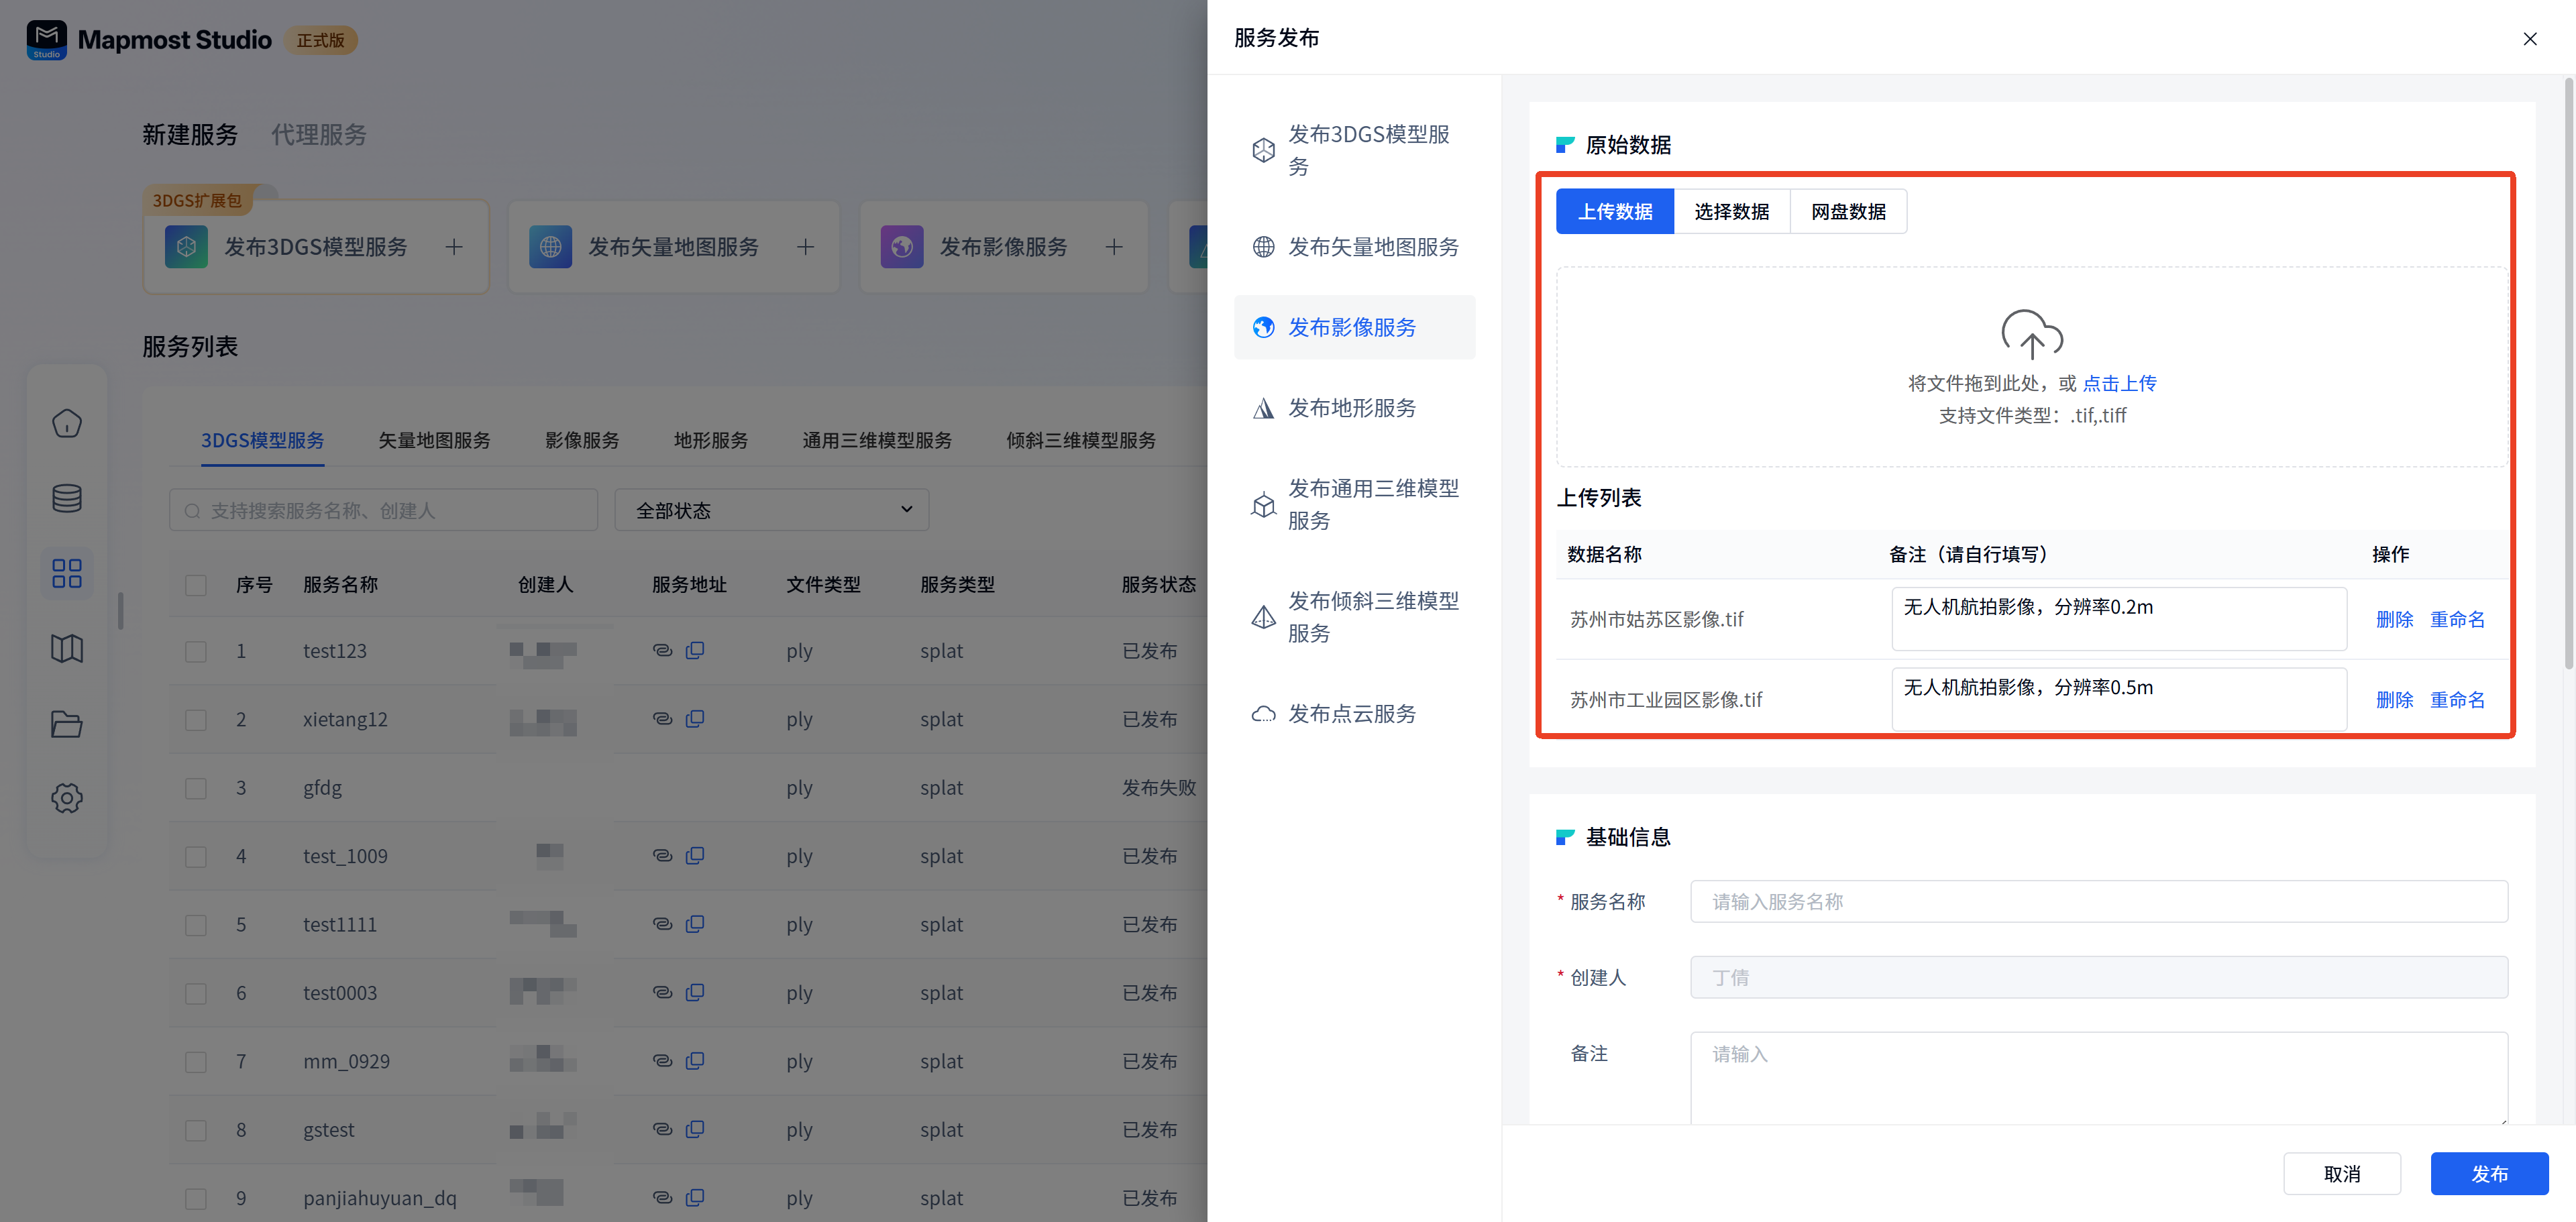
②Select uploaded data from My Data. When selecting data, you can select multiple or single data at one time.
③ To select data from Network Disk Data, you need to select the data path and output path. The supported file format when selecting the data path is.tif/.tiff. Network disk data means that NAS network disks can be configured when deploying the system. Users can directly select data in the network disk for service release, and service data can also be stored in the network disk. Network disk data is only available to private deployment users.
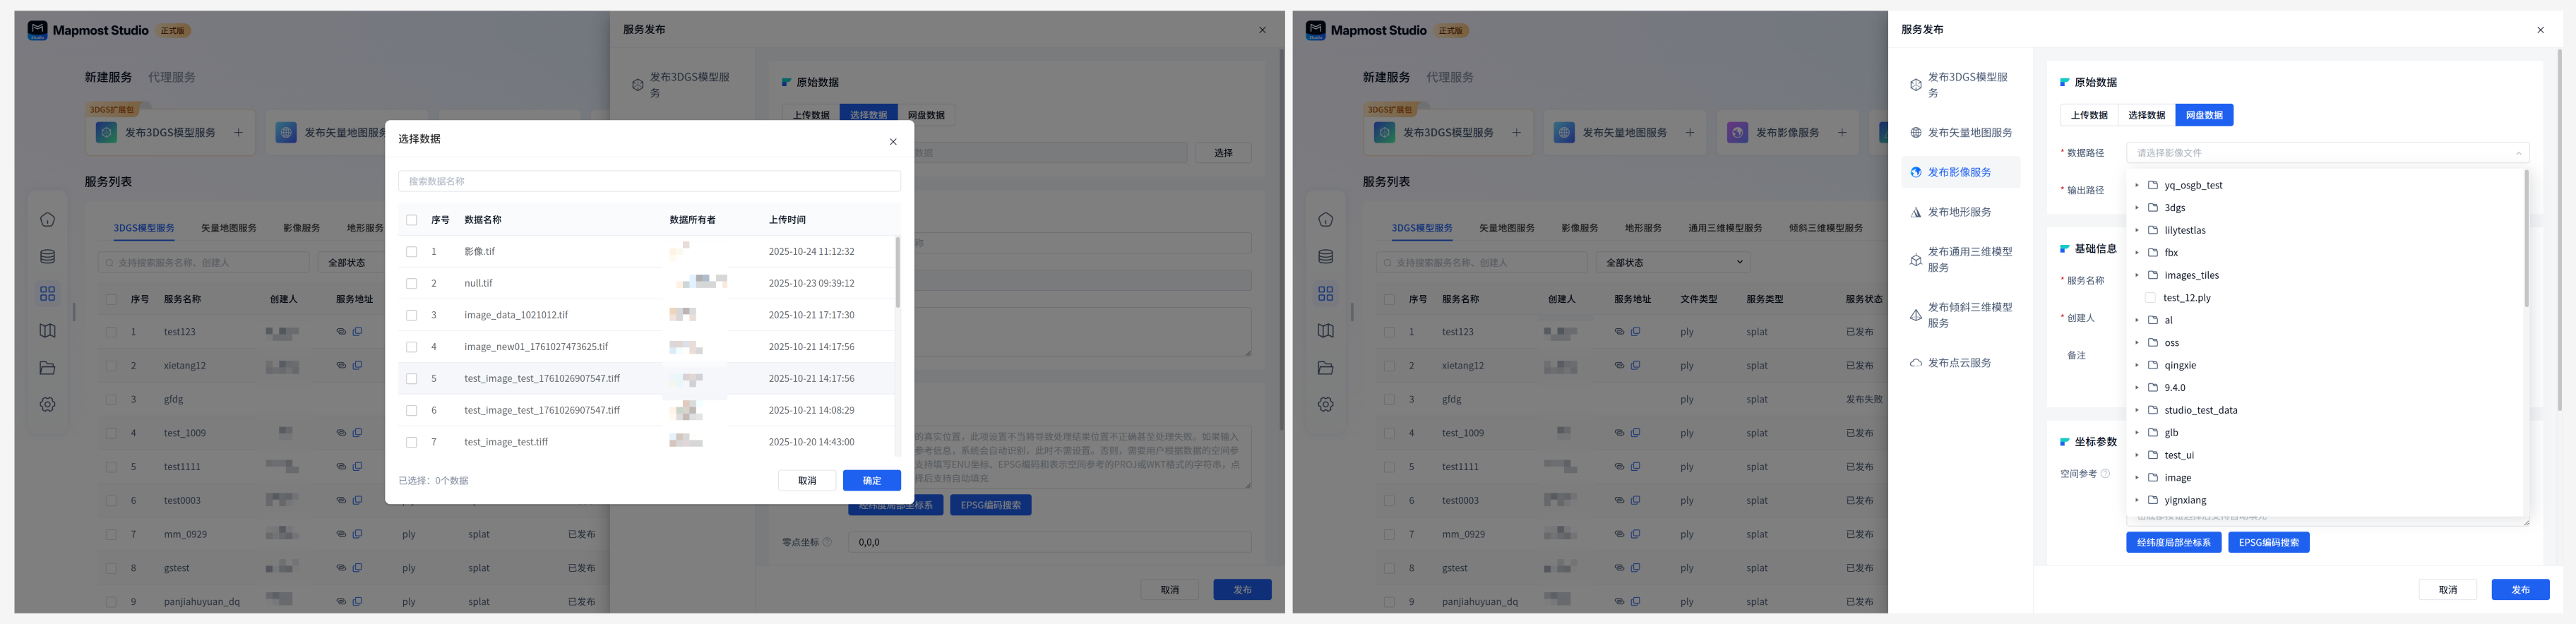
Basic information:
| Field | illustrate |
|---|---|
| Service name | Required, the name must start with a lowercase letter, be 4-32 characters in length, and consist of letters, numbers, and underscores. |
| Uploader | Required, automatically entered, cannot be modified. |
| Remark | It is not required and can be filled in according to the actual situation. |
Coordinate parameters:
| Field | illustrate |
|---|---|
| spatial reference | Optional, spatial reference can be vividly compared to the positioning system of geographical data, which defines how to identify and place data at specific locations on the earth. The spatial reference is used to determine the true location of the data. Improper setting of this will result in incorrect location of the processing results or even processing failure. If the input file contains spatial reference information, the system will automatically recognize it and no settings are required at this time. Otherwise, the user needs to manually specify it based on the spatial reference of the data. Supports filling in ENU coordinates, EPSG encoding, and strings in PROJ or WKT format indicating spatial reference. Automatic filling is supported after clicking the button at the bottom to select. |
| Zero point coordinates | Optional. Specify the offset of the data origin relative to the spatial reference. It is divided into three directions: xyz and unit meter. The default is no offset (0,0,0). Setting this value allows the data to be offset in the corresponding direction. It is generally used for problems where the coordinates of a three-dimensional model are very large and difficult to operate in certain projected coordinate systems. It is therefore assumed that the data has an offset position, then in this spatial reference: modeled coordinates + zero point coordinates = projected coordinates. |
Processing parameters:
| Field | illustrate |
|---|---|
| maximum level | Optional, the maximum level parameter controls the level to which the tile can ultimately be enlarged. Default: Automatically calculated, the value will be calculated based on the raster data resolution. Supports self-setting, the range is [10, 25], the actual value will be the set value and the automatically calculated minimum value. The default value is recommended. |
| Tile size | Optional, the pixel width and height of the image after slicing, supports 256 and 512. According to common tradition, the tile size is 256, but in fact it can be set to 512, which can reduce the number of tile requests on large screens. |
| Service type | Optional. The slice index organization method in the published image service supports WMTS and TMS. WMTS starts from level 0, with the upper left corner of the map as the origin, the positive direction of the horizontal axis from left to right, and the positive direction of the vertical axis from top to bottom. The slice index of the published WMTS service type is in the form of {z}/{x}/{y}. TMS takes the lower left corner of the map as the origin, and the vertical axis is the positive direction from bottom to top. |
| Projection type | Optional, Mercator and latitude and longitude formats are supported. |
| background transparent | Optional. Background transparency is used to solve the problem of white or black edges in the data after slicing. Three methods are supported. Automatic: Automatically determine which band is transparent based on the band metadata of the raster, suitable for data with complete metadata information. Fourth band: If the number of bands in the raster is greater than 3, then the fourth band is forced to be a transparent band, which is suitable for actual data that has a fourth band and is determined to be a transparent value. Transparent color: No matter how many bands the raster has, as long as the read color is equal to the RGB value set here, the pixel is considered to be purely transparent, which is suitable for data with incomplete transparency information. |
Publish Drawer Action:
| Field | illustrate |
|---|---|
| Cancel | Click Cancel to exit the current service publishing process, and the entered content will not be saved. |
| release | Click Publish, the current content is saved and published into the corresponding service, and the progress can be viewed in the service list. |
2.3. Preview
Publish a successful service support preview.
Click Preview to preview the current service and the parameters released by the service.
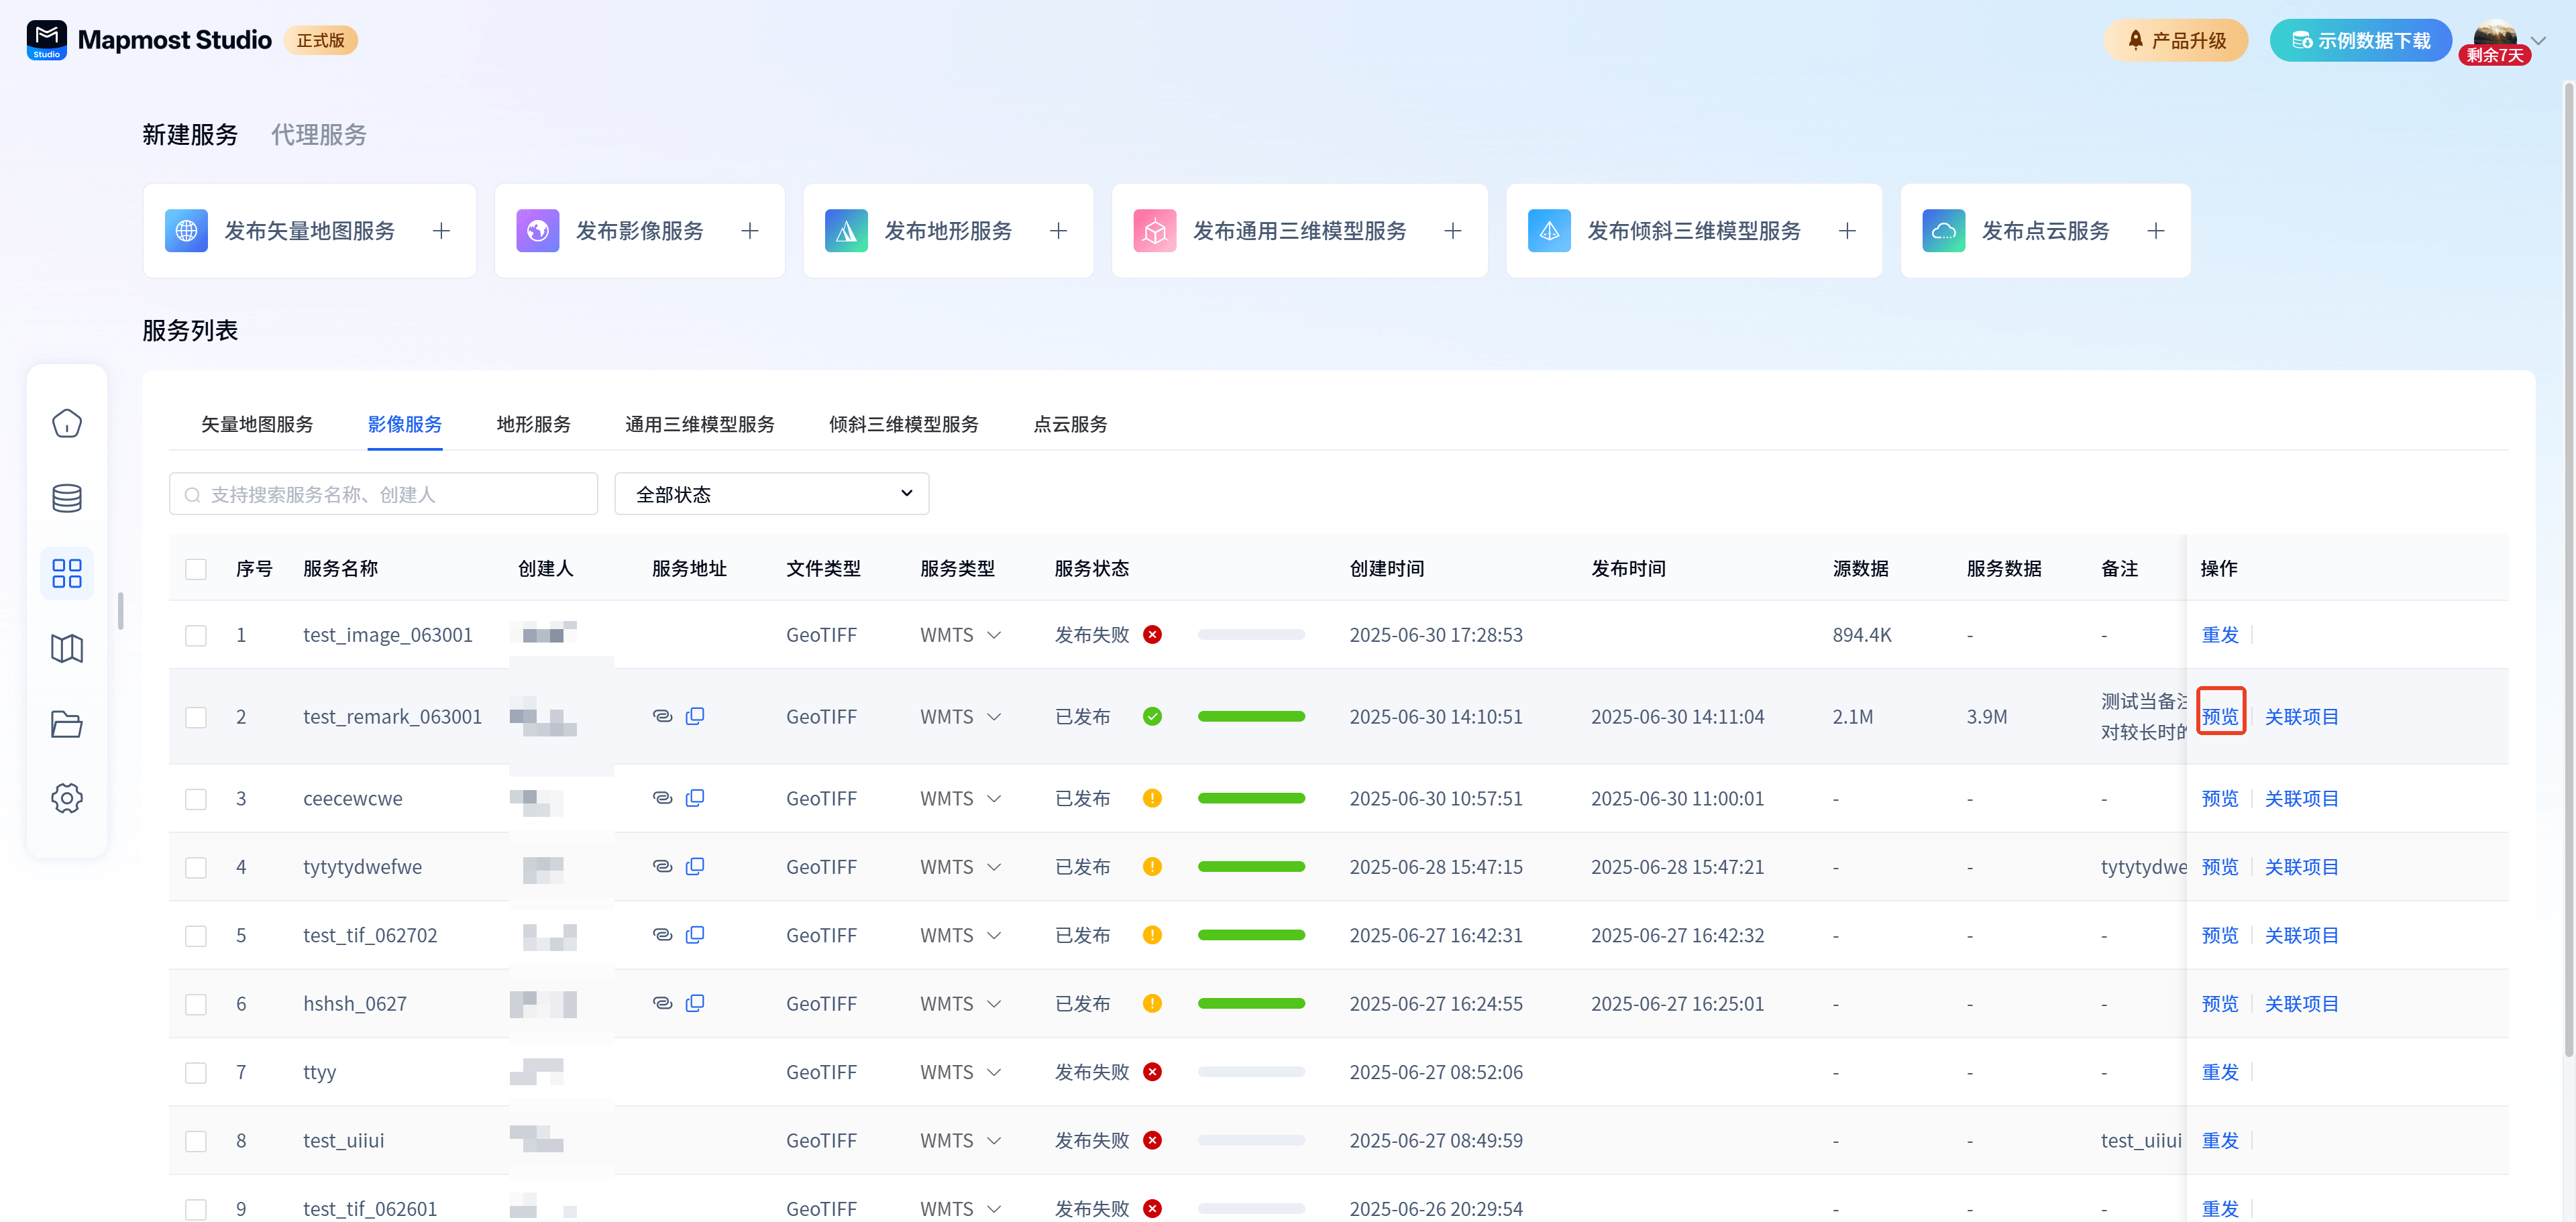
Click "View Full Screen" to view the service effects in full screen on the new page.
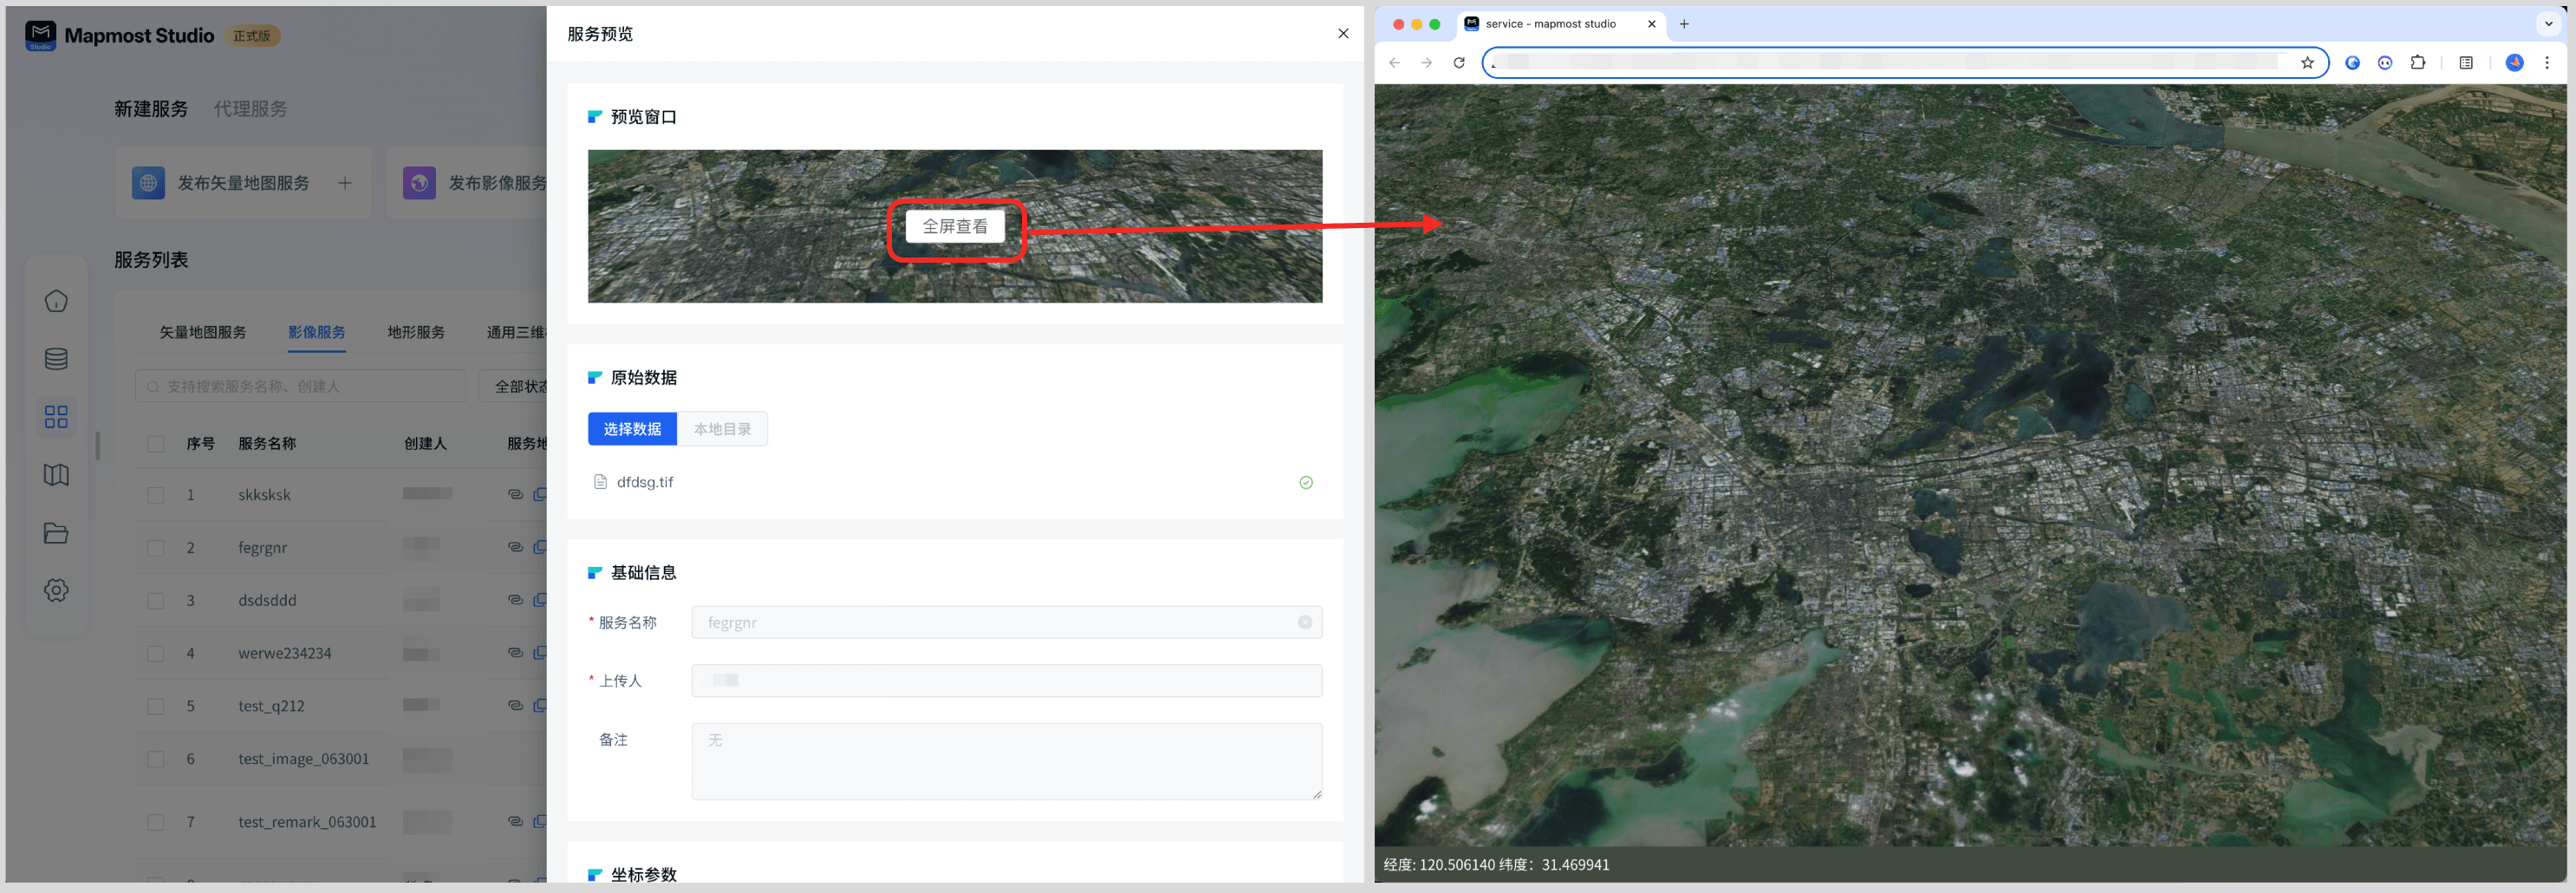
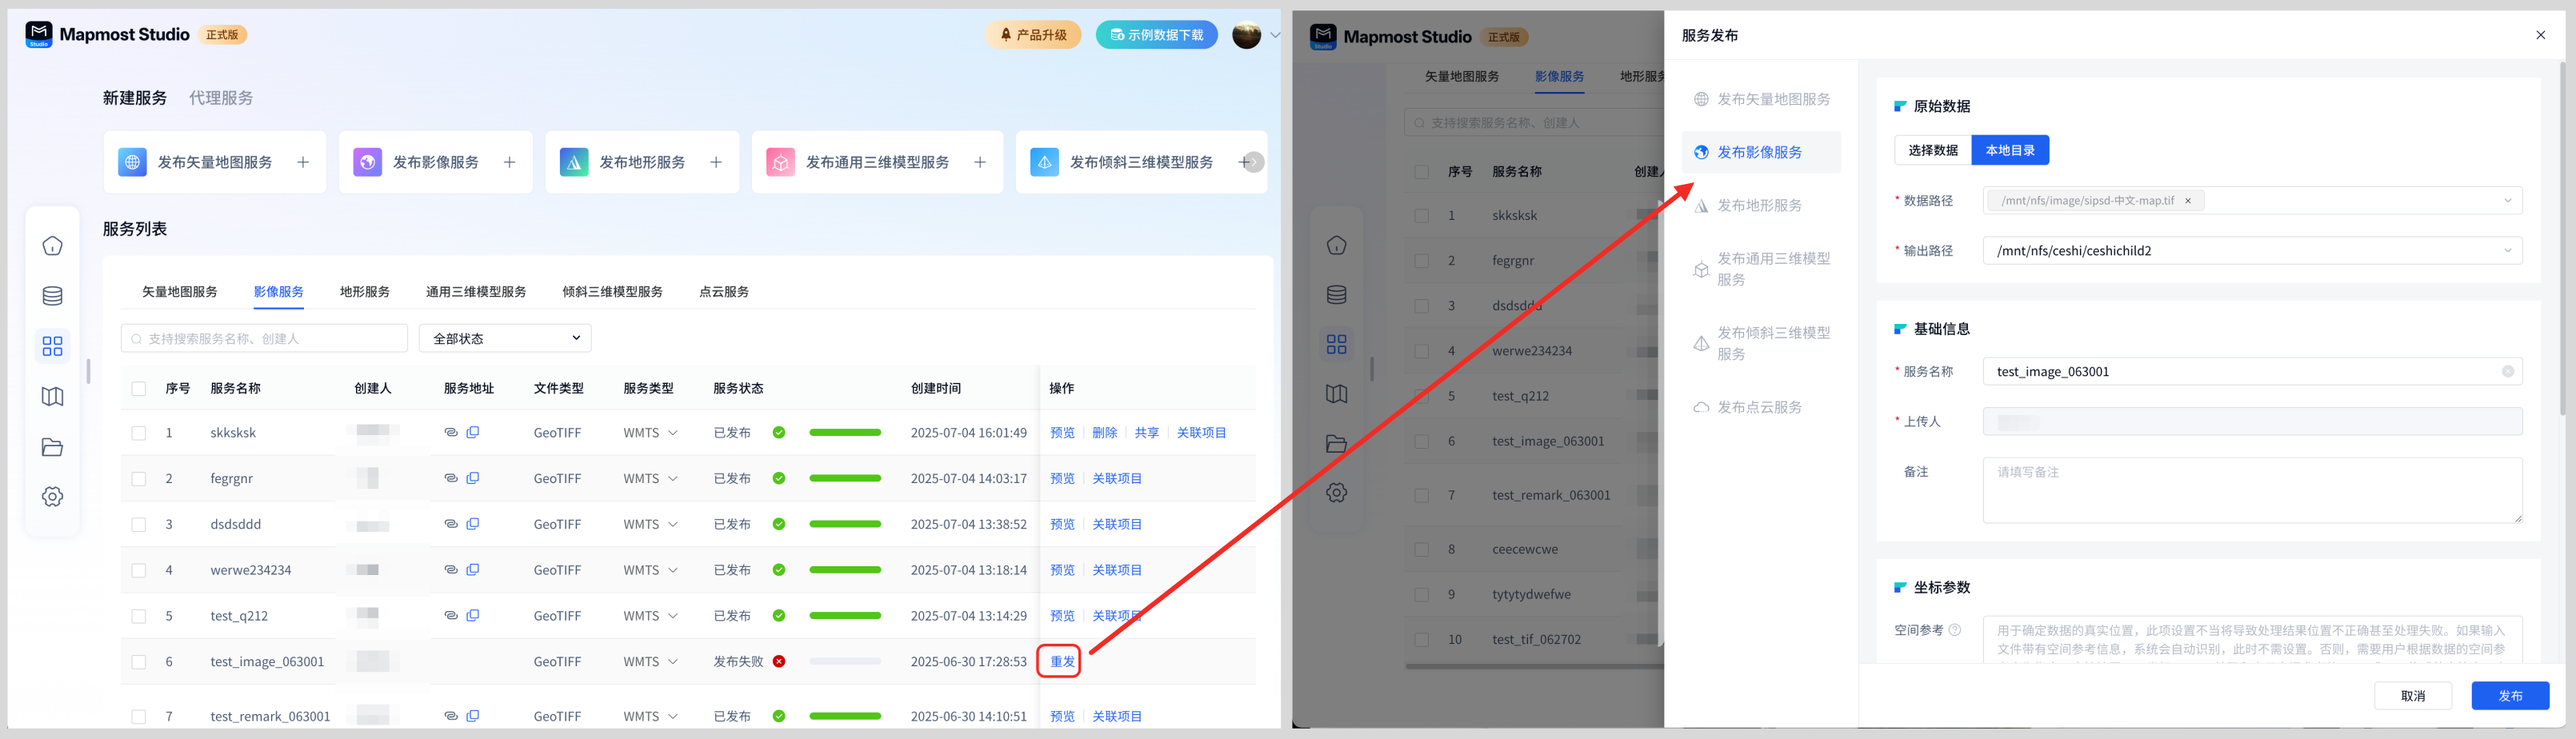
2.4. Resend
Image services that fail to be published support retransmission.
Click Resend to display the publishing drawer, where you can reselect data, adjust parameters, and publish again.
2.5. Delete
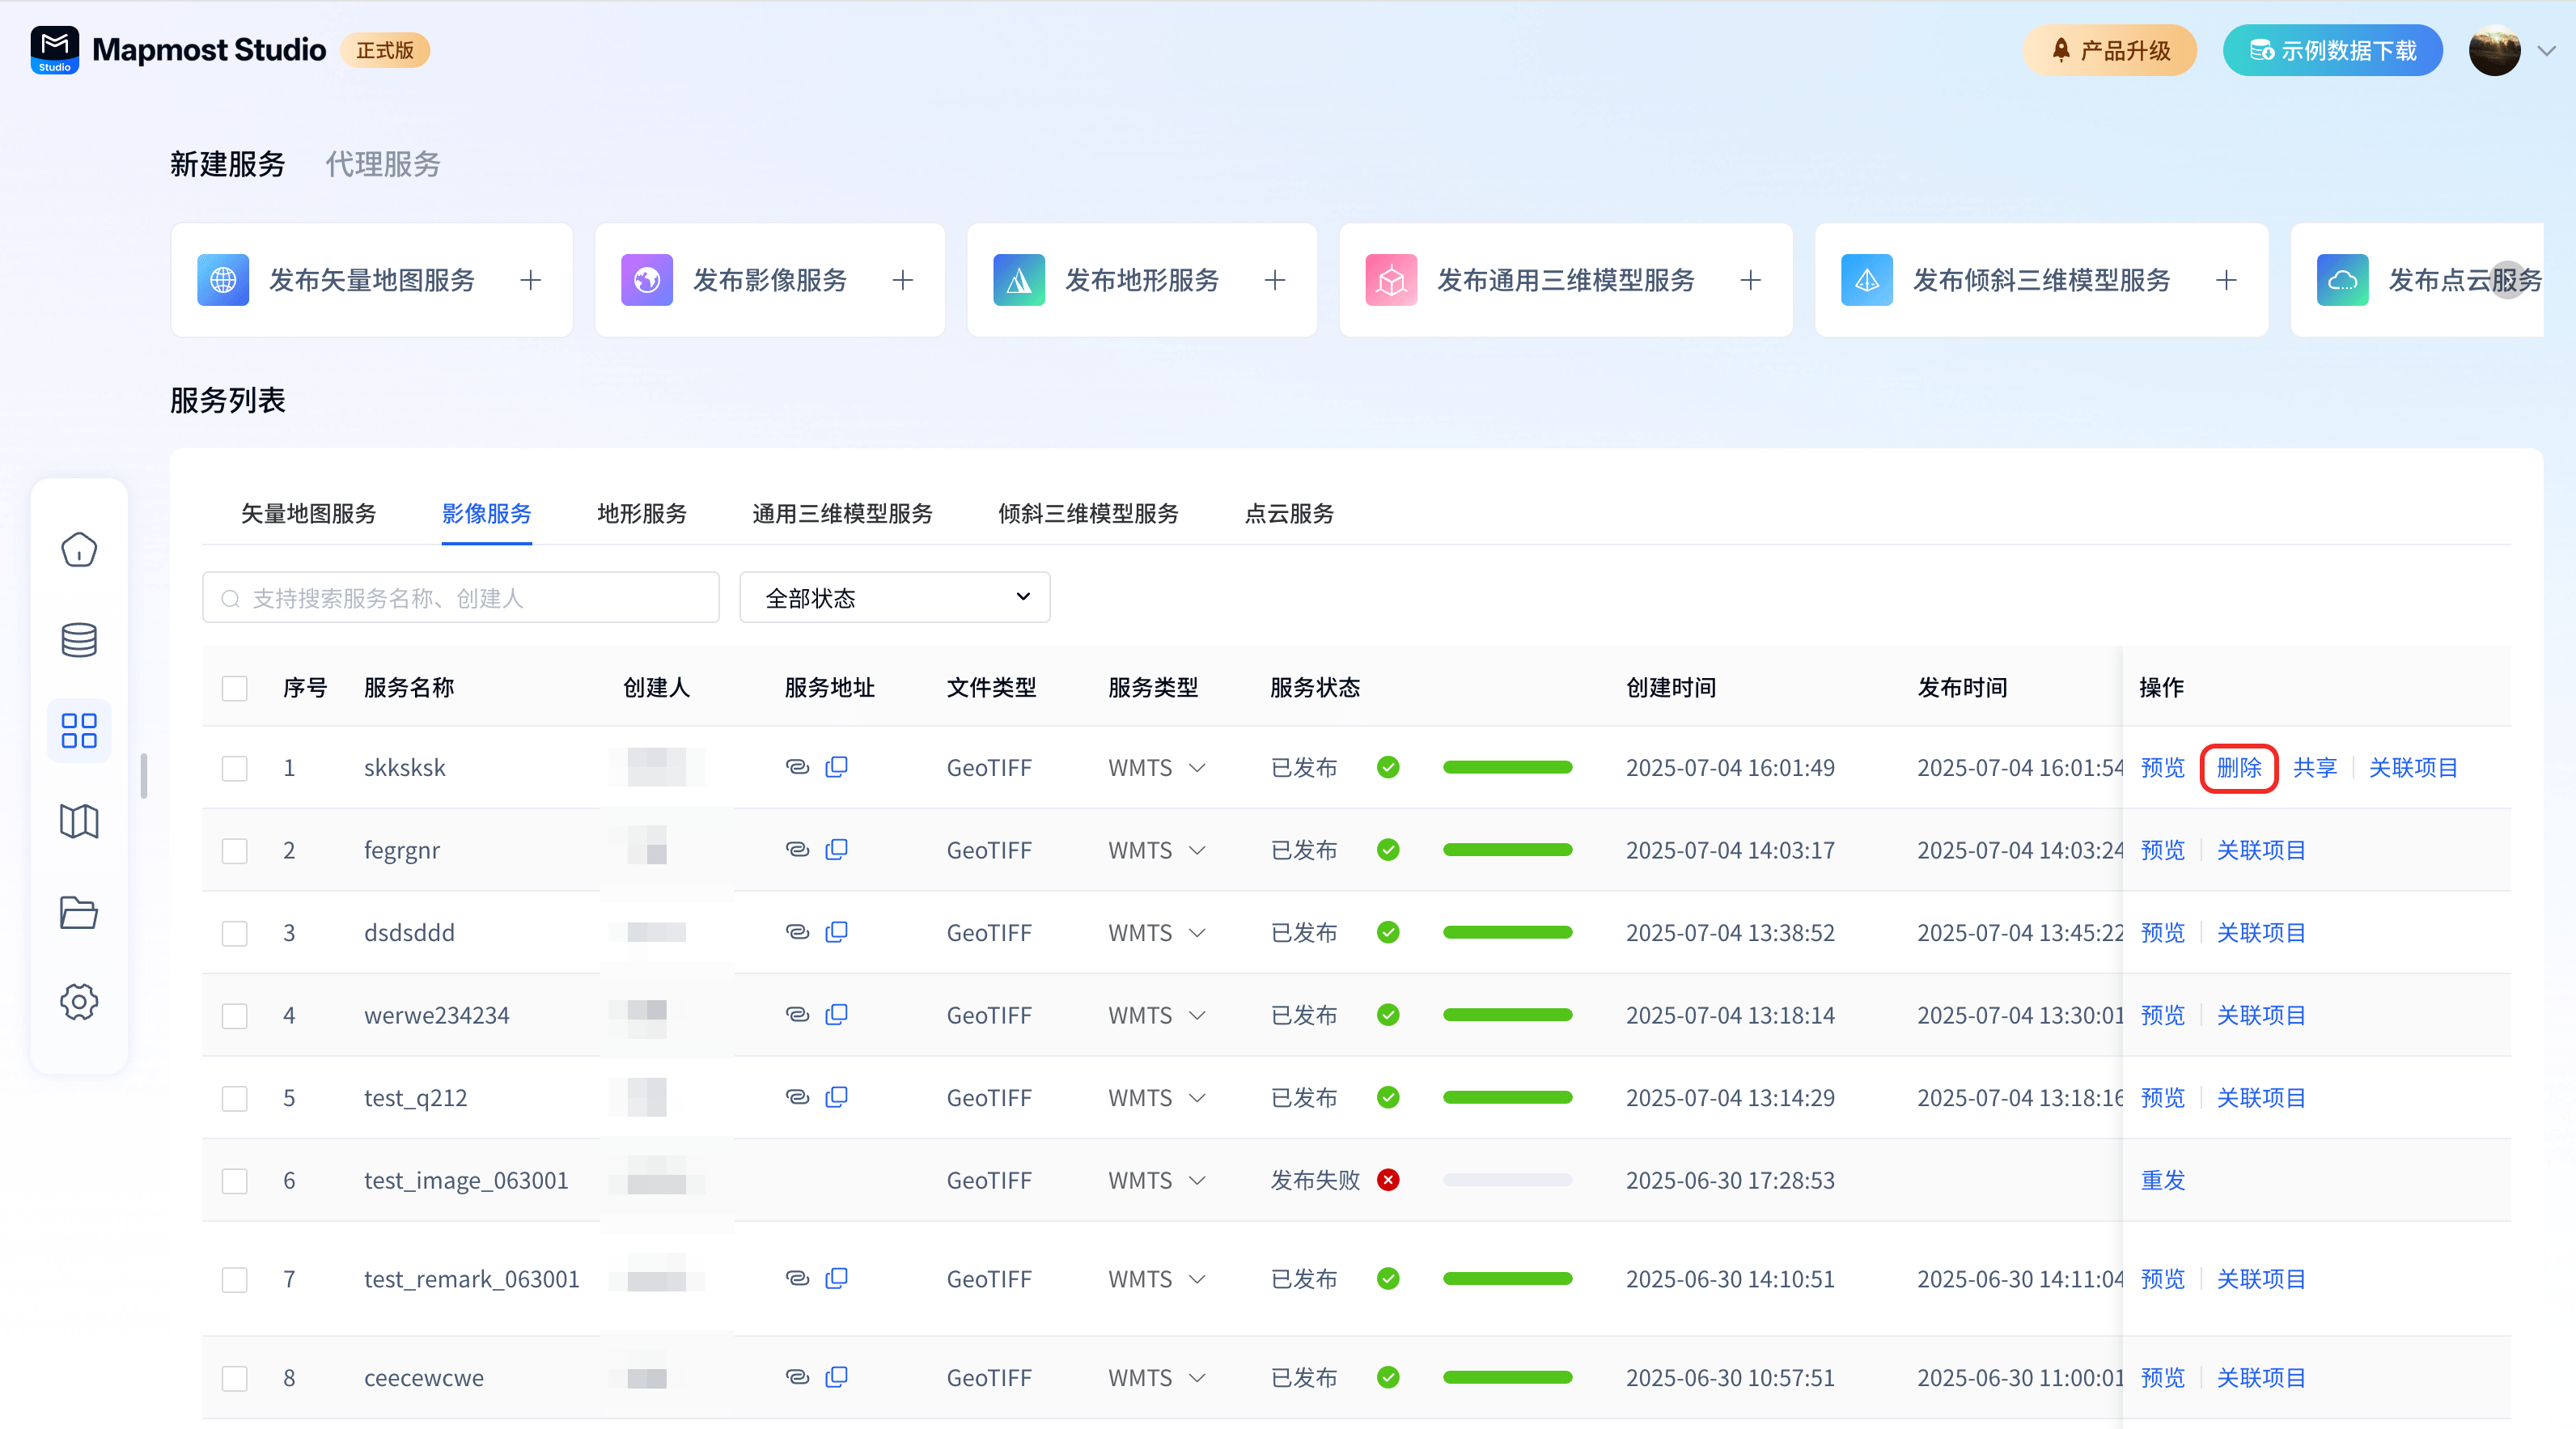
You can only delete services published by yourself, not services published by others.
①Single deletion: table operation-deletion, supports single service deletion.
② Batch deletion: Select multiple services to be deleted and click the delete button in the multi-select operation box above the table.
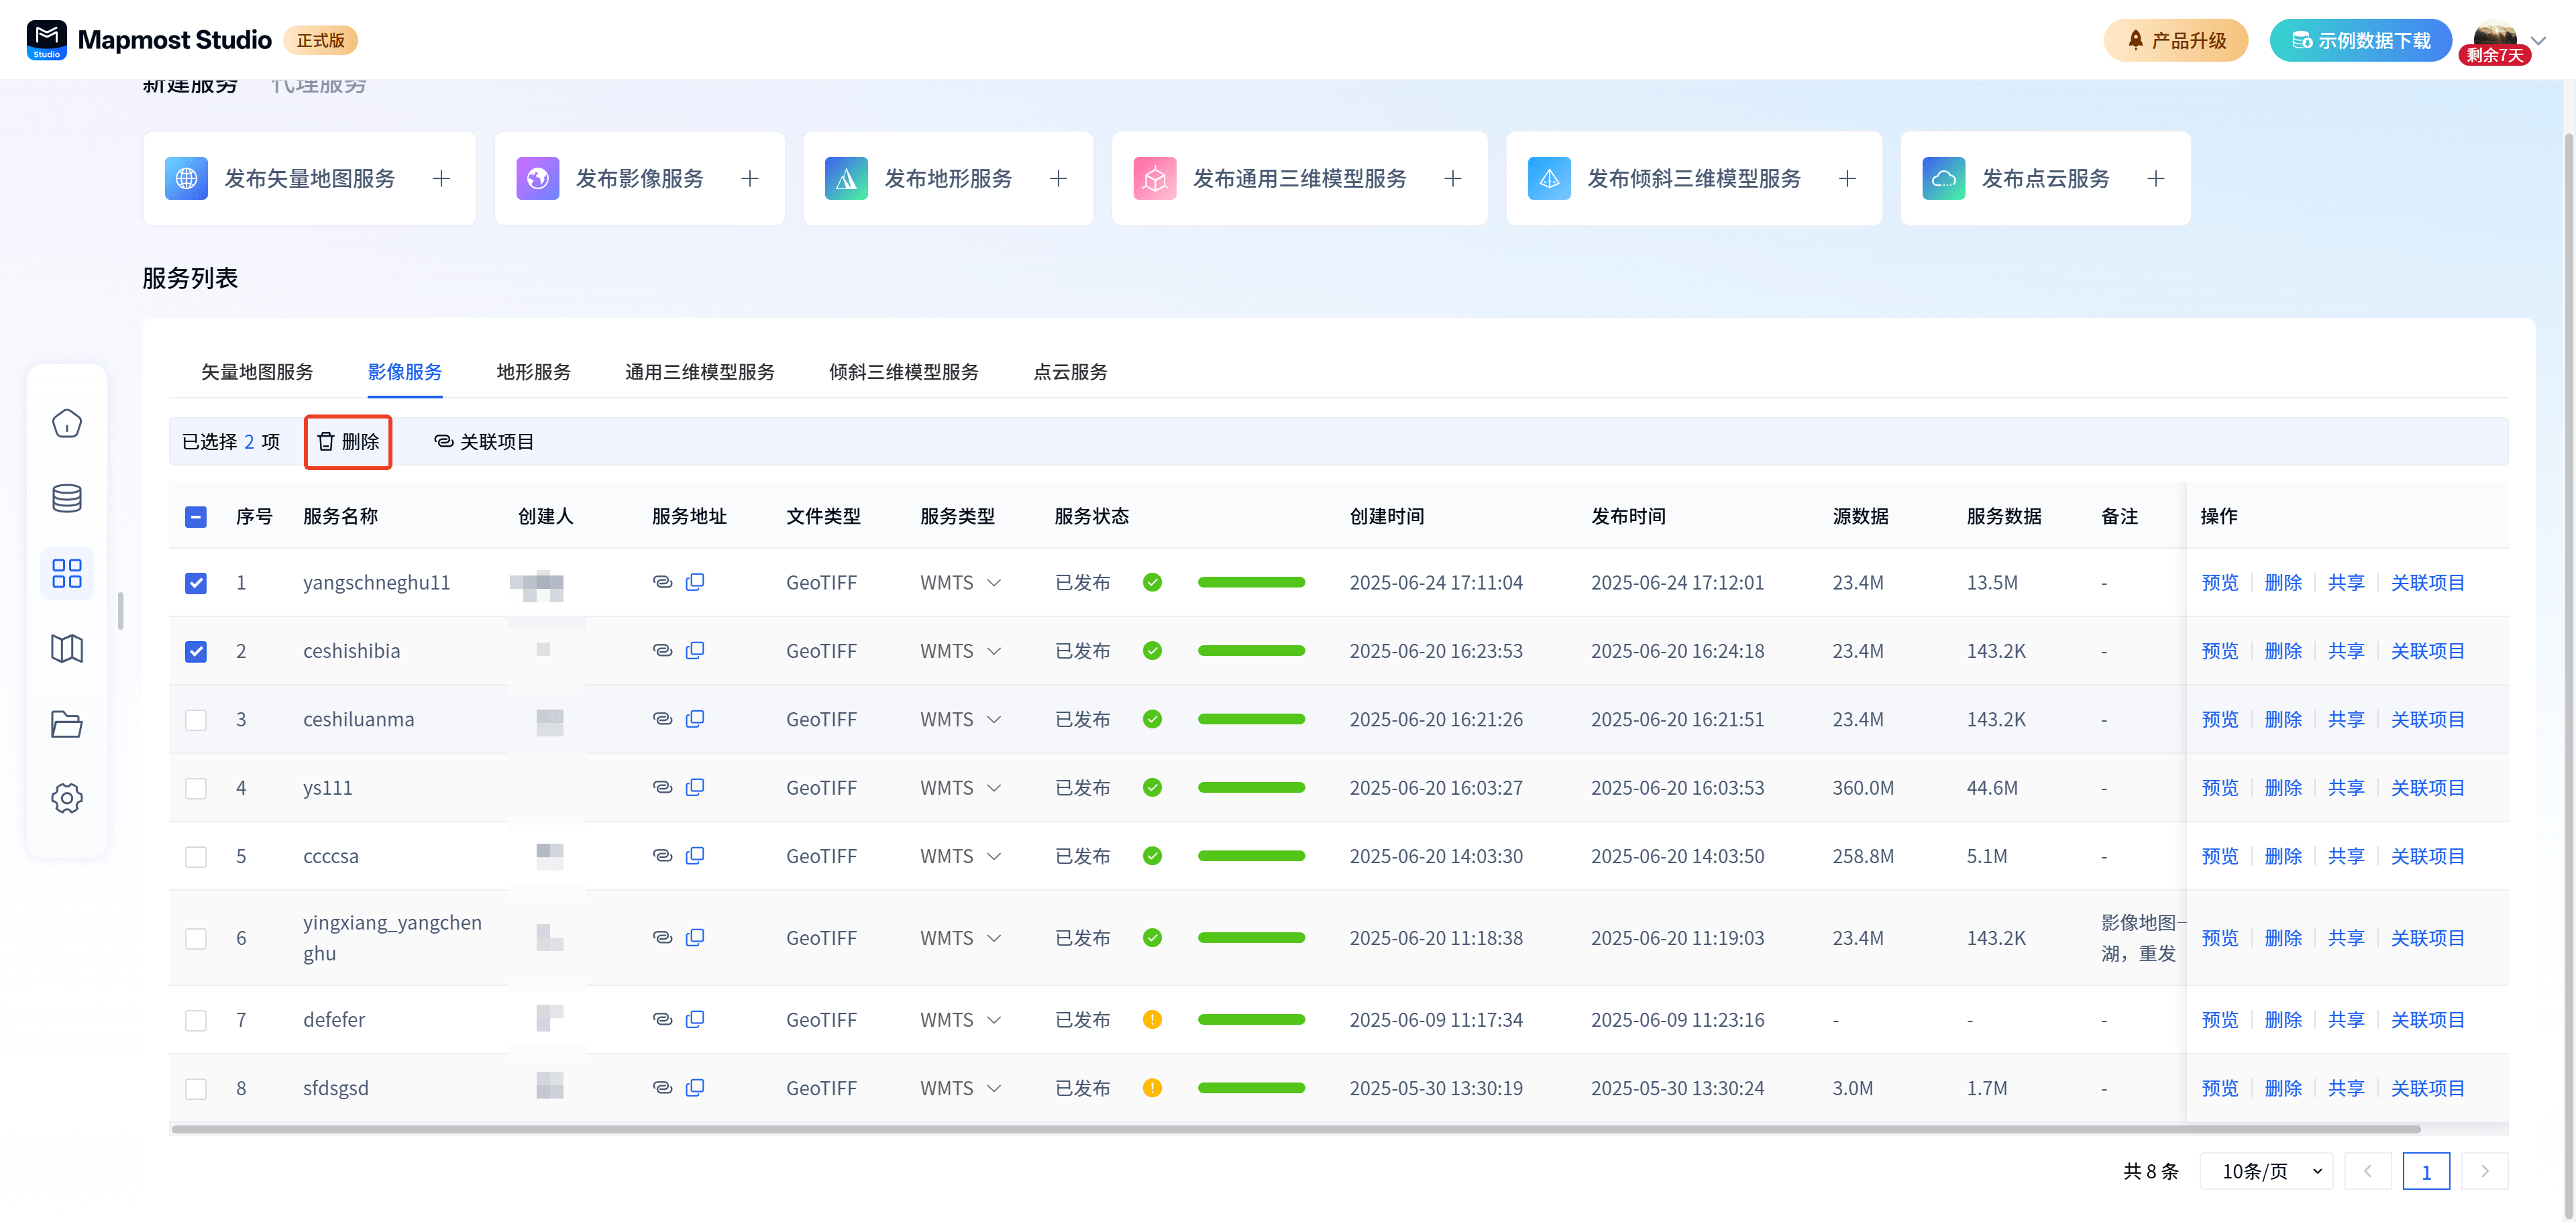
Note: Services associated with projects do not support deletion.
2.6. Sharing
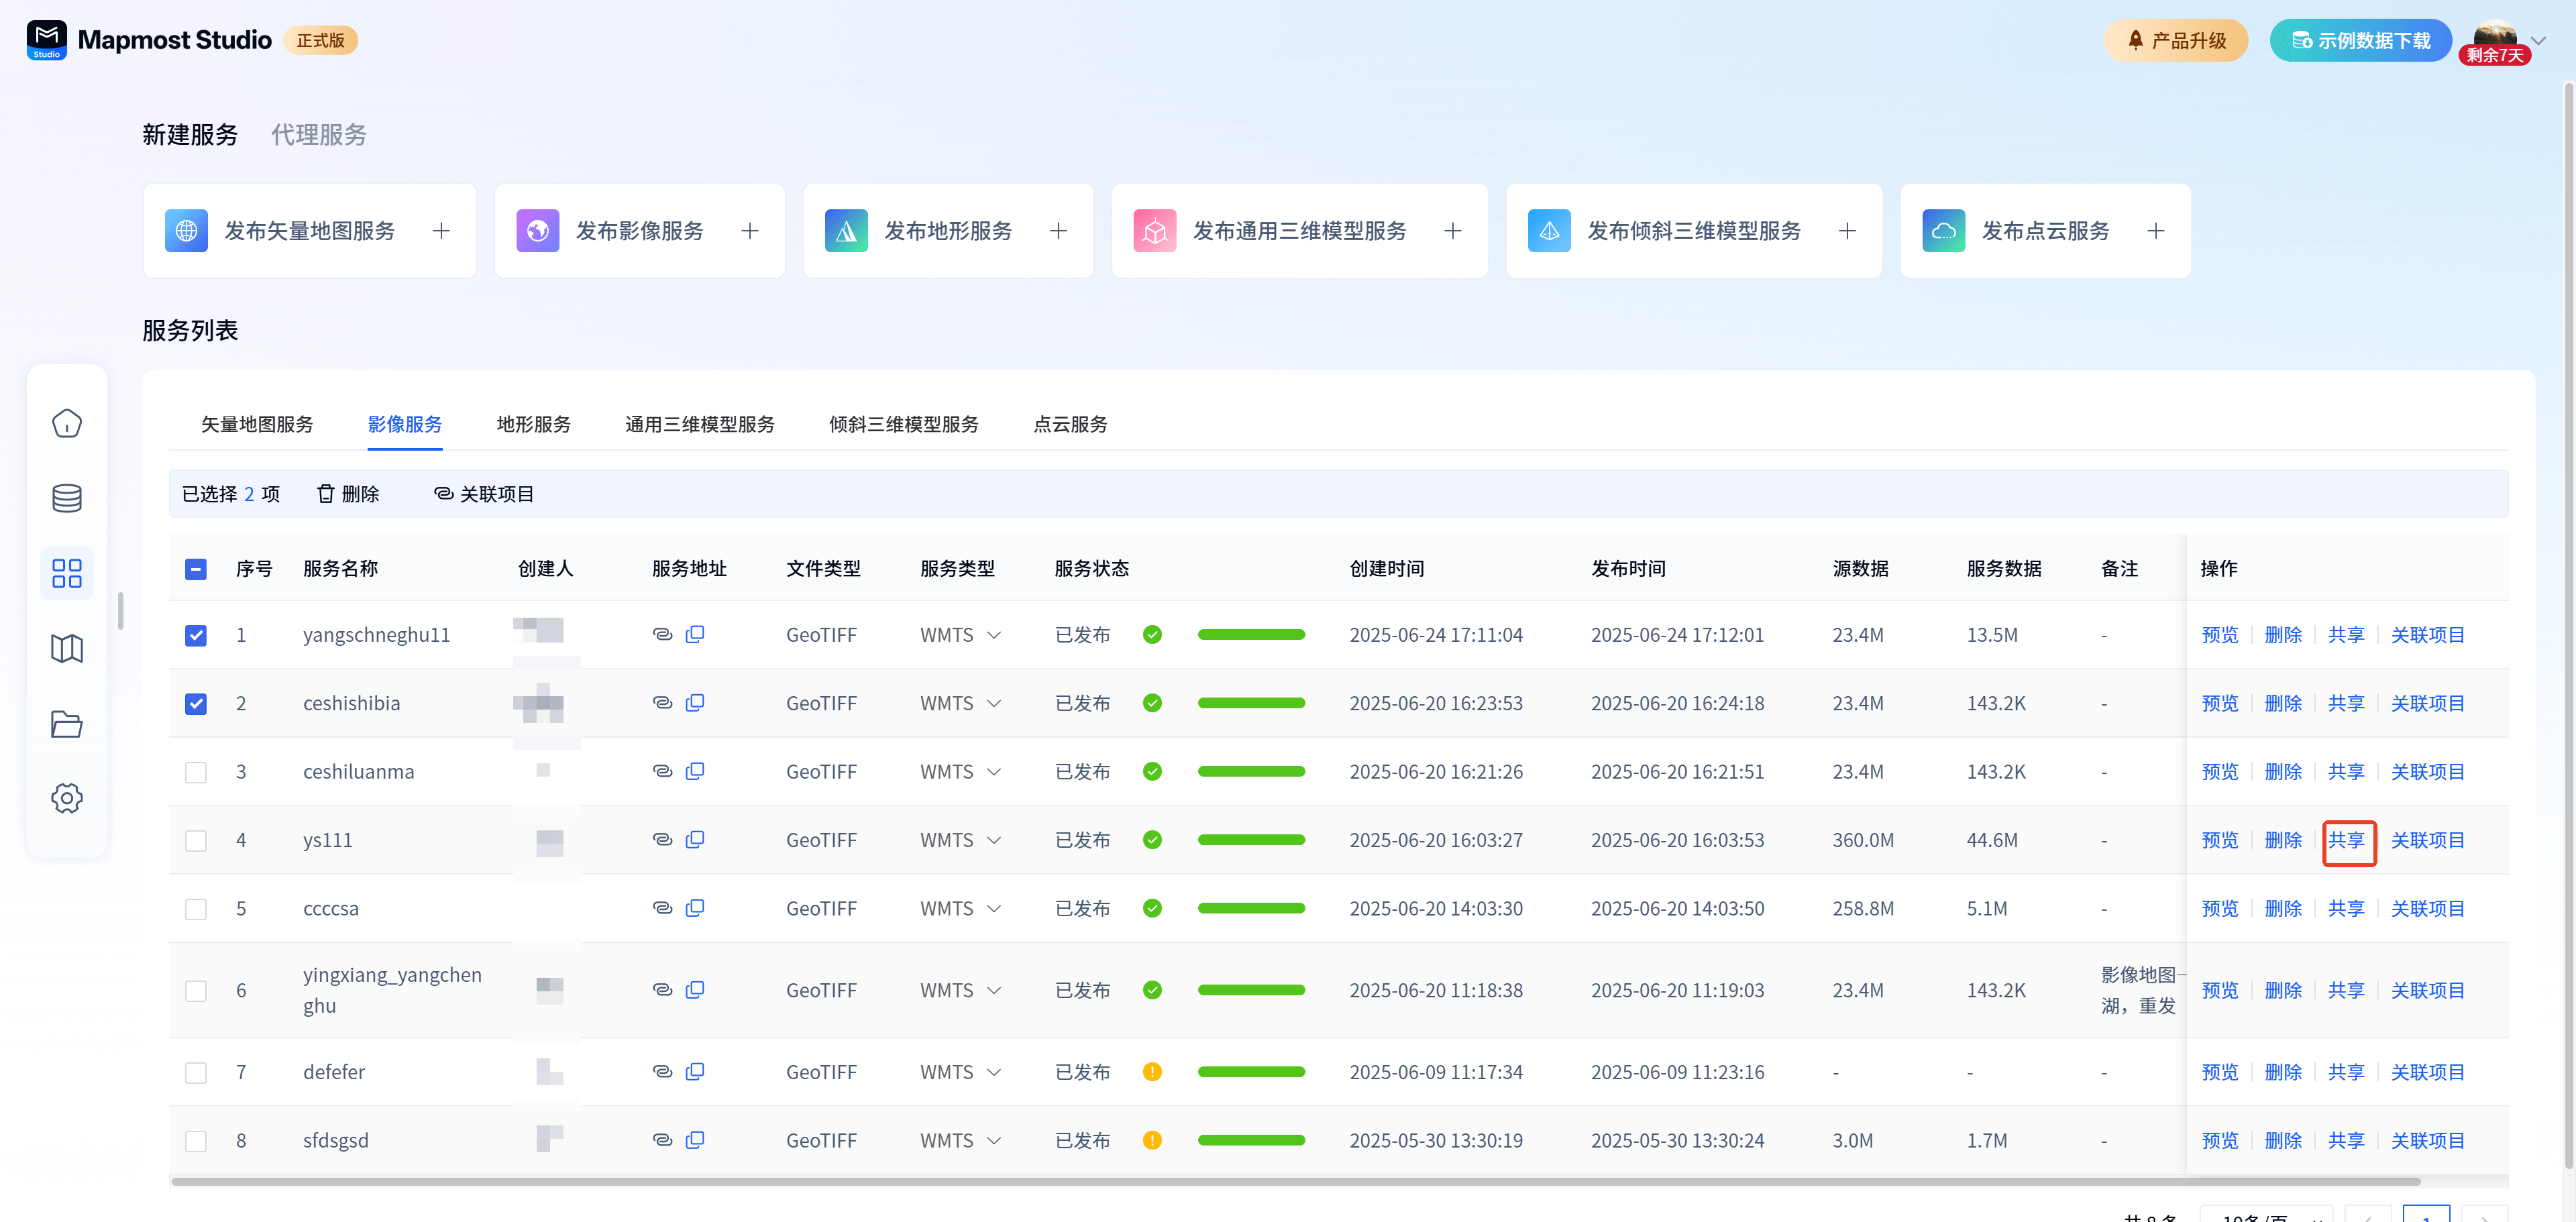
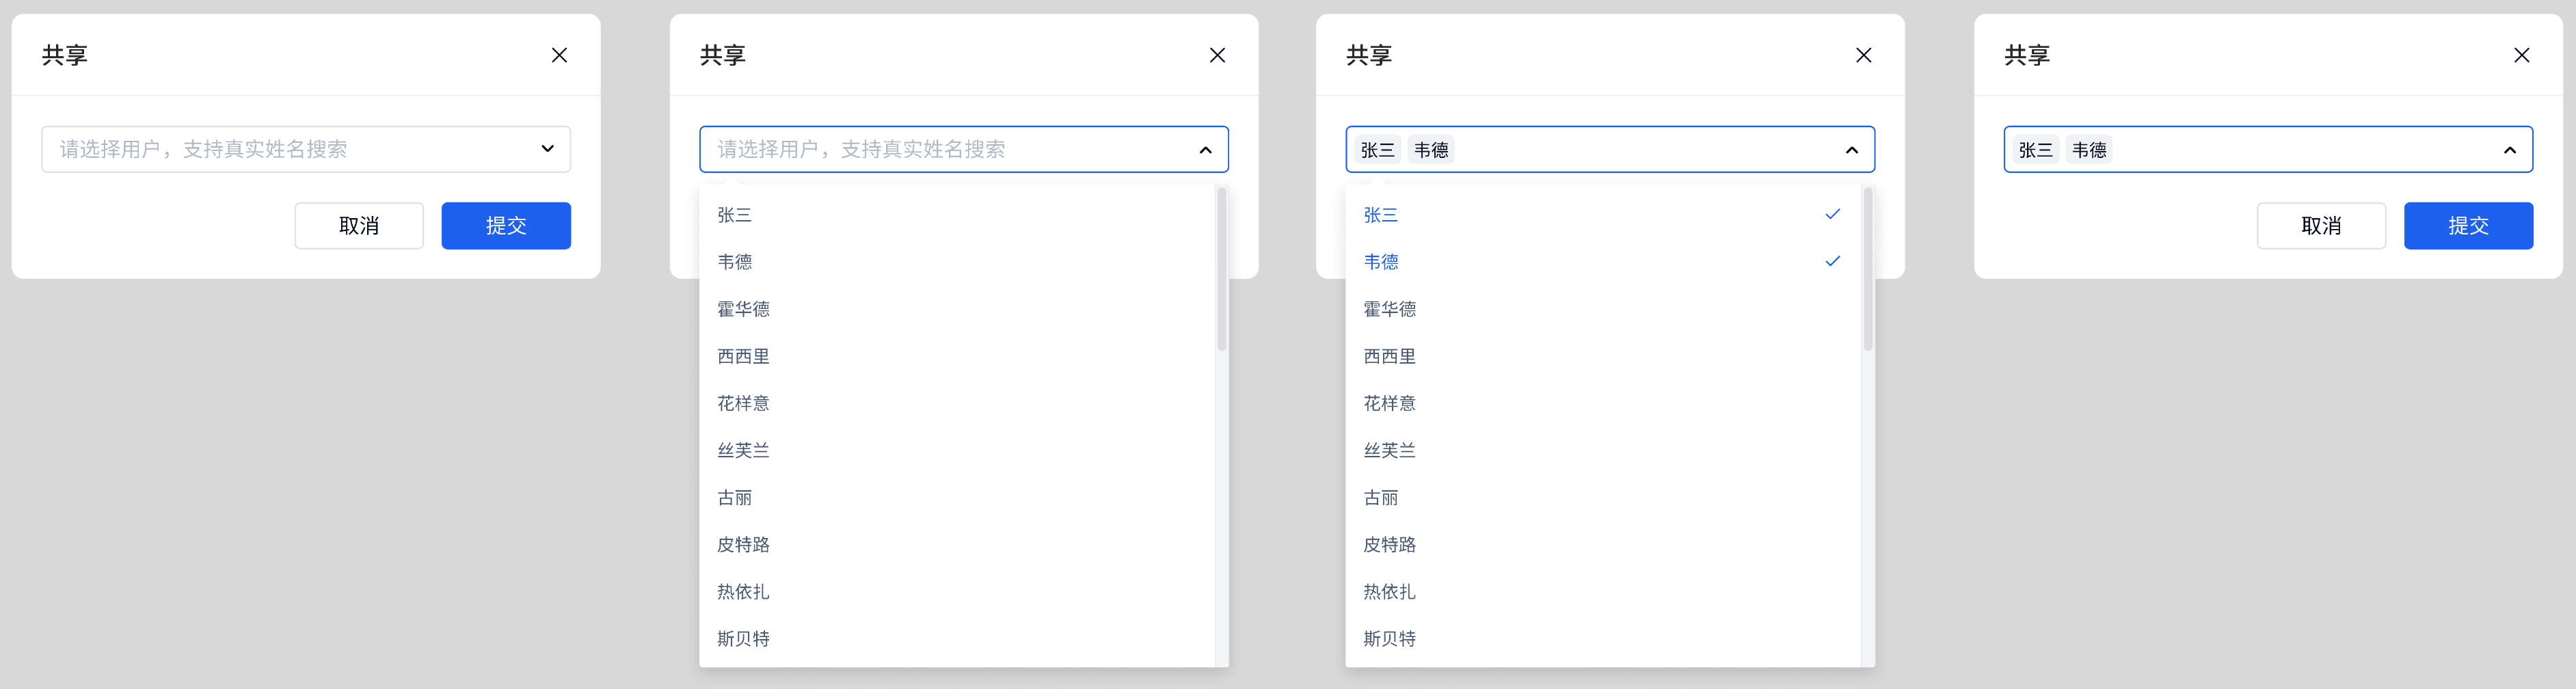
Only services successfully published by myself support sharing. The operation path is: table operation-sharing.
Sharing supports sharing by typing or searching for members' real names. The names of members who have been shared will be displayed in the sharing pop-up window.
2.7. View logs
The detailed operation of image service view log is the same as Vector Map Service View Log
2.8. Related projects
①Single associated project: table operation-associated project, supports single service association.
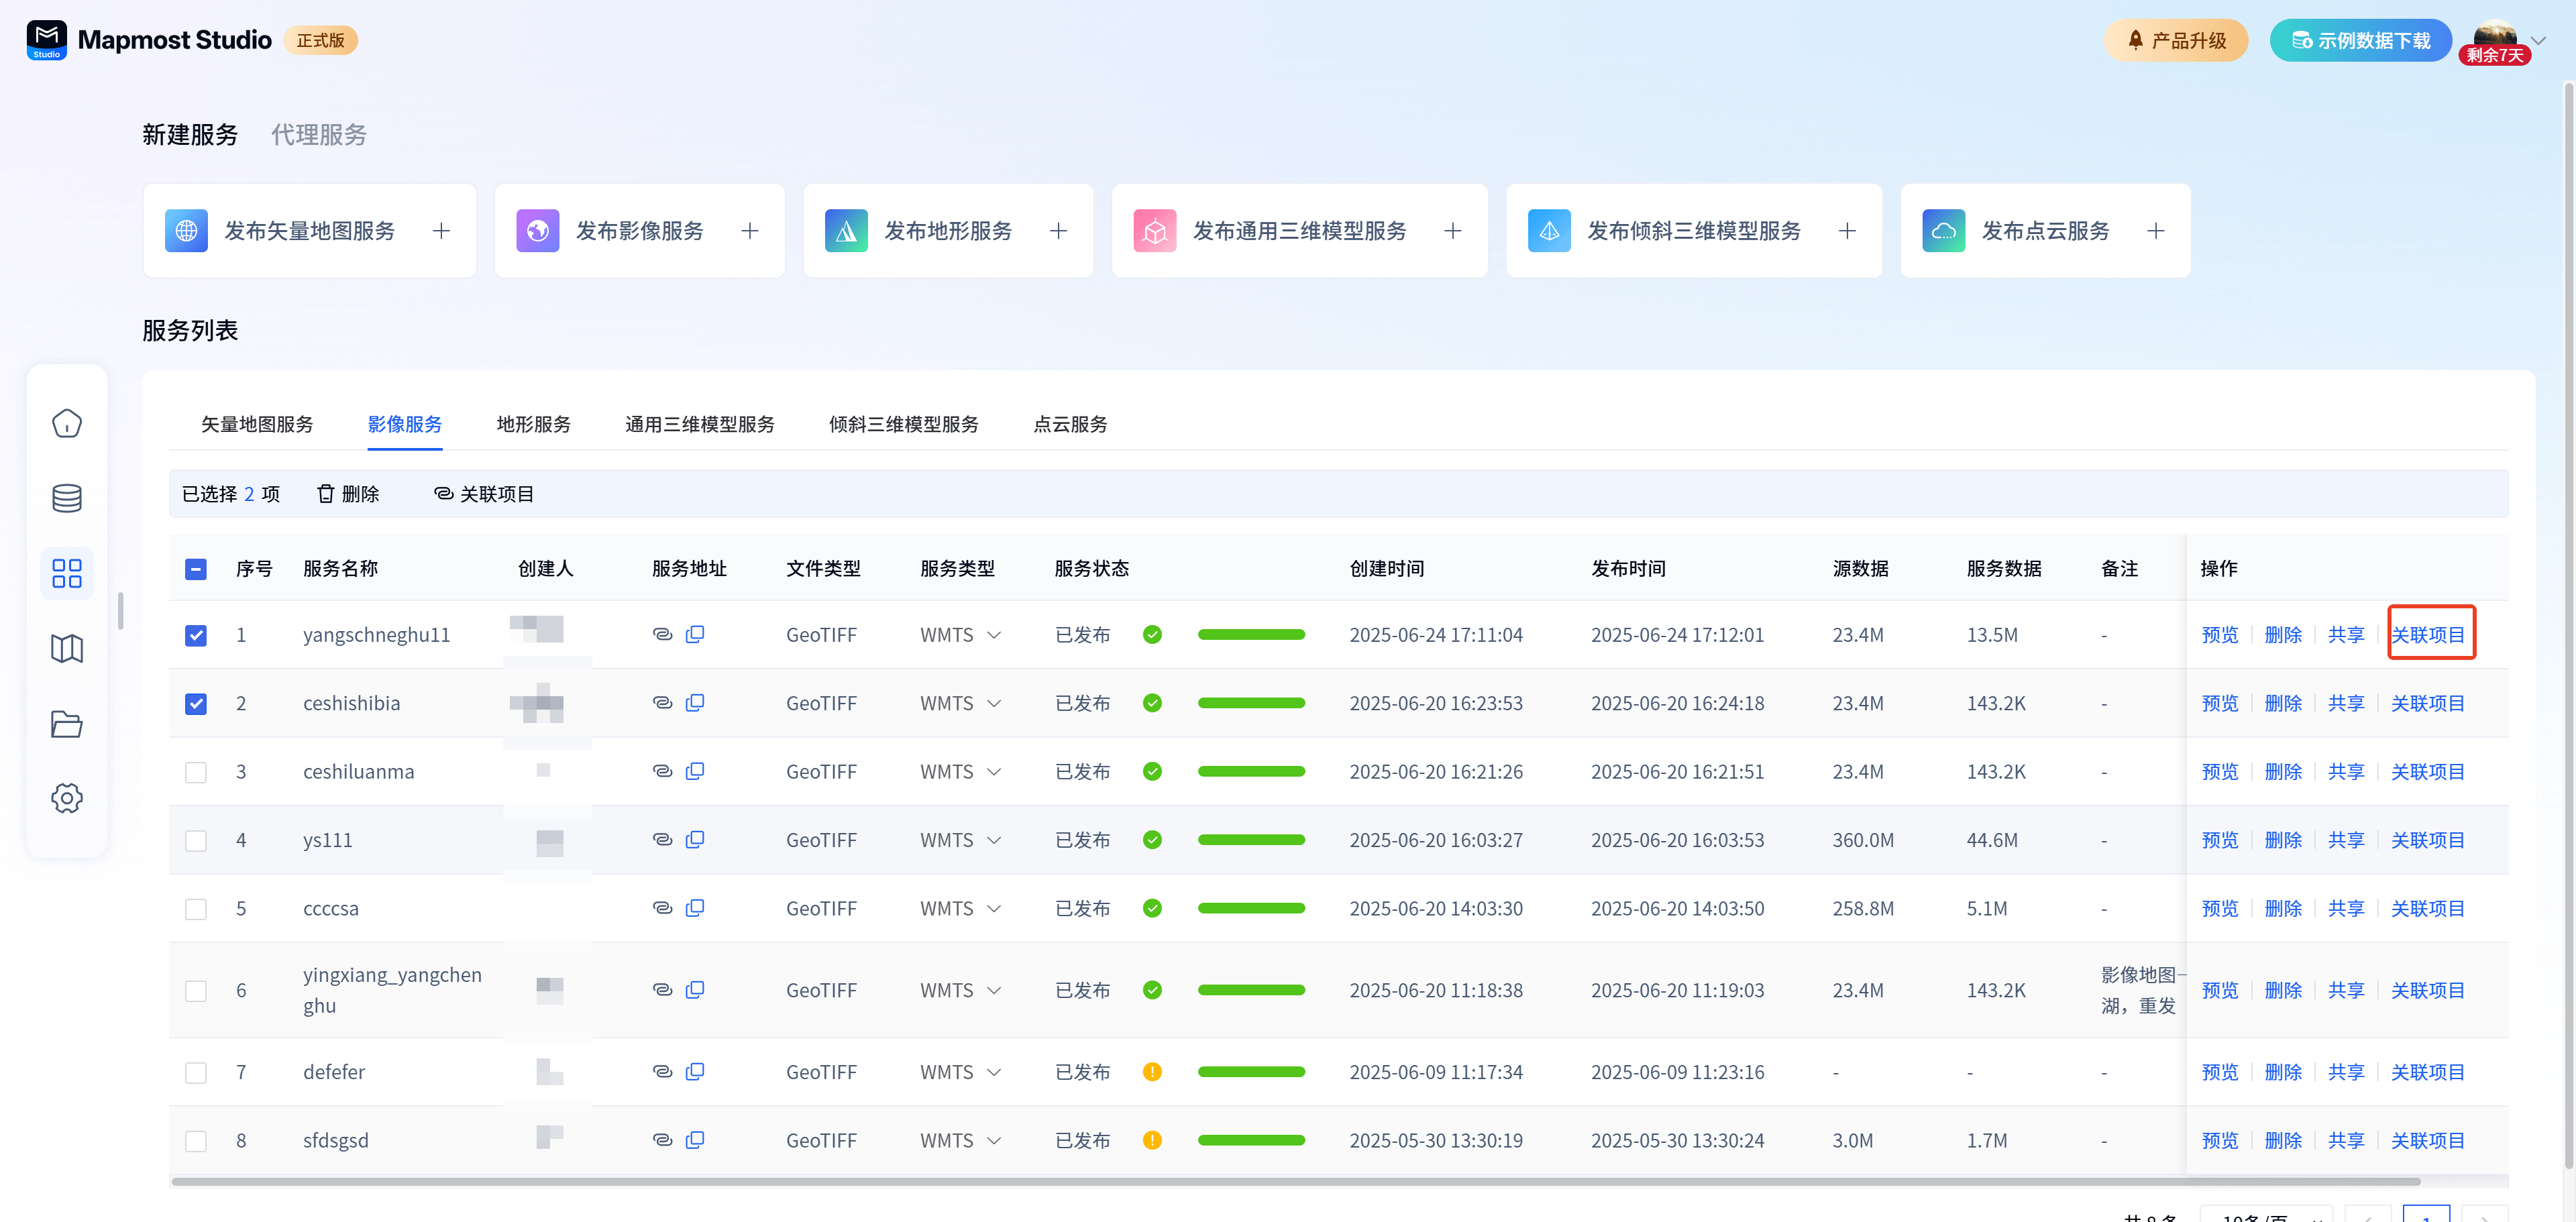
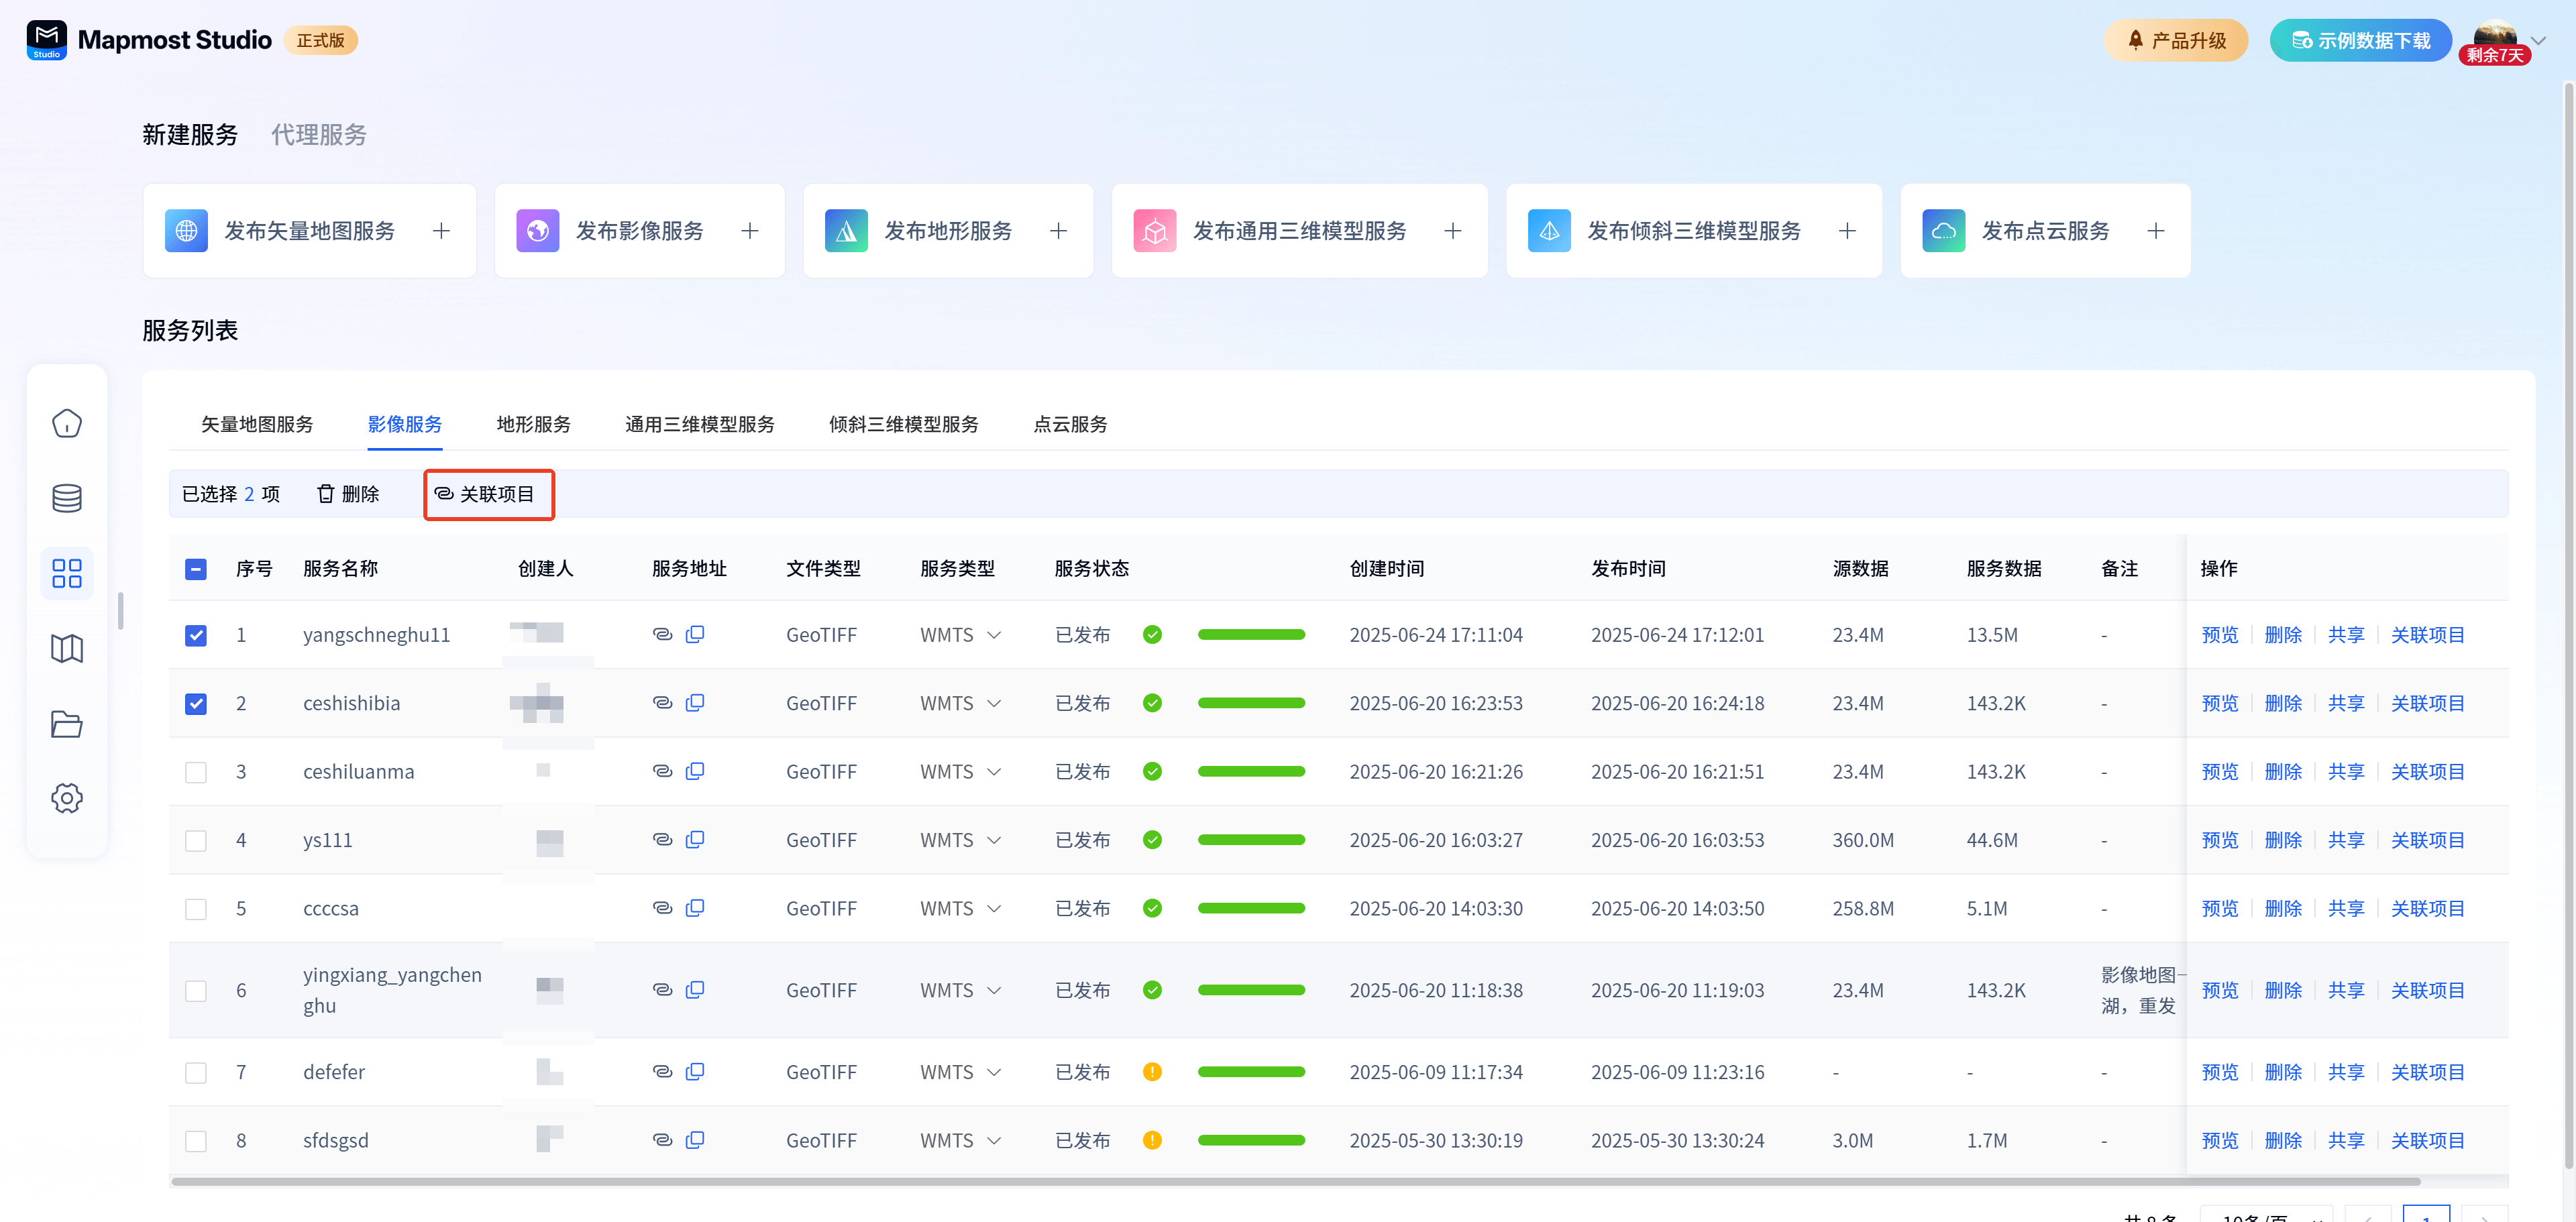
② Batch associated projects: Select multiple services to be associated with projects, and click the Associate Projects button in the multi-select operation box above the table.
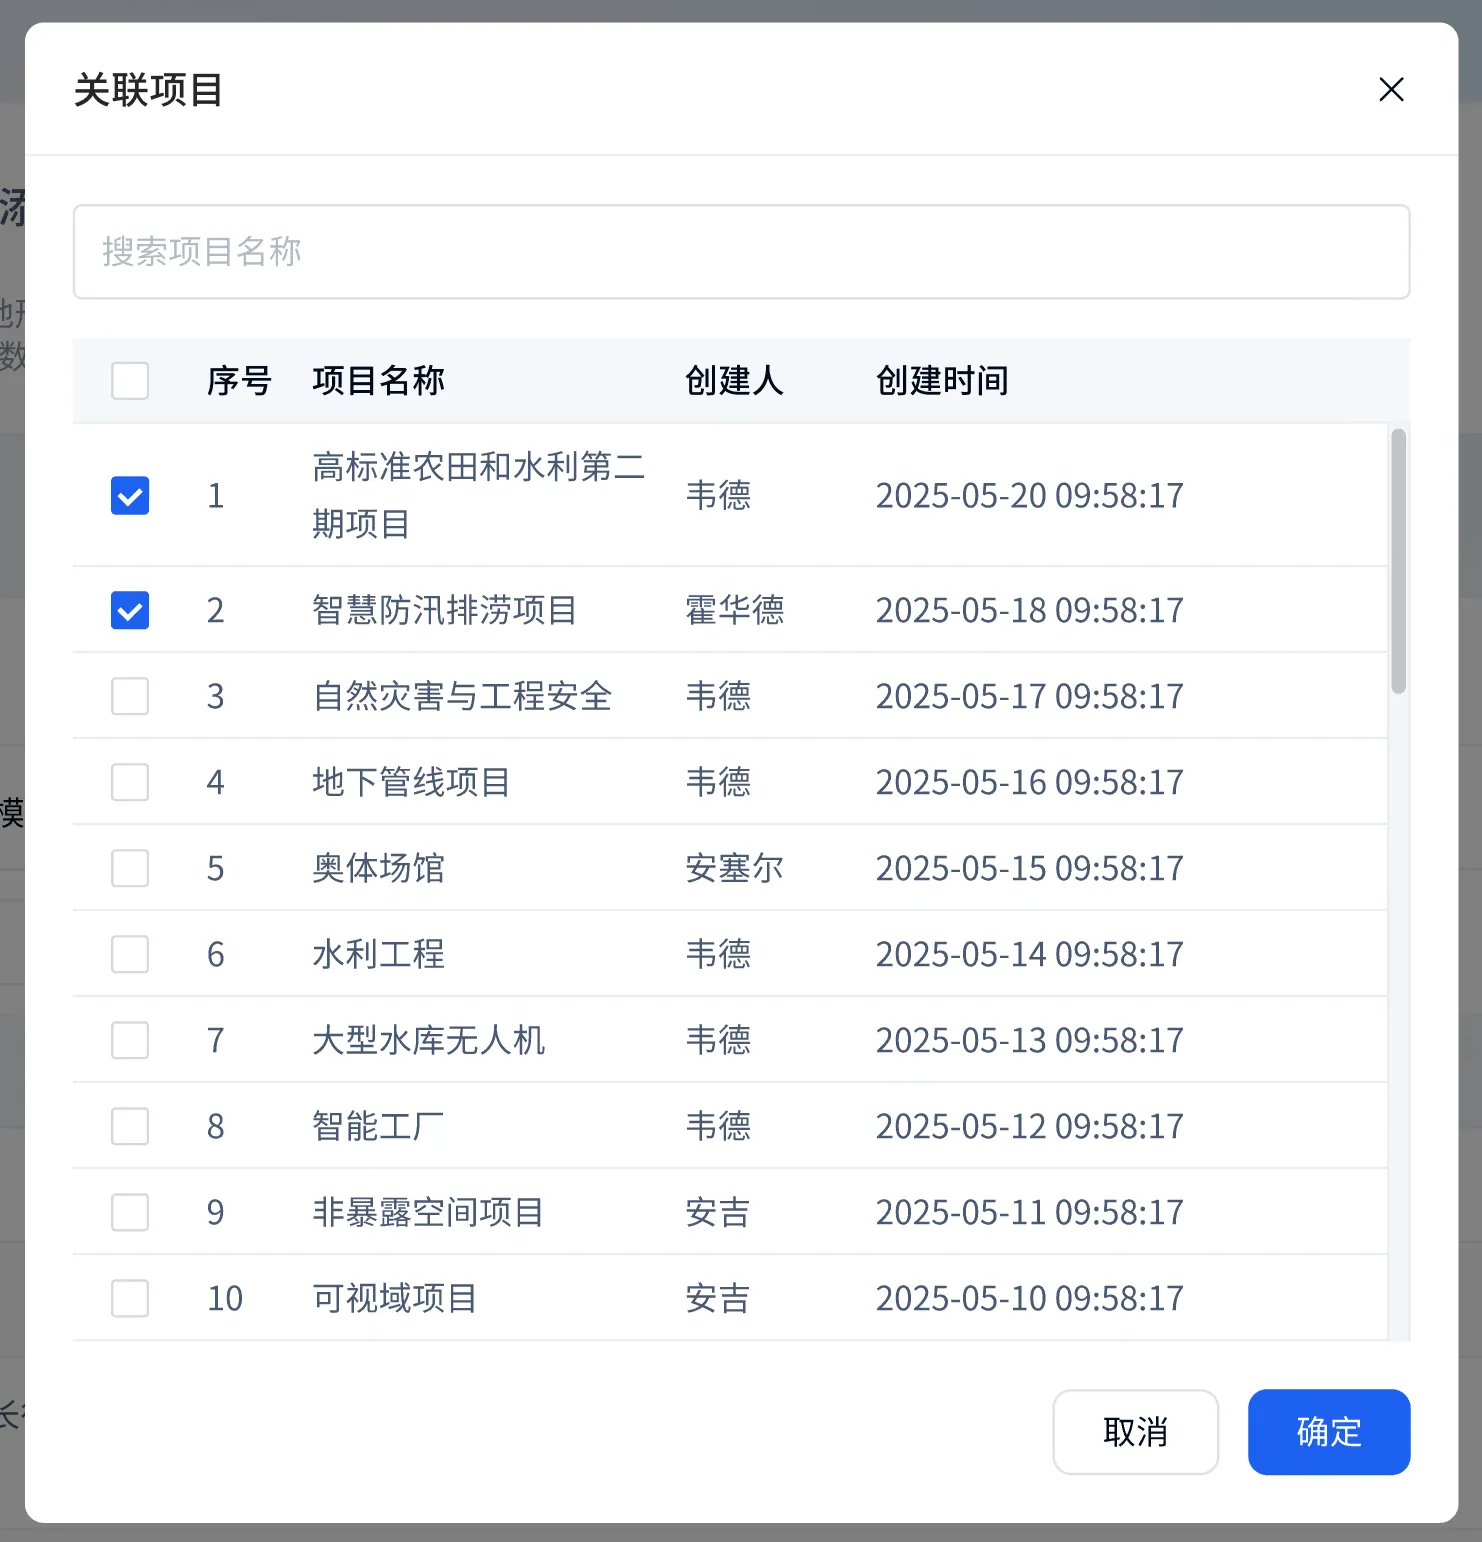
Related projects support searching by project name or table selection, and supporting multiple projects.
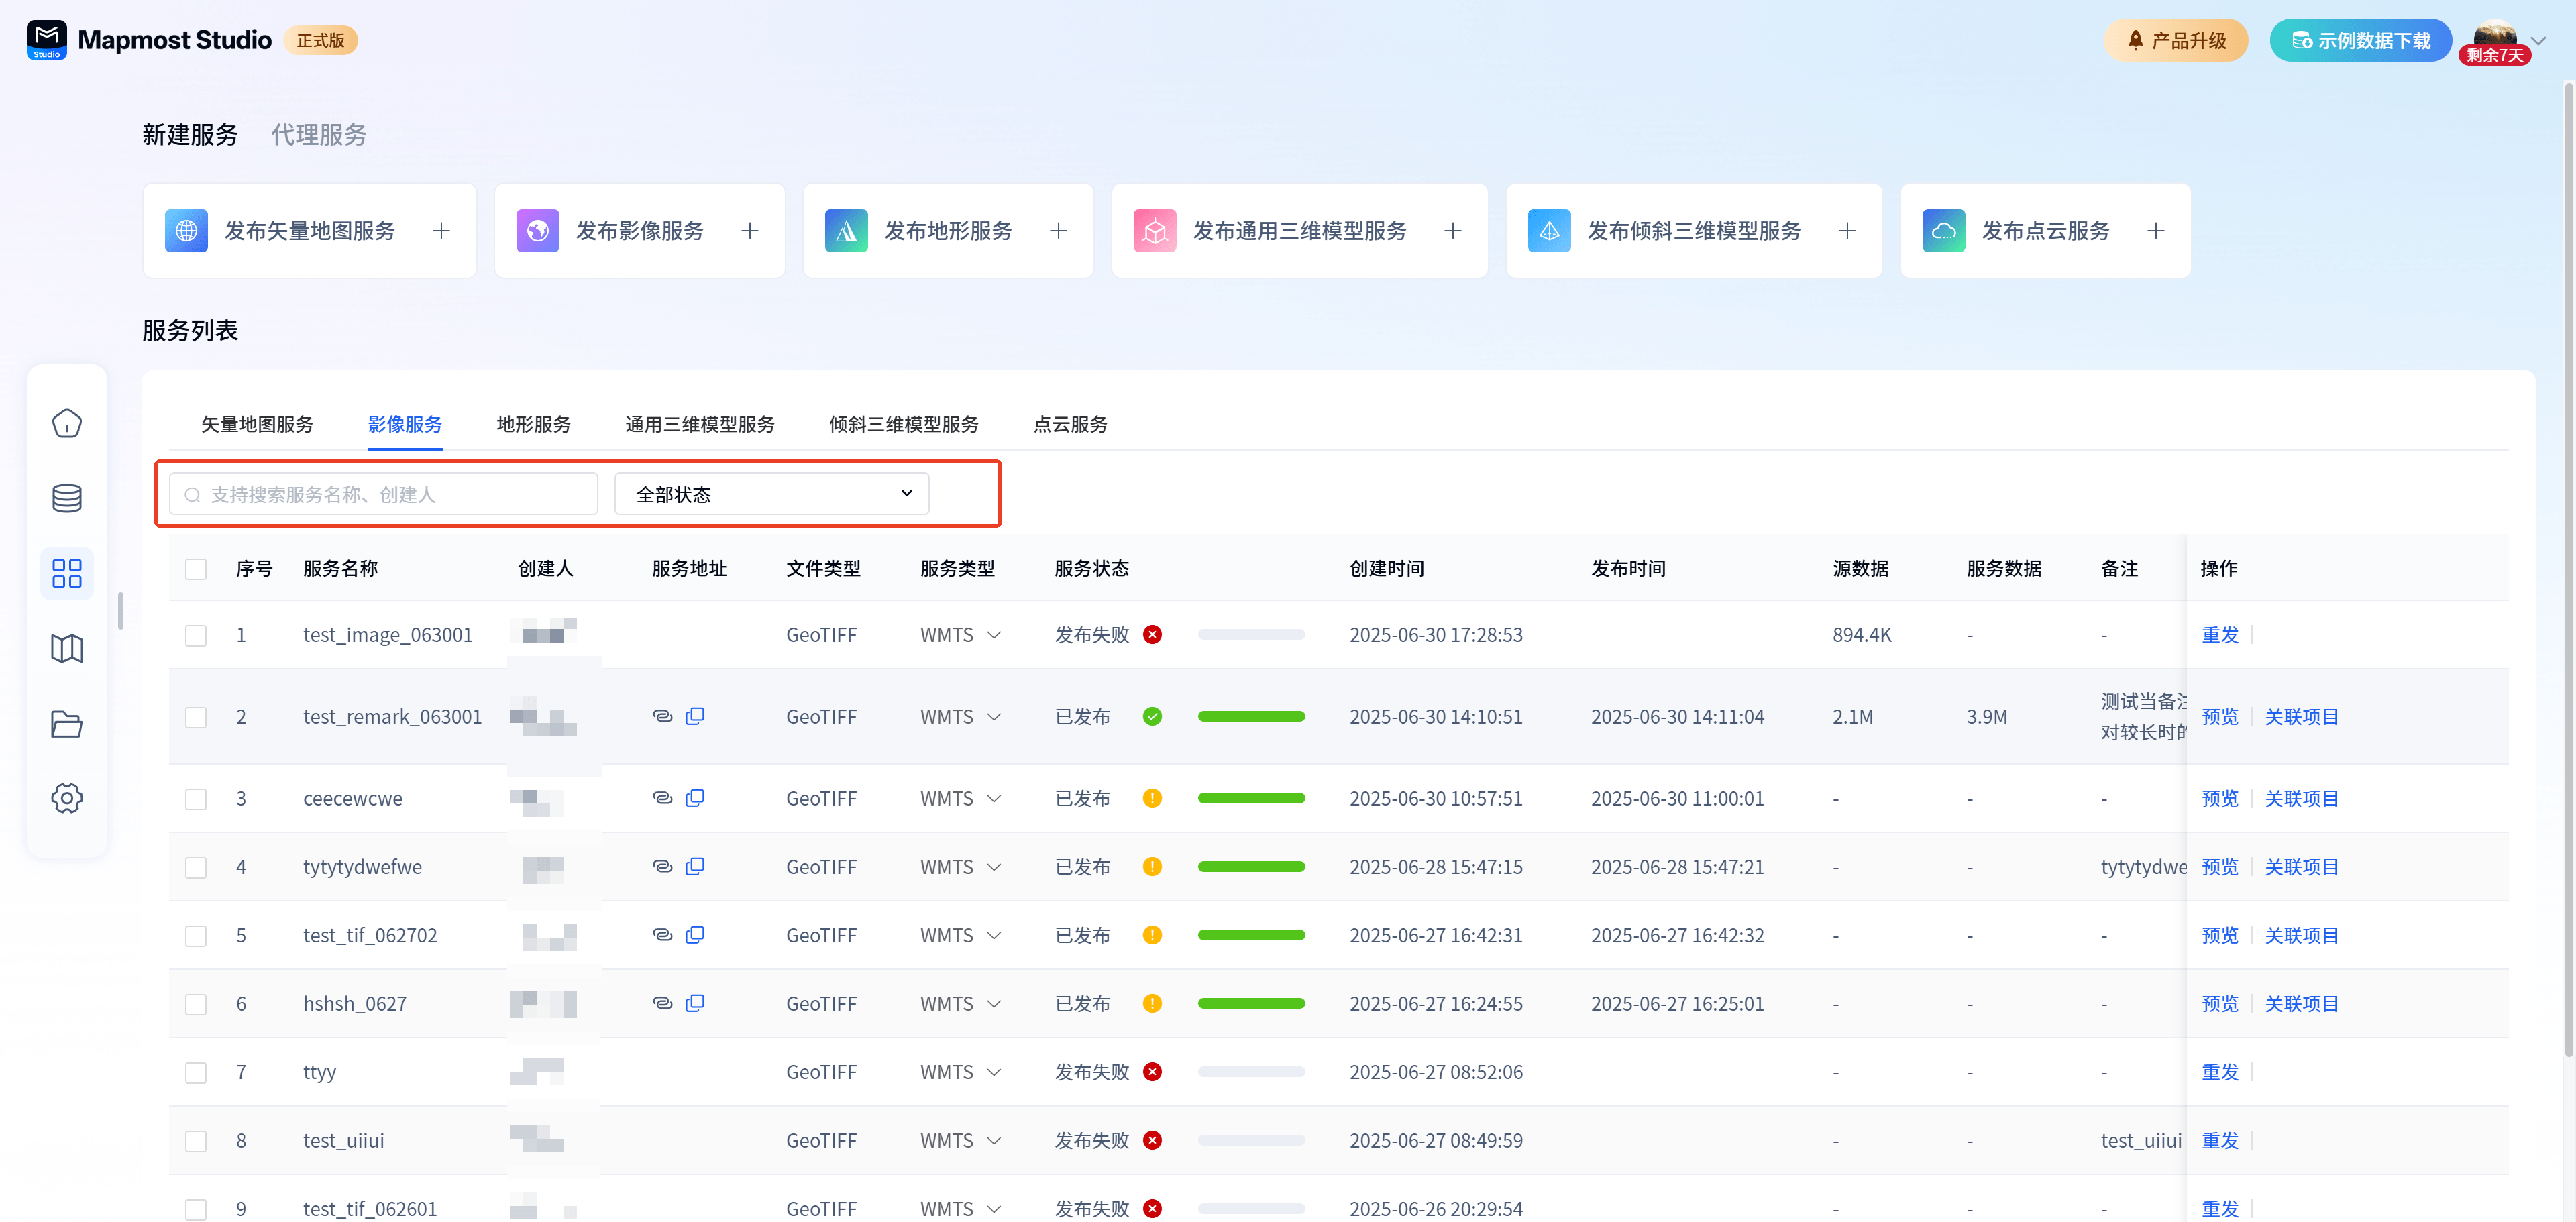
2.9. Filtering
Service list supports filtering
①Support filtering services by keyword-service name, creator
②Support filtering services by service status
2.10. Copy service address
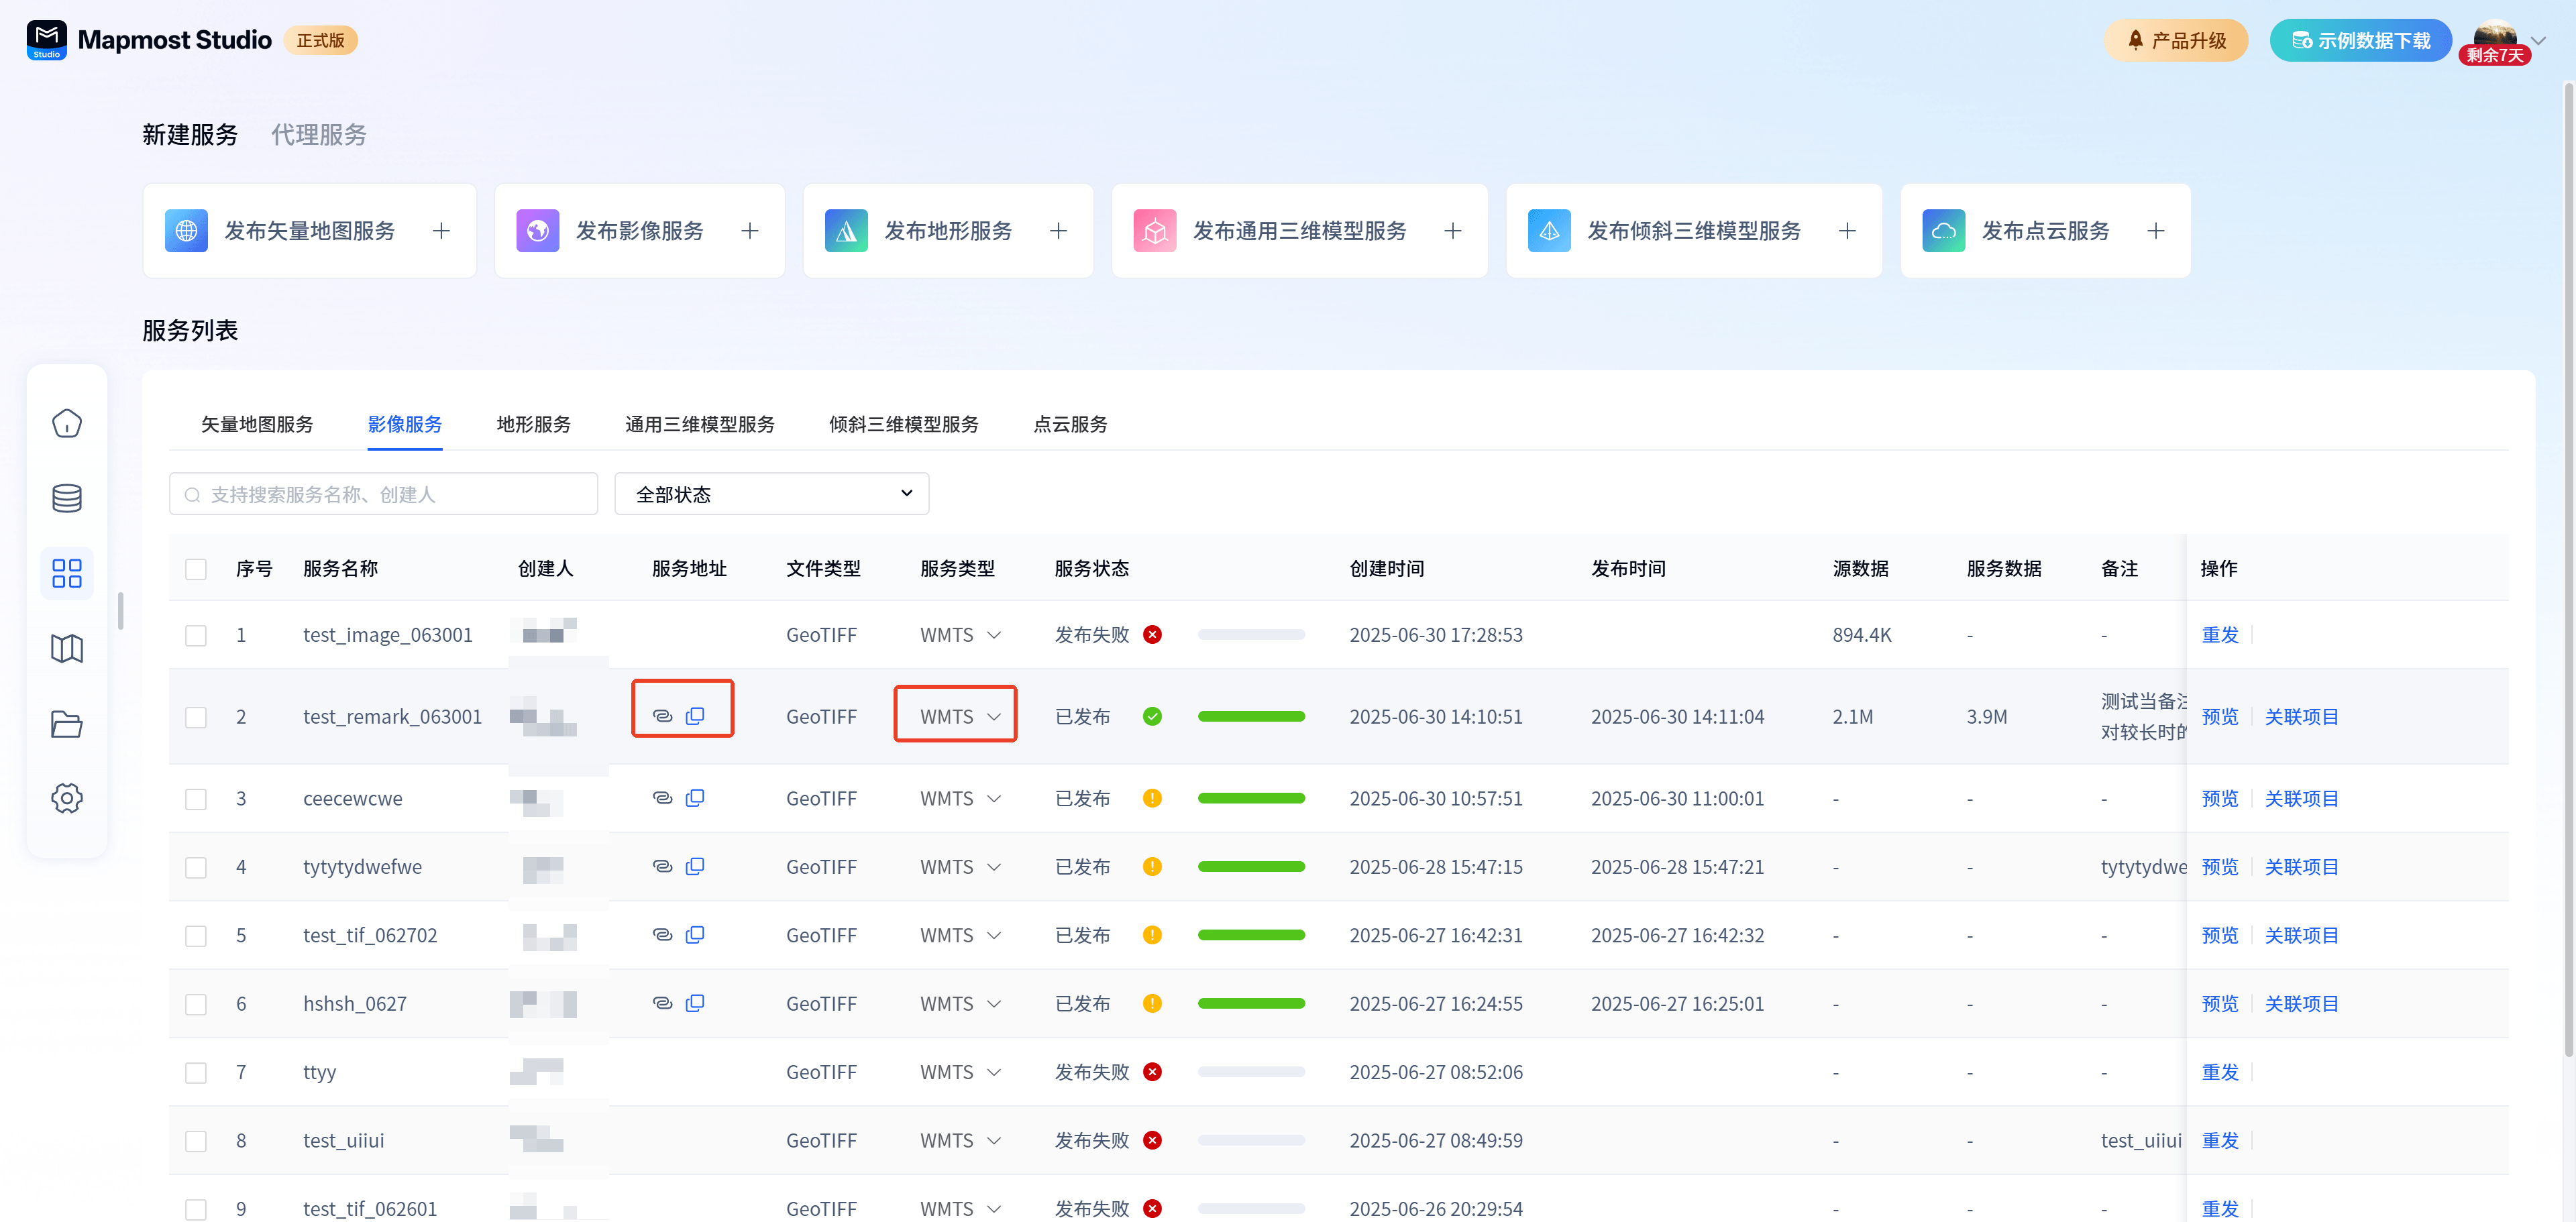
Successfully published services support copying. Click the copy button to copy the service address to the clipboard. The service address supports loading in Mapmost SDK for WebGL.
Please note: There are two types of imaging services, each type has a corresponding service address. After selecting the service type as needed, click the copy button at the service address.
3. terrain services
3.1. New
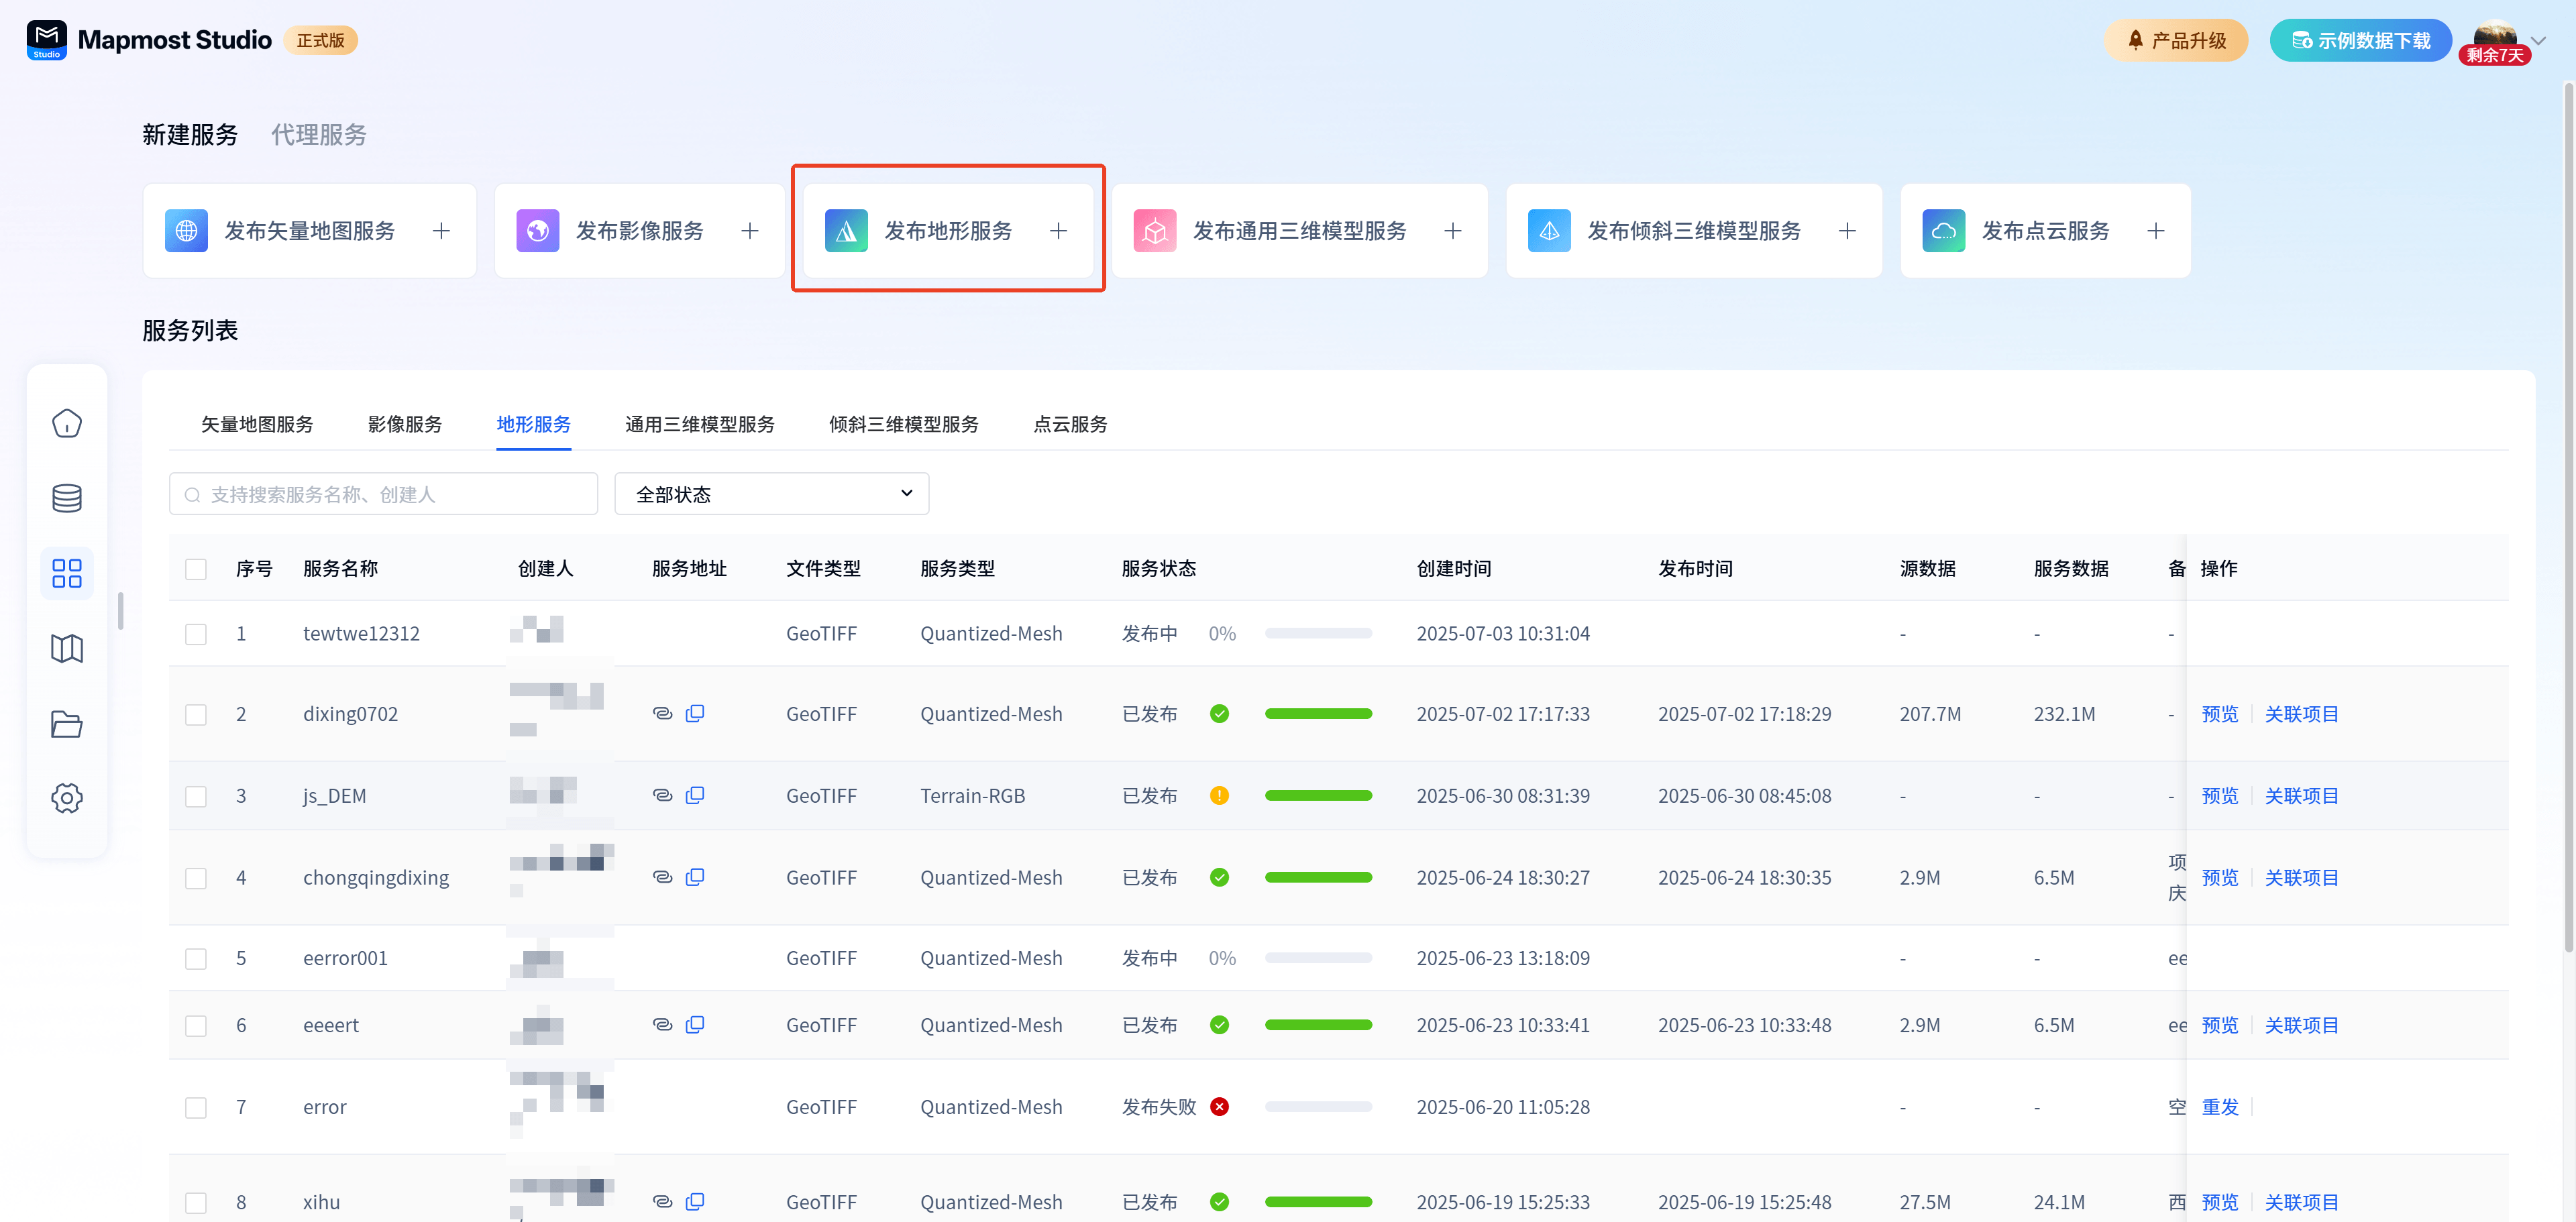
Open the "Mapmost Studio" software, switch to the "My Services" module in the left navigation bar, and under the "New Service Release" category, click "Publish Terrain Service" to enter the corresponding service release page.
3.2. Release
Raw data:
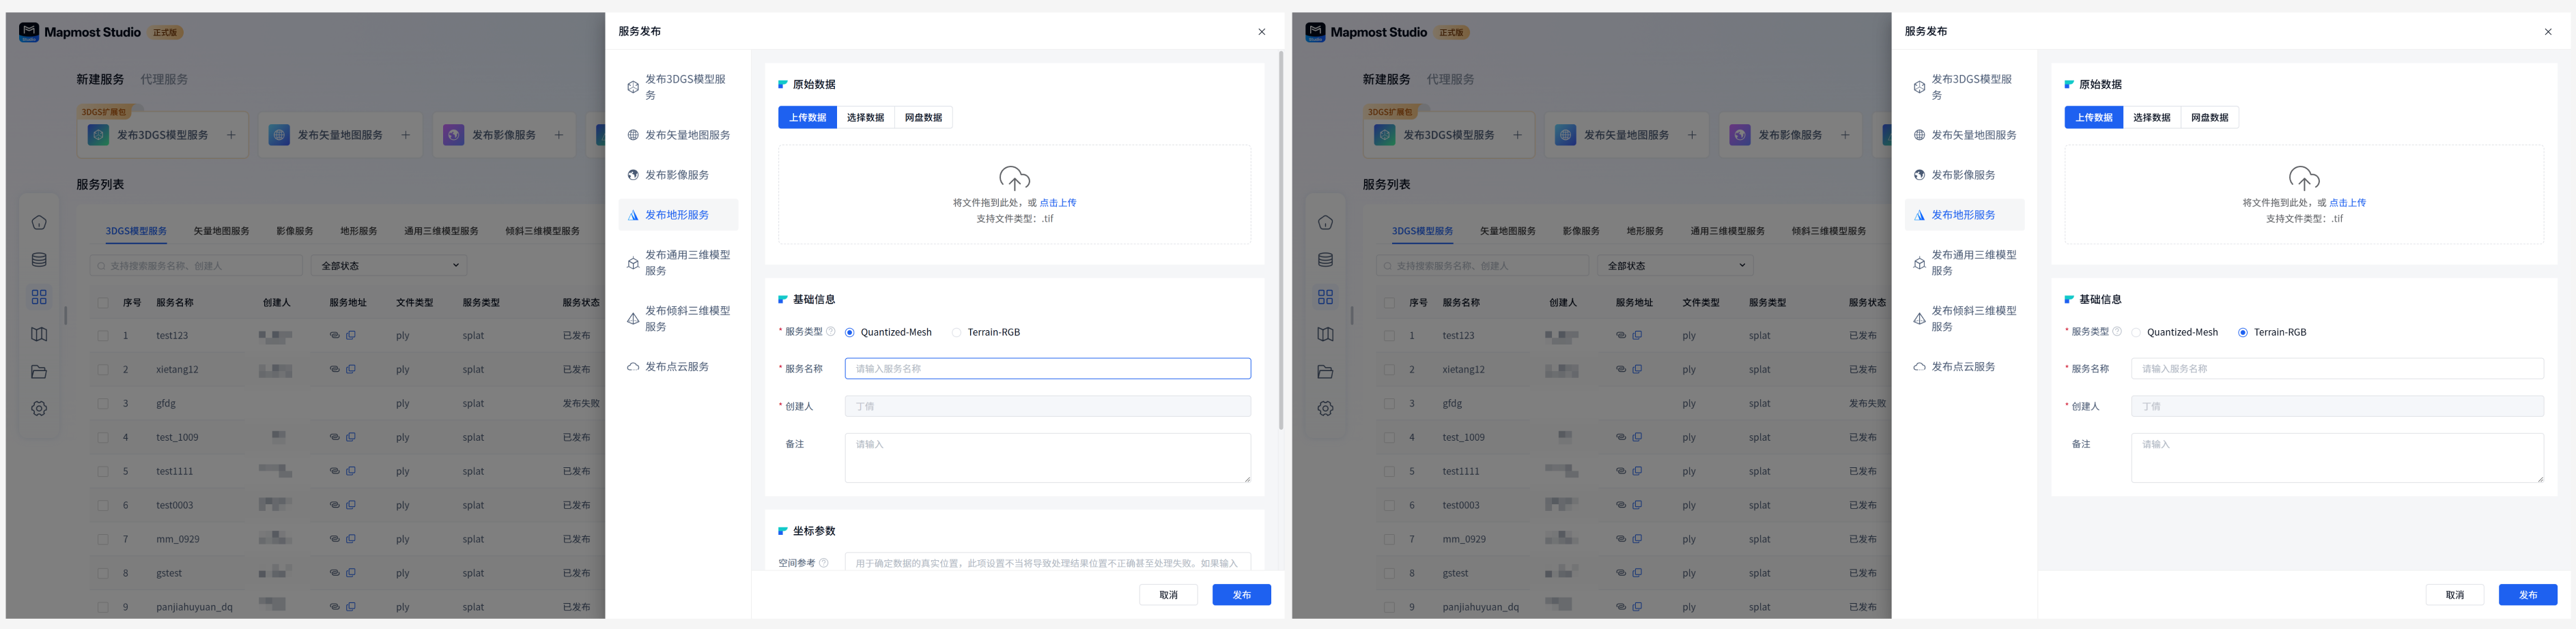
Three data adding methods are supported:
① Supports uploading local data, the uploaded data is displayed in the upload list, supports data deletion and data name renaming; supports uploading multiple data at one time.
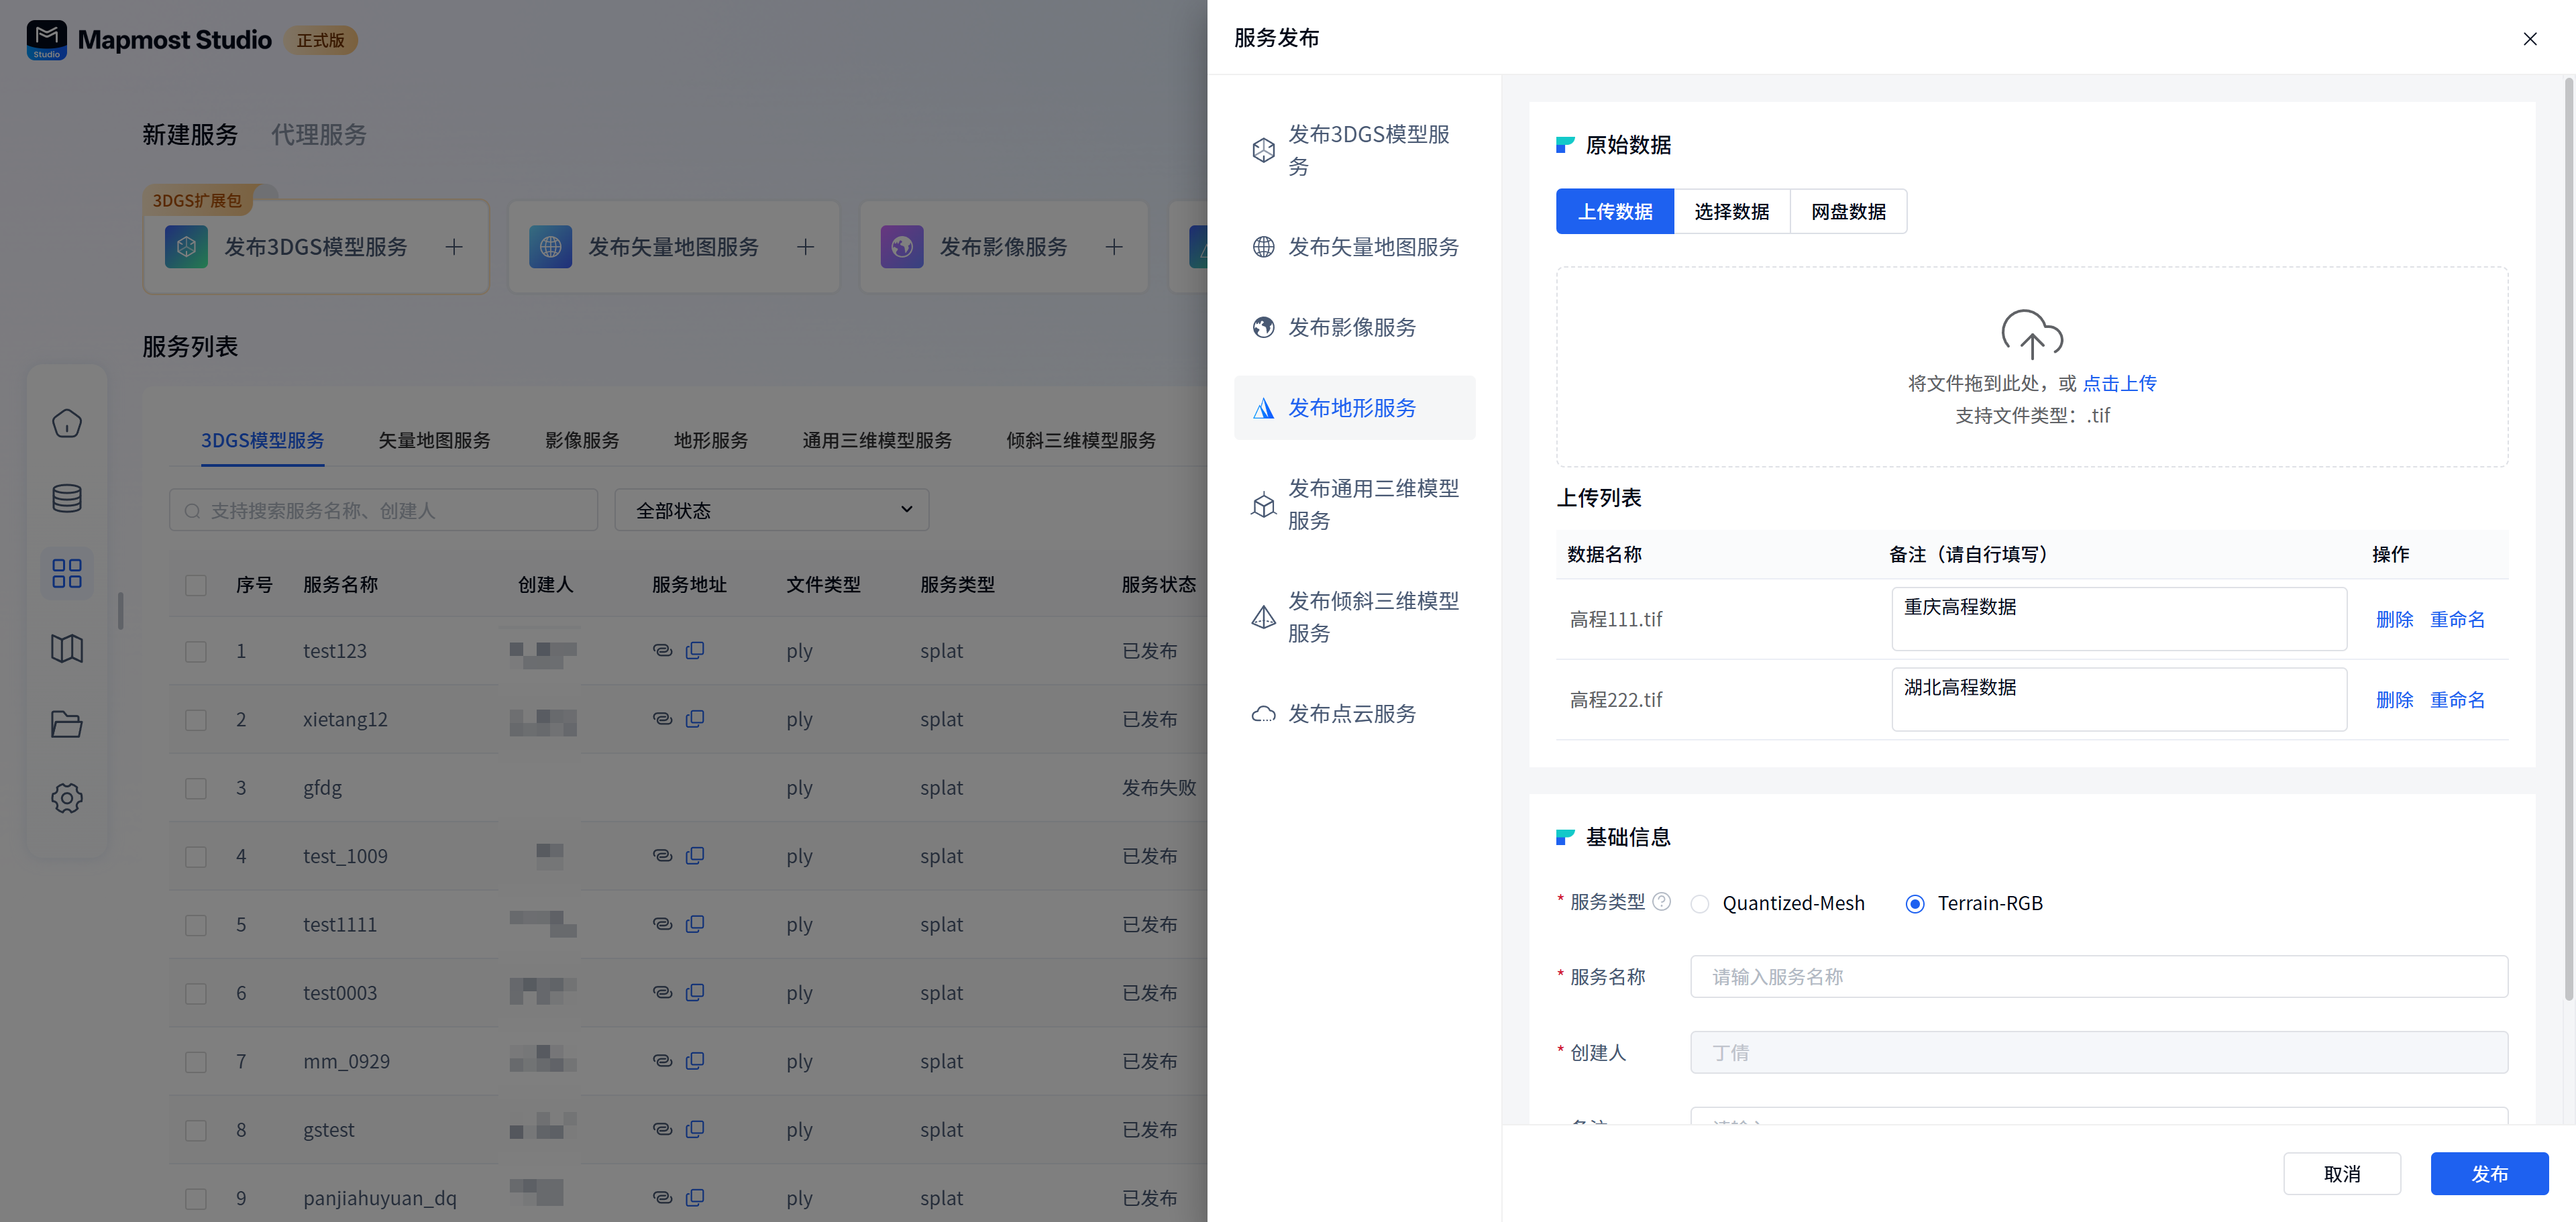
②Select uploaded data from My Data. When selecting data, you can select multiple or single data at one time.
③ To select data from Network Disk Data, you need to select the data path and output path. When selecting the data path, the supported file format is.tif. Network disk data means that NAS network disks can be configured when deploying the system. Users can directly select data in the network disk for service release, and service data can also be stored in the network disk. Network disk data is only available to private deployment users.
Basic information:
| Field | illustrate |
|---|---|
| Service type | Required, the two service types are Quantized-Mesh and Terrain-RGB; only the Quantized-Mesh service type is supported when selecting multiple data. Quantized-Mesh is available with Mapmost SDK for UE5 and Terrain-RGB is available with Mapmost SDK for WebGL. |
| Service name | Required, the name must start with a lowercase letter, be 4-32 characters in length, and consist of letters, numbers, and underscores. |
| Uploader | Required, automatically entered, cannot be modified. |
| Remark | It is not required and can be filled in according to the actual situation. |
Coordinate parameters:
| Field | illustrate |
|---|---|
| spatial reference | Optional, supported when Quantized-Mesh is selected as the service type. Spatial reference can be vividly compared to the positioning system of geographical data, which defines how to identify and place the specific location of data on the earth. The spatial reference is used to determine the true location of the data. Improper setting of this will result in incorrect location of the processing results or even processing failure. If the input file contains spatial reference information, the system will automatically recognize it and no settings are required at this time. Otherwise, the user needs to manually specify it based on the spatial reference of the data. Supports filling in ENU coordinates, EPSG encoding, and strings in PROJ or WKT format indicating spatial reference. Automatic filling is supported after clicking the button at the bottom to select. |
Processing parameters:
| Field | illustrate |
|---|---|
| Trigonometric algorithm | Optional, supported when Quantized-Mesh is selected as the service type. Supports both ctb and vcg. ctb: A fast mesh-based triangle network simplification algorithm, which is characterized by fast speed and the processing time is about 1/60 of vcg, but the error is large. Default ctb. vcg: Triangulation network simplification algorithm based on the classic edge collapse algorithm. It is characterized by better grid structure quality and small errors, but slow processing speed. |
Publish Drawer Action:
| Field | illustrate |
|---|---|
| Cancel | Click Cancel to exit the current service publishing process, and the entered content will not be saved. |
| release | Click Publish, the current content is saved and published into the corresponding service, and the progress can be viewed in the service list. |
3.3. Preview
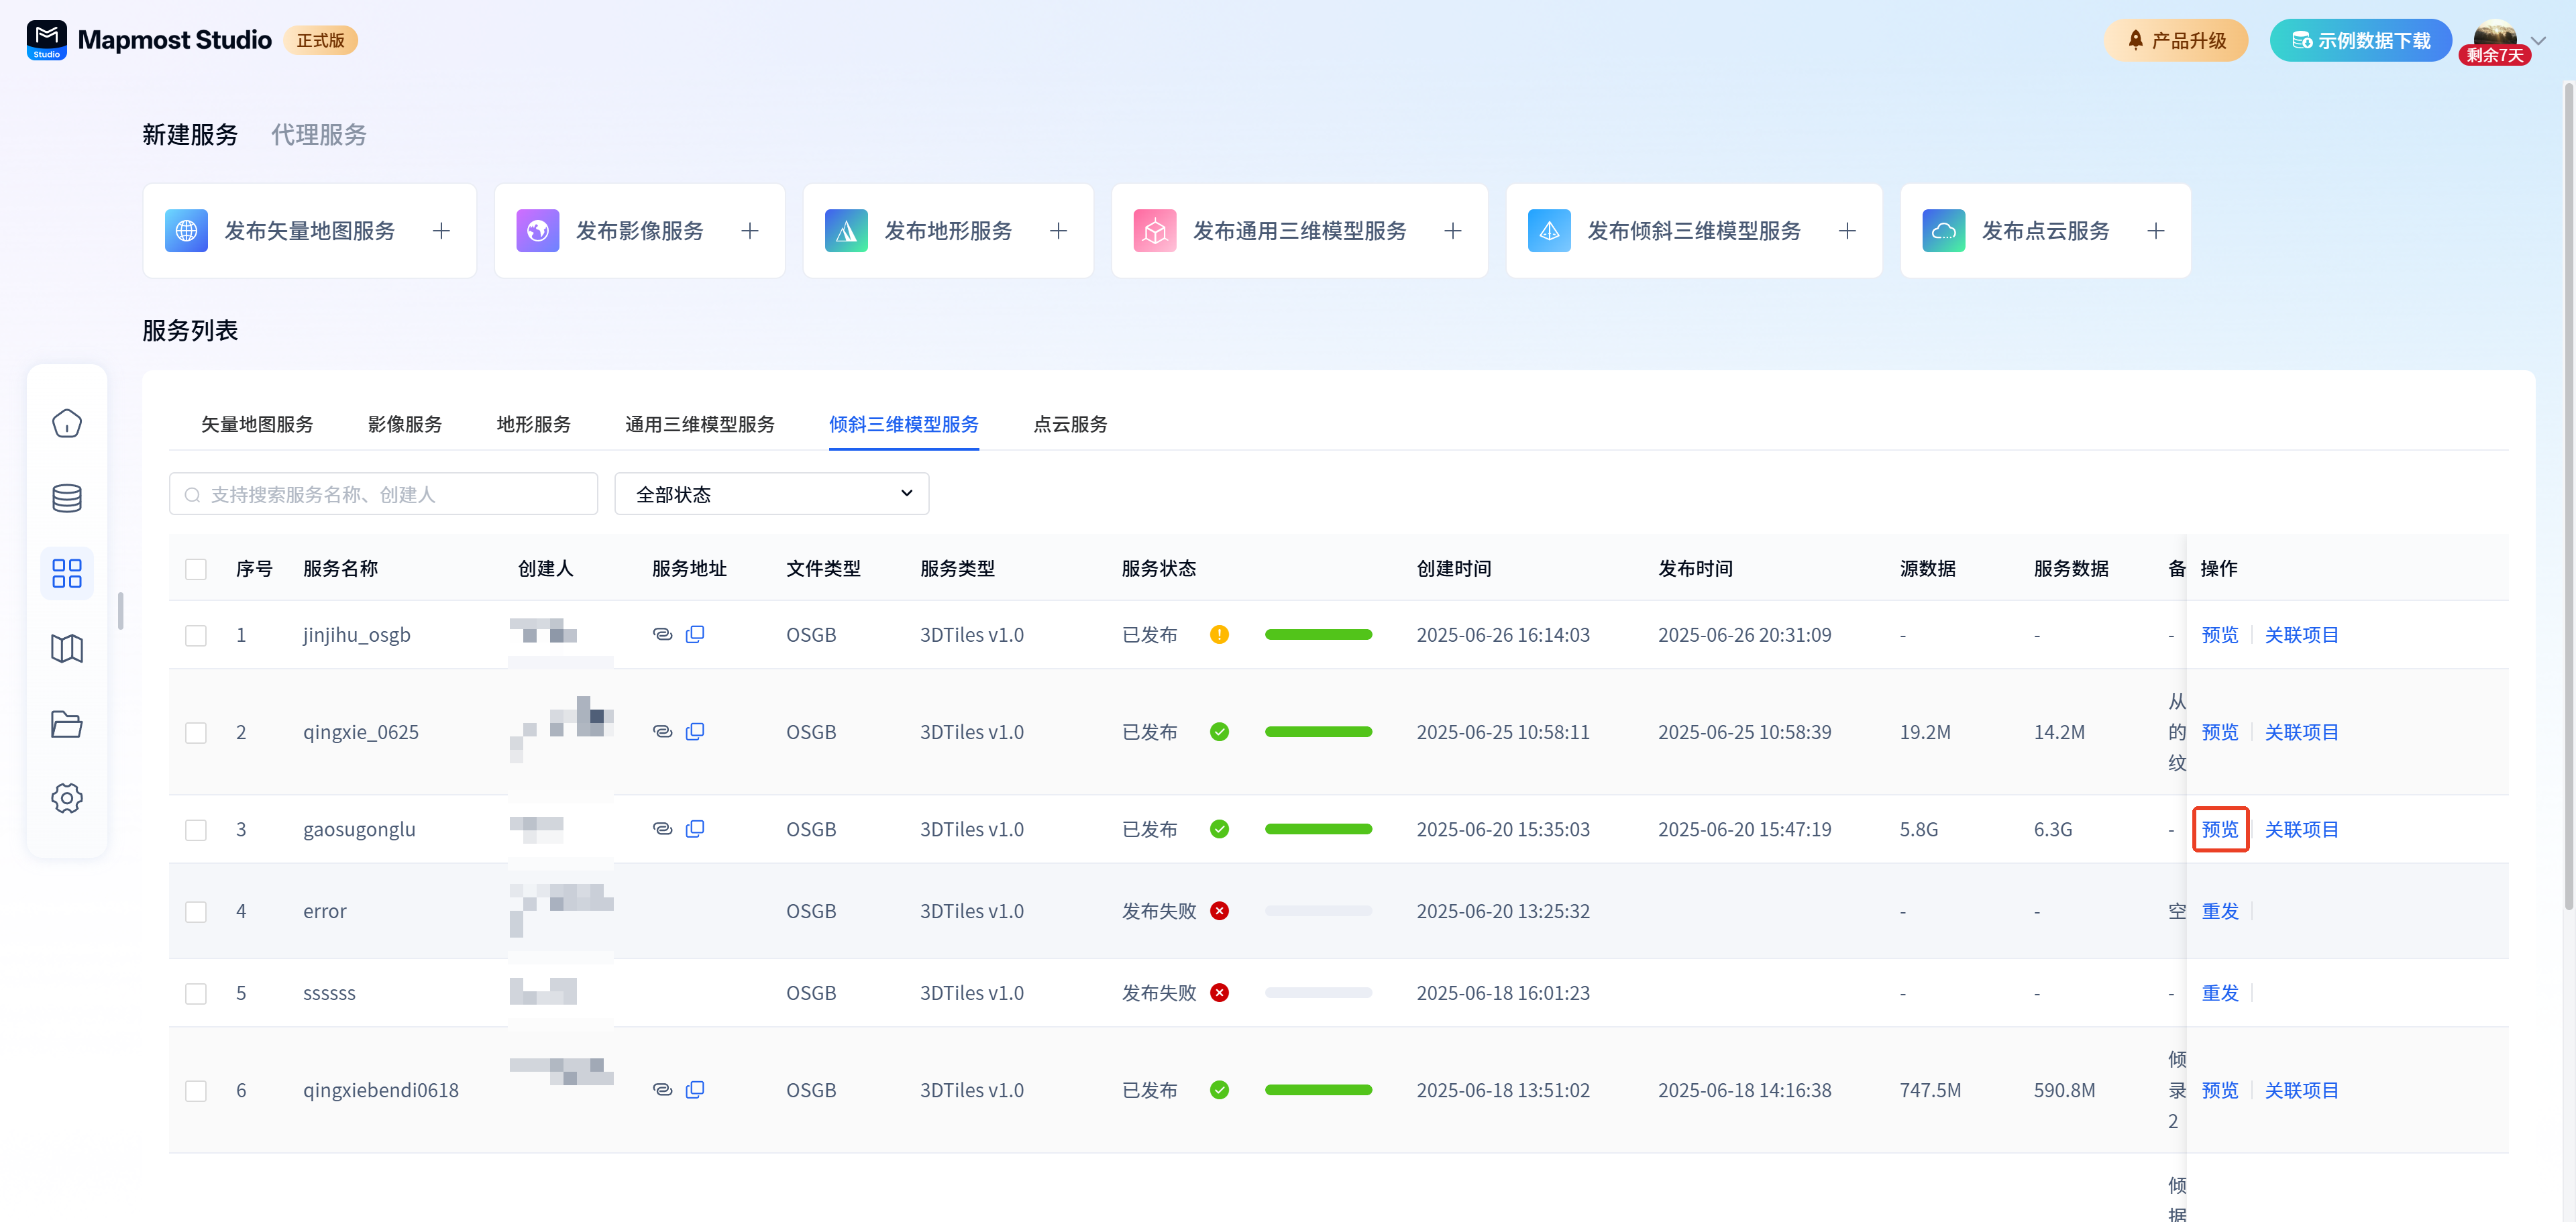
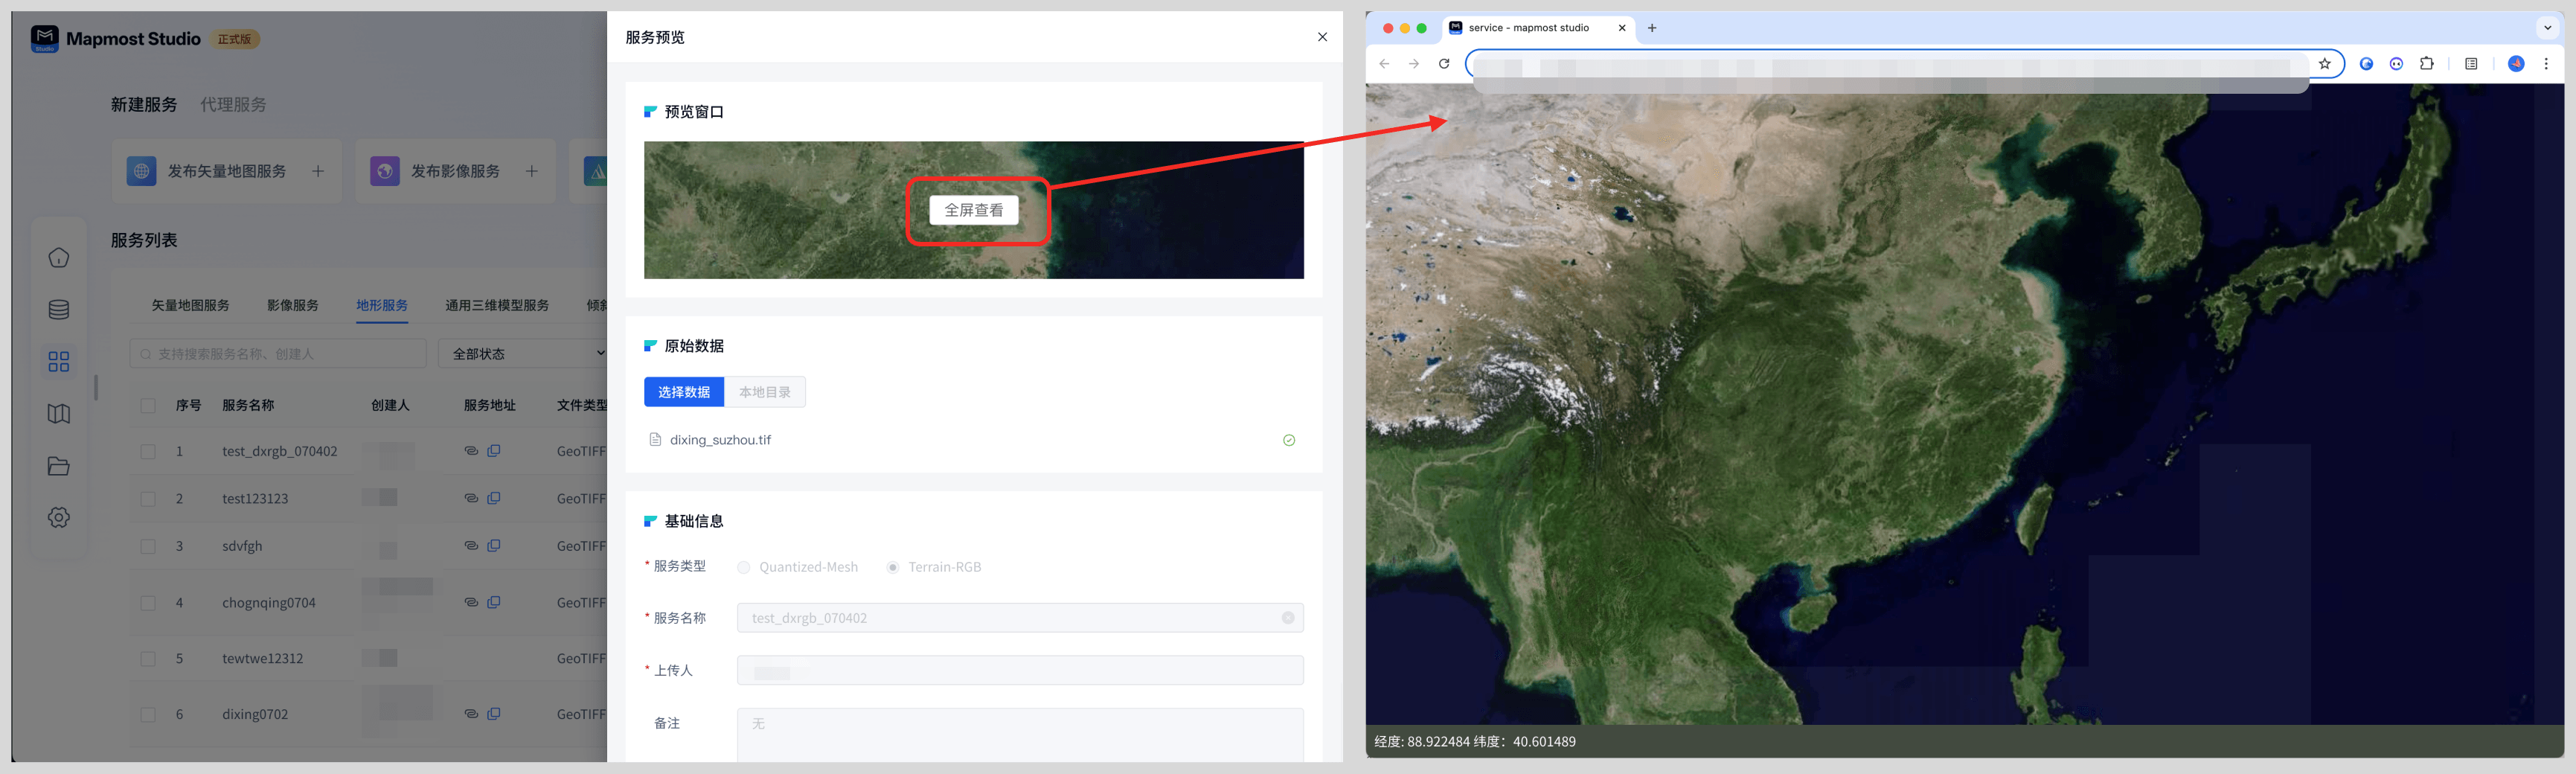
Publish a successful terrain service support preview. Click Preview to preview the current service and the parameters released by the service. Click the preview window to view the service effect in full screen on the new page.
3.4. Resend
Publish failed terrain services and support re-issuance. Click Resend to display the publishing drawer, where you can reselect data, adjust parameters, and publish again.

3.5. Delete
The detailed operation of terrain service deletion is the same as Image Service Removed
3.6. Sharing
The detailed operation of terrain service sharing is the same as Image service sharing
3.7. View logs
The detailed operation of terrain service view log is the same as Vector Map Service View Log
3.8. Related projects
The detailed operations of terrain service related projects are the same as Imaging service related projects
3.9. Filtering
The detailed operation of terrain service screening is the same as Imaging Service Screening
3.10. Copy service address
The detailed operation of terrain service copy address is the same as Vector map service copy address
4. Universal 3D model service
4.1. New
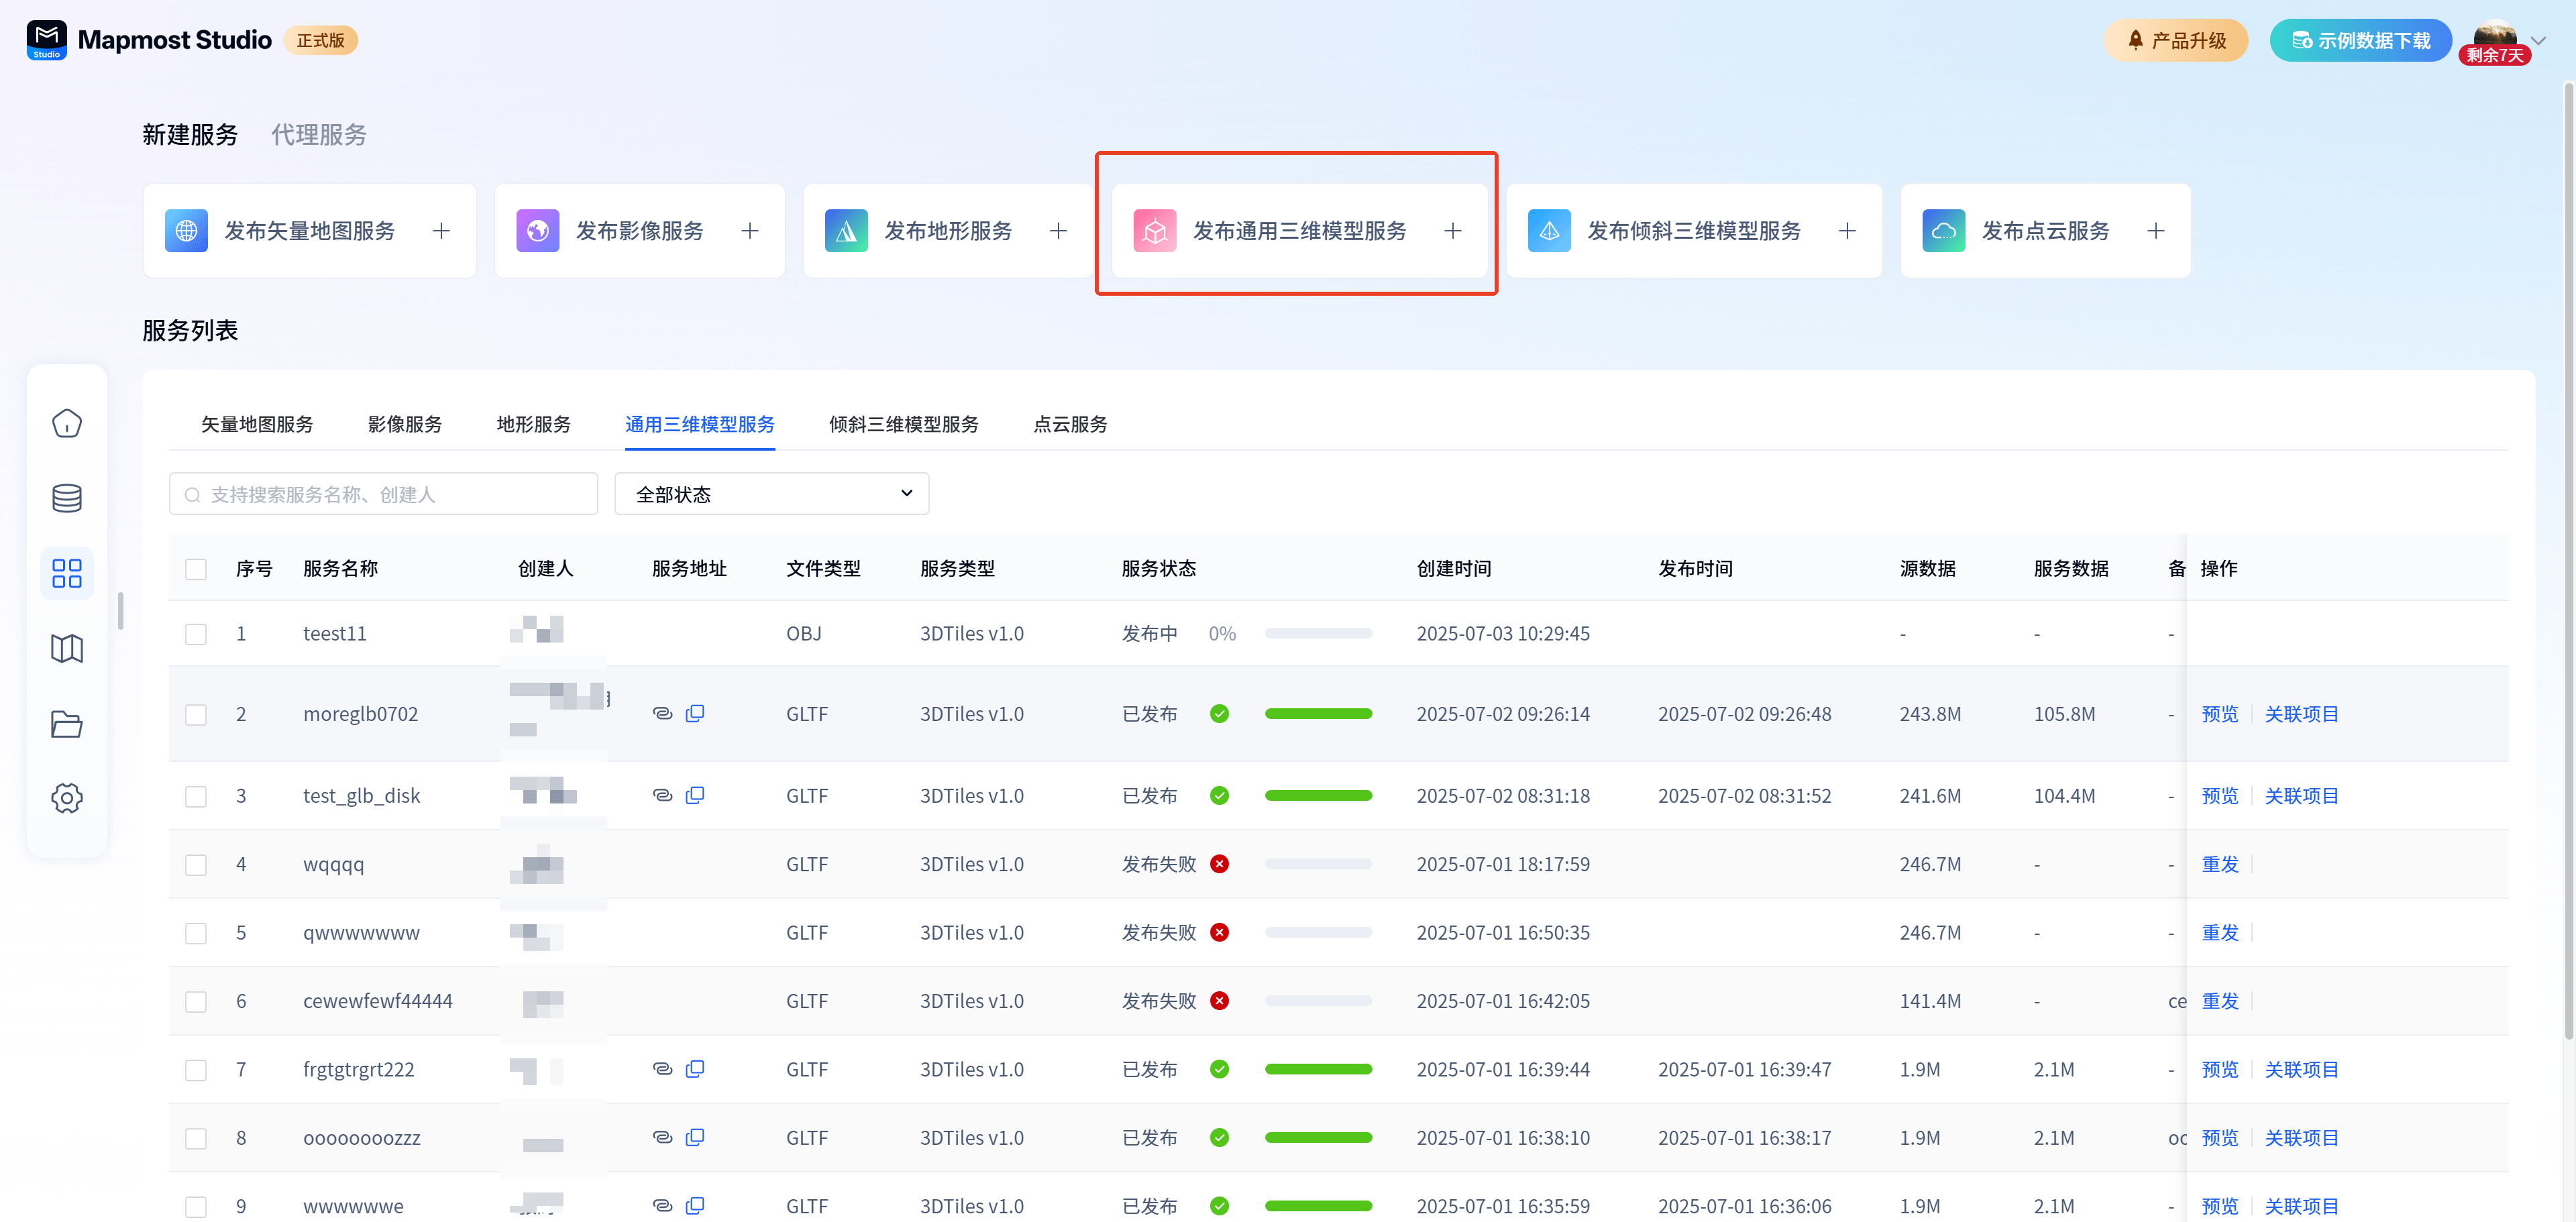
Open the "Mapmost Studio" software, switch to the "My Services" module in the left navigation bar, and under the "New Service Release" category, click "Publish Universal 3D Model Service"** to enter the corresponding service release page.
4.2. Publishing
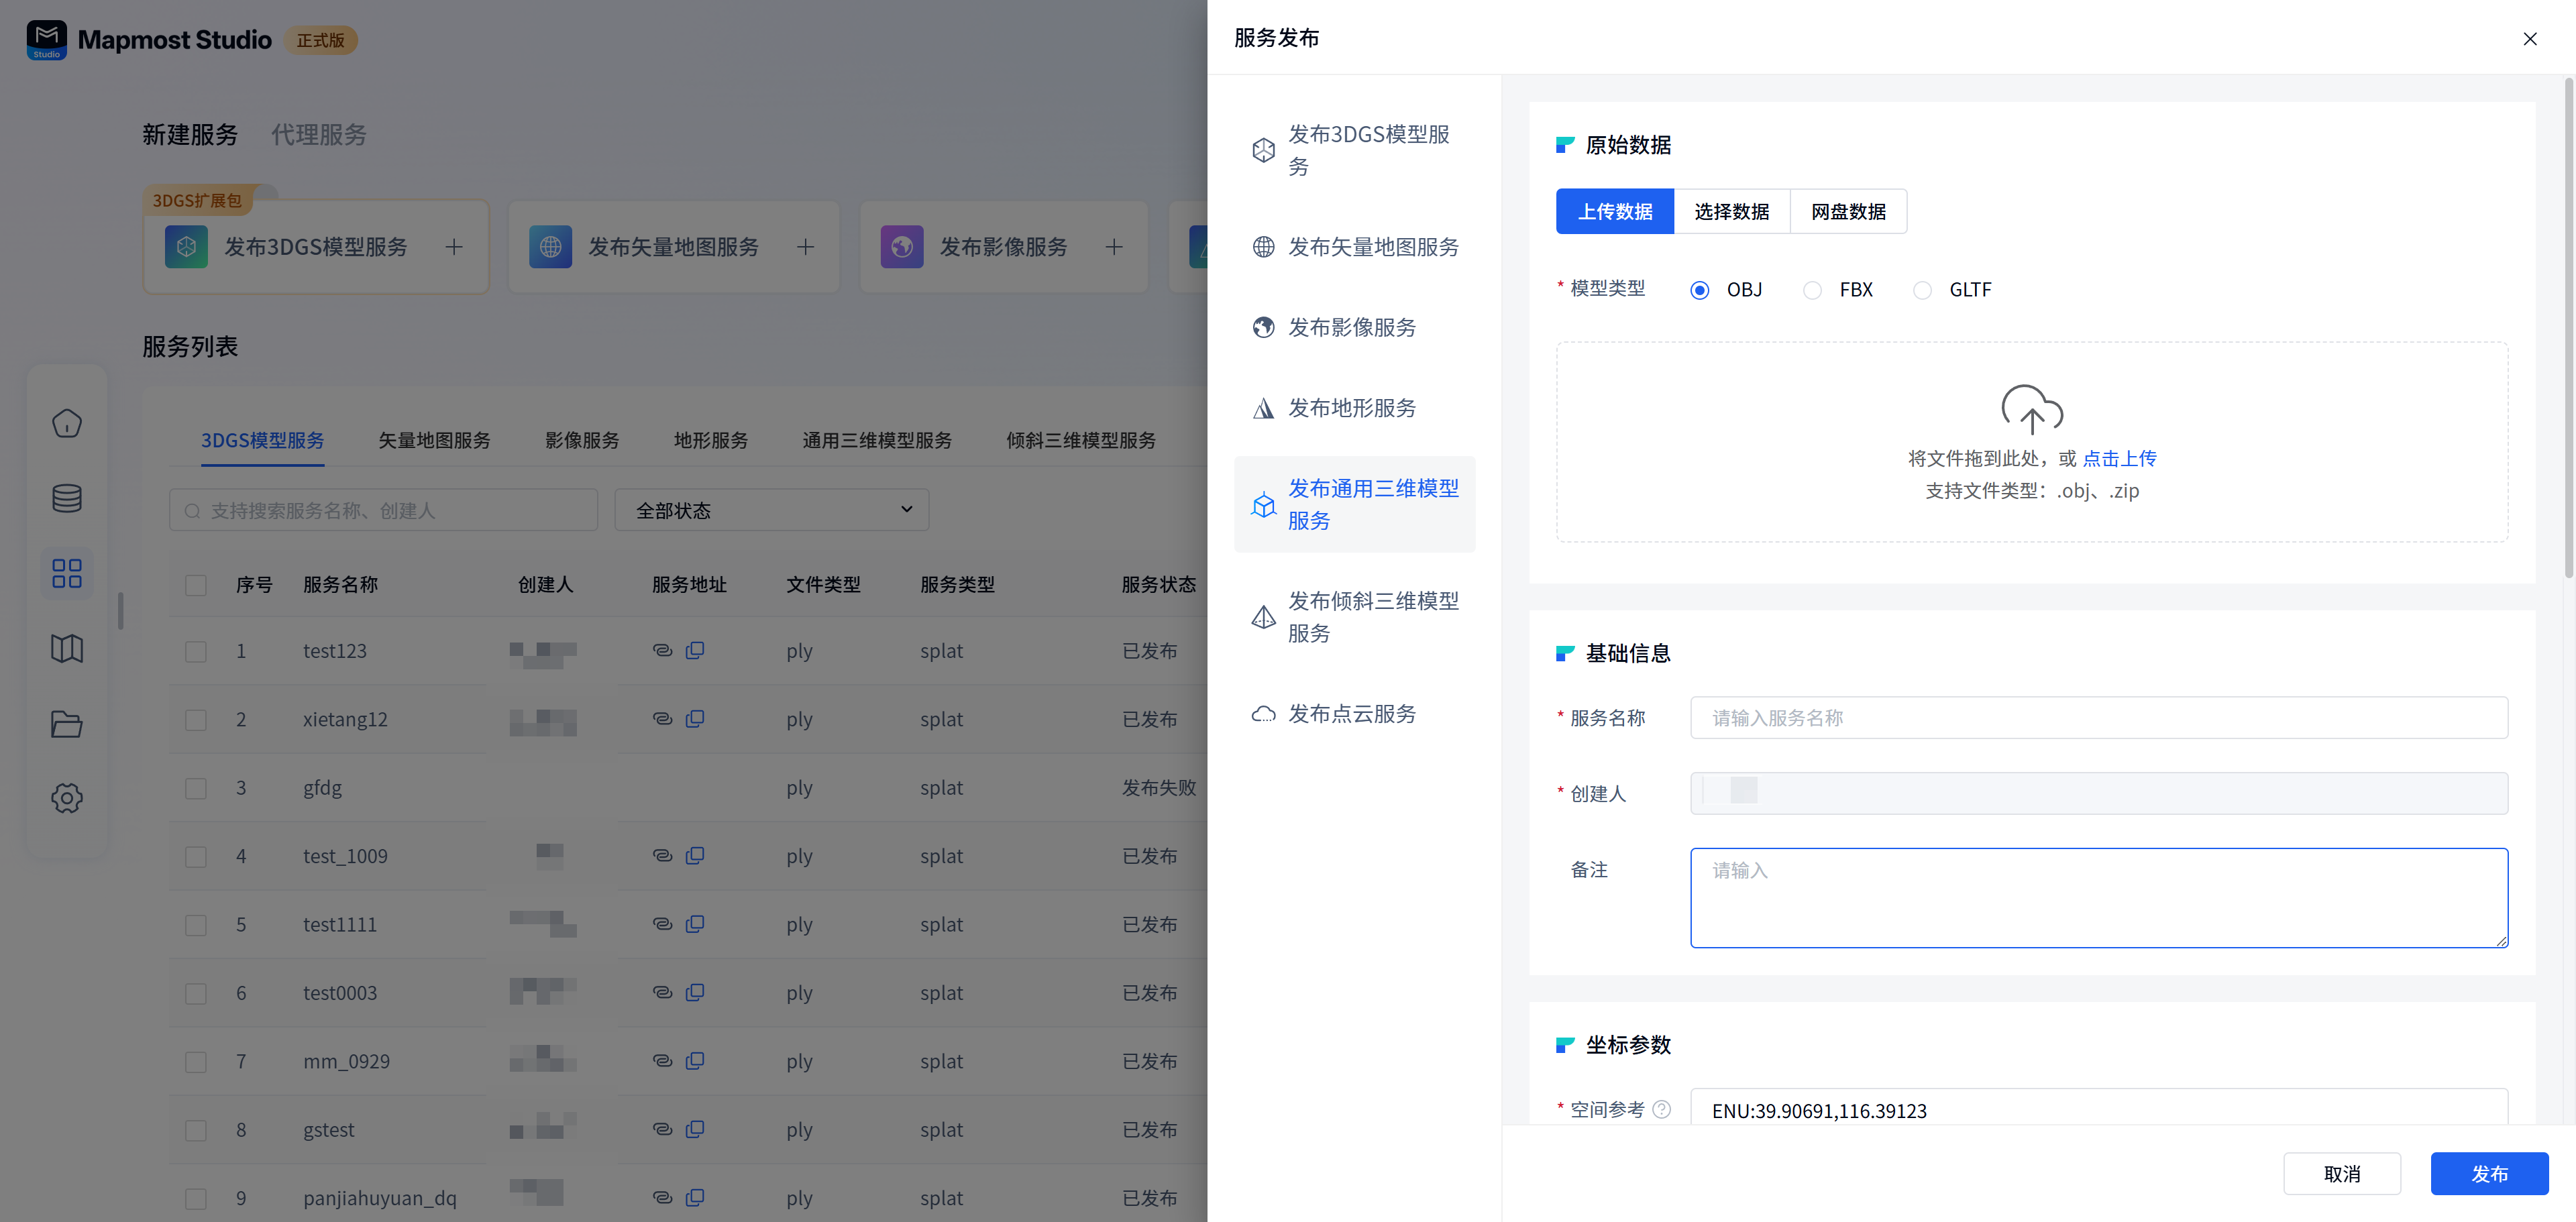
Raw data:
Three data adding methods are supported:
① Upload local data directly, and the uploaded data will be displayed in the upload list. It supports deleting data and renaming data names, and supports uploading multiple data.

②Select uploaded data from My Data. When selecting data, you can select multiple or single data at one time.
③ To select data from Network Disk Data, you need to select the data path and output path. The data path format must correspond to the model type format. The supported mode formats are obj, fbx, and gltf. Network disk data means that NAS network disks can be configured when deploying the system. Users can directly select data in the network disk for service release, and service data can also be stored in the network disk. Network disk data is only available to private deployment users.
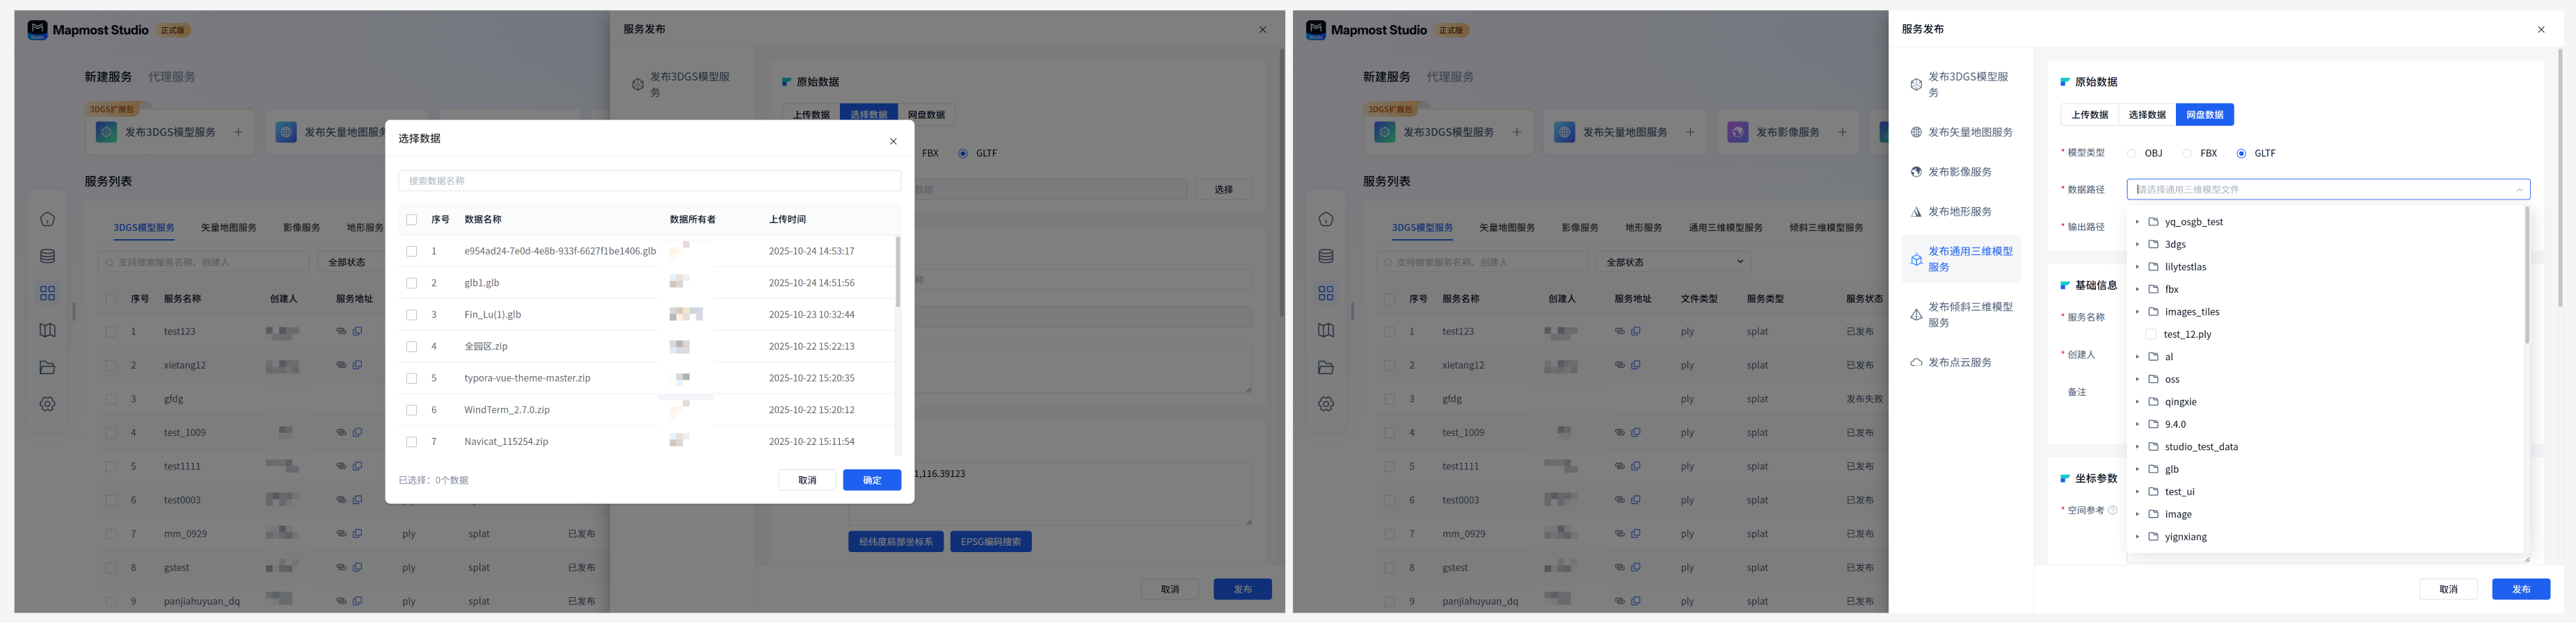
Model type: required, respectively:
OBJ: The file format is.obj or.zip.
FBX: The file format is.fbx.
GLTF: The file format is.gltf,.glb or.zip (discrete gltf file).
Basic information:
| Field | illustrate |
|---|---|
| Service name | Required, the name must start with a lowercase letter, be 4-32 characters in length, and consist of letters, numbers, and underscores. |
| Uploader | Required, automatically entered, cannot be modified. |
| Remark | It is not required and can be filled in according to the actual situation. |
Coordinate parameters:
| Field | illustrate |
|---|---|
| spatial reference | Required, spatial reference can be vividly compared to the positioning system of geographical data, which defines how to identify and place the specific location of data on the earth. The spatial reference is used to determine the true location of the data. Improper setting of this will result in incorrect location of the processing results or even processing failure. If the input file contains spatial reference information, the system will automatically recognize it and no settings are required at this time. Otherwise, the user needs to manually specify it based on the spatial reference of the data. Supports filling in ENU coordinates, EPSG encoding, and strings in PROJ or WKT format indicating spatial reference. Automatic filling is supported after clicking the button at the bottom to select. |
| Zero point coordinates | Optional. Specify the offset of the data origin relative to the spatial reference. It is divided into three directions: xyz and unit meter. The default is no offset (0,0,0). Setting this value allows the data to be offset in the corresponding direction. It is generally used for problems where the coordinates of a three-dimensional model are very large and difficult to operate in certain projected coordinate systems. It is therefore assumed that the data has an offset position, then in this spatial reference: modeled coordinates + zero point coordinates = projected coordinates. For details, please refer to: https://mp.weixin.qq.com/s/wapDcuesF_emaCsj9vMzFQ |
| Flip YZ coordinates | Optional. If the Y axis of the model is upward, the Z axis will be upward after turning on this switch, and vice versa. This option is used to solve the problem of inconsistent upward axis when the 3D engine is loaded after the service is released. |
| Output coordinate system | Optional, supports Mapmost default coordinate system and EPSG: 4978 as the service output coordinate system. Selecting the service published by Mapmost's default coordinate system will improve the loading speed in Mapmost SDK for WebGL. Select Mapmost's default coordinate system, which does not support vertex compression. |
Processing parameters:
| Field | illustrate |
|---|---|
| processor | Optional, divided into small scene processor and octree processor. The characteristic of the small scene processor is that it does not make any simplification or scaling of the input data and uses the original precision. But it will do merging, compression, splitting, etc. Maximize data loading efficiency without losing display quality. In general, small scene processors are used to publish services. Only when the data cannot be loaded after processing, the octree processor is considered to create LOD. Creating LOD requires high algorithms and takes a long time to run. |
| Maximum slice | Optional, supported by small scene processor. This parameter controls the maximum slice size, unit MB, range [1-256]. The default is 20MB, which means that if some b3dm exceeds 20MB during processing, try to split it. |
| Number of instance optimizations | Optional, supported by small scene processor. This parameter indicates that if the number of times a geometry is reused exceeds this value, i3dm will be used for rendering, otherwise b3dm will be used. The higher the model reuse rate, the greater the significance of i3dm optimization. It is best to match and adjust based on the data to achieve a balance between rendering batches and data volume. The default is 50. |
| minimum level | Optional, supported by octree processor. The default is automatic: that is, automatic identification based on model data, and supports specification. However, it is generally recommended to be level 16, corresponding to an accuracy of 0.59 meters, which means that the difference of about half a meter can be clearly seen at most. |
| level range | Optional, supported by octree processor. The level range is used to determine the maximum level. The calculation formula is: maximum level = minimum level + level range. The supported value range is [0, 8] |
| LOD strategy | Optional, supported by octree processor. Reconstruction and simplification: Divide the data into blocks according to the octree block boundaries and try to simplify within each block. This strategy is characterized by its simplicity and strong adaptability, but the simplification speed is too slow, and some surface normal vectors are incorrect. Size filtering: Calculate the pixel size of the object based on the size of each object and the current octree level. When it is greater than the minimum pixel parameter, the object is stored in the current octree node. Under this strategy, each object is not actually streamlined, but the loading priority of each object is different depending on its size, which is suitable for complex BIM models with a very large number of components. |
| Triangle network simplification | Optional, supported by octree processor. It is effective when the LOD strategy selects reconstruction and simplification. If it is not turned on, the geometry will not be reconstructed, but the texture will be reconstructed. Turn on to reduce the number of vertices. If the geometry density in the scene is very complex, it is recommended to turn it on. |
| Transparent mode | Users can forcefully set the form of transparent stickers, and can specify MASK or BLEND. [Automatic]: When the model is a mixed material (translucent + opaque mixture), the system automatically identifies the alpha value of the model's transparency channel. If the alpha value is only 0 or 255, use MASK (adapted to leaves, grilles, etc.); if the alpha value is between 0 and 255, use BLEND mode (adapted to glass, etc.). [MASK]: When the transparency channel of the model material is set incorrectly, causing objects that should be opaque (such as leaves, grilles) to be mistakenly rendered as translucent, enabling this mode can force it to be corrected to a true effect of "either transparent or opaque". [BLEND]: When all models are made of translucent materials (such as glass, water, etc.), it is recommended to use BLEND, which can directly solve the rendering problem of translucent materials such as transparent covers, acrylic, glass corridors, and films. |
Texture parameters:
| Field | illustrate |
|---|---|
| Texture merging | Optional, supported by small scene processor. Texture merging is an optimization of merging textures with repeated mapping. |
| texture format | It is optional and divided into four types: default, basis, webp and ktx2. Default: Use jpg (non-transparent) or png (transparent) format. Basis: The compression speed is faster and supports multi-platform use on PC, Android, and iPhone. webp: The size is about 70% of the default jpg, which can speed up network transmission but does not reduce video memory usage. ktx2: The size is about 90% of the default jpg, reducing video memory consumption by 5/6, but the service release time will increase. |
| color to texture | Optional, turned off by default. This option is suitable for BIM components with almost no texture inside. Most components are of different colors. In order to reduce the rendering batch, turn it on. |
Compression parameters:
| Field | illustrate |
|---|---|
| vertex compression | Optional, select Mapmost's default coordinate system, which does not support vertex compression. When vertex compression is turned on, the Draco compression algorithm will be used to reduce the storage amount of vertex data, with a compression rate of about 1/7, thereby saving the amount of transmitted data. |
| Compression level | It is not required and is divided into elementary, intermediate and advanced levels. You can choose according to your own requirements. |
Publish Drawer Action:
| Field | illustrate |
|---|---|
| Cancel | Click Cancel to exit the current service publishing process, and the entered content will not be saved. |
| release | Click Publish, the current content is saved and published into the corresponding service, and the progress can be viewed in the service list. |
4.3. Preview
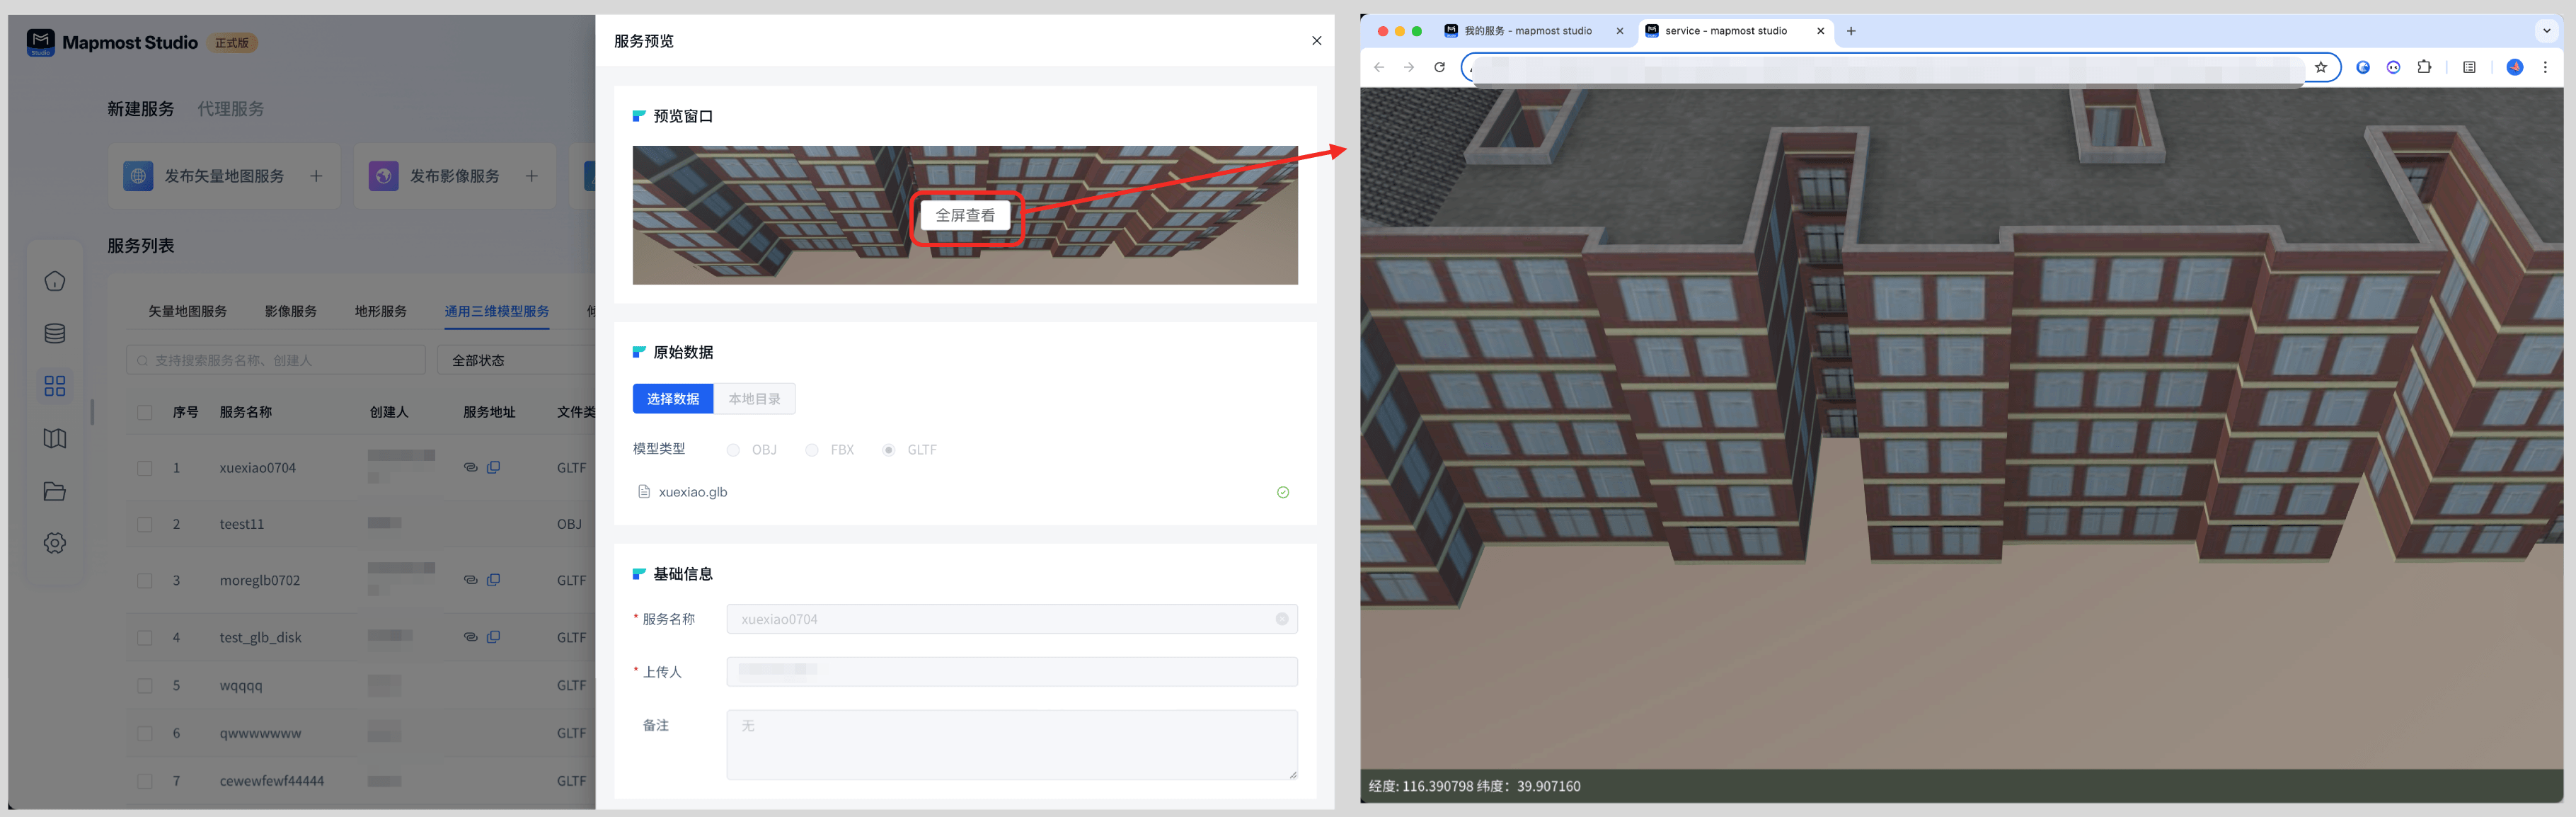
The successfully released universal 3D model service supports preview. Click Preview to preview the current service and the parameters released by the service. Click the preview window to view the service effect in full screen on the new page.

4.4. Resend
The detailed operation of general 3D model service resend is the same as Image Service Resend
4.5. Delete
The detailed operation of deleting the general 3D model service is the same as Image Service Removed
4.6. Sharing
The detailed operation of general 3D model service sharing is the same as Image service sharing
4.7. View logs
The detailed operation of the general 3D model service view log is the same as Vector Map Service View Log
4.8. Related projects
The detailed operations of general 3D model service related projects are the same as Imaging service related projects
4.9. Filtering
The detailed operation of general 3D model service screening is the same as Imaging Service Screening
4.10. Copy service address
The detailed operation of general 3D model service copy address is the same as Vector map service copy address
5. oblique 3D model service
5.1. New
Open the "Mapmost Studio" software, switch to the "My Services" module in the left navigation bar, and under the "New Service Release" category, click "Publish Oblique 3D Model Service"** to enter the corresponding service release page.
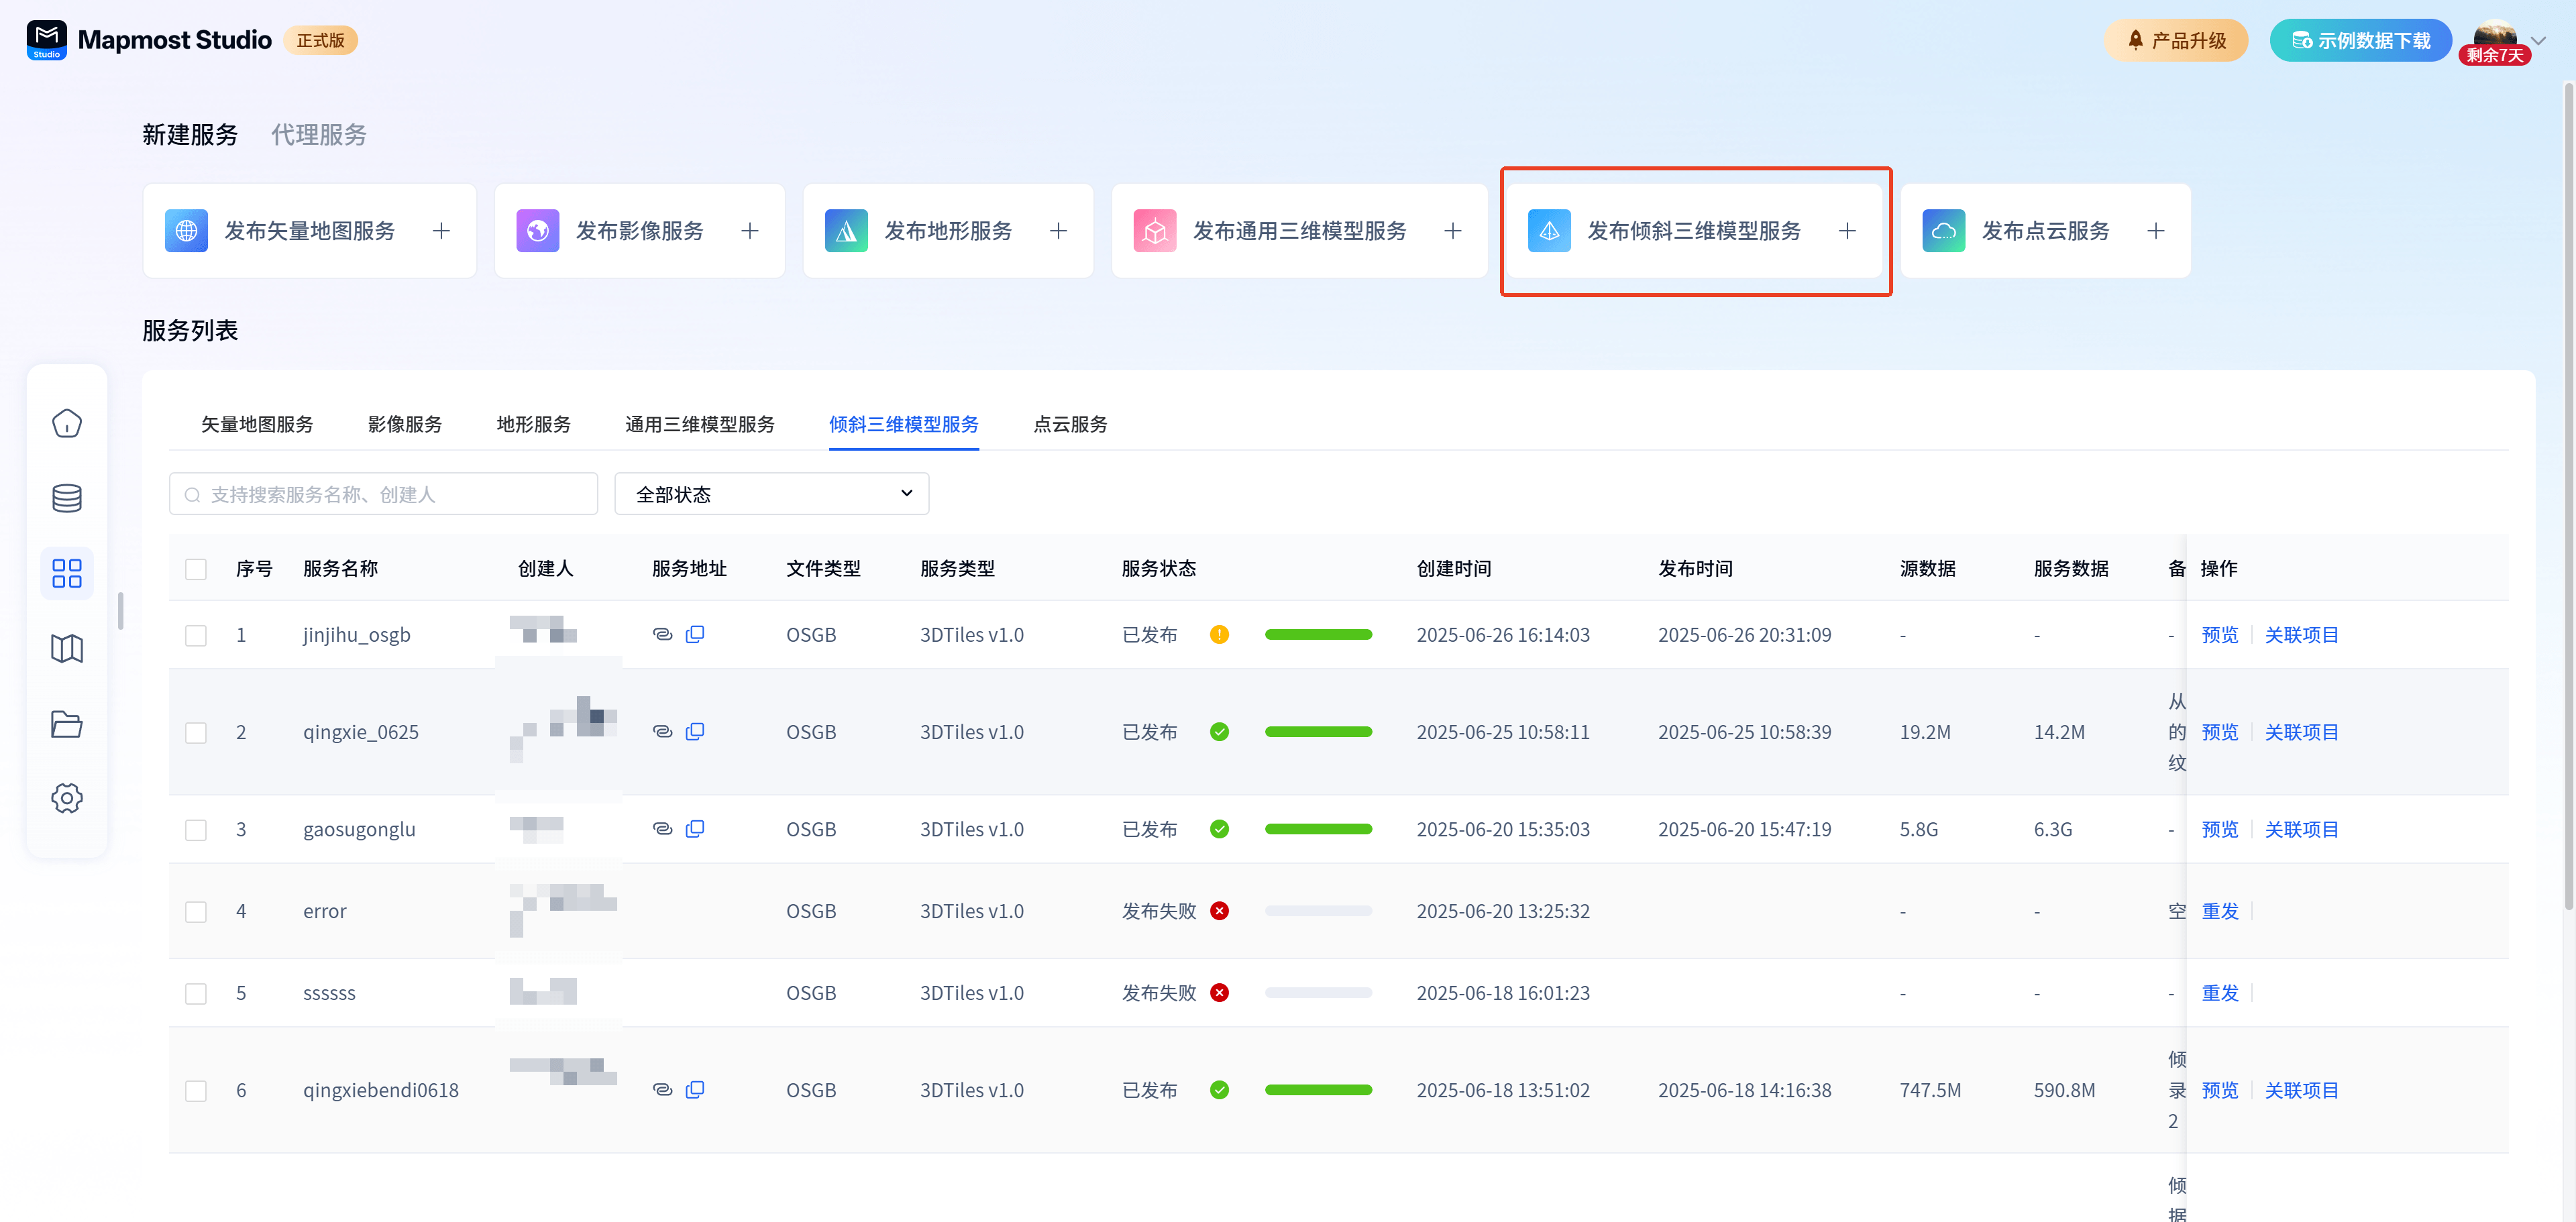
5.2. Release
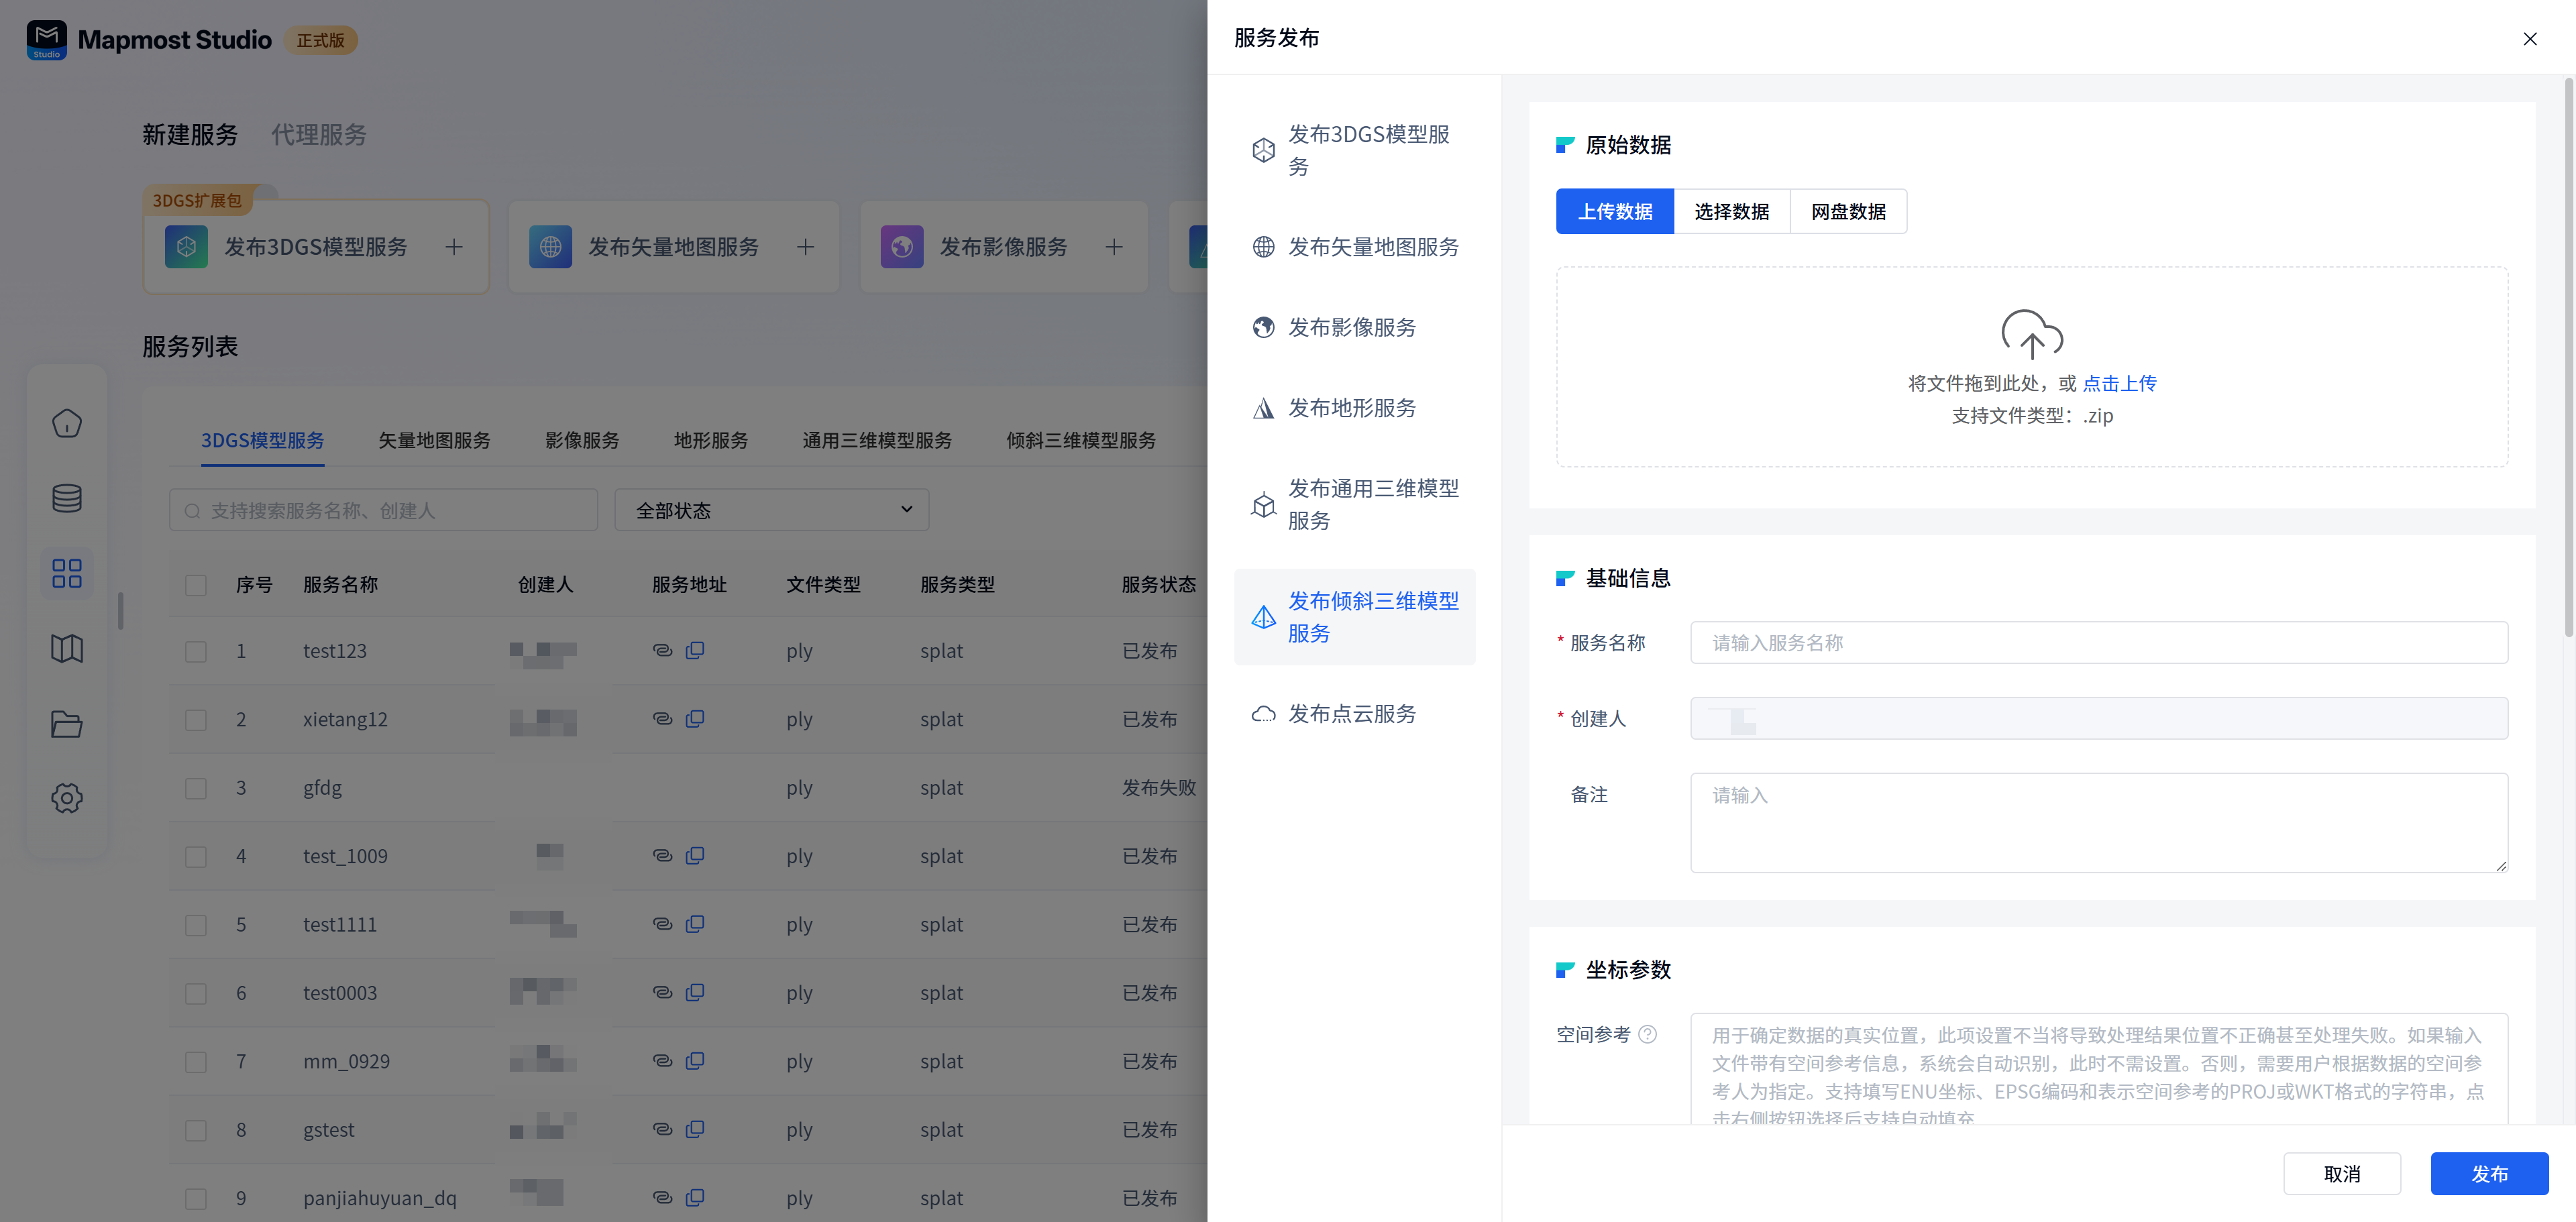
Raw data:
Three data adding methods are supported:
① Directly upload local data, and the uploaded data will be displayed in the upload list. Data deletion and data name renaming are supported; oblique data only supports uploading a single data.
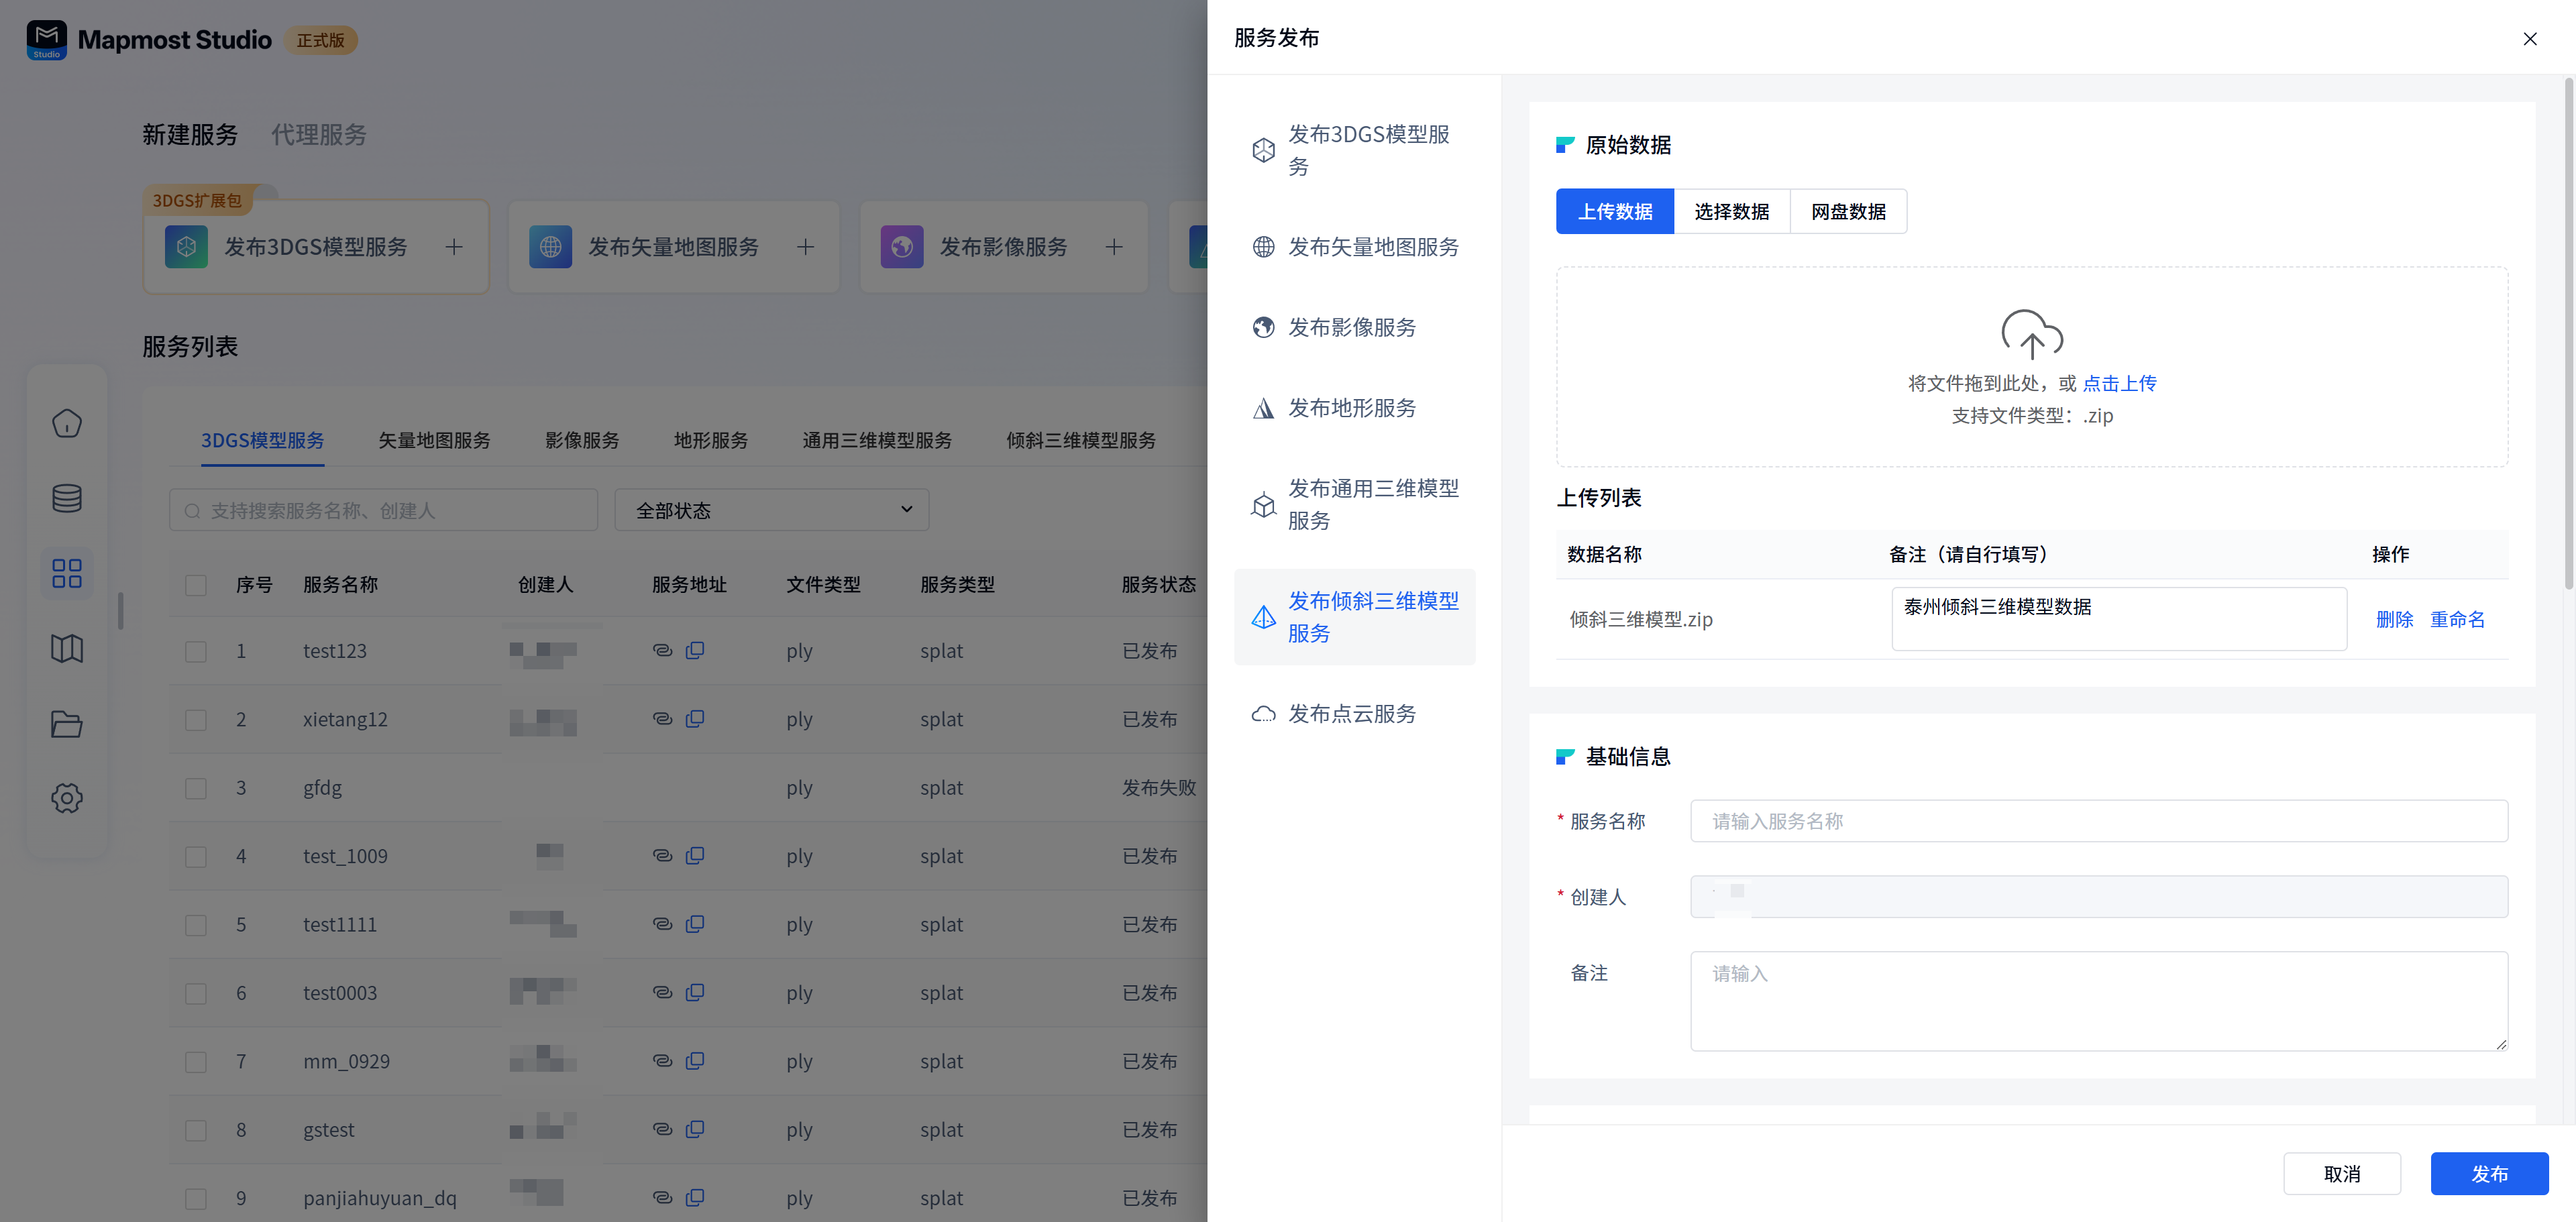
②Select uploaded data from My Data. When selecting data, only supports selecting single data.
③ To select data from Network Disk Data, you need to select the data path and output path. When selecting the data path, you need to select the Data directory of the model. Network disk data means that NAS network disks can be configured when deploying the system. Users can directly select data in the network disk for service release, and service data can also be stored in the network disk. Network disk data is only available to private deployment users.
Basic information:
| Field | illustrate |
|---|---|
| Service name | Required, the name must start with a lowercase letter, be 4-32 characters in length, and consist of letters, numbers, and underscores. |
| Uploader | Required, automatically entered, cannot be modified. |
| Remark | It is not required and can be filled in according to the actual situation. |
Coordinate parameters:
| Field | illustrate |
|---|---|
| spatial reference | Optional, spatial reference can be vividly compared to the positioning system of geographical data, which defines how to identify and place data at specific locations on the earth. The spatial reference is used to determine the true location of the data. Improper setting of this will result in incorrect location of the processing results or even processing failure. If the input file contains spatial reference information, the system will automatically recognize it and no settings are required at this time. Otherwise, the user needs to manually specify it based on the spatial reference of the data. Supports filling in ENU coordinates, EPSG encoding, and strings in PROJ or WKT format indicating spatial reference. Automatic filling is supported after clicking the button at the bottom to select. |
| Zero point coordinates | Optional. Specify the offset of the data origin relative to the spatial reference. It is divided into three directions: xyz and unit meter. The default is no offset (0,0,0). Setting this value allows the data to be offset in the corresponding direction. It is generally used for problems where the coordinates of a three-dimensional model are very large and difficult to operate in certain projected coordinate systems. It is therefore assumed that the data has an offset position, then in this spatial reference: modeled coordinates + zero point coordinates = projected coordinates. |
| Output coordinate system | Optional, supports Mapmost default coordinate system and EPSG: 4978 as the service output coordinate system. Selecting the service published by Mapmost's default coordinate system will improve the loading speed in Mapmost SDK for WebGL. Select Mapmost's default coordinate system, which does not support vertex compression. |
Rebuild top level:
| Field | illustrate |
|---|---|
| Rebuild the top level | Optional. The top-level reconstruction function will use octree reconstruction based on the tile space structure relationship. Therefore, when enabled, the service rendering speed will be accelerated, but the service release time will be increased. It is disabled by default. |
Effect parameters:
| Field | illustrate |
|---|---|
| Force double sided | Optionally, the texture is forced to be rendered on both sides, that is, both front and back sides. Generally, there is no need to turn it on, but for some abnormal data, there may be loopholes caused by front and back cropping. You can try turning this option on to achieve the purpose of double-sided rendering. |
| No light | Not required. Turn this option on for a more realistic rendering effect. It is turned on by default. However, because the generated tiles do not contain normal information, and some engines render this type of data black, you can try turning off this option to avoid this problem. |
Compression parameters:
| Field | illustrate |
|---|---|
| vertex compression | Optional, select Mapmost's default coordinate system, which does not support vertex compression. When vertex compression is turned on, the Draco compression algorithm will be used to reduce the storage amount of vertex data, with a compression rate of about 1/7, thereby saving the amount of transmitted data. |
| Compression level | It is not required and is divided into elementary, intermediate and advanced levels. You can choose according to your own requirements. |
| texture format | Optional, the default is jpg format: the format in the original osgb. webp: The size is about 70% of the default jpg, which can speed up network transmission. ktx2: The size is about 90% of the default jpg, reducing video memory consumption by 5/6, but the service release time will increase. |
Publish Drawer Action:
| Field | illustrate |
|---|---|
| Cancel | Click Cancel to exit the current service publishing process, and the entered content will not be saved. |
| release | Click Publish, the current content is saved and published into the corresponding service, and the progress can be viewed in the service list. |
5.3. Preview
The detailed operation of tilted 3D model service preview is the same as Imaging Service Preview
5.4. Resend
The detailed operation of tilted 3D model service resend is the same as Image Service Resend
5.5. Delete
The detailed operation of deleting the tilted 3D model service is the same as Image Service Removed
5.6. Sharing
The detailed operation of tilted 3D model service sharing is the same as Image service sharing
5.7. View logs
The detailed operation of tilted 3D model service view log is the same as Vector Map Service View Log
5.8. Related projects
The detailed operations of tilted 3D model service related projects are the same as Imaging service related projects
5.9. Filtering
The detailed operation of oblique 3D model service screening is the same as Imaging Service Screening
5.10. Copy service address
The detailed operation of tilting 3D model service copy address is the same as Vector map service copy address
6. Point cloud service
6.1. New
Open the "Mapmost Studio" software, switch to the "My Services" module in the left navigation bar, and under the "New Service Release" category, click "Publish Point Cloud Data Service"** to enter the corresponding service release page.
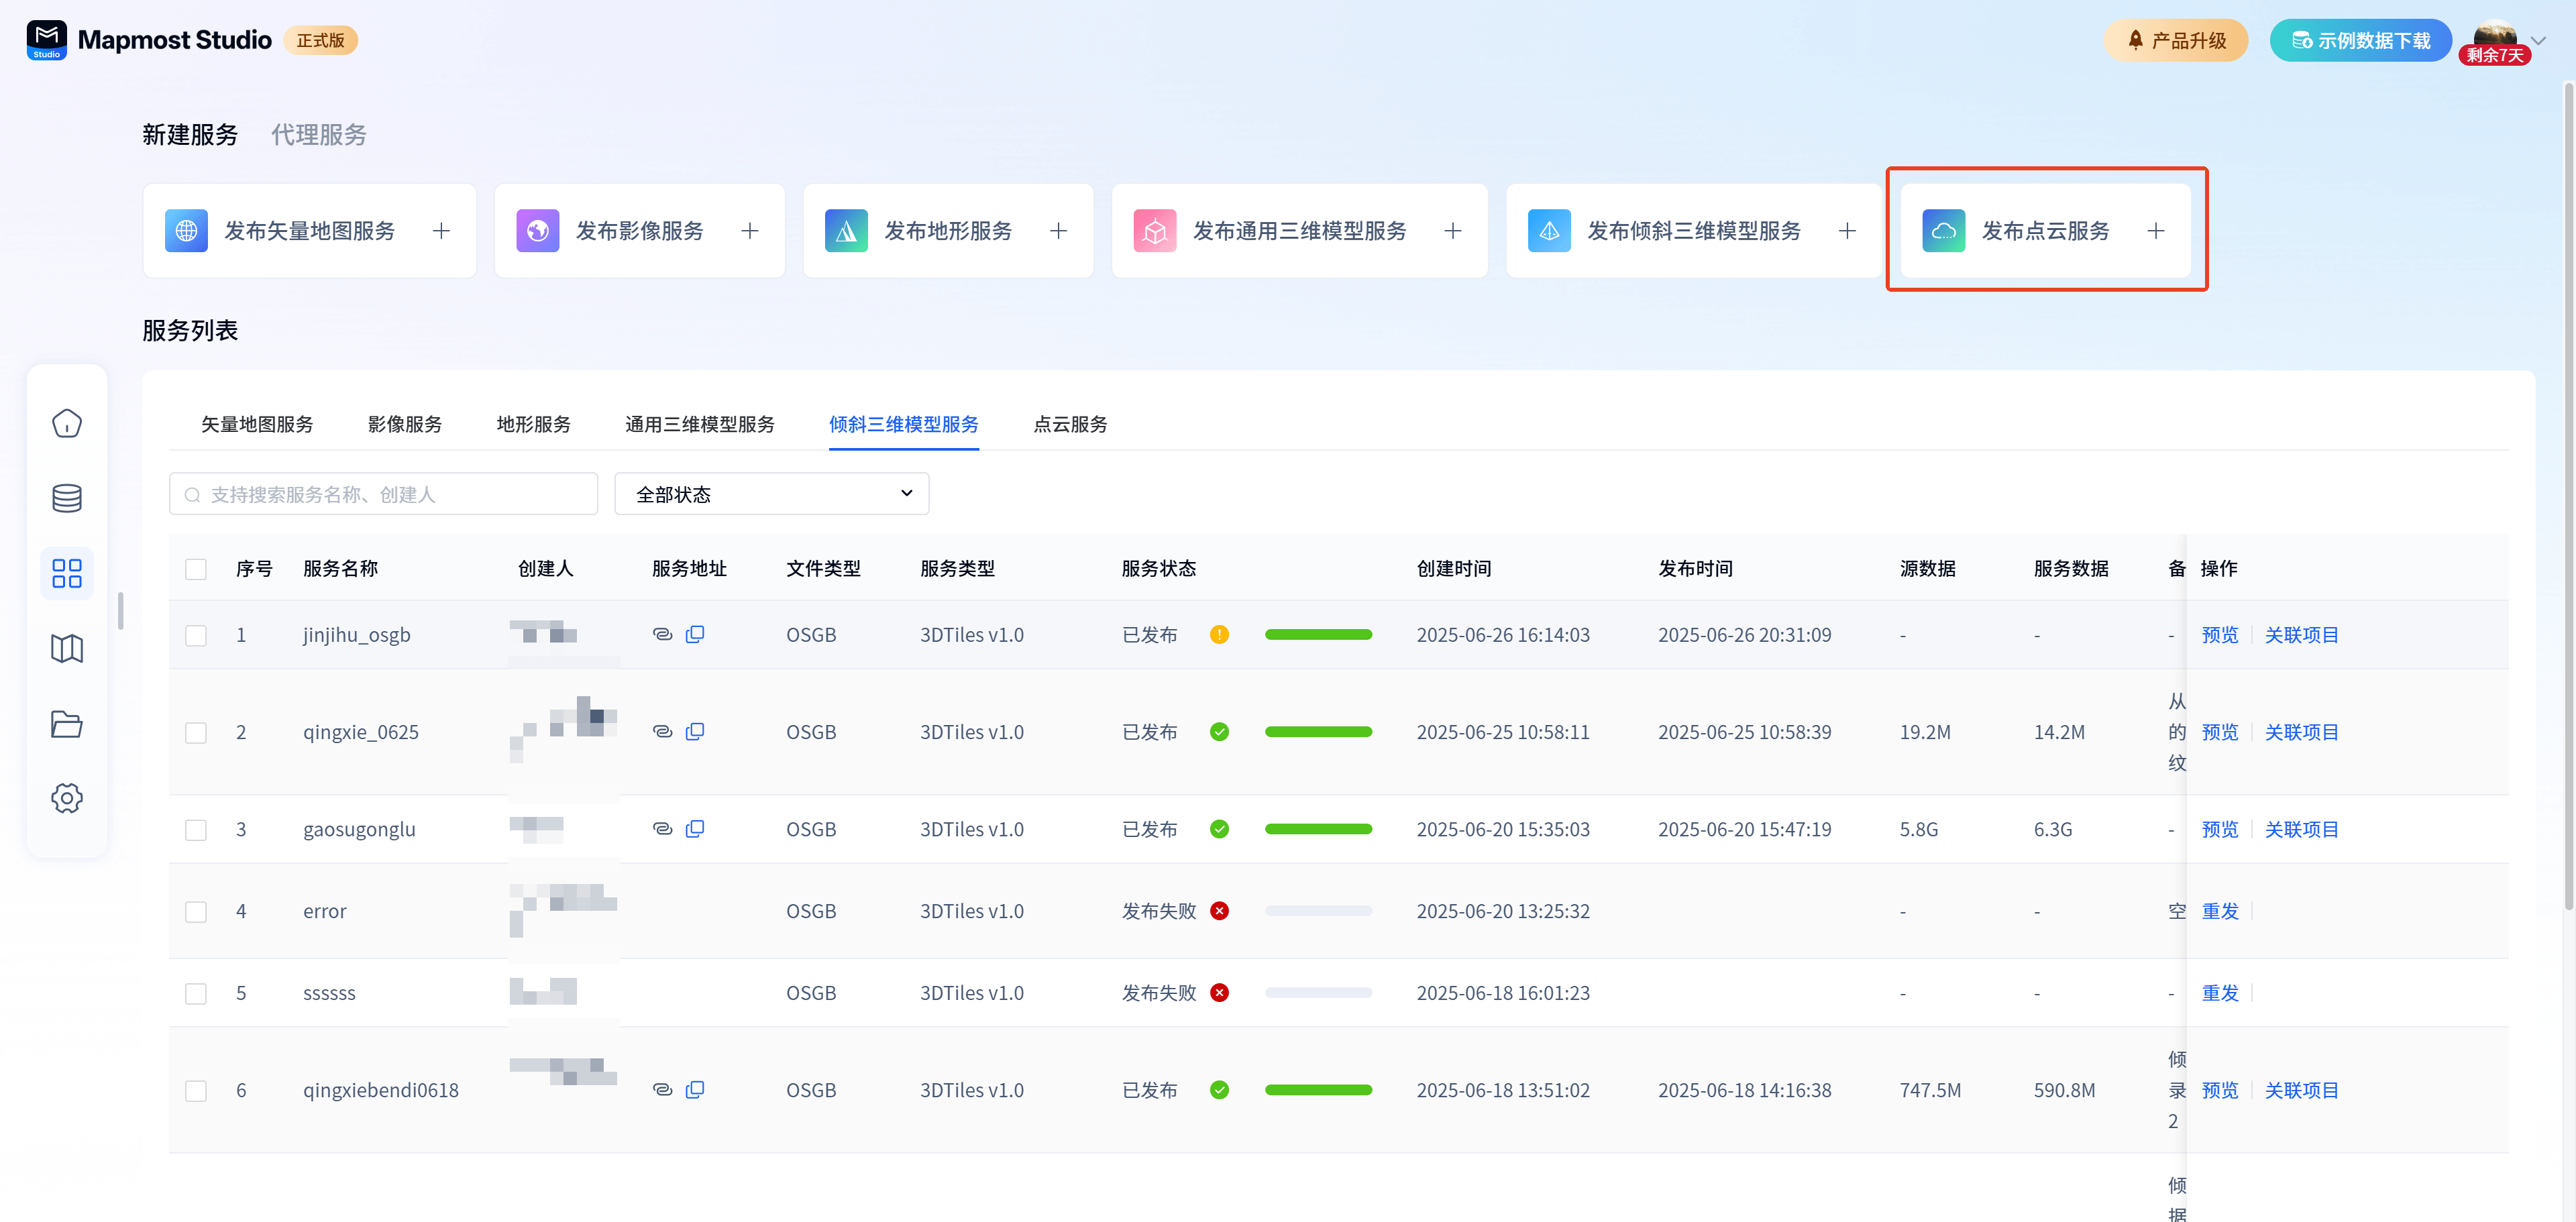
6.2. Release
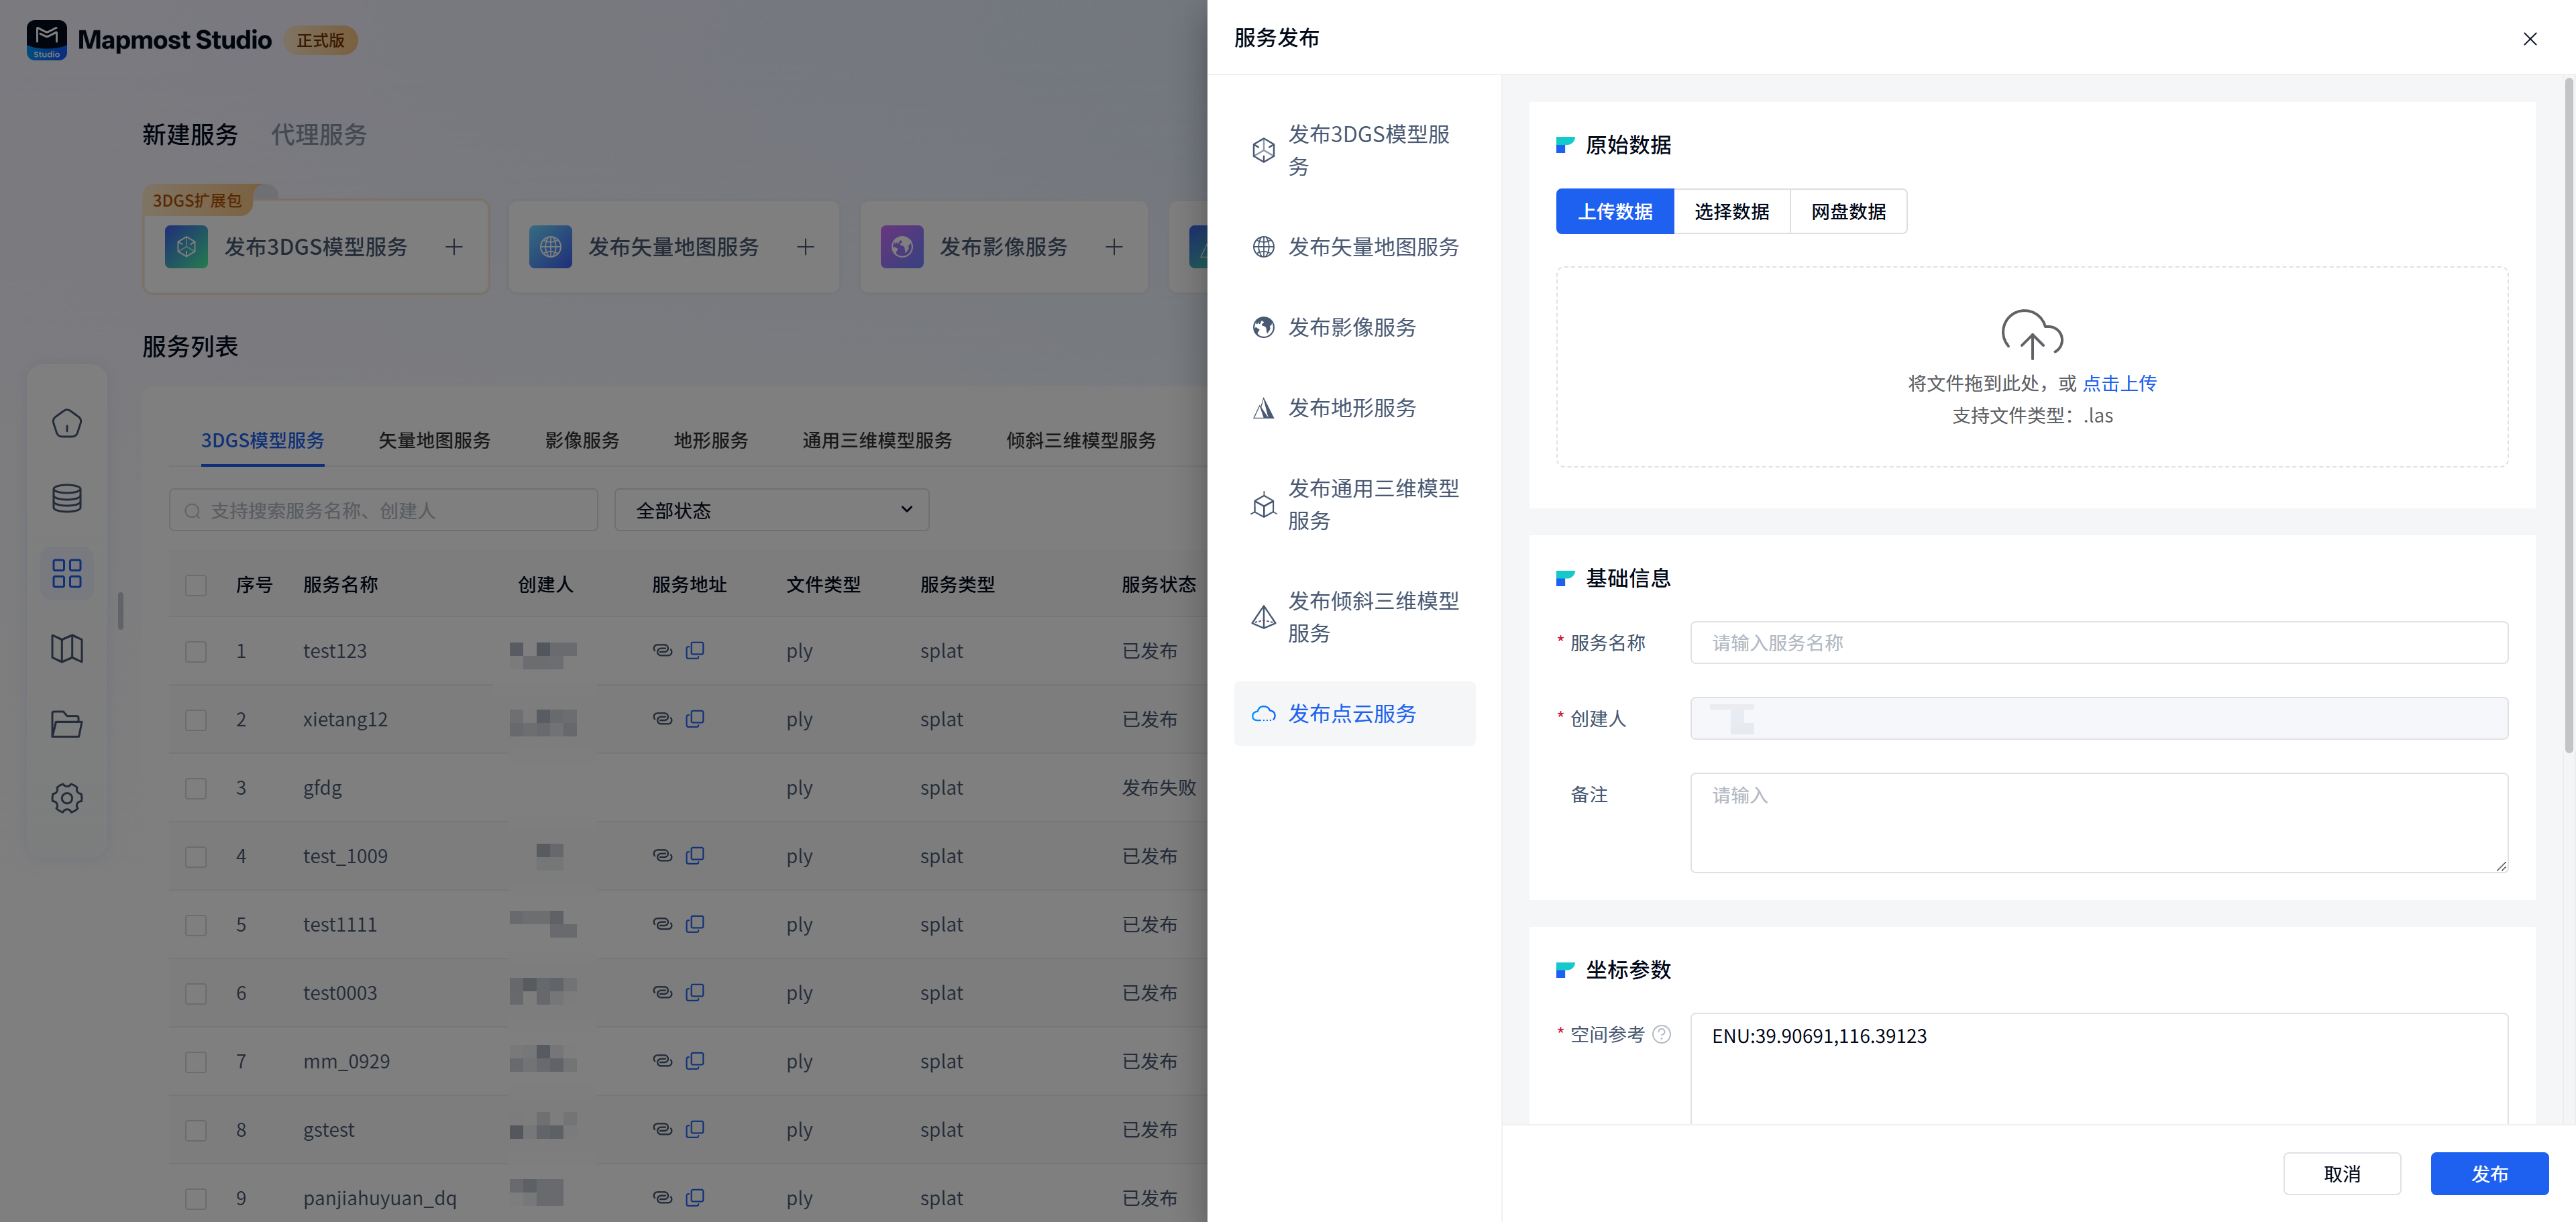
Raw data:
Three data adding methods are supported:
① Directly upload local data. The uploaded data is displayed in the upload list. Data deletion and data name renaming are supported; point cloud data only supports uploading a single data.
①Select uploaded data from My Data. When selecting data, only single data can be selected.
② To select data from Network Disk Data, you need to select the data path and output path. The supported file format when selecting the data path is.las. Network disk data means that NAS network disks can be configured when deploying the system. Users can directly select data in the network disk for service release, and service data can also be stored in the network disk. Network disk data is only available to private deployment users.
Basic information:
| Field | illustrate |
|---|---|
| Service name | Required, the name must start with a lowercase letter, be 4-32 characters in length, and consist of letters, numbers, and underscores. |
| Uploader | Required, automatically entered, cannot be modified. |
| Remark | It is not required and can be filled in according to the actual situation. |
Coordinate parameters:
| Field | illustrate |
|---|---|
| spatial reference | Required, spatial reference can be vividly compared to the positioning system of geographical data, which defines how to identify and place the specific location of data on the earth. The spatial reference is used to determine the true location of the data. Improper setting of this will result in incorrect location of the processing results or even processing failure. If the input file contains spatial reference information, the system will automatically recognize it and no settings are required at this time. Otherwise, the user needs to manually specify it based on the spatial reference of the data. Supports filling in ENU coordinates, EPSG encoding, and strings in PROJ or WKT format indicating spatial reference. Automatic filling is supported after clicking the button at the bottom to select. |
| Zero point coordinates | Optional. Specify the offset of the data origin relative to the spatial reference. It is divided into three directions: xyz and unit meter. The default is no offset (0,0,0). Setting this value allows the data to be offset in the corresponding direction. It is generally used for problems where the coordinates of a three-dimensional model are very large and difficult to operate in certain projected coordinate systems. It is therefore assumed that the data has an offset position, then in this spatial reference: modeled coordinates + zero point coordinates = projected coordinates. |
Processing parameters:
| Field | illustrate |
|---|---|
| color storage | Optional, if this option is turned on, we will store the color of the point cloud in 3dtiles. Note that some laser-scanned point clouds generally do not have color values, while the point clouds generated by oblique processing are colored, so enable this option based on your own data. If not enabled, the amount of 3dtiles will be reduced. |
| maximum level | Optional. The maximum level is related to the point cloud density. If it is too small, the accuracy of the point cloud will be reduced. If it is too large, the processing time will be increased and too many Tiles will be generated. The default is 20. |
Compression parameters:
| Field | illustrate |
|---|---|
| vertex compression | Optionally, if vertex compression is turned on, the Draco compression algorithm will be used to reduce the amount of vertex data stored, thereby saving the amount of transmitted data. |
| Compression level | Optional. The higher the compression level, the greater the compression rate, and the loss of data accuracy will be greater. It is recommended to use the intermediate level. |
Publish Drawer Action:
| Field | illustrate |
|---|---|
| Cancel | Click Cancel to exit the current service publishing process, and the entered content will not be saved. |
| release | Click Publish, the current content is saved and published into the corresponding service, and the progress can be viewed in the service list. |
6.3. Preview
The detailed operation of point cloud service preview is the same as Imaging Service Preview
6.4. Resend
The detailed operation of point cloud service resend is the same as Image Service Resend
6.5. Delete
The detailed operation of point cloud service deletion is the same as Image Service Removed
6.6. Sharing
The detailed operation of point cloud service sharing is the same as Image service sharing
6.7. View logs
The detailed operation of point cloud service view log is the same as Vector Map Service View Log
6.8. Related projects
The detailed operations of point cloud service related projects are the same as Imaging service related projects
6.9. Filtering
The detailed operation of Tongdian Cloud Service Screening is the same as Imaging Service Screening
6.10. Copy service address
The detailed operation of point cloud service copy address is the same as Vector map service copy address
7. Register for Geoserver vector map service
7.1. New
Open the "Mapmost Studio" software, switch to the "My Services" module in the left navigation bar, and under the "Agent Service Release" category, click "Register Geoserver Vector Service"** to enter the corresponding service release page.
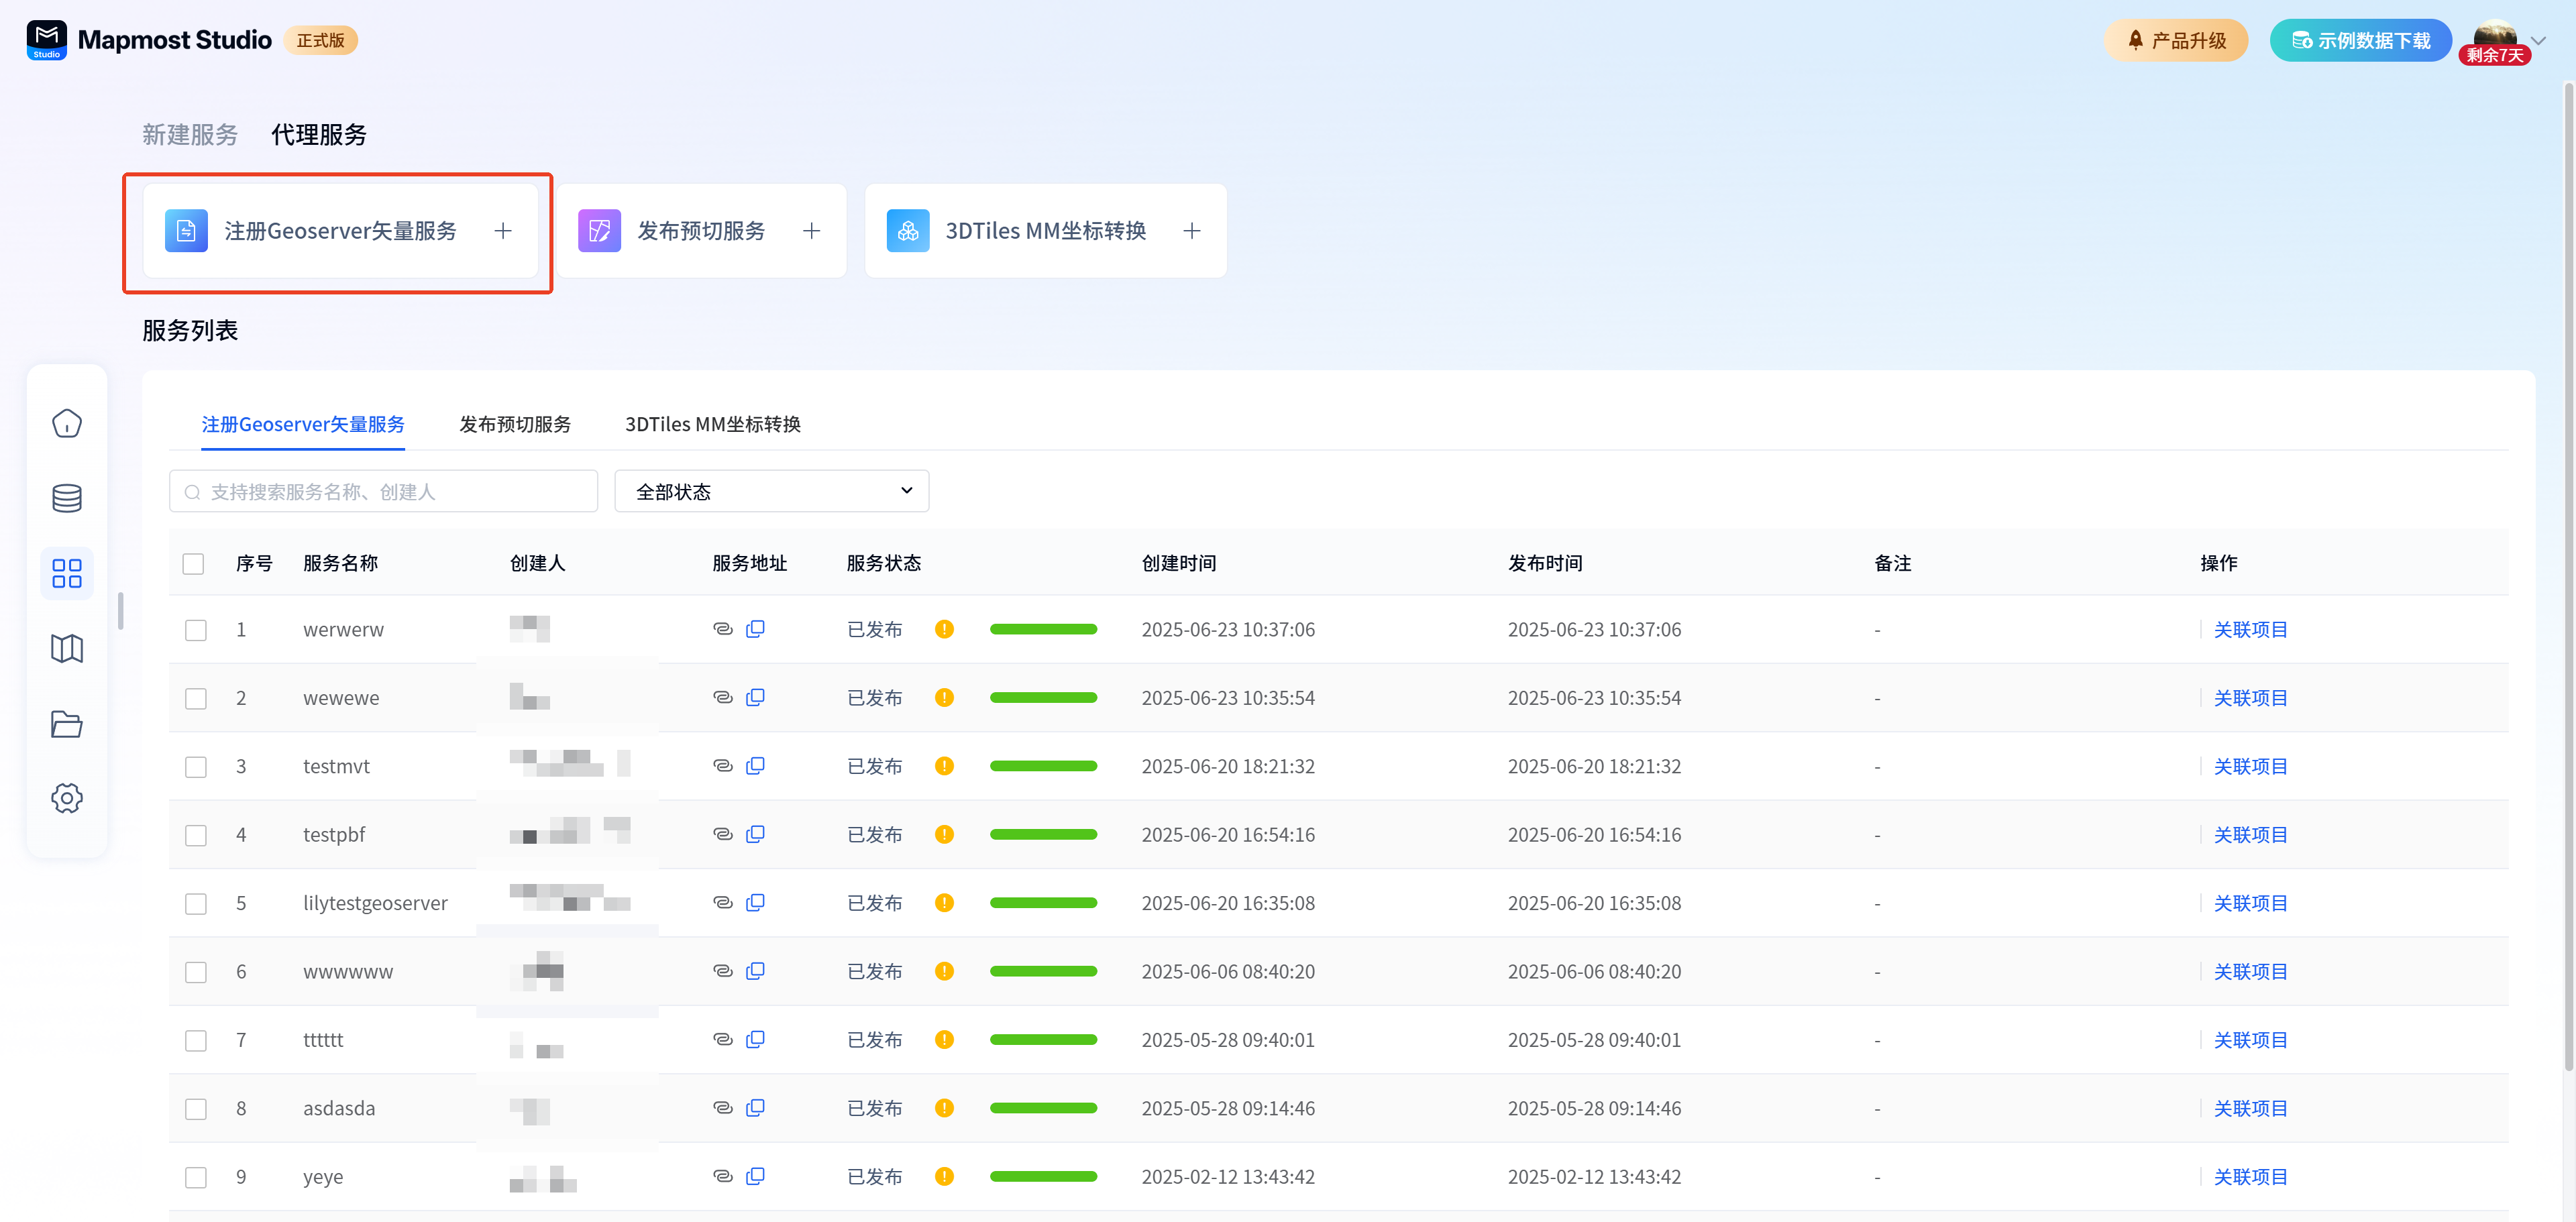
7.2. Release
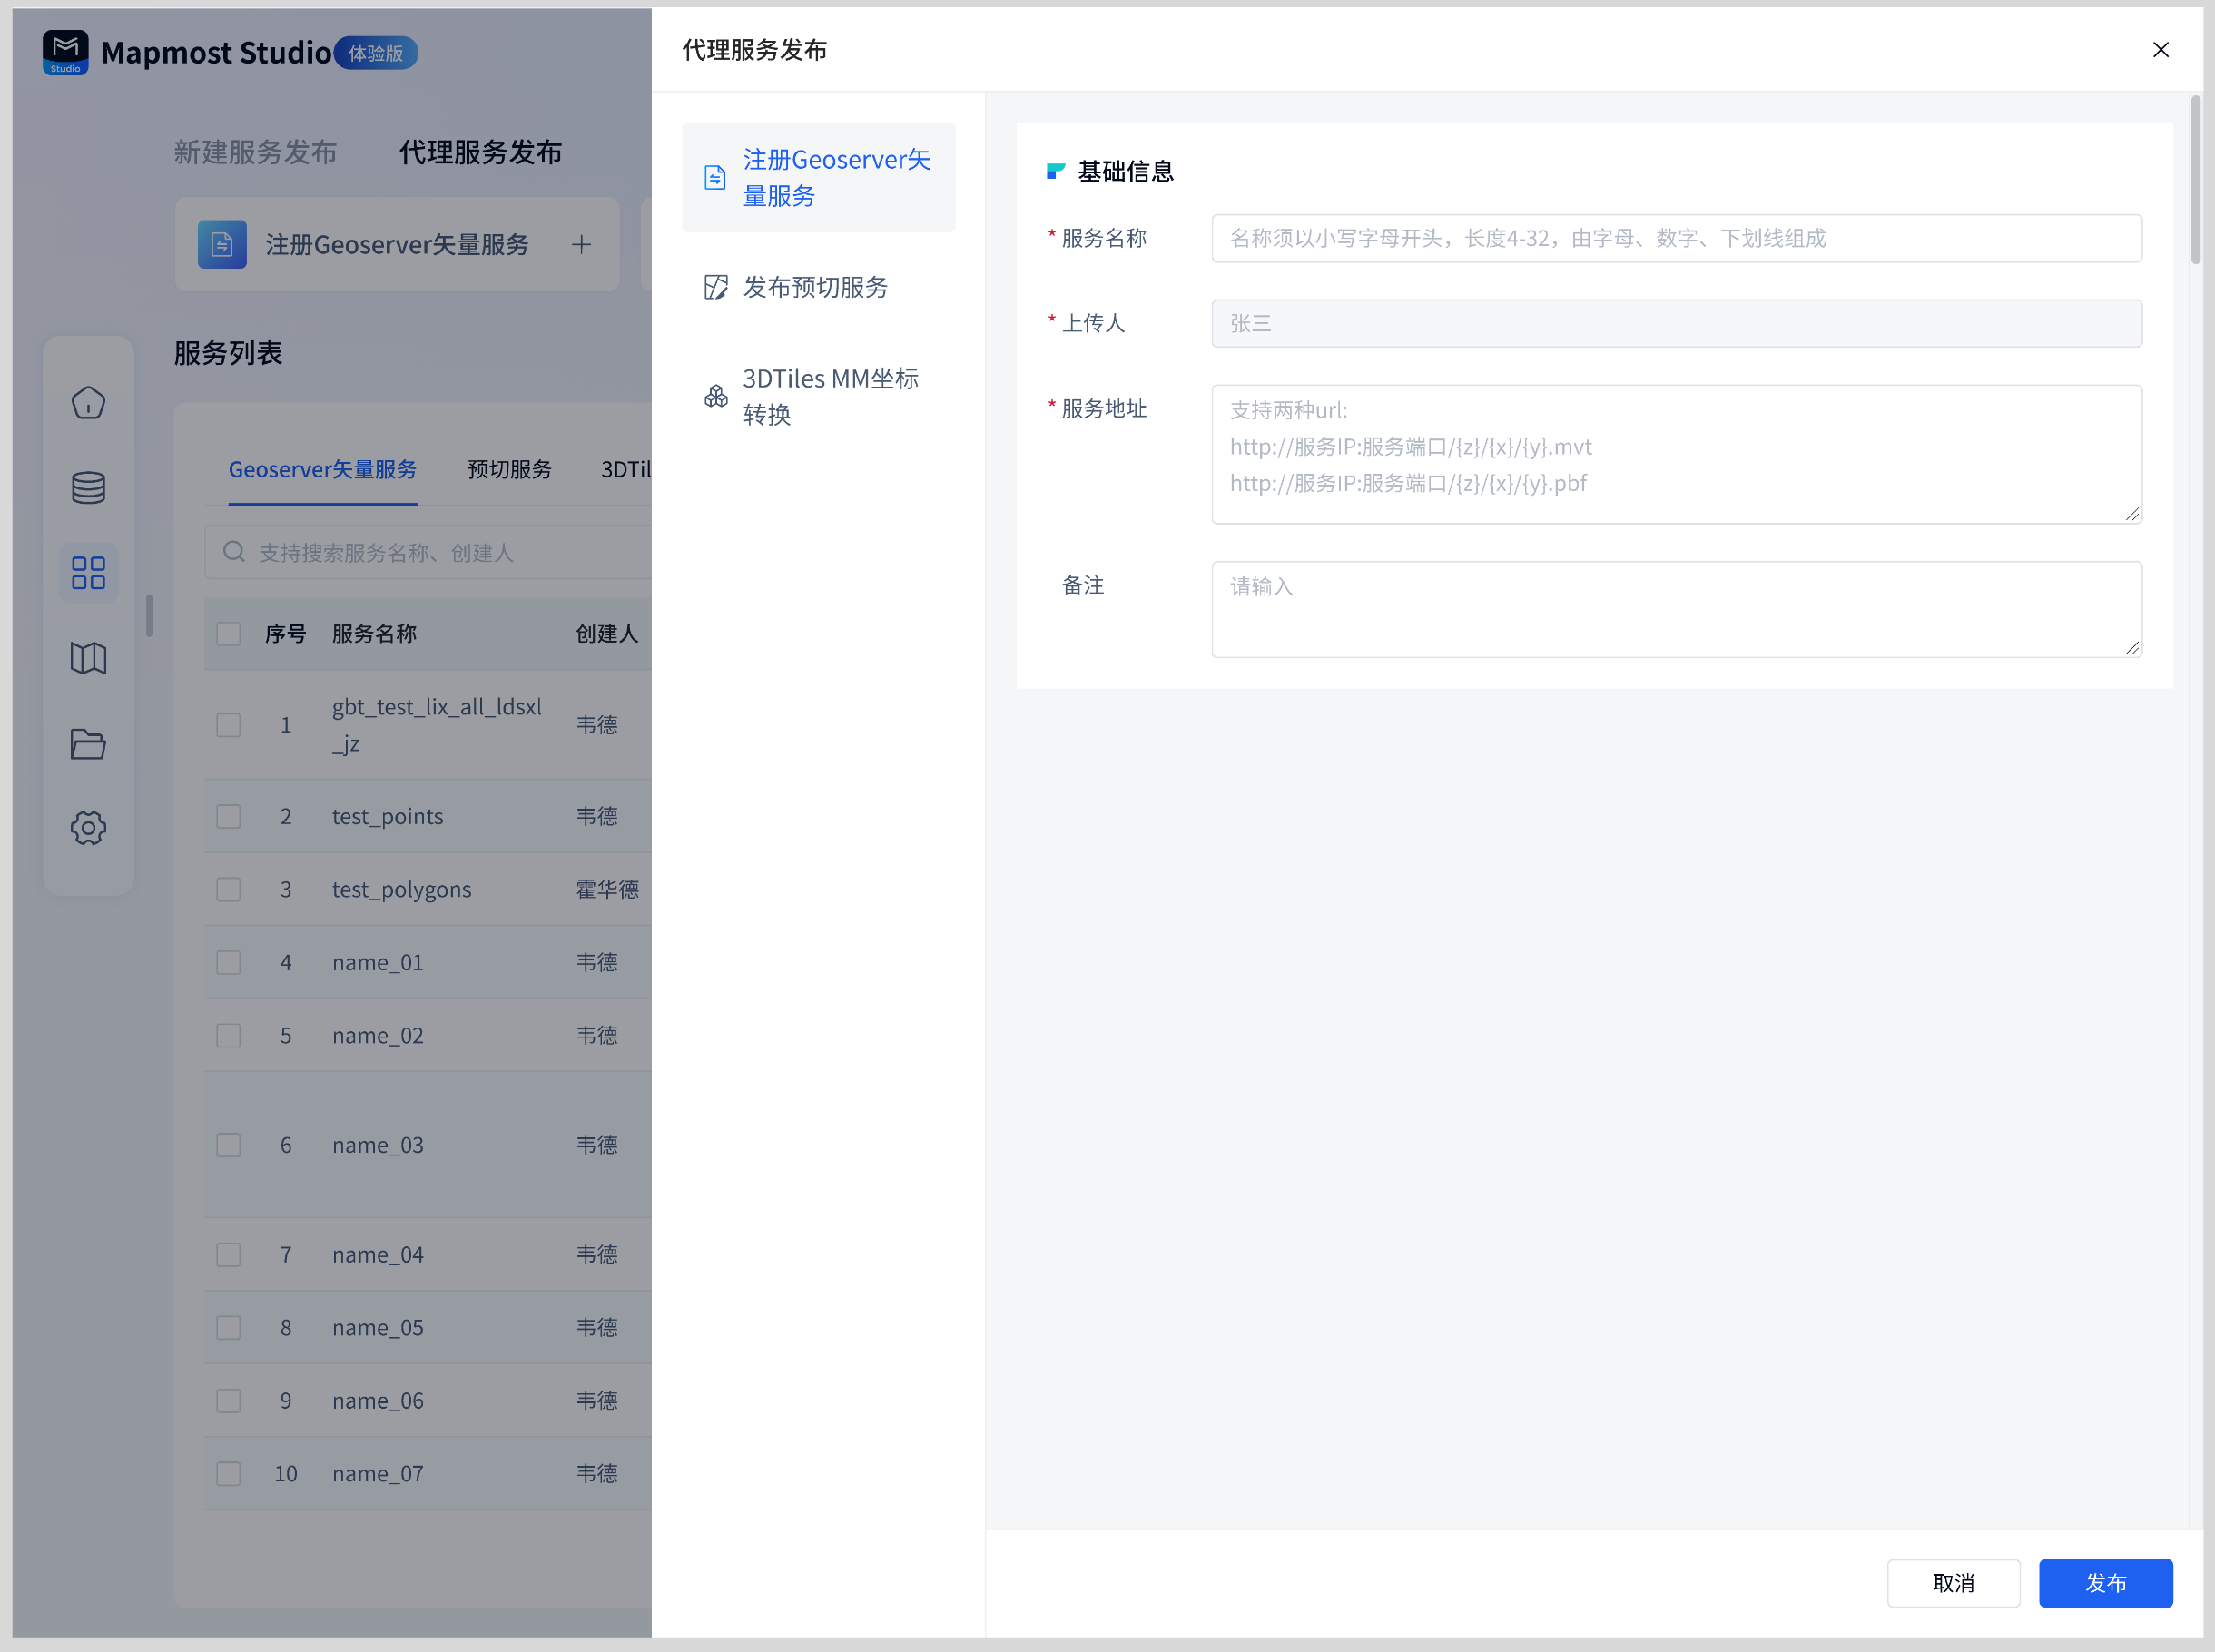
Basic information:
| Field | illustrate |
|---|---|
| Service name | Required, the name must start with a lowercase letter, be 4-32 characters in length, and consist of letters, numbers, and underscores. |
| Uploader | Required, automatically entered, cannot be modified. |
| Service address | Required, supports two URLs: http://service-ip:service-port/{z}/{x}/{y}.mvt; http://service-ip:service-port/{z}/{x}/{y}.pbf. |
| Remark | It is not required and can be filled in according to the actual situation. |
Publish Drawer Action:
| Field | illustrate |
|---|---|
| Cancel | Click Cancel to exit the current service publishing process, and the entered content will not be saved. |
| release | Click Publish, the current content is saved and published into the corresponding service, and the progress can be viewed in the service list. |
7.3. Delete
The detailed operation of service deletion is the same as Image Service Removed
7.4. Sharing
The detailed operation of service sharing is the same as Image service sharing
7.5. Related projects
The detailed operations of service related projects are the same as Imaging service related projects
7.6. Filtering
The detailed operation of service screening is the same as Imaging Service Screening
7.7. Copy service address
The detailed operation of service copy address is the same as Vector map service copy address
8. Pre-cut service
8.1. New
Open the "Mapmost Studio" software, switch to the "My Services" module in the left navigation bar, and under the "Agent Service Release" category, click "Publish Pre-cut Service"** to enter the corresponding service release page.
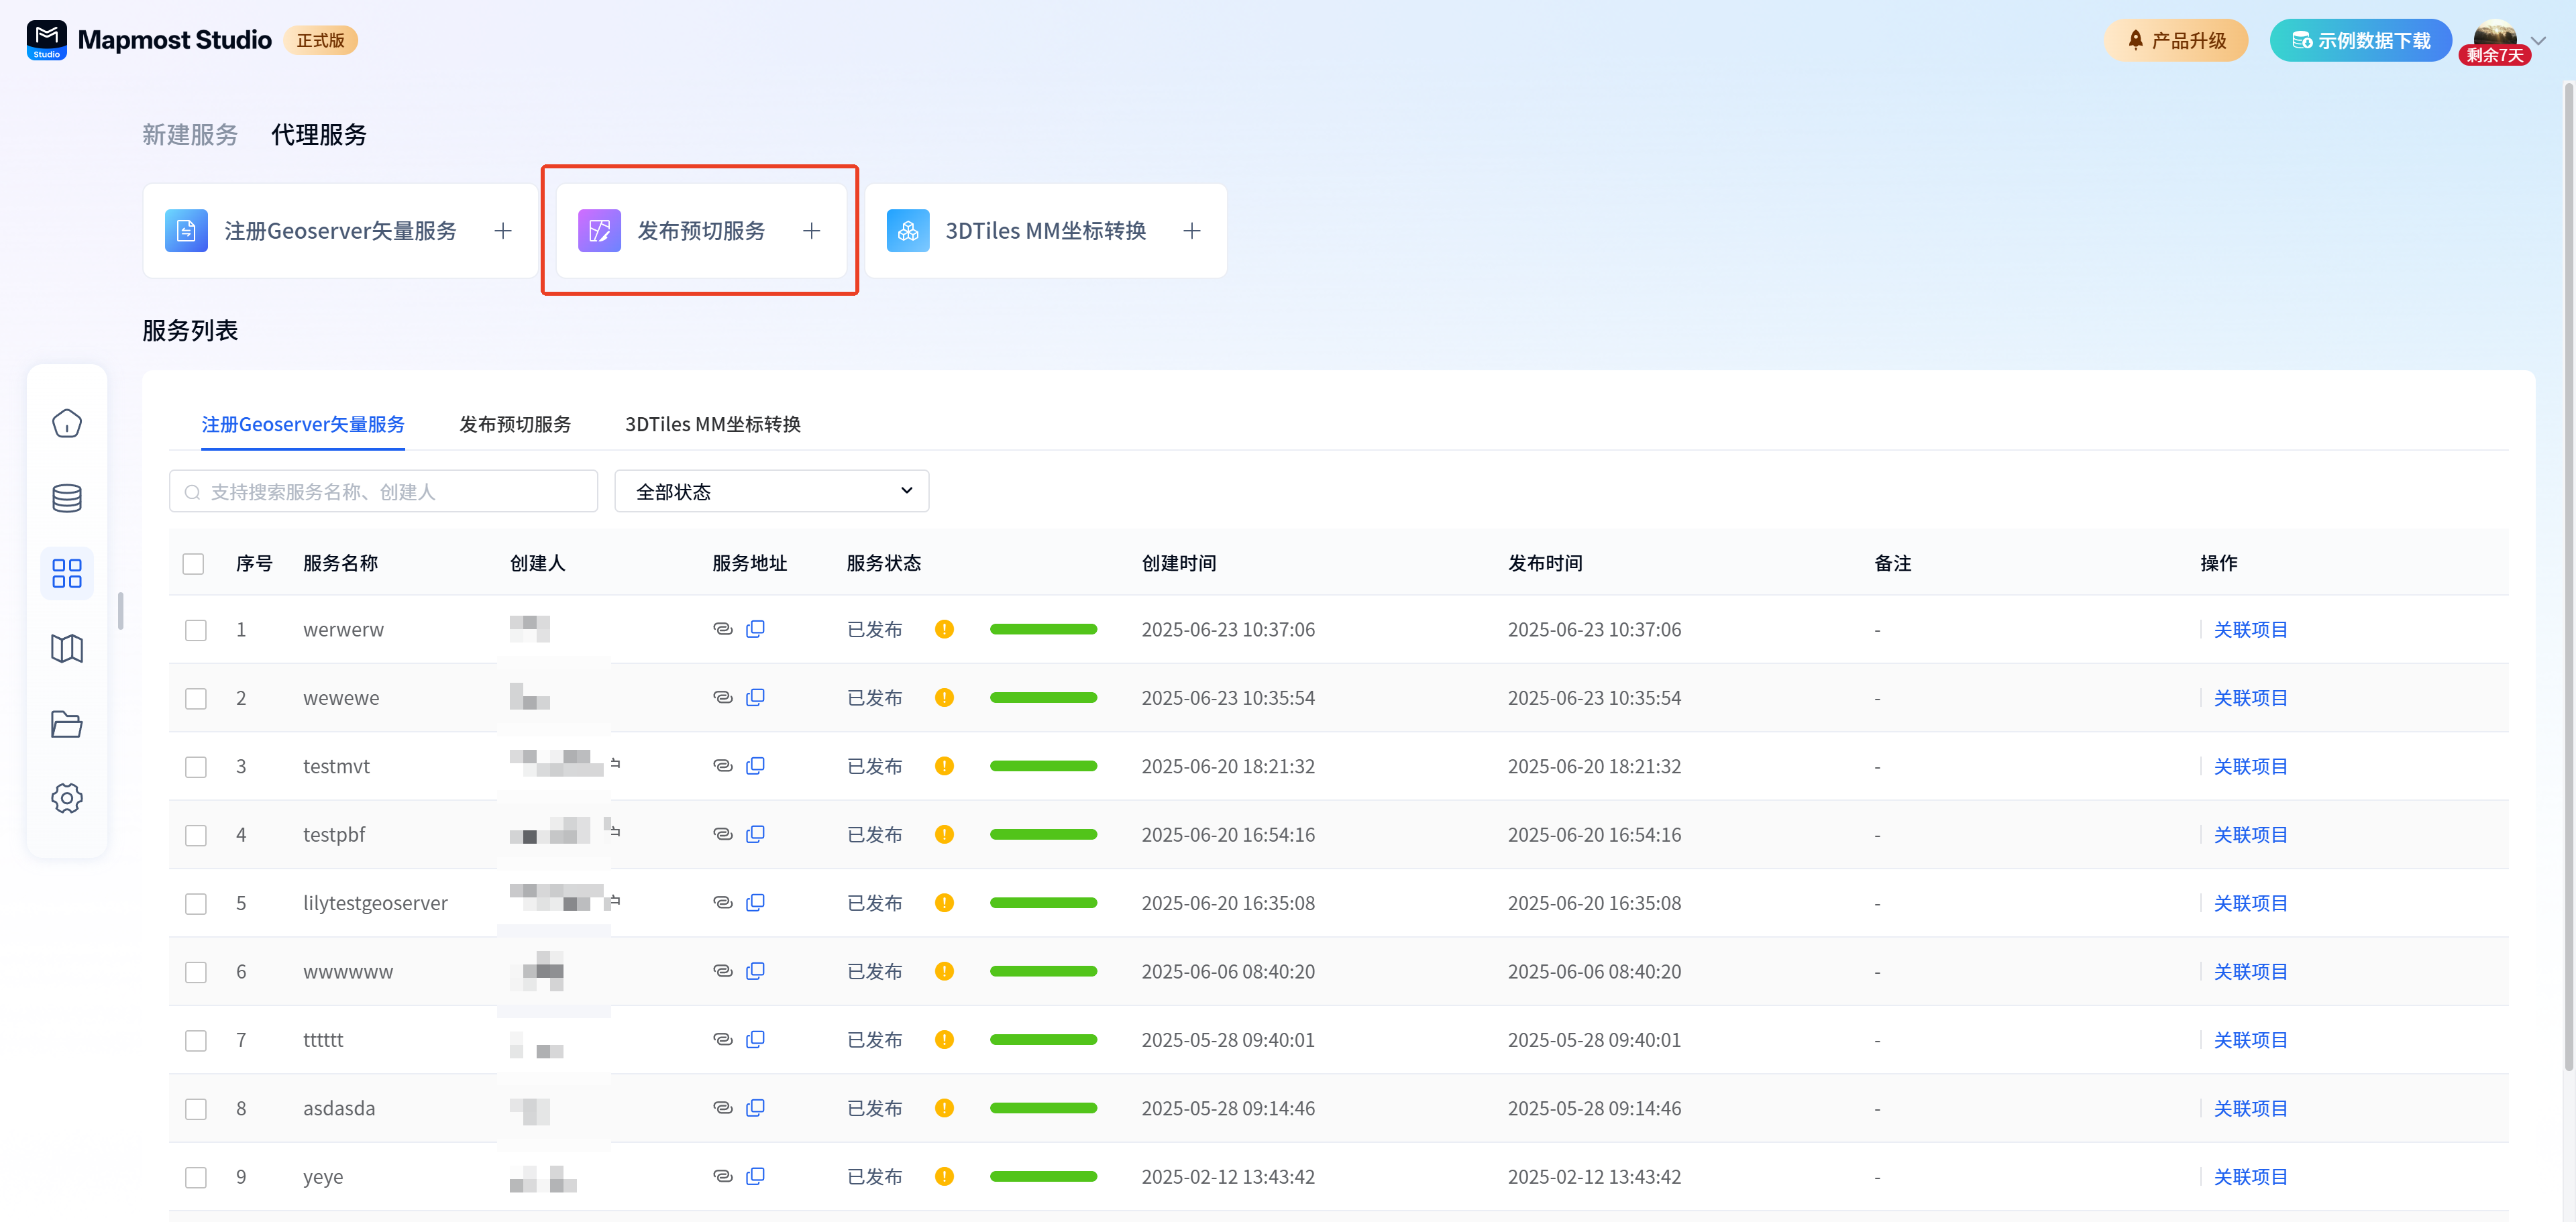
8.2. Publishing
The pre-tiled service is a special form of map publishing in Mapmost Studio, which requires the map publishing package to be prepared in advance. The production tools are currently not open to the public. Please consult business personnel or customer service for details. You can call 0512-67632003 or email sales@mapmost.com to inquire about related trial matters.
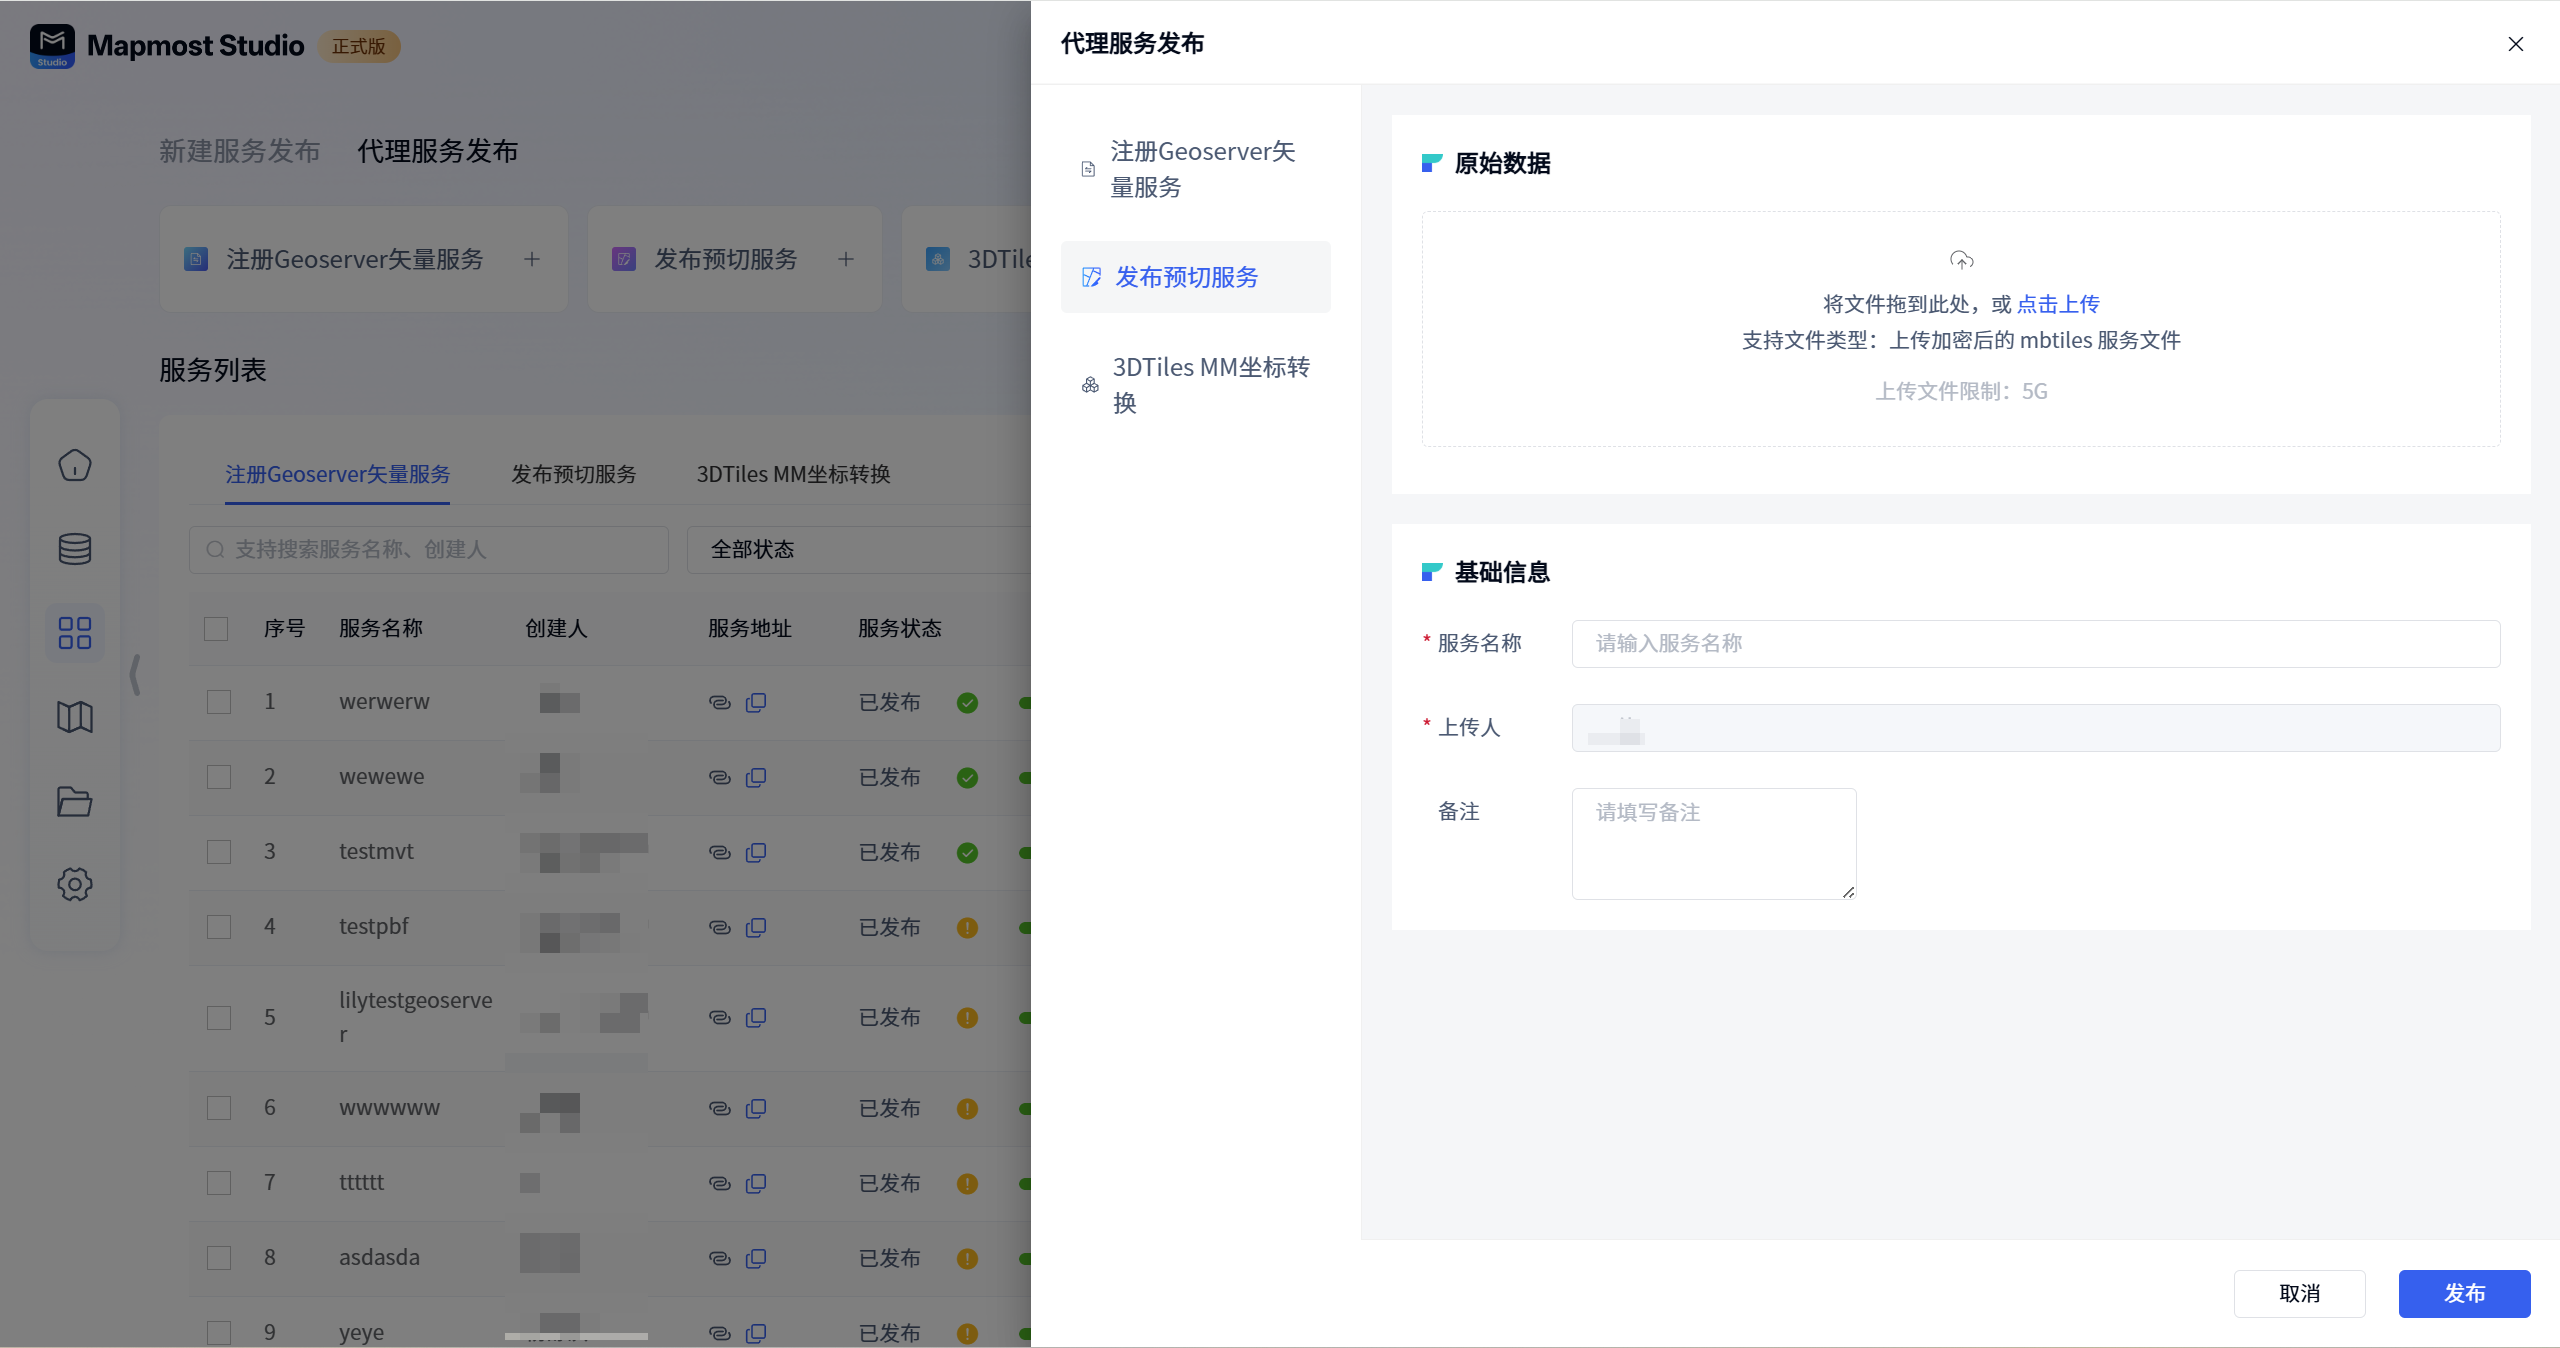
Basic information:
| Field | illustrate |
|---|---|
| Upload files | Required, only encrypted mbtiles service files can be uploaded. |
| Service name | Required, the name must start with a lowercase letter, be 4-32 characters in length, and consist of letters, numbers, and underscores. |
| Uploader | Required, automatically entered, cannot be modified. |
| Remark | It is not required and can be filled in according to the actual situation. |
Publish Drawer Action:
| Field | illustrate |
|---|---|
| Cancel | Click Cancel to exit the current service publishing process, and the entered content will not be saved. |
| release | Click Publish, the current content is saved and published into the corresponding service, and the progress can be viewed in the service list. |
8.3. Preview
The detailed operation of pre-tiled service preview is the same as Imaging Service Preview
8.4. Delete
The detailed operation of service deletion is the same as Image Service Removed
8.5. Sharing
The detailed operation of service sharing is the same as Image service sharing
8.6. Related projects
The detailed operations of service related projects are the same as Imaging service related projects
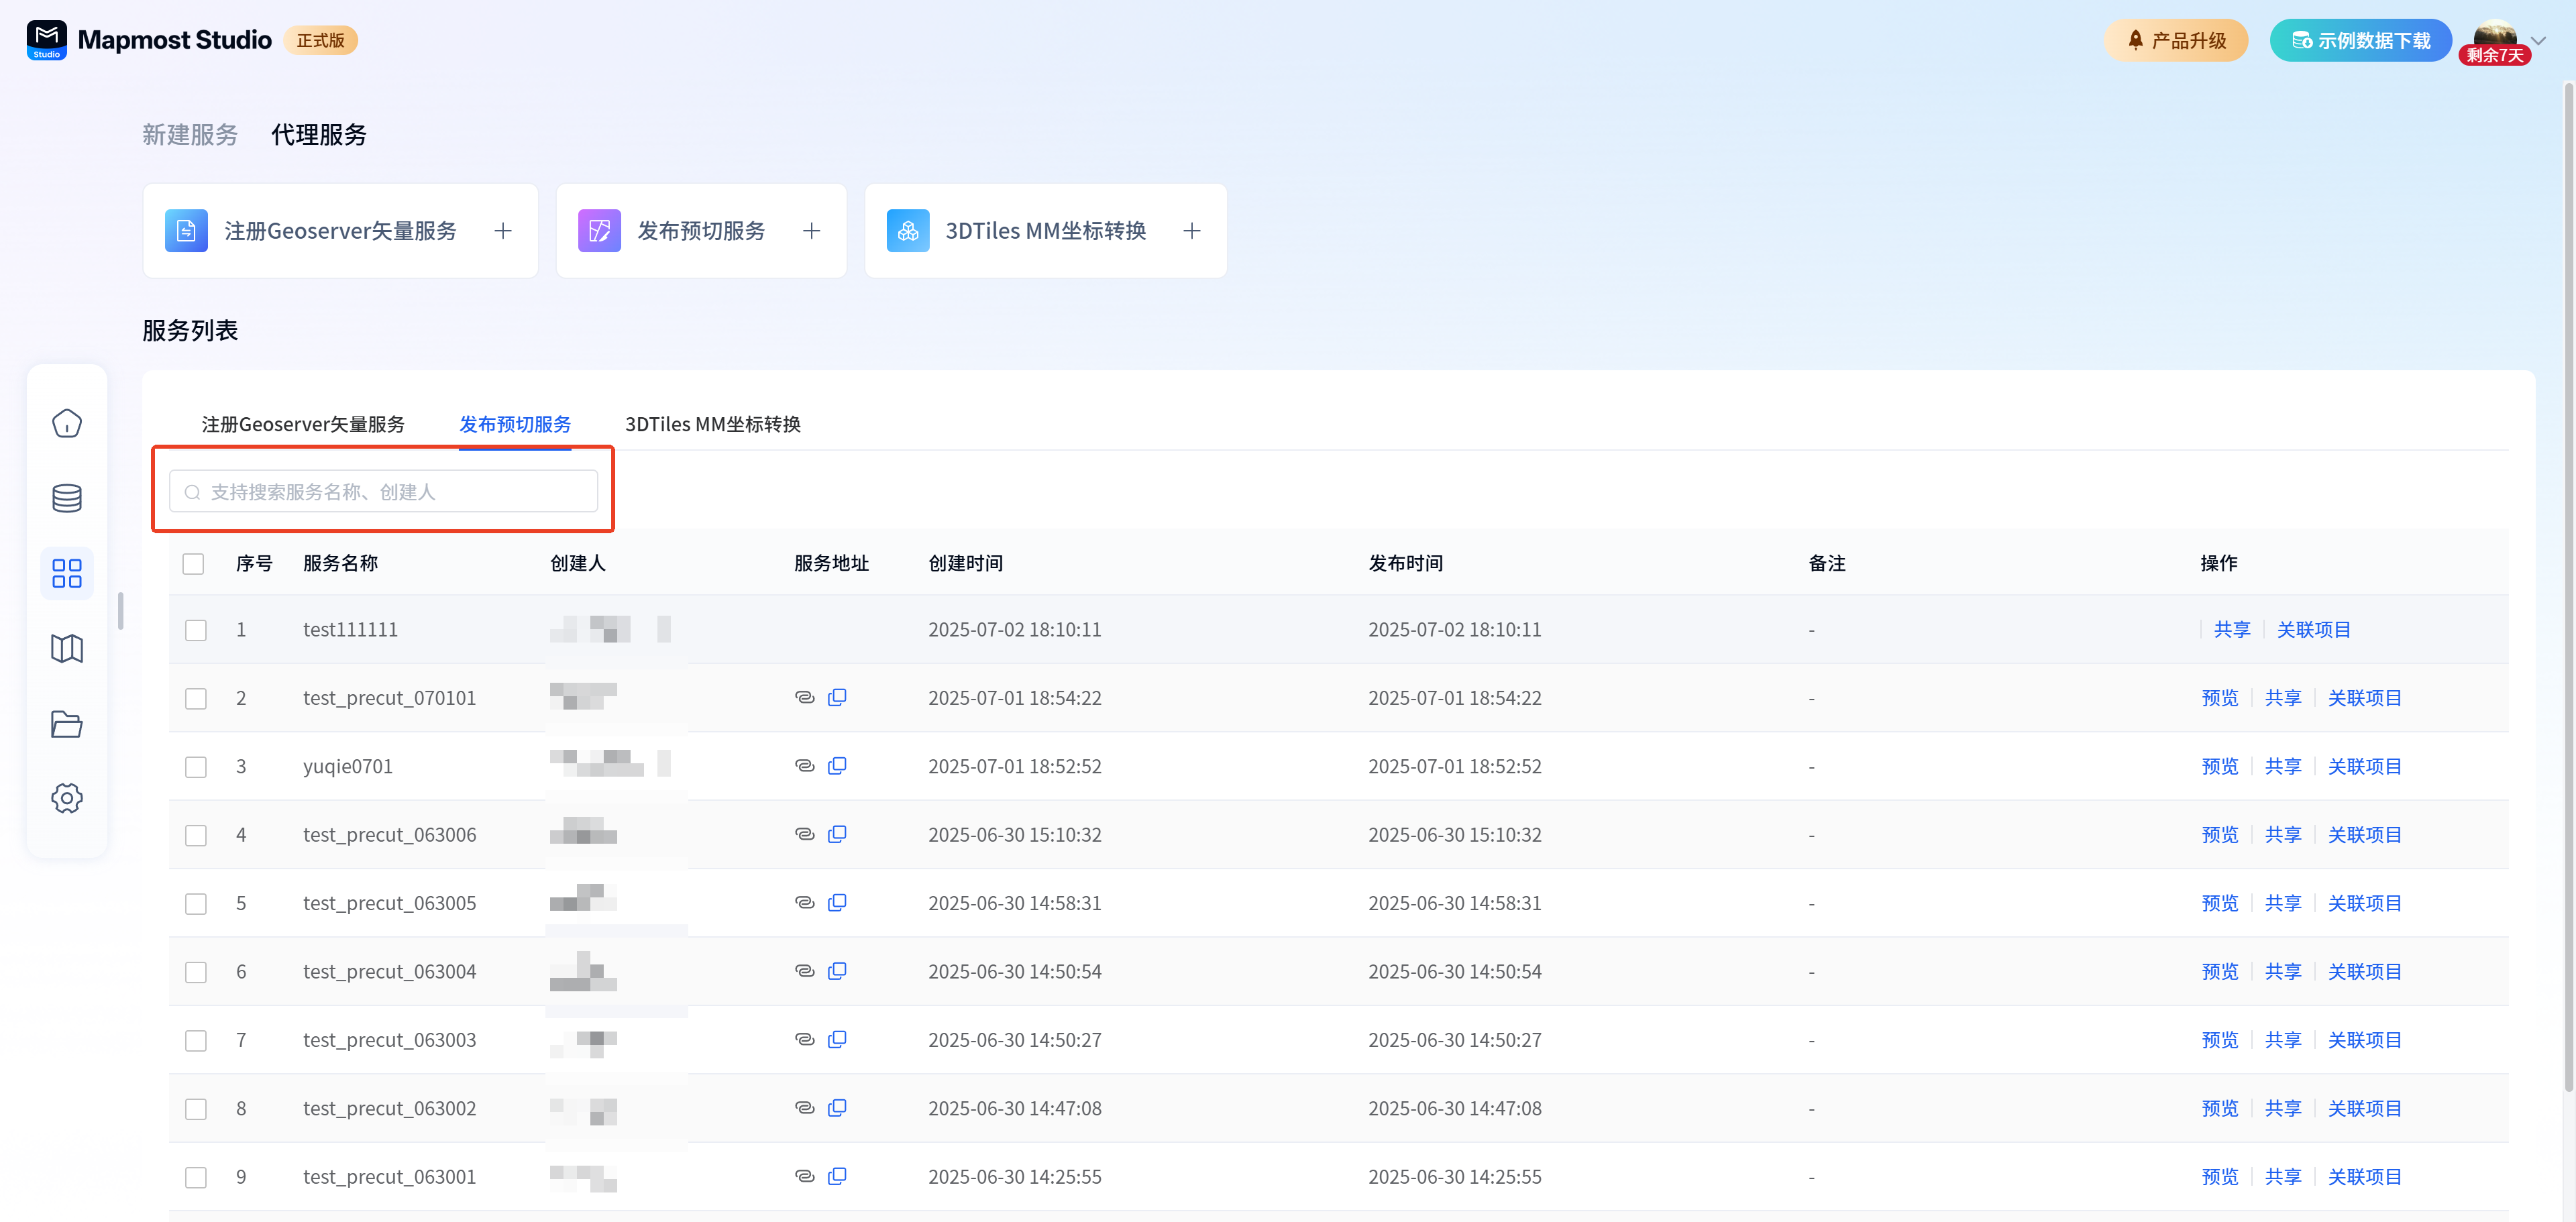
8.7. Filtering
The service list supports filtering, and supports filtering services by keyword-service name and creator.
8.8. Copy service address
The detailed operation of service copy address is the same as Vector map service copy address
9. 3DTiles MM coordinate conversion
9.1. New
Open the "Mapmost Studio" software, switch to the "My Services" module in the left navigation bar, and under the "Agent Service Release" category, click "3DTiles MM Coordinate Conversion"** to enter the corresponding service release page.
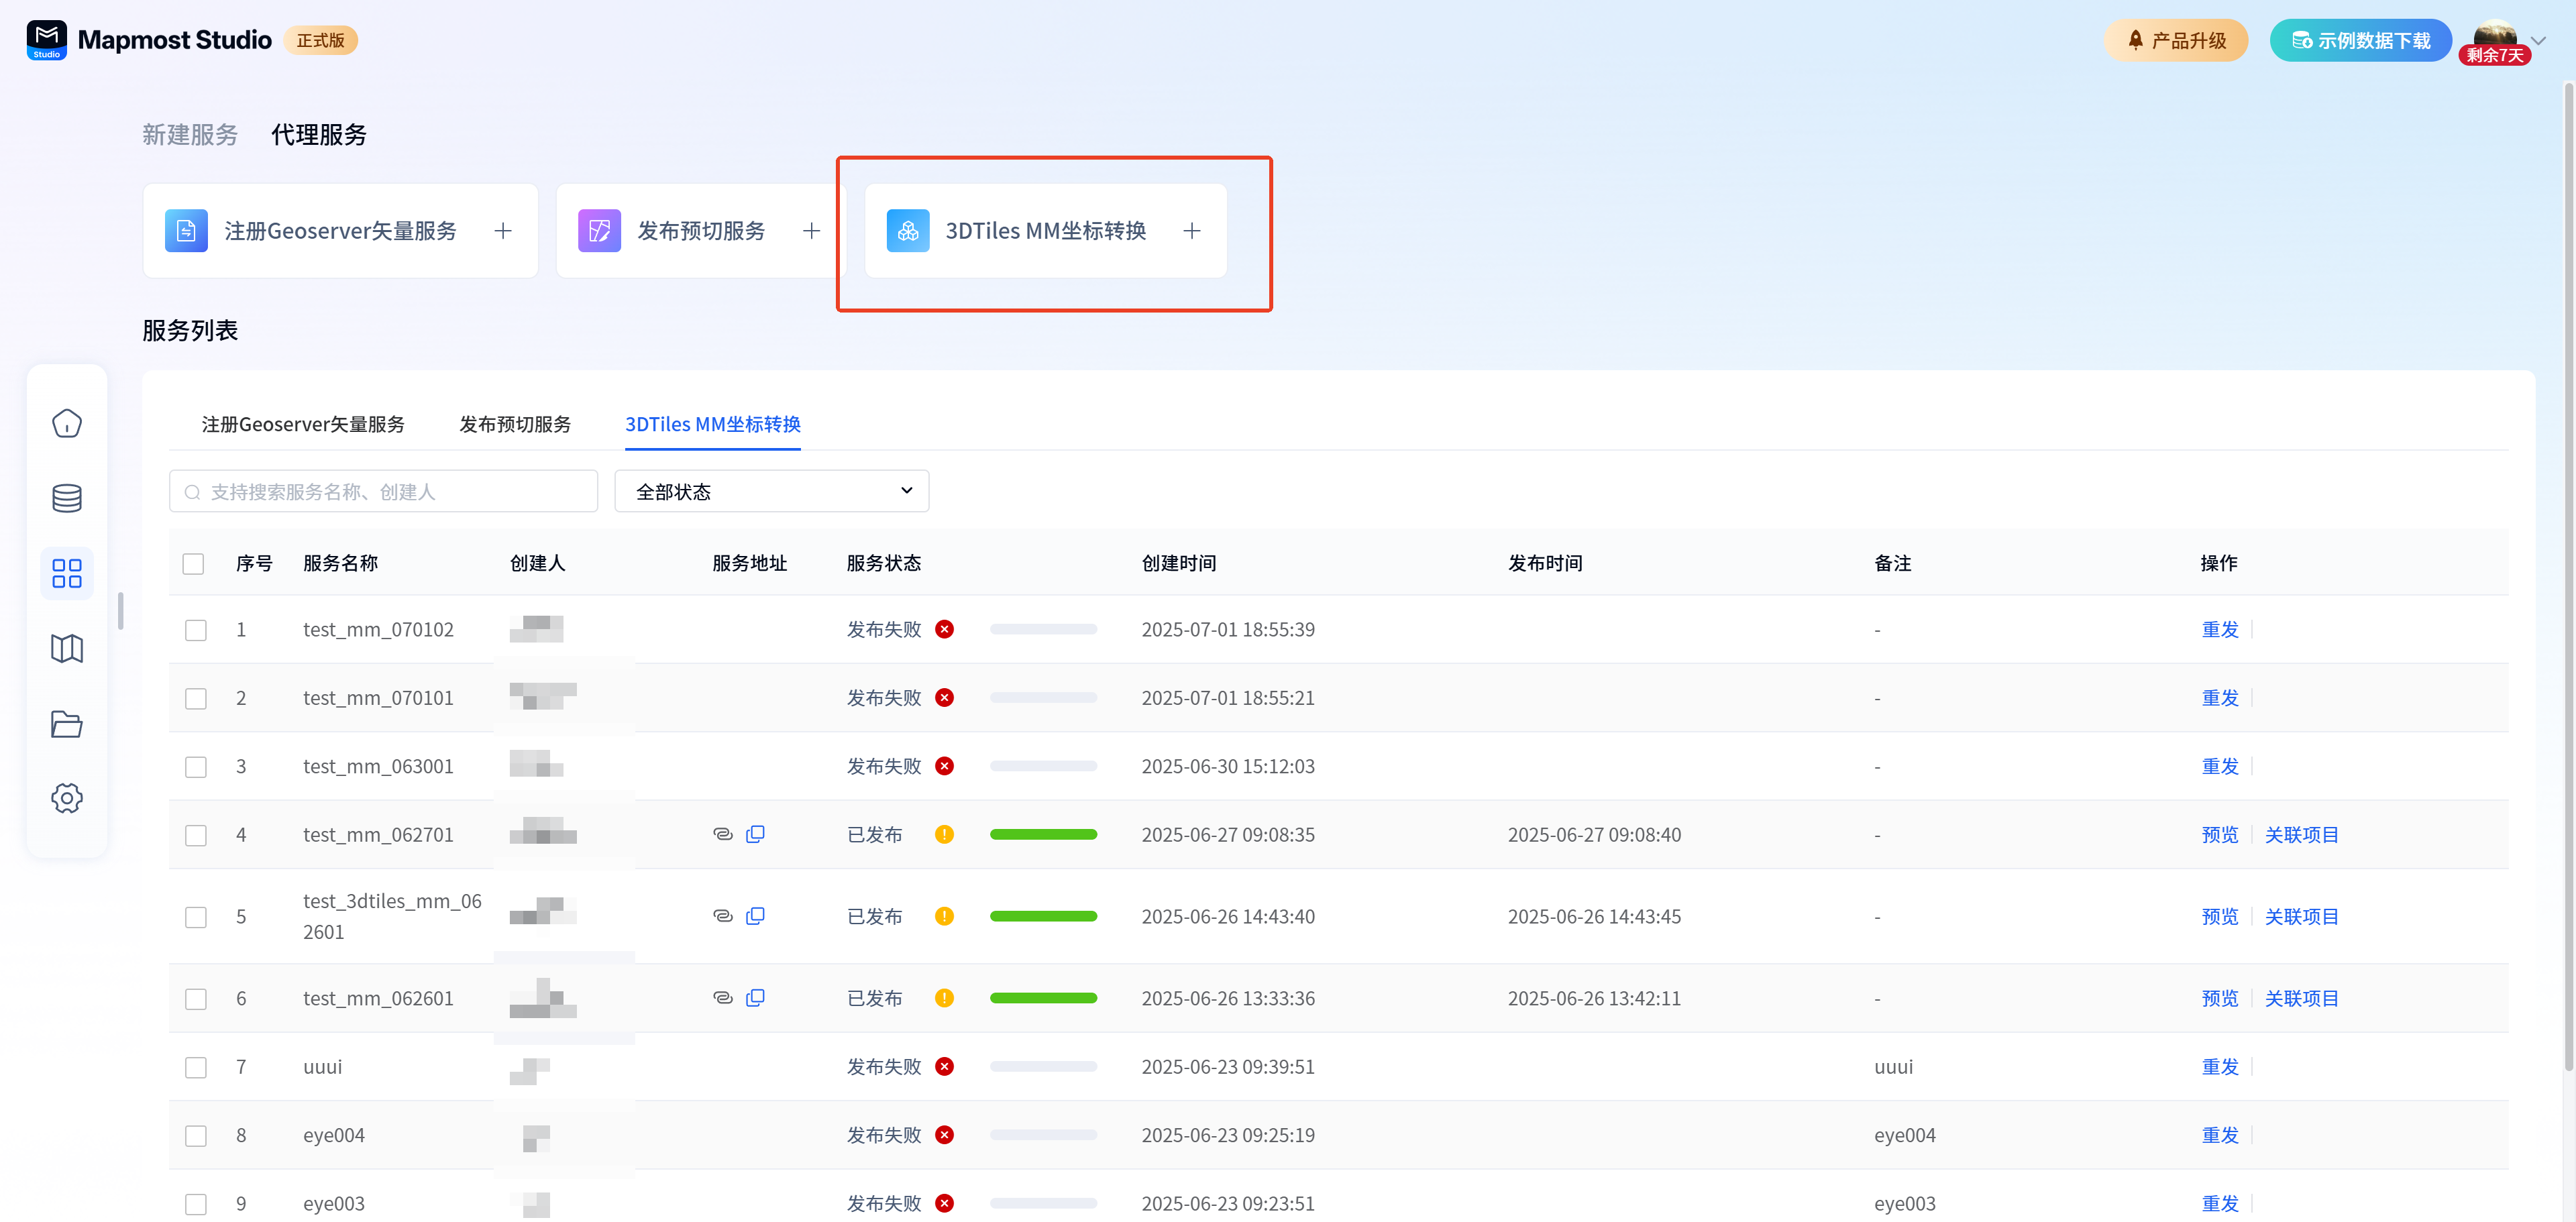
9.2. Publishing
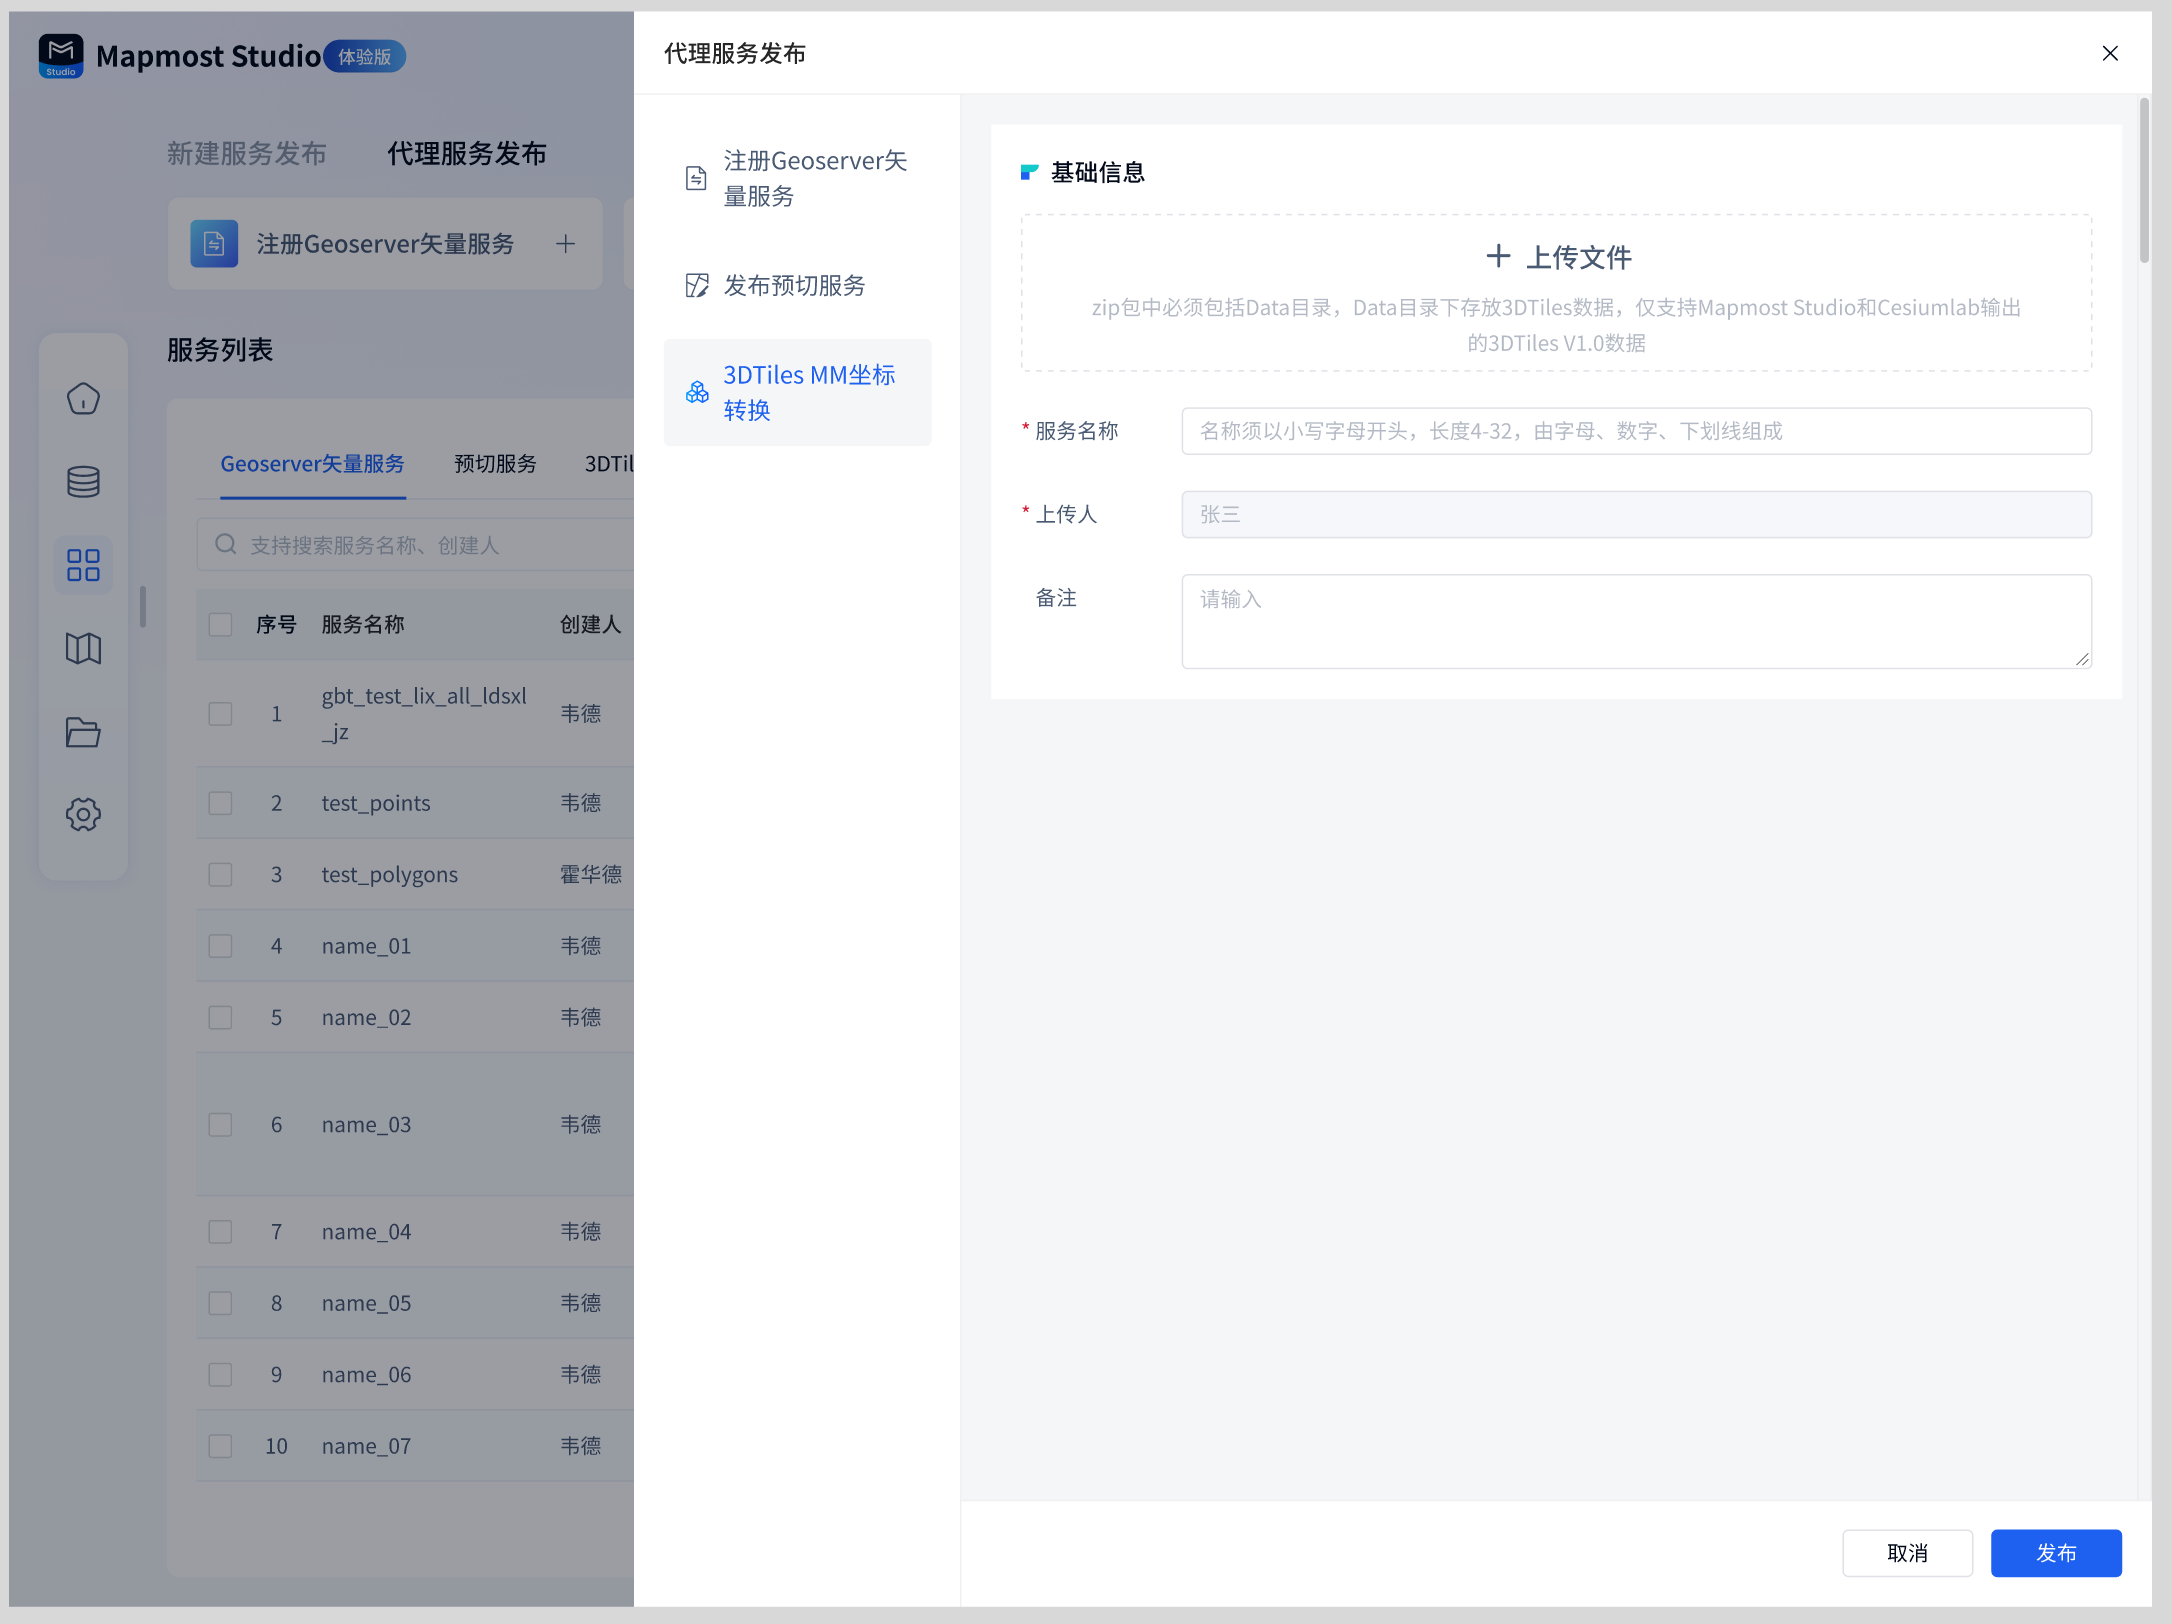
Basic information:
| Field | illustrate |
|---|---|
| Upload files | Required, the zip package must include the Data directory, which stores 3DTiles data. Only the 3DTiles V1.0 data output by Mapmost Studio and Cesiumlab are supported. |
| Service name | Required, the name must start with a lowercase letter, be 4-32 characters in length, and consist of letters, numbers, and underscores. |
| Uploader | Required, automatically entered, cannot be modified. |
| Remark | It is not required and can be filled in according to the actual situation. |
Publish Drawer Action:
| Field | illustrate |
|---|---|
| Cancel | Click Cancel to exit the current service publishing process, and the entered content will not be saved. |
| release | Click Publish, the current content is saved and published into the corresponding service, and the progress can be viewed in the service list. |
9.3. Preview
The detailed operation of 3DTiles MM coordinate conversion service preview is the same as Imaging Service Preview
9.4. Resend
The detailed operation of service resend is the same as Image Service Resend
9.5. Delete
The detailed operation of service deletion is the same as Image Service Removed
9.6. Sharing
The detailed operation of service sharing is the same as Image service sharing
9.7. Related projects
The detailed operations of service related projects are the same as Imaging service related projects
9.8. Filtering
The detailed operation of service screening is the same as Imaging Service Screening
9.9. Copy service address
The detailed operation of service copy address is the same as Vector map service copy address
The loading speed of 3DTiles services after coordinate transformation has been improved in Mapmost SDK for WebGL.