Service Publishing
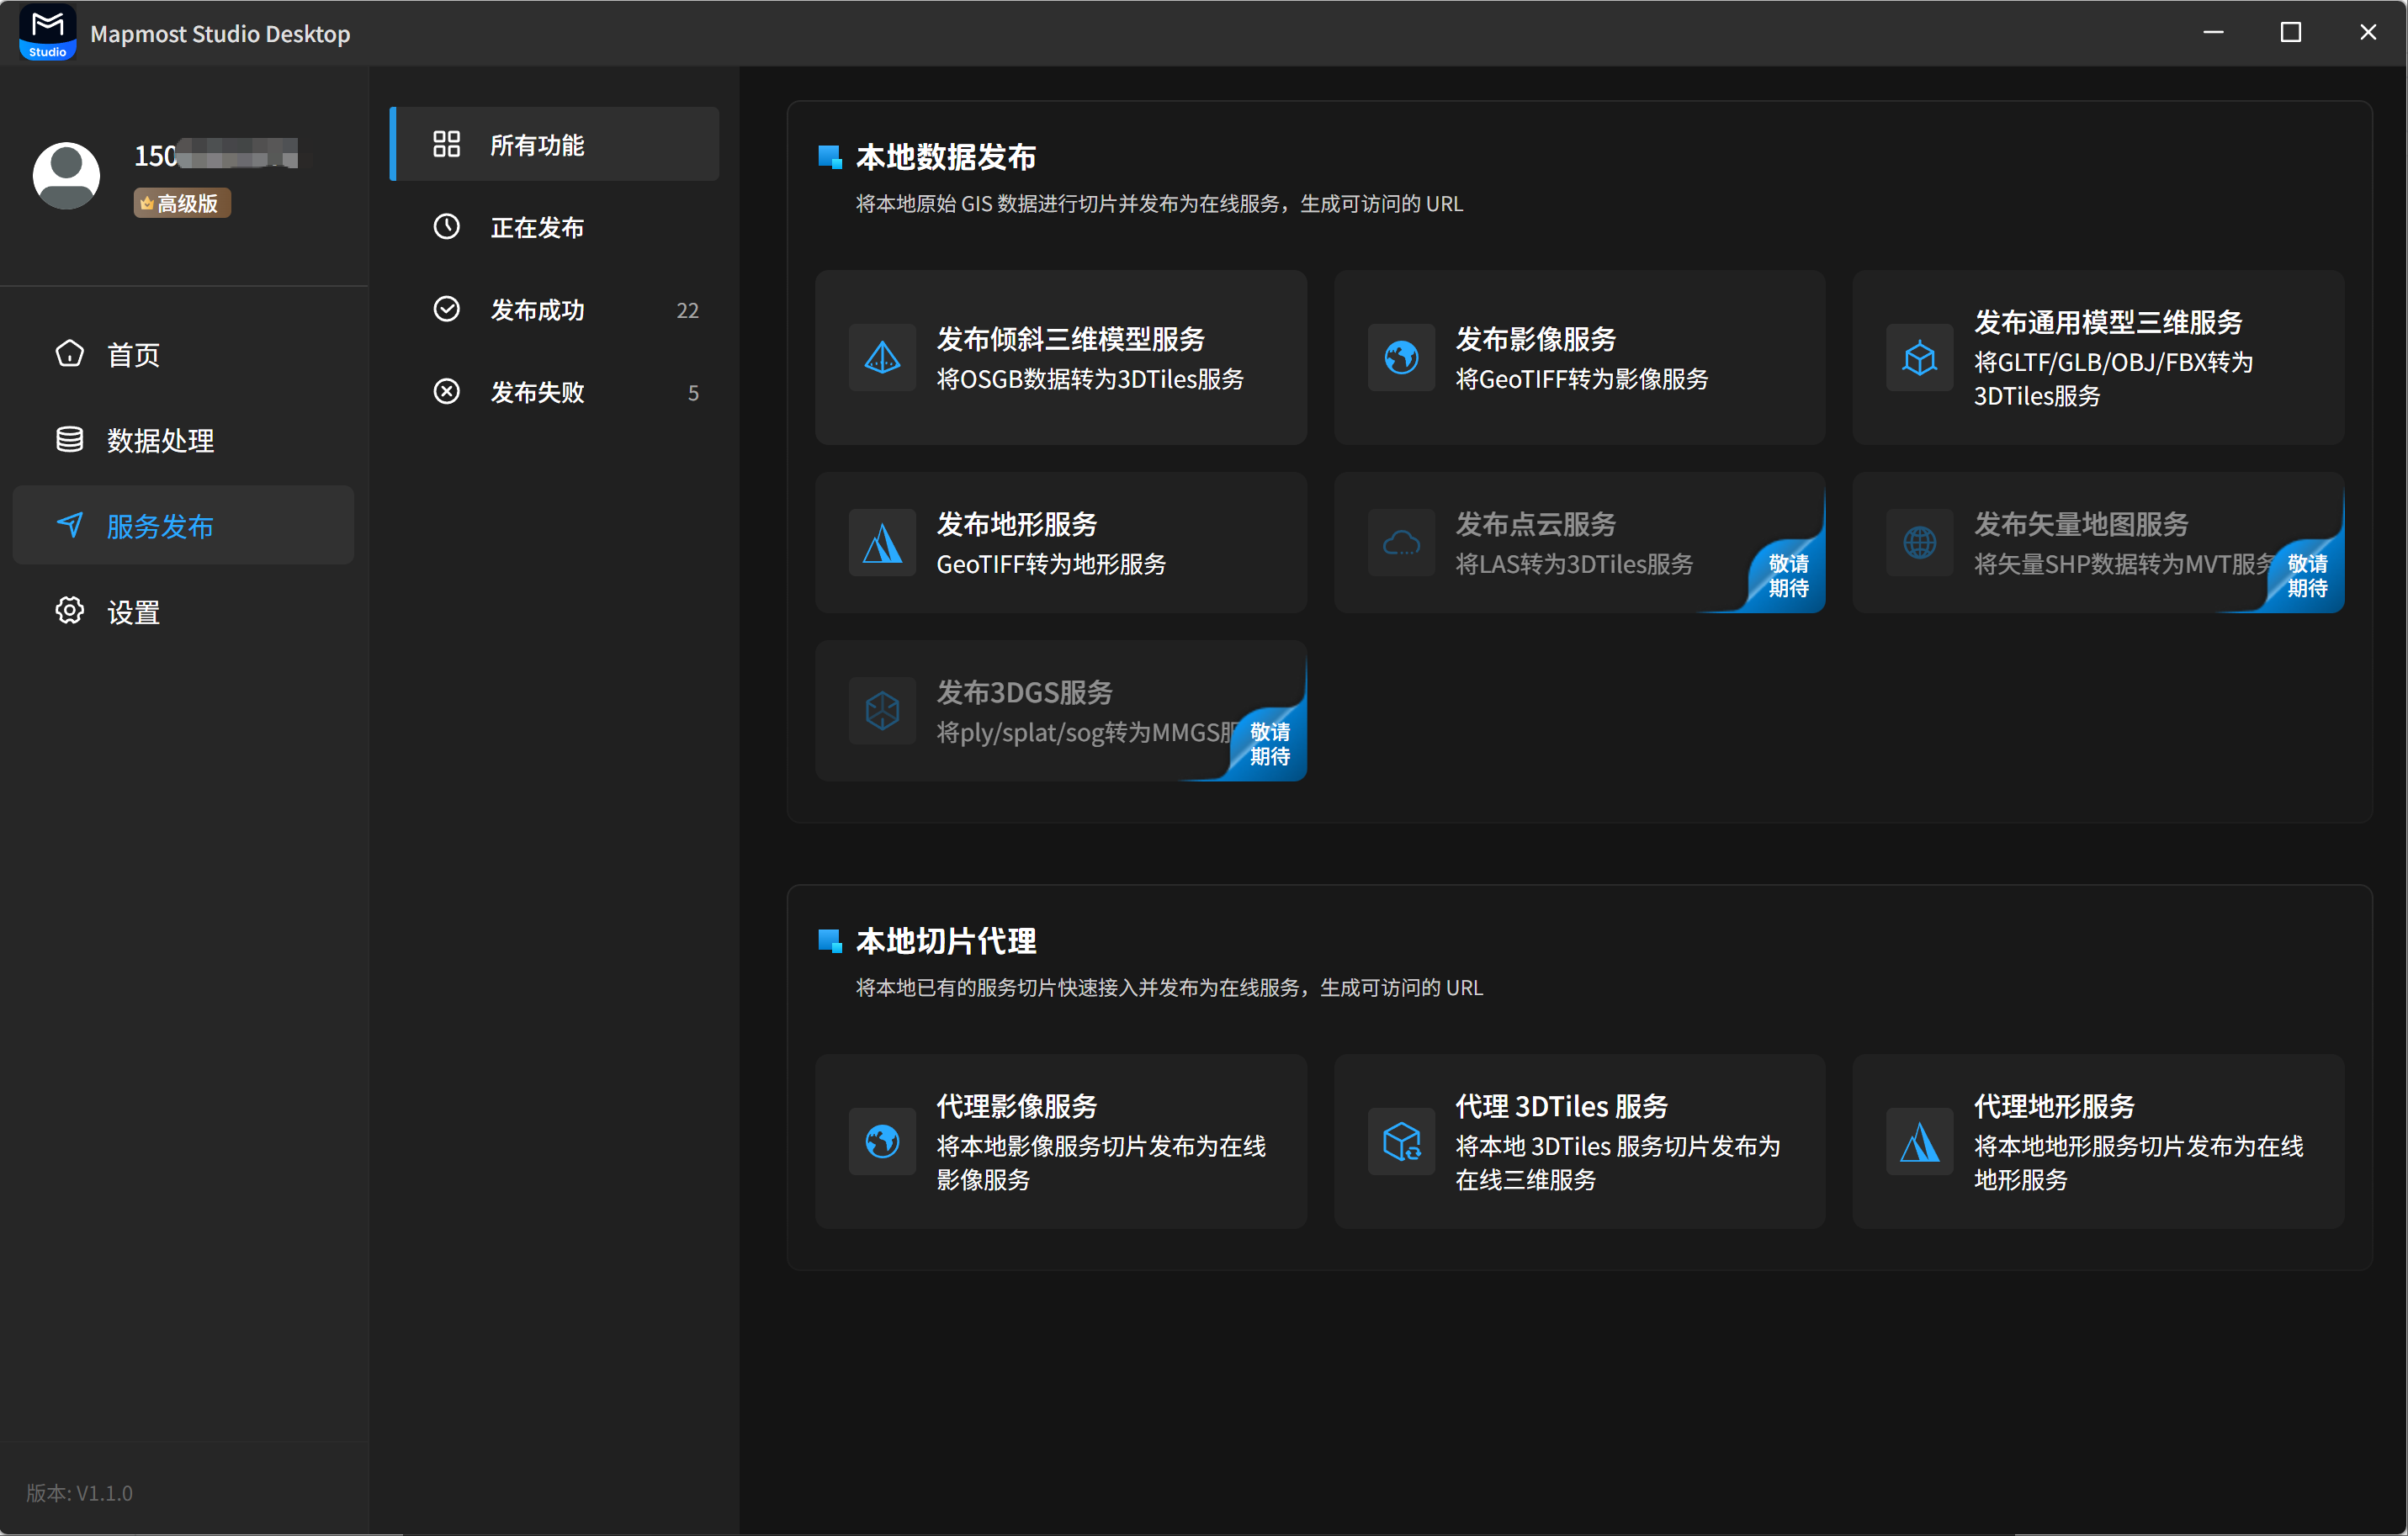
The service publishing module provides 2D and 3D data tiling and service publishing. It supports tiling and publishing imagery, oblique 3D models, terrain, general 3D models, vector data (coming soon), and laser point cloud data (coming soon). Successfully published services can be previewed and distributed.
- For publishing imagery services, see Publish Imagery Service.
- For publishing oblique 3D model services, see Publish Oblique 3D Model Service.
- For publishing terrain services, see Publish Terrain Service.
- For publishing general 3D model services, see Publish General 3D Model Service.
1. All Features
1.1 Local Data Publishing
1.1.1 Publish Imagery Service
Select a local imagery file (.tif or .tiff), fill in the parameters, and publish it as an imagery tile service.
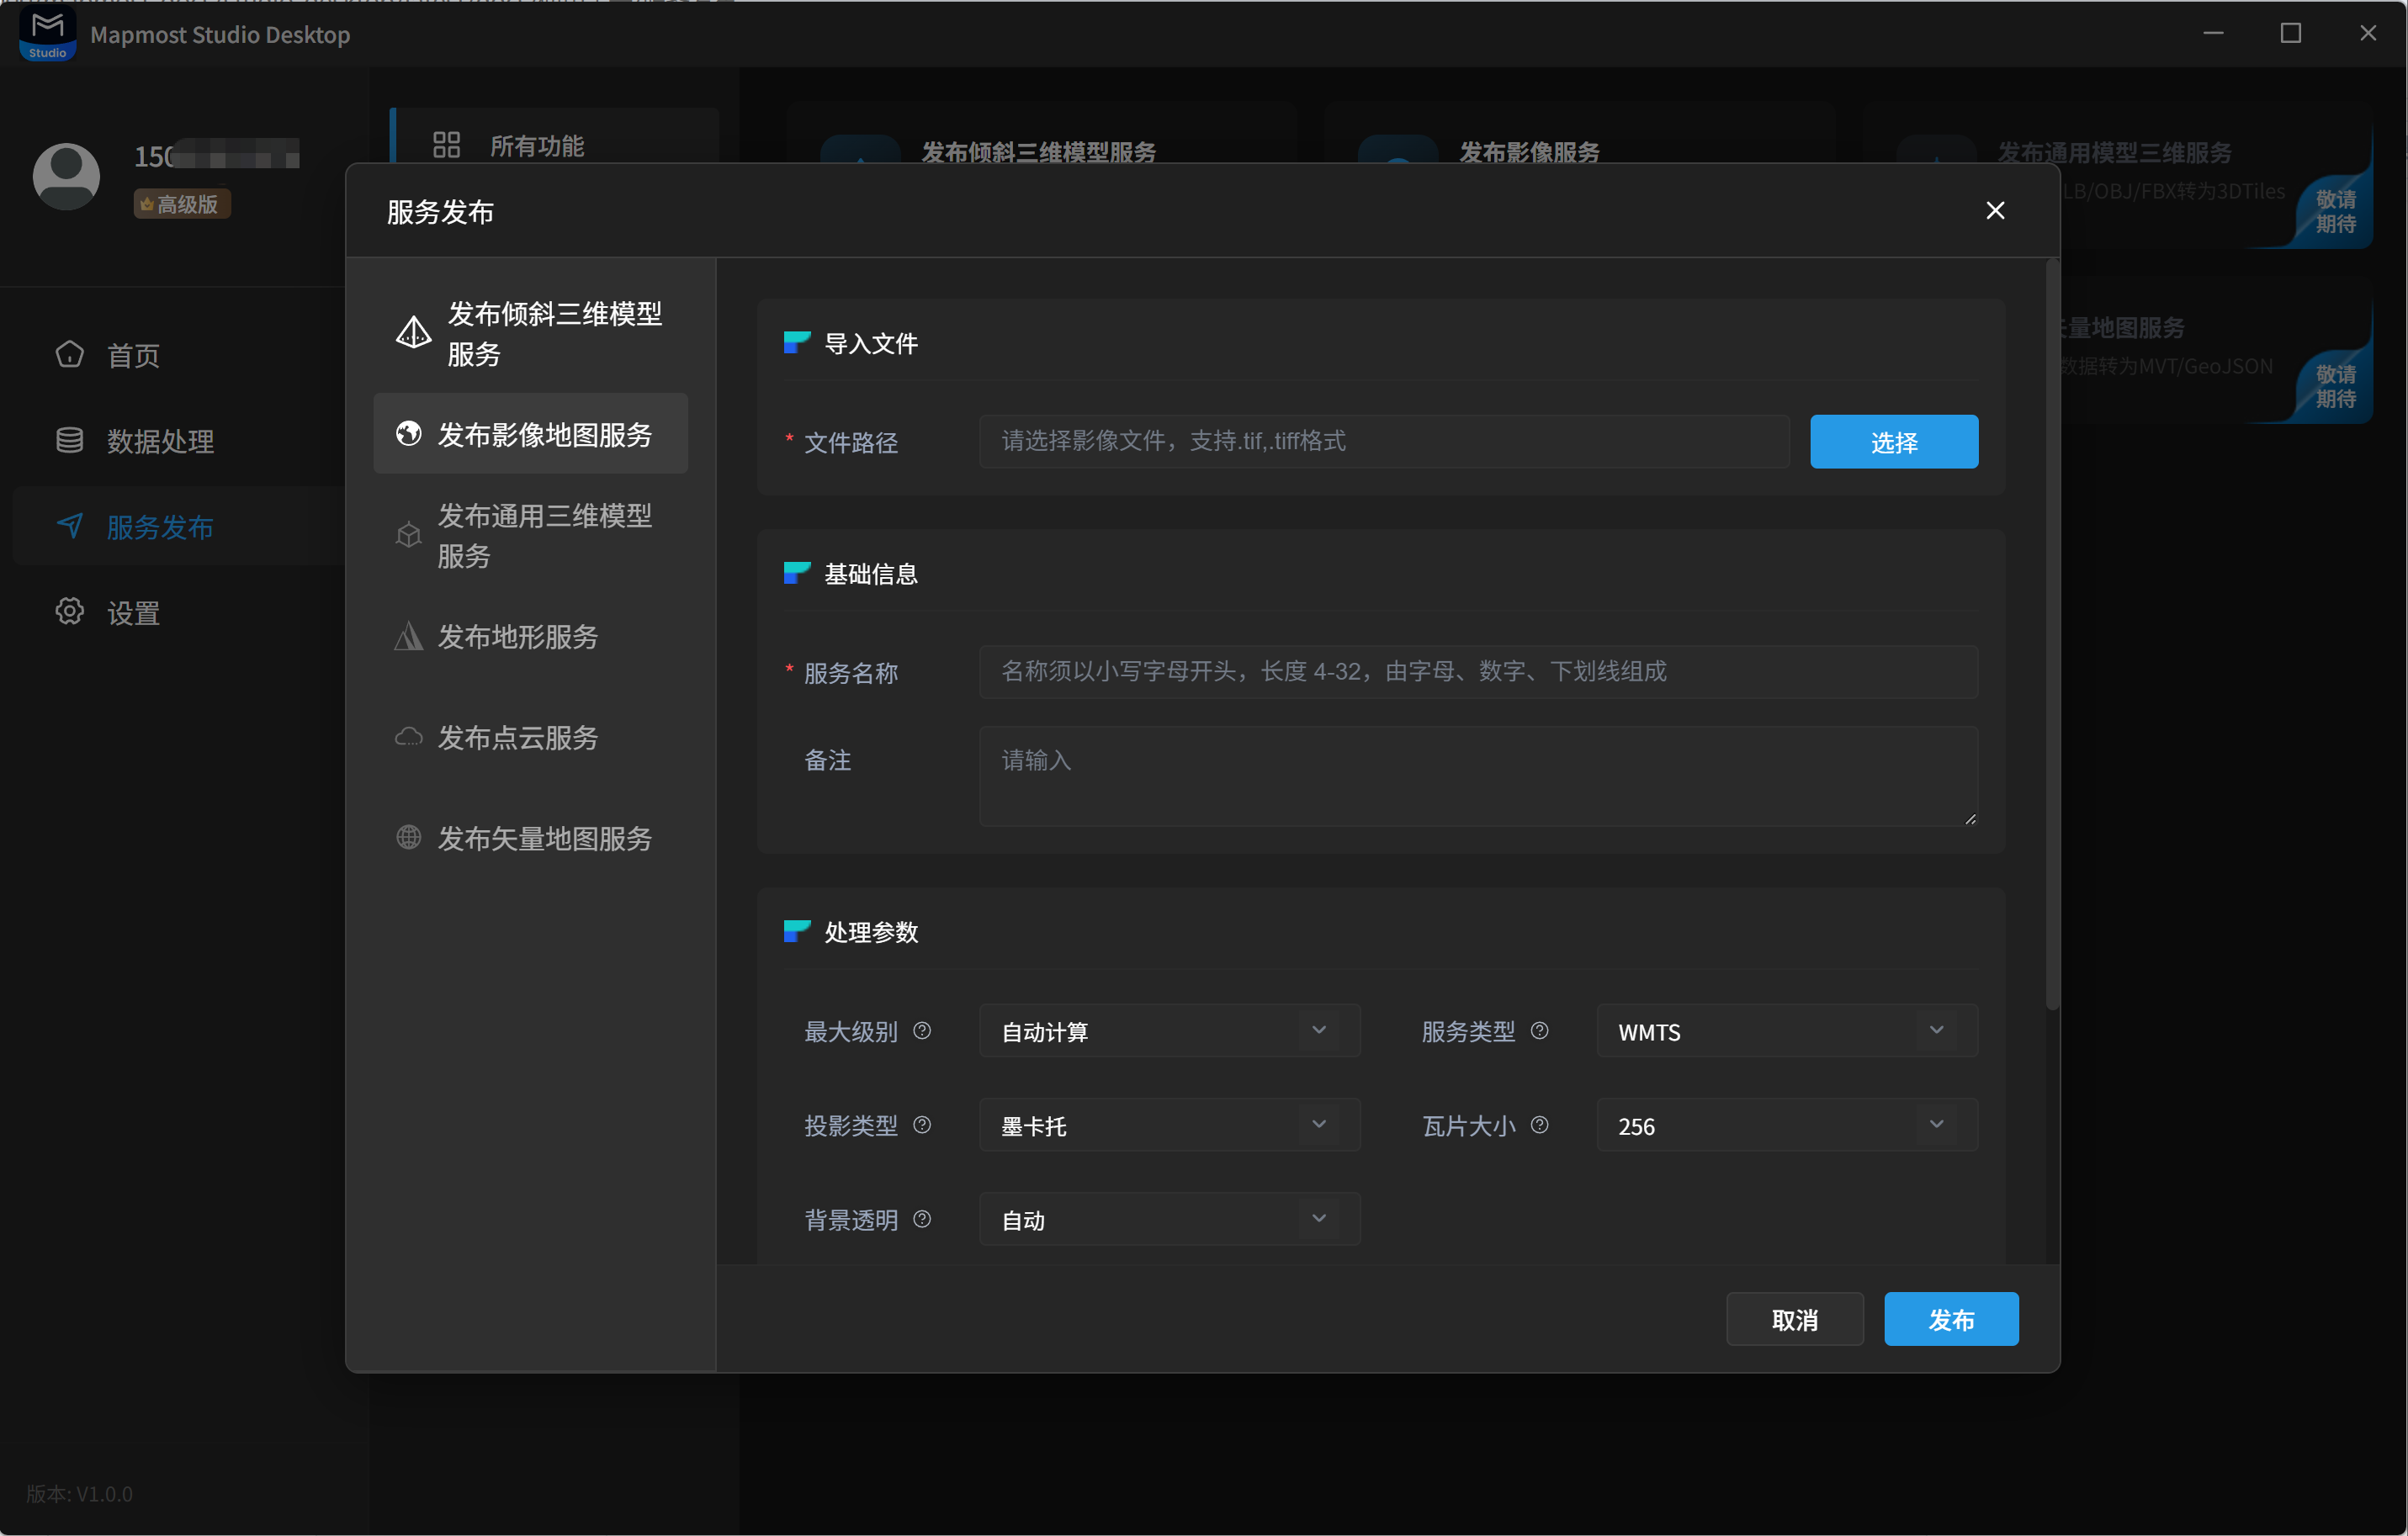
Imagery service publishing parameters:
Basic Information
| Field | Description |
|---|---|
| Import File | Required. Select a local imagery file (.tif or .tiff). |
| Service Name | Required. The name must start with a lowercase letter, contain 4 to 32 characters, and use only letters, numbers, and underscores. |
| Remarks | Optional. Enter notes according to your needs. |
Processing Parameters
| Field | Description |
|---|---|
| Maximum Level | Optional. Controls the maximum zoom level of the generated tiles. Default: auto calculation. The value is calculated from the raster resolution. You can also set it manually within [10, 25]; the actual value uses the smaller value between the manual setting and auto calculation. The default is recommended. |
| Service Type | Optional. Defines the tile index organization of the published imagery service. WMTS and TMS are supported. WMTS starts from level 0, uses the upper-left corner as the origin, increases x from left to right, and increases y from top to bottom. WMTS tile indexes use the {z}/{x}/{y} format. TMS uses the lower-left corner as the origin and increases the vertical axis from bottom to top. |
| Projection Type | Optional. Mercator and geographic coordinate formats are supported. |
| Tile Size | Optional. Pixel width and height of each generated tile. 256 and 512 are supported. The common default is 256, but 512 can reduce tile requests on large screens. |
| Transparent Background | Optional. Removes white or black borders after tiling. Three modes are supported. Auto: automatically identifies the transparent band from raster band metadata, suitable for data with complete metadata. Fourth Band: if the raster has more than three bands, force the fourth band to be used as the transparent band, suitable when the fourth band exists and is known to contain transparency. Transparent Color: regardless of band count, pixels matching the specified RGB value are treated as fully transparent, suitable for data with incomplete transparency information. |
Export Data
| Field | Description |
|---|---|
| Output Path | Required. Select a local folder as the output path. Tile data is stored in the selected path for later use. |
Publishing Actions
| Field | Description |
|---|---|
| Cancel | Exit the current publishing workflow. Entered content is not saved. |
| Publish | Save the current content and publish it as the corresponding service. Progress can be viewed in the Publishing list. |
1.1.2 Publish Oblique 3D Model Service
Select local OSGB data, specifically the directory that contains the Data folder, fill in the parameters, and publish it as an oblique 3D model tile service.
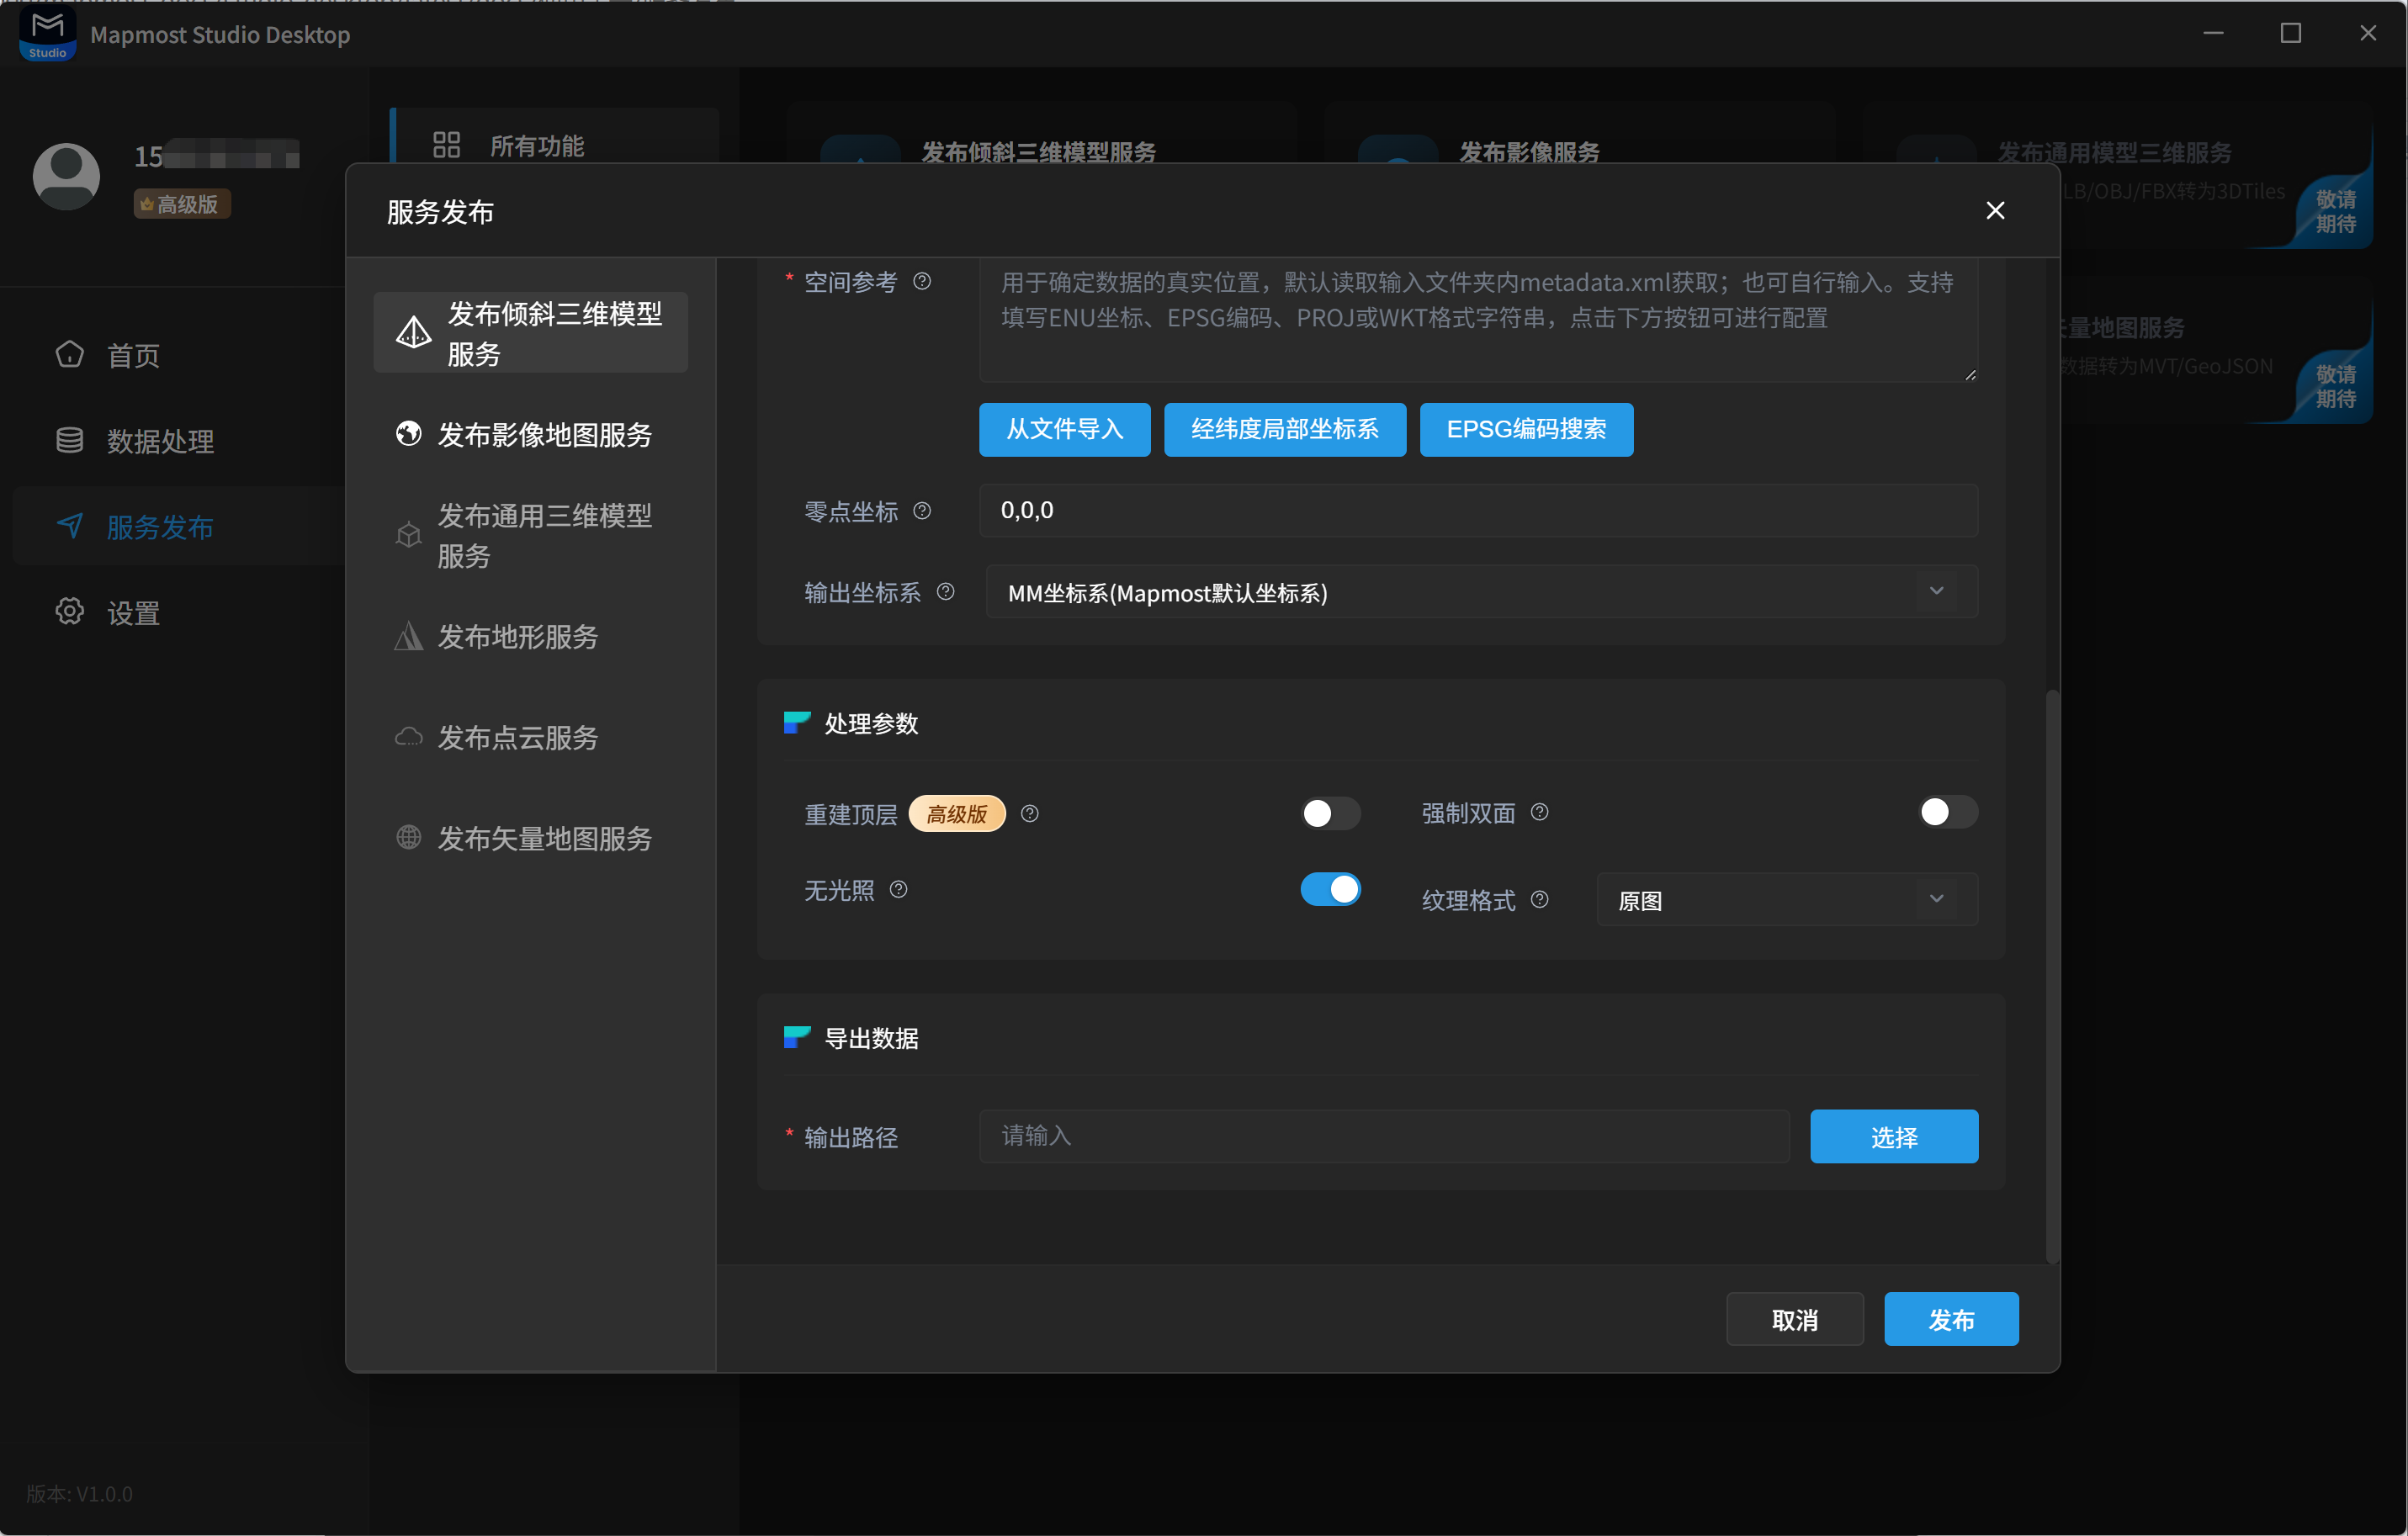
Oblique 3D model service publishing parameters:
Basic Information
| Field | Description |
|---|---|
| Import File | Required. Select local OSGB data, specifically the directory that contains the Data folder. |
| Service Name | Required. The name must start with a lowercase letter, contain 4 to 32 characters, and use only letters, numbers, and underscores. |
| Remarks | Optional. Enter notes according to your needs. |
Coordinate Parameters
| Field | Description |
|---|---|
| Spatial Reference | Optional. The spatial reference acts like the positioning system for geographic data. It defines how data is identified and placed on Earth. It determines the real-world position of the data. Incorrect settings may cause incorrect output positions or processing failure. If the input file contains spatial reference information, the system recognizes it automatically. Otherwise, specify it manually. ENU coordinates, EPSG codes, and PROJ or WKT strings are supported. Click the button at the bottom to select and auto-fill a value. |
| Origin Coordinates | Optional. Specifies the offset of the data origin relative to the spatial reference in the x, y, and z directions, in meters. The default is no offset (0,0,0). Use this when 3D model coordinates are very large in some projected coordinate systems and are difficult to operate on. In this case, the model uses an offset position, so in the spatial reference: modeling coordinates + origin coordinates = projected coordinates. |
| Output Coordinate System | Optional. Supports the Mapmost default coordinate system and EPSG:4978 as service output coordinate systems. Services published with the Mapmost default coordinate system load faster in Mapmost SDK for WebGL. |
Processing Parameters
| Field | Description |
|---|---|
| Rebuild Top Level | Optional. Rebuilds the top level based on tile spatial structure using an octree. Enabling this improves service rendering speed but increases publishing time. It is disabled by default. |
| Force Double-sided | Optional. Renders textures on both front and back faces. This is usually unnecessary, but it can be enabled for abnormal data where back-face culling causes holes. |
| Unlit | Optional. This option makes the rendering effect more realistic and is enabled by default. Because generated tiles do not contain normal information, some engines may render this data as black; disable this option if that occurs. |
| Texture Format | Optional. Default: use the original format in the OSGB, usually jpg. webp: about 70% of the default jpg size and can speed up network transfer. ktx2: about 90% of the default jpg size and reduces video memory usage by about 5/6, but increases publishing time. |
Export Data
| Field | Description |
|---|---|
| Output Path | Required. Select a local folder as the output path. Tile data is stored in the selected path for later use. |
Publishing Actions
| Field | Description |
|---|---|
| Cancel | Exit the current publishing workflow. Entered content is not saved. |
| Publish | Save the current content and publish it as the corresponding service. Progress can be viewed in the Publishing list. |
1.1.3 Publish Terrain Service
Select a local terrain file (.tif), fill in the parameters, and publish it as a terrain tile service.
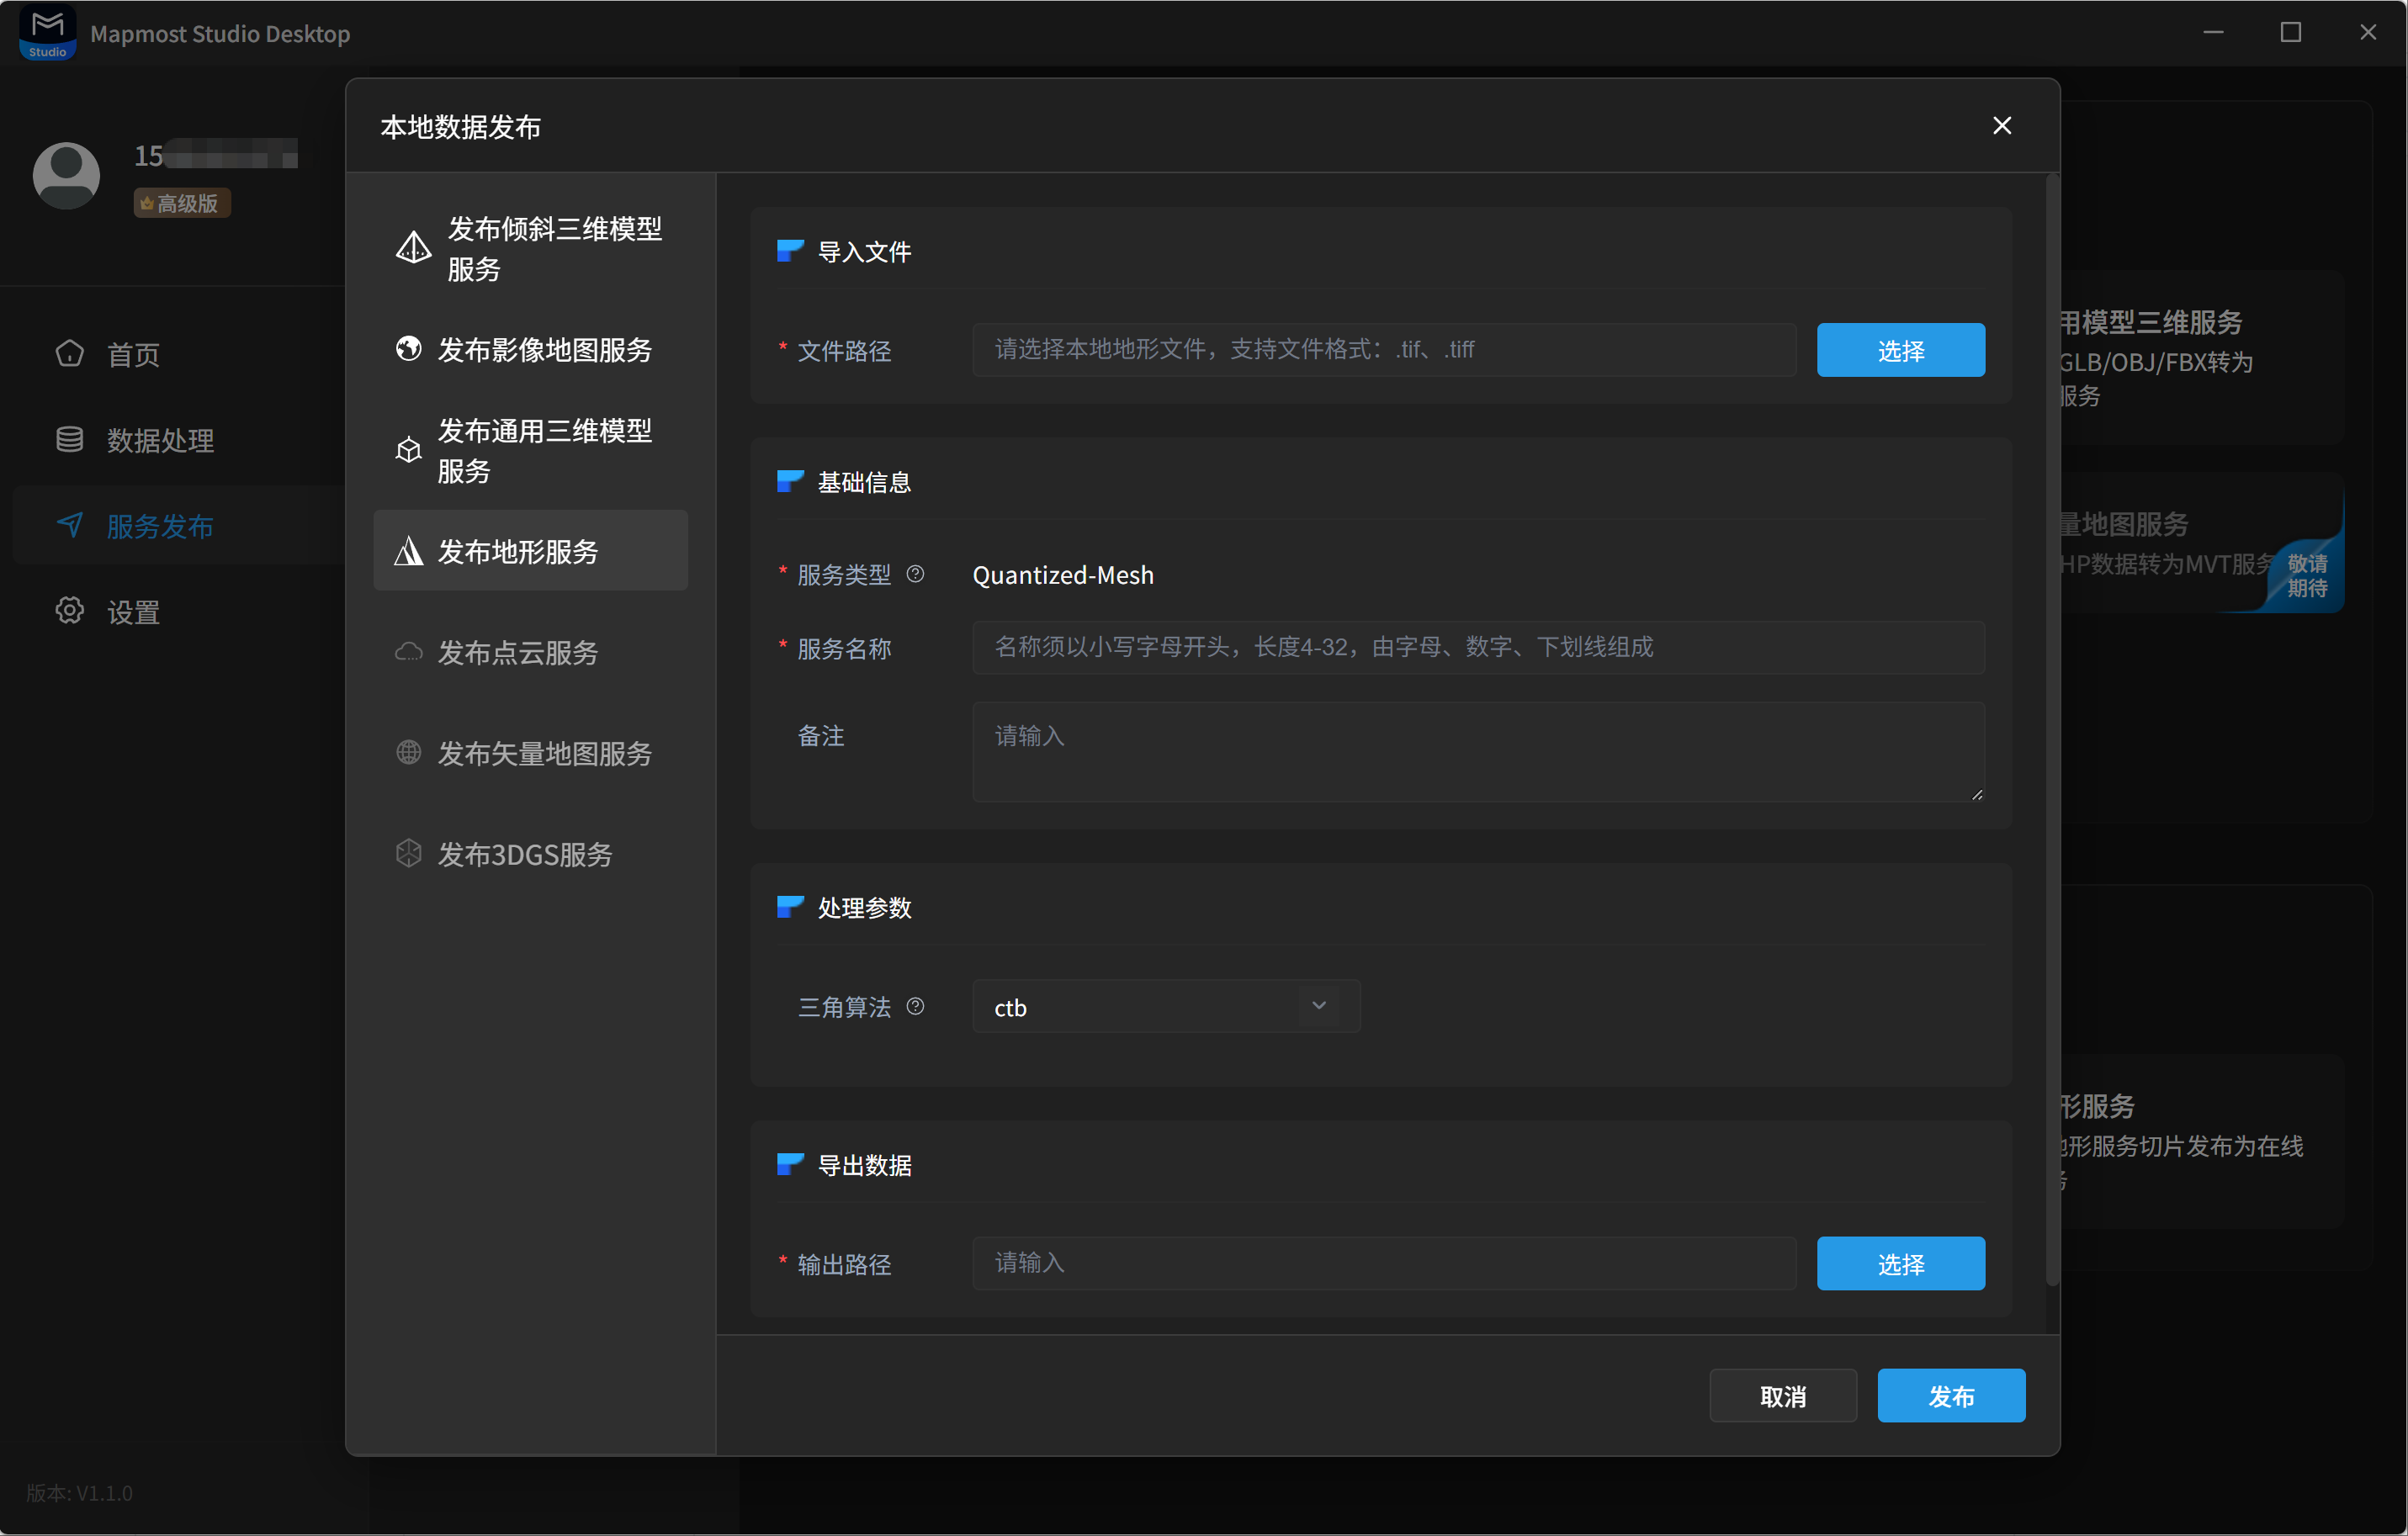
Terrain service publishing parameters:
Basic Information
| Field | Description |
|---|---|
| Import File | Required. Select a local terrain file (.tif). |
| Service Type | Required. The terrain format supported in this version is Quantized-Mesh. |
| Service Name | Required. The name must start with a lowercase letter, contain 4 to 32 characters, and use only letters, numbers, and underscores. |
| Remarks | Optional. Enter notes according to your needs. |
Processing Parameters
| Field | Description |
|---|---|
| Triangulation Algorithm | Optional. Supports ctb and vcg. The default is ctb. vcg is a triangle mesh simplification algorithm based on the classic edge-collapse algorithm. It provides better mesh structure quality and lower error, but processes more slowly. ctb is a grid-based fast triangle mesh simplification algorithm. It is fast, with processing time about 1/60 of vcg, but has higher error. |
Export Data
| Field | Description |
|---|---|
| Output Path | Required. Select a local folder as the output path. Tile data is stored in the selected path for later use. |
Publishing Actions
| Field | Description |
|---|---|
| Cancel | Exit the current publishing workflow. Entered content is not saved. |
| Publish | Save the current content and publish it as the corresponding service. Progress can be viewed in the Publishing list. |
1.1.4 Publish General 3D Model Service
Select local general 3D model data (.obj or .fbx), fill in the parameters, and publish it as a general 3D model tile service. EPSG code search and KTX2 textures are Advanced features. They are available as a free 7-day trial. To renew or purchase them, contact customer service.
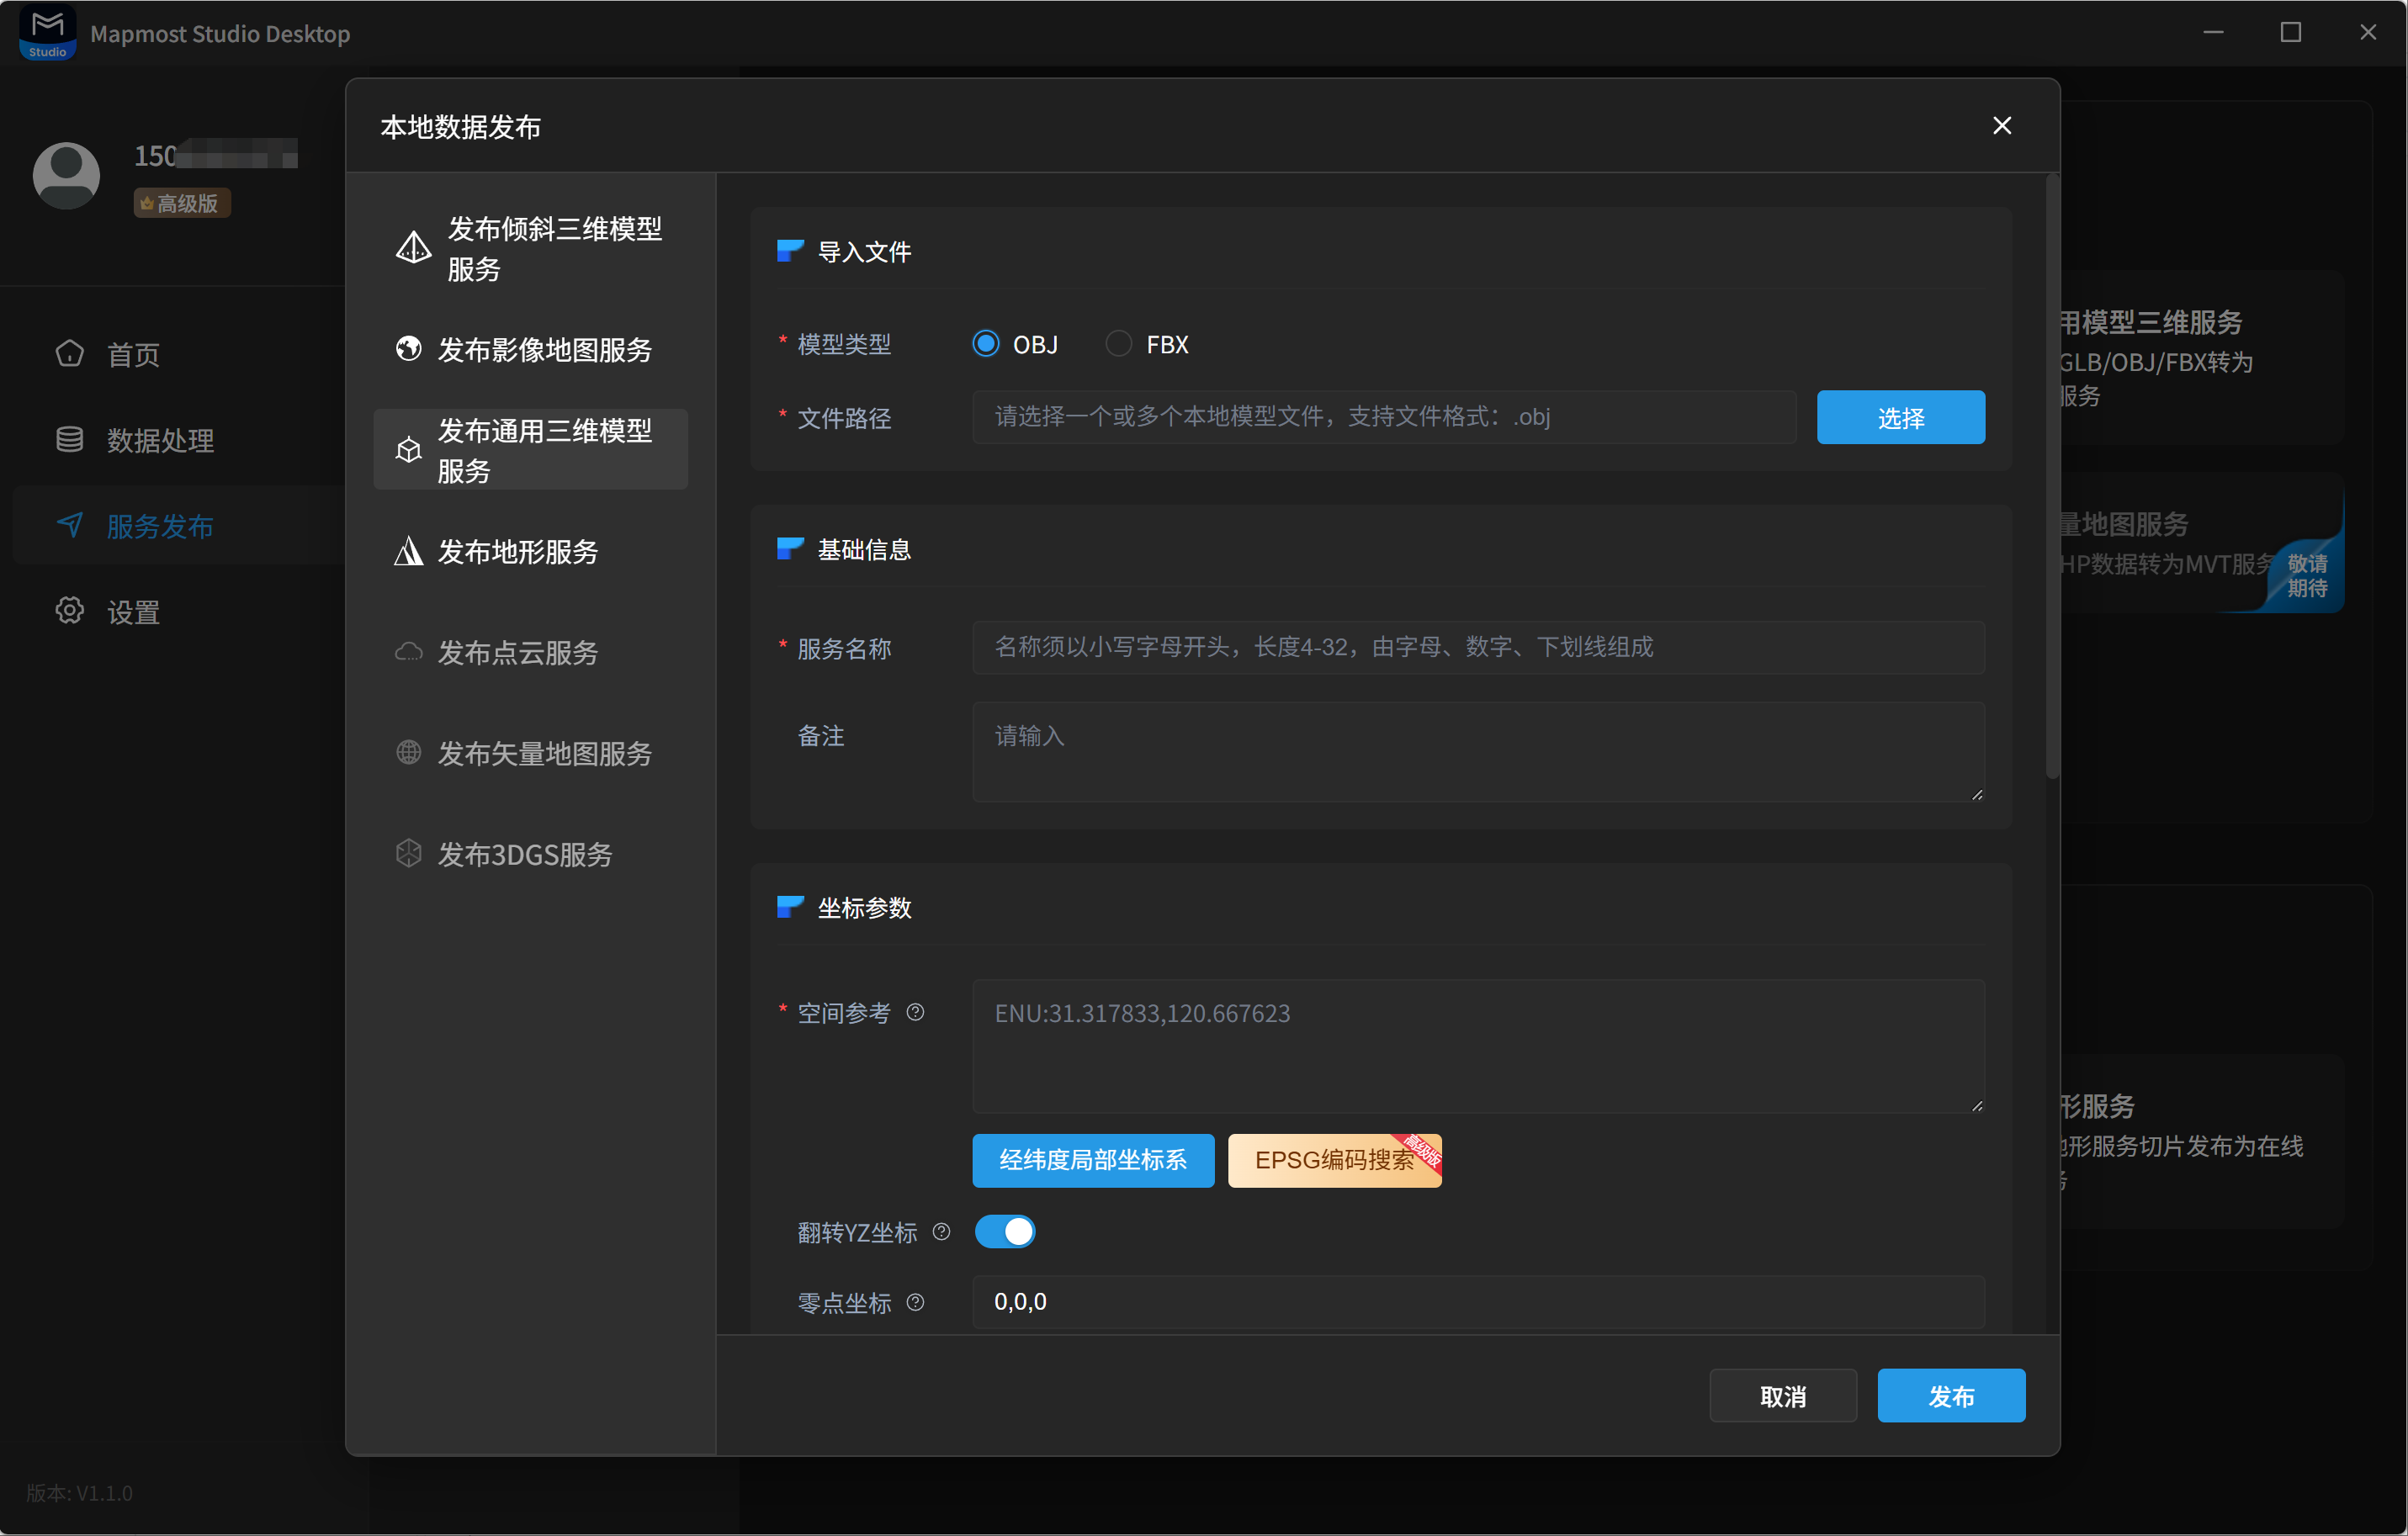
General 3D model service publishing parameters:
Basic Information
| Field | Description |
|---|---|
| Import File | Required. Select local 3D model data (.obj or .fbx). Multiple files can be selected, but they must share the same center coordinates. |
| Service Name | Required. The name must start with a lowercase letter, contain 4 to 32 characters, and use only letters, numbers, and underscores. |
| Remarks | Optional. Enter notes according to your needs. |
Coordinate Parameters
| Field | Description |
|---|---|
| Spatial Reference | Required. The spatial reference acts like the positioning system for geographic data. It defines how data is identified and placed on Earth. It determines the real-world position of the data. Incorrect settings may cause incorrect output positions or processing failure. If the input file contains spatial reference information, the system recognizes it automatically. Otherwise, specify it manually. ENU coordinates, EPSG codes, and PROJ or WKT strings are supported. Click the button at the bottom to select and auto-fill a value. |
| Origin Coordinates | Optional. Specifies the offset of the data origin relative to the spatial reference in the x, y, and z directions, in meters. The default is no offset (0,0,0). Use this when 3D model coordinates are very large in some projected coordinate systems and are difficult to operate on. In this case, the model uses an offset position, so in the spatial reference: modeling coordinates + origin coordinates = projected coordinates. |
| Output Coordinate System | Optional. Supports the Mapmost default coordinate system and EPSG:4978 as service output coordinate systems. Services published with the Mapmost default coordinate system load faster in Mapmost SDK for WebGL. |
| Flip YZ Coordinates | Optional. If the model uses the Y axis as up, enable this option to make the Z axis up, and vice versa. This option resolves up-axis mismatches when loading the service in a 3D engine. |
Processing Parameters
| Field | Description |
|---|---|
| Processor | Optional. Supports the small-scene processor and octree processor. The small-scene processor does not simplify or scale input data and uses the original precision, while merging, compressing, and splitting data to improve loading efficiency without reducing visual quality. It is recommended for most cases. Use the octree processor to create LOD only when the processed data cannot be loaded successfully. Creating LOD has higher algorithmic requirements and takes much longer. |
| Maximum Tile Size | Optional. Supported by the small-scene processor. Controls the maximum tile size in MB, with range [1, 256]. The default is 20 MB; when some b3dm files exceed 20 MB during processing, the system attempts to split them. |
| Instance Optimization Count | Optional. Supported by the small-scene processor. If a geometry is reused more than this value, it is rendered as i3dm; otherwise it is rendered as b3dm. The higher the model reuse rate, the greater the benefit of i3dm optimization. Adjust this value according to the data to balance rendering batches and data size. The default is 50. |
| Minimum Level | Optional. Supported by the octree processor. Default: auto, where the model data is identified automatically. You can also specify a value. Level 16 is generally recommended, corresponding to about 0.59 m precision. |
| Level Range | Optional. Supported by the octree processor. Determines the maximum level. Formula: maximum level = minimum level + level range. Supported range is [0, 8]. |
| LOD Strategy | Optional. Supported by the octree processor. Rebuild Simplification: splits data by octree block boundaries and attempts simplification within each block. It is simple and adaptable, but slow, and may produce incorrect surface normals in some cases. Size Filtering: calculates the pixel size of each object based on object size and current octree level. Objects larger than the minimum pixel parameter are stored in the current octree node. In this strategy, objects are not actually simplified; loading priority differs by object size. It is suitable for complex BIM models with many components. |
| Mesh Simplification | Optional. Supported by the octree processor and valid when the LOD strategy is Rebuild Simplification. When disabled, geometry is not rebuilt, but textures are rebuilt. When enabled, vertex count can be reduced. Enable it when the scene contains dense and complex geometry. |
| Transparency Mode | Optional. Supported by the small-scene processor. You can force the transparent texture mode to MASK or BLEND.Auto: when the model uses mixed materials (semi-transparent and opaque), the system detects the alpha channel. If alpha values are only 0 or 255, it uses MASK for assets such as leaves and grilles. If alpha values are between 0 and 255, it uses BLEND for assets such as glass.MASK: use this when incorrect material alpha settings make opaque objects such as leaves or grilles render as semi-transparent. This forces a fully transparent or fully opaque effect. BLEND: recommended when all models use semi-transparent materials such as glass or water. It directly resolves rendering for transparent covers, acrylic, glass corridors, film-like materials, and similar semi-transparent assets. |
Texture Parameters
| Field | Description |
|---|---|
| Texture Merge | Optional. Supported by the small-scene processor. Merges and optimizes textures that use repeated texture mapping. |
| Texture Format | Optional. Supports default, basis, webp, and ktx2. Default: use jpg for opaque textures or png for transparent textures. basis: faster compression and supports PC, Android, and iPhone. webp: about 70% of the default jpg size and speeds up network transfer, but does not reduce video memory usage. ktx2: about 90% of the default jpg size and reduces video memory usage by about 5/6, but increases publishing time. |
| Color to Texture | Optional. Disabled by default. Suitable for BIM components with almost no internal textures, where most components use different colors. Enable this option to reduce rendering batches. |
Export Data
| Field | Description |
|---|---|
| Output Path | Required. Select a local folder as the output path. Tile data is stored in the selected path for later use. |
Publishing Actions
| Field | Description |
|---|---|
| Cancel | Exit the current publishing workflow. Entered content is not saved. |
| Publish | Save the current content and publish it as the corresponding service. Progress can be viewed in the Publishing list. |
1.1.5 Other Data Service Publishing
Vector data, laser point cloud data, and 3DGS model service publishing are coming soon. These features are already available in the offline deployment edition of Mapmost Studio. To use them, contact customer service.

1.2 Local Tile Proxy
1.2.1 Proxy Imagery Service
Proxy local imagery tile data as an online map service. Enter a service name, select the folder that contains the imagery tiles, set the service type, and click Publish to quickly generate an online imagery service.
For service type parameters, see the service type description in Publish Imagery Service.
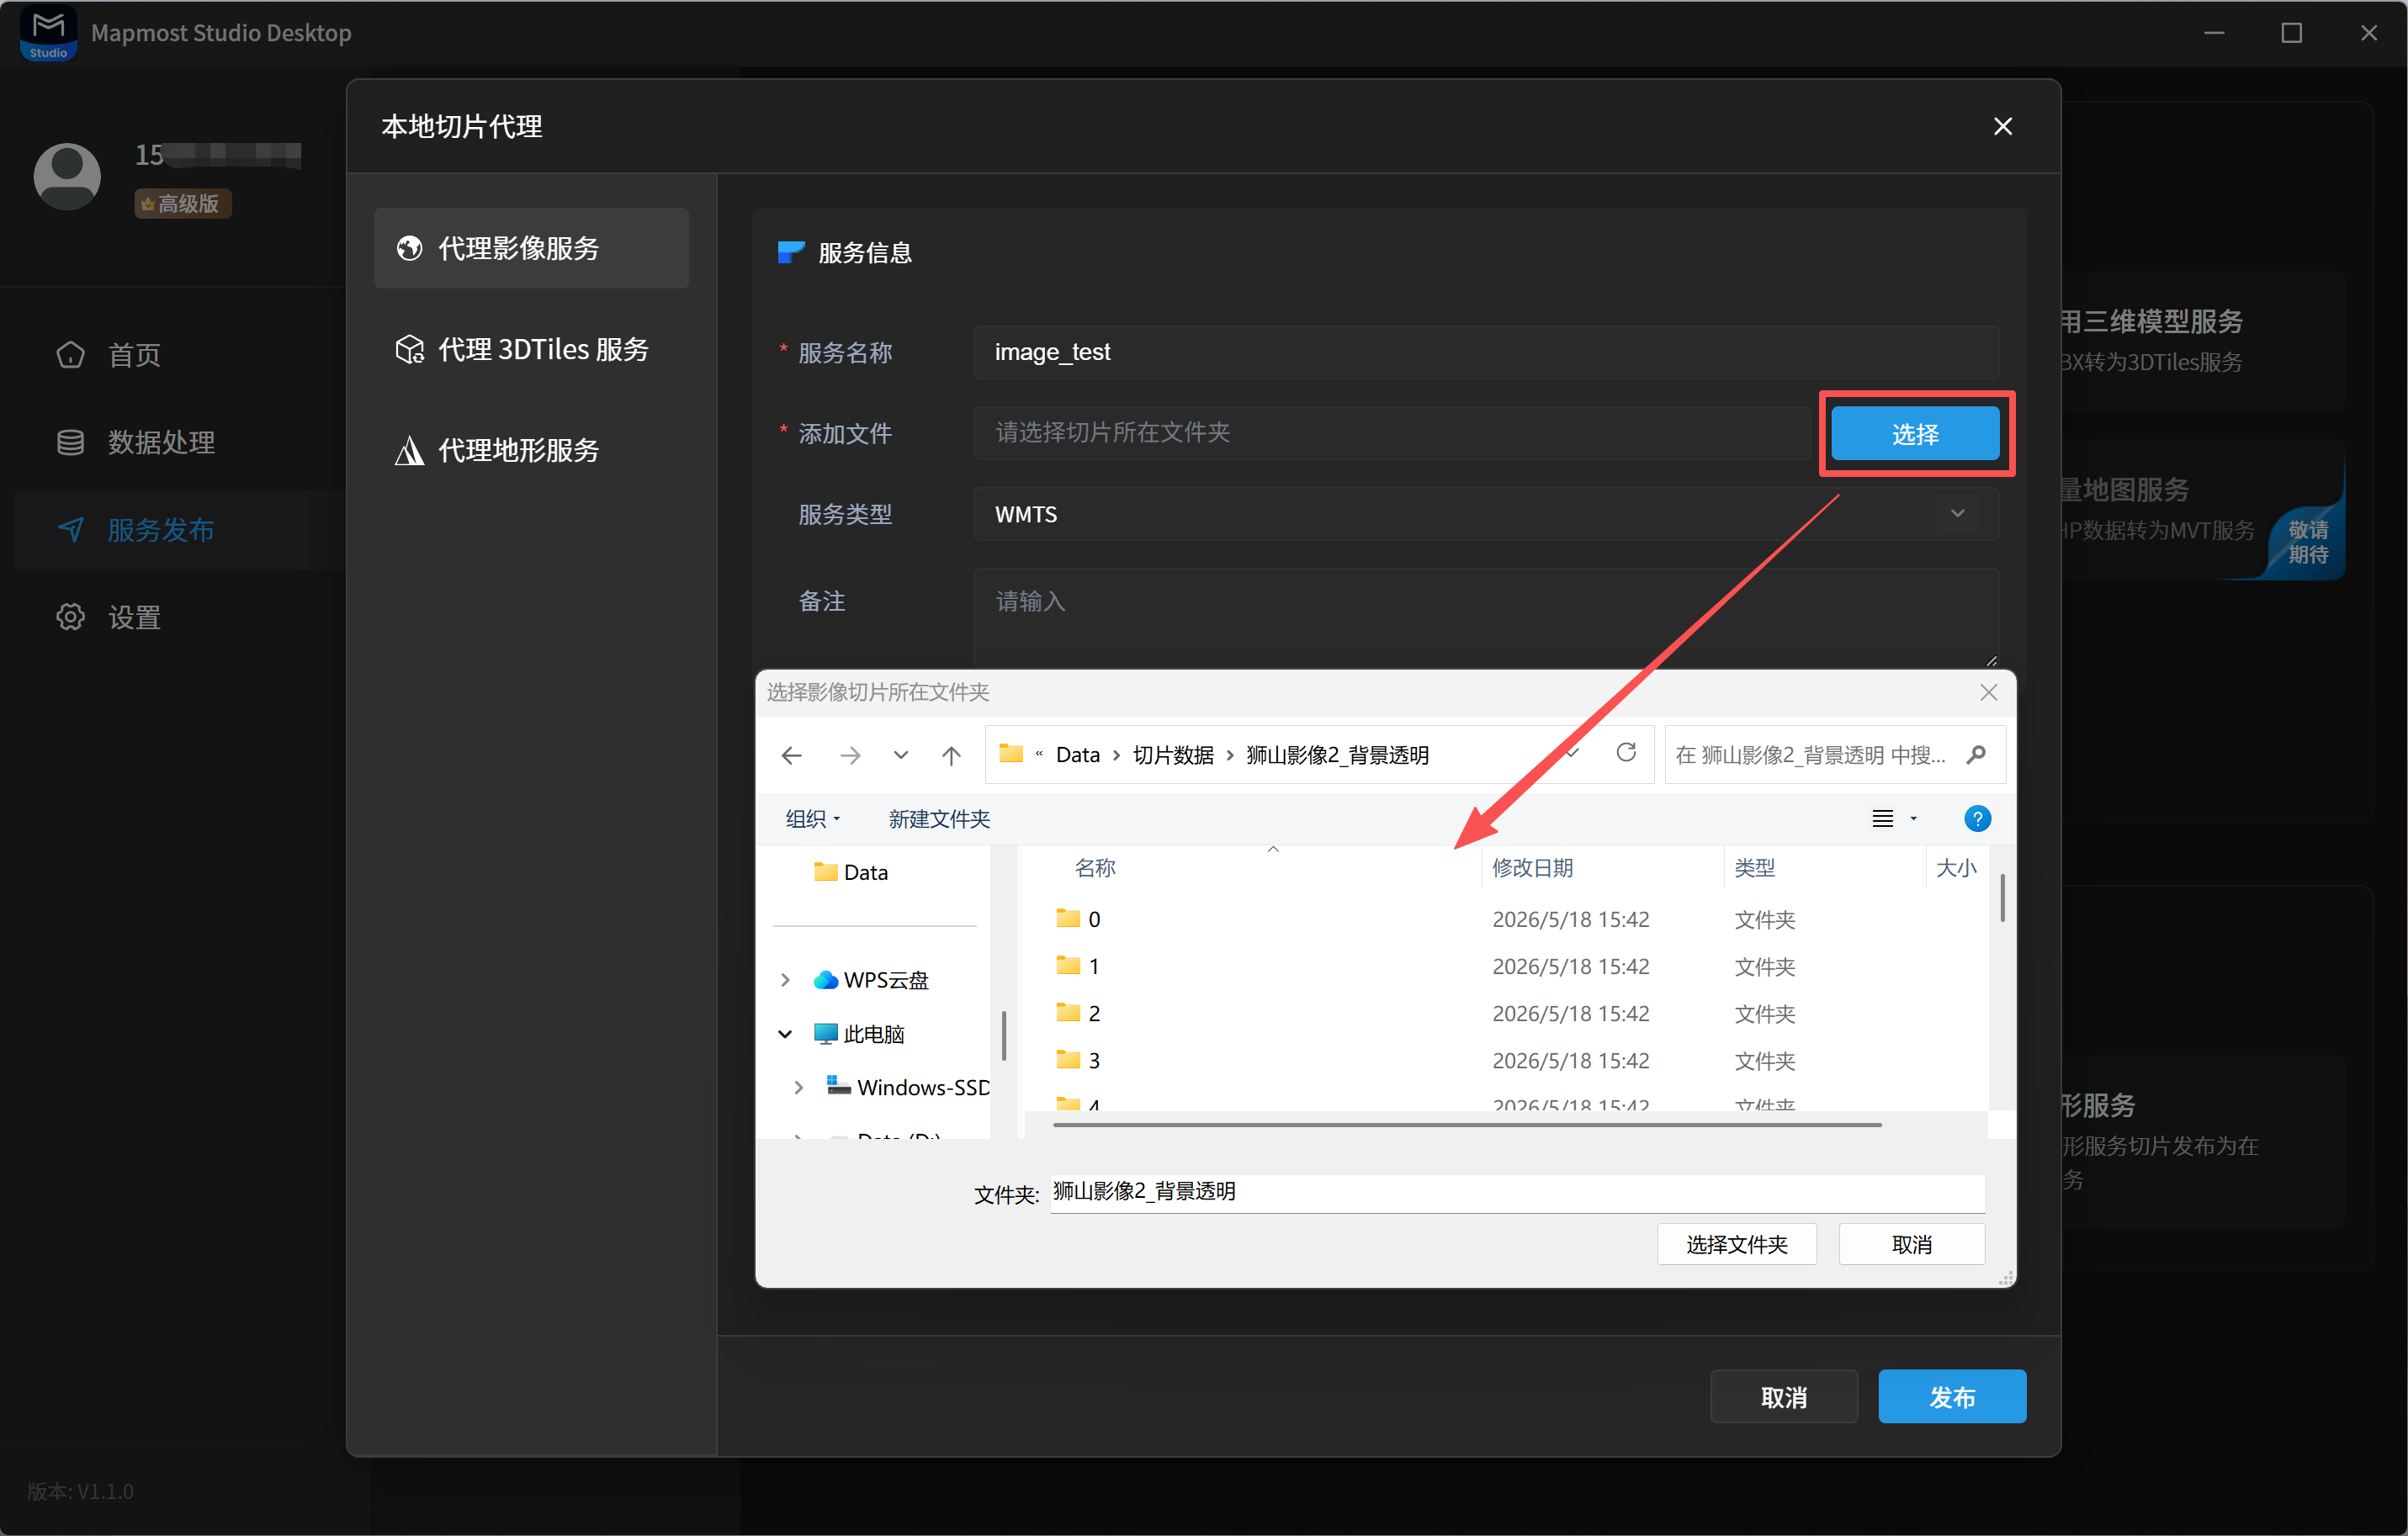
1.2.2 Proxy 3D Tiles Service
Proxy local 3D Tiles data as an online map service. Enter a service name, select the tileset.json file, set the service type, and click Publish to quickly generate an online 3D Tiles service.
Note: if the original tiles are 3D Tiles v1.0, select 3D Tiles v1.0 as the service type. If the original tiles are 3D Tiles v1.1, select 3D Tiles v1.1. Otherwise, proxy publishing may fail.
1.2.3 Proxy Terrain Service
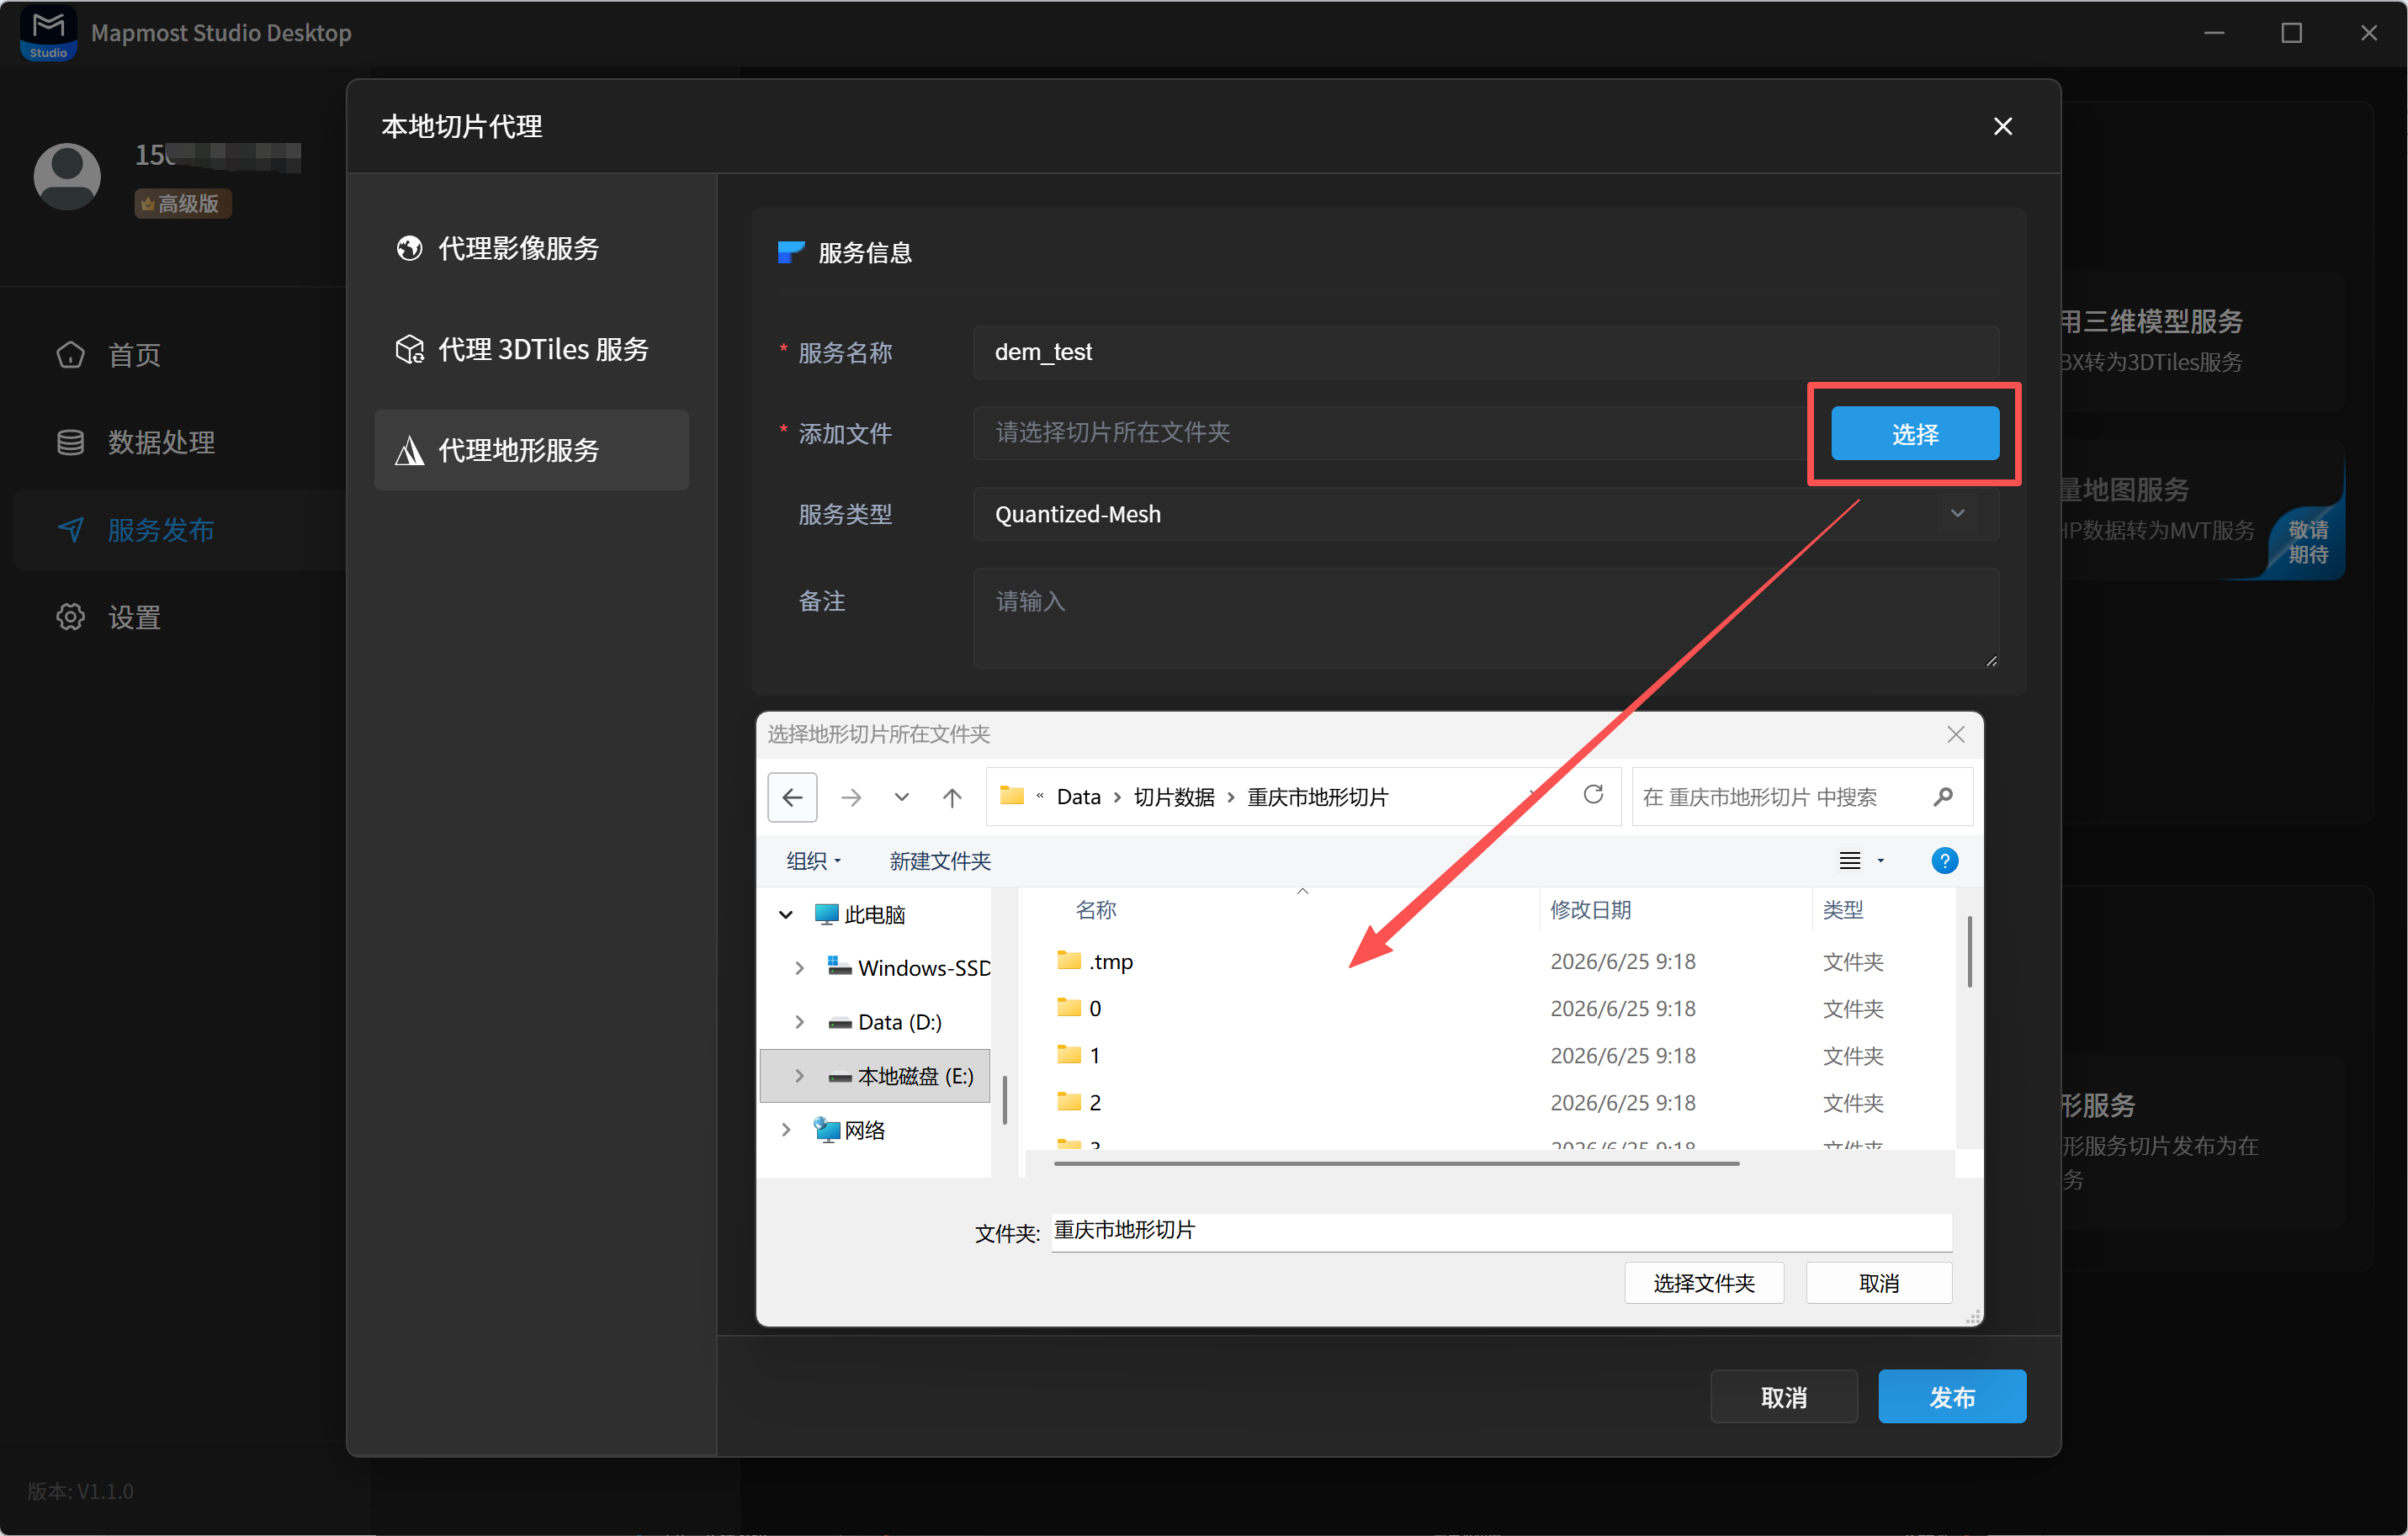
Proxy local terrain tile data as an online map service. Enter a service name, select the folder that contains the terrain tiles, set the service type, and click Publish to quickly generate an online terrain service.
Note: if the original tiles are Quantized-Mesh, select Quantized-Mesh as the service type. If the original tiles are Terrain-RGB, select Terrain-RGB. Otherwise, proxy publishing may fail.
2. Publishing
2.1 View Service Details
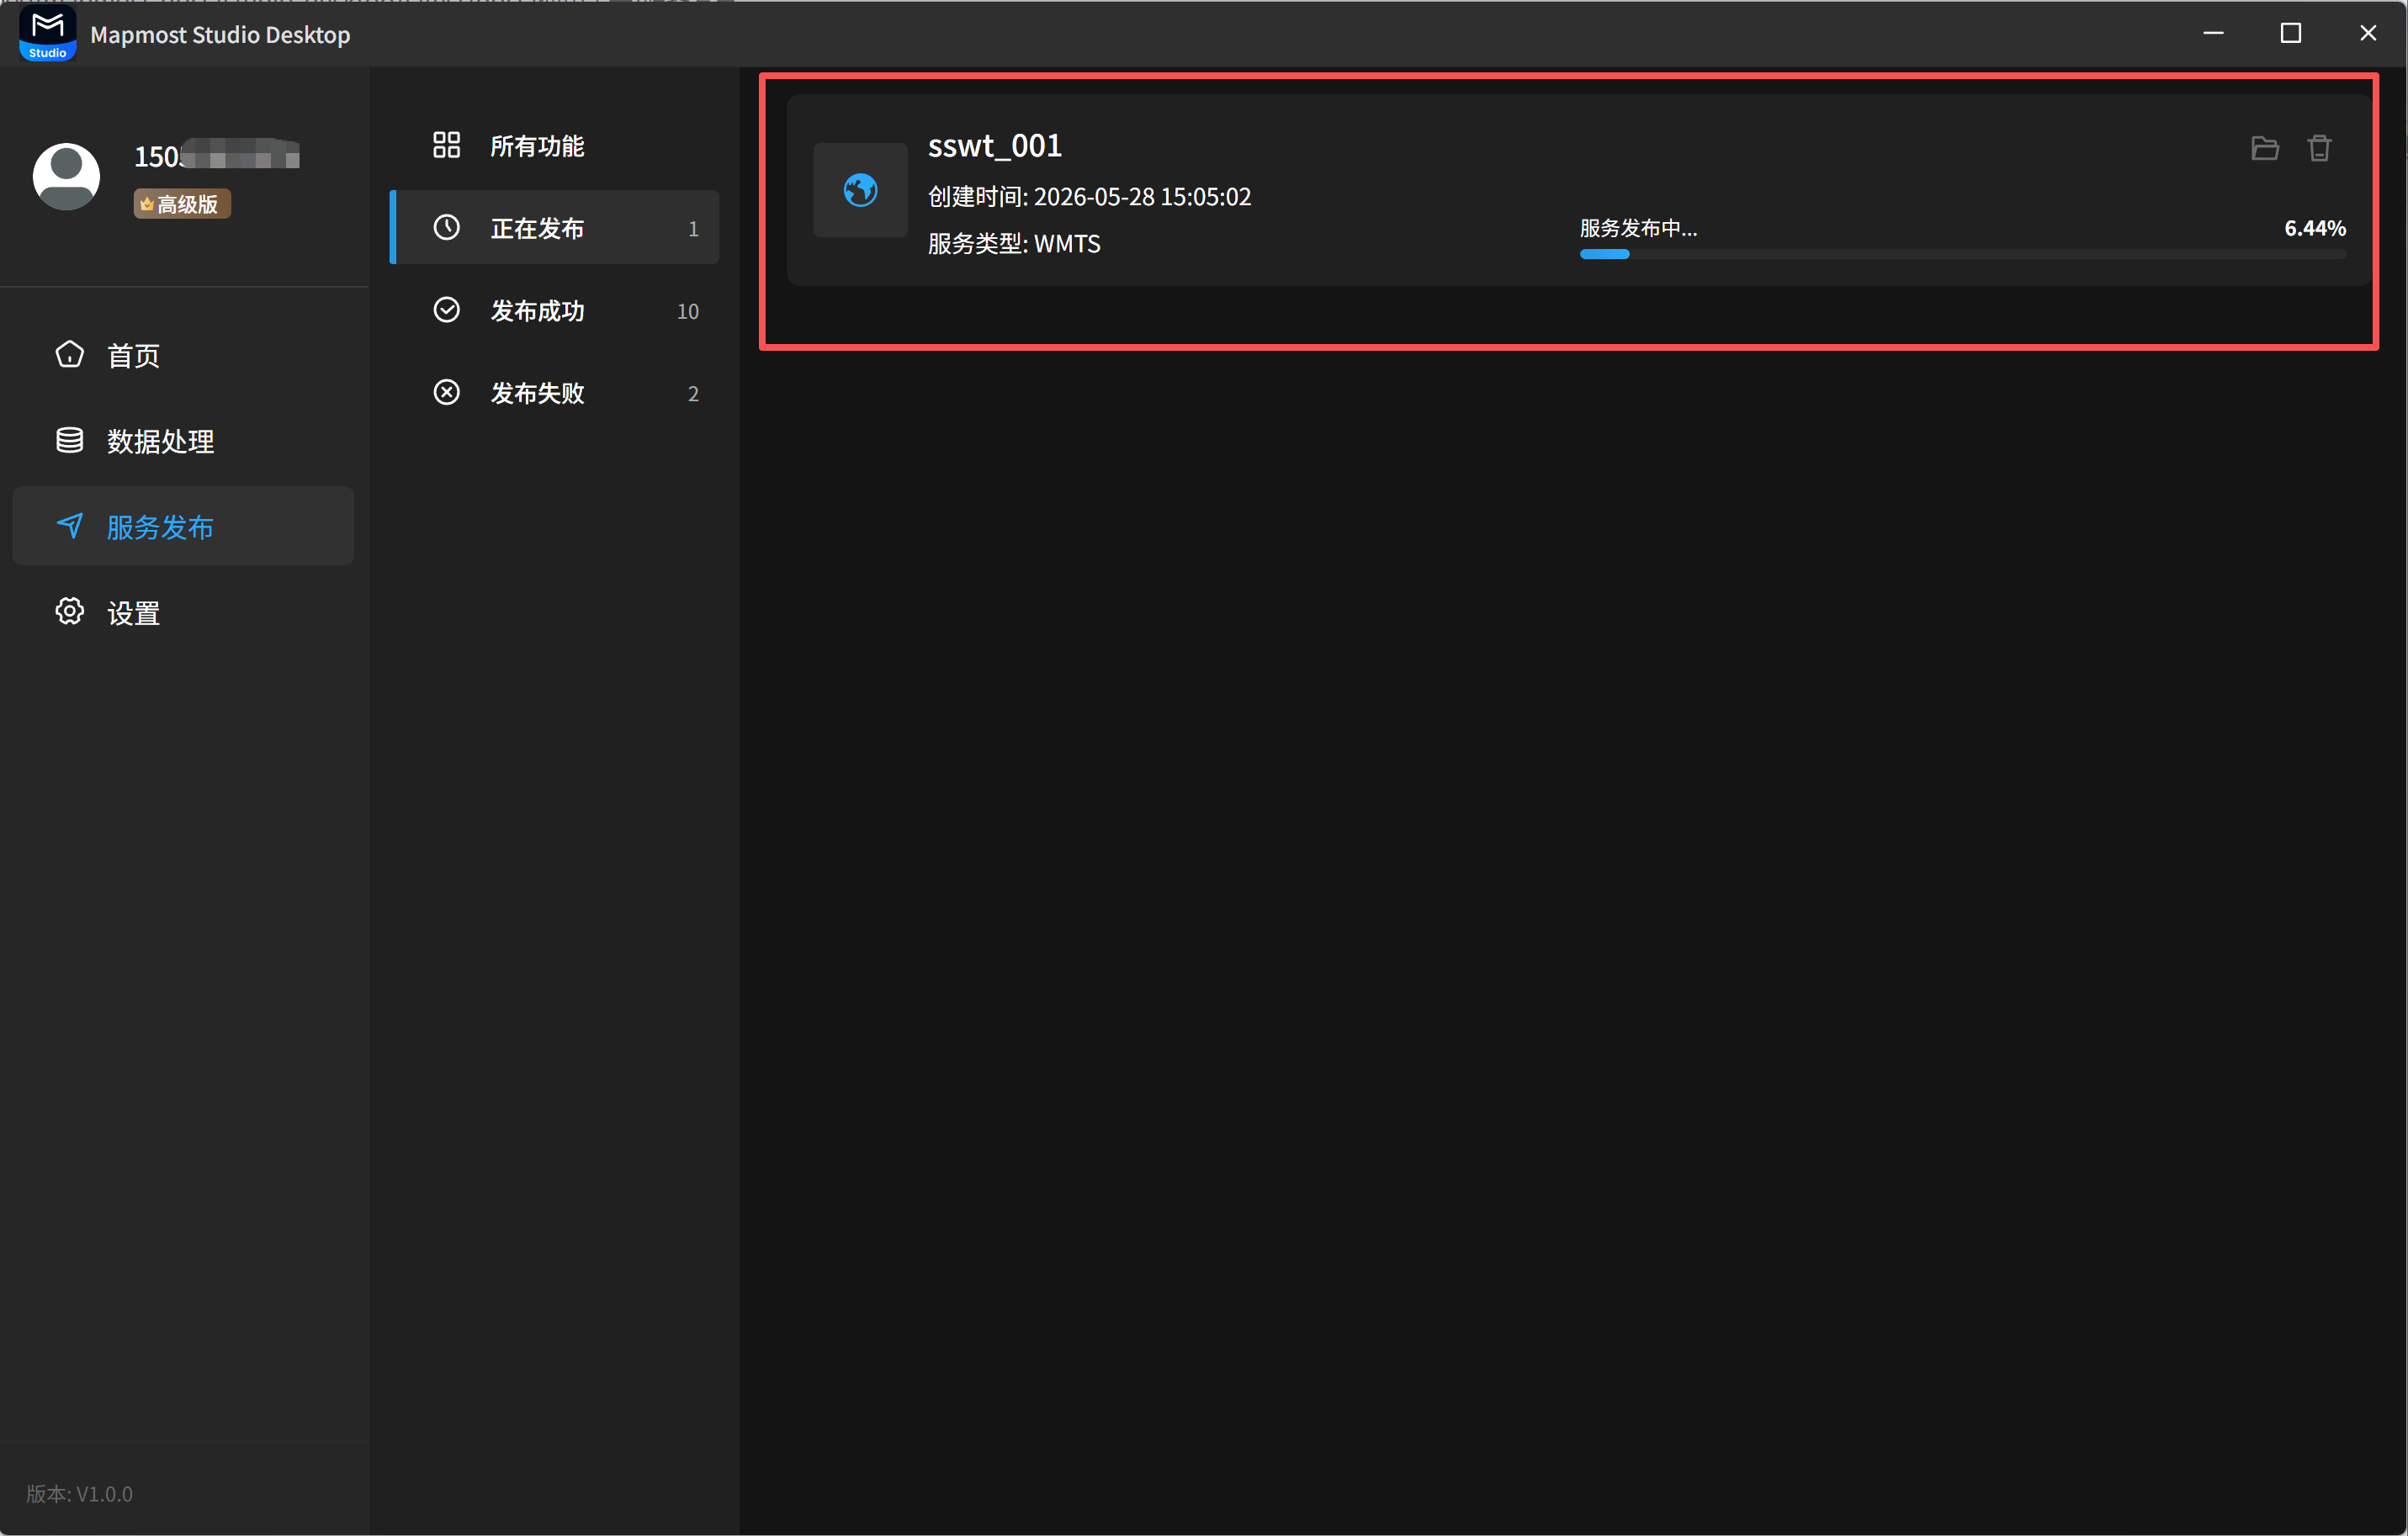
The Publishing list displays services currently being published. You can view the service name, task start time, service type, task progress, and related information.
2.2 View Service Results
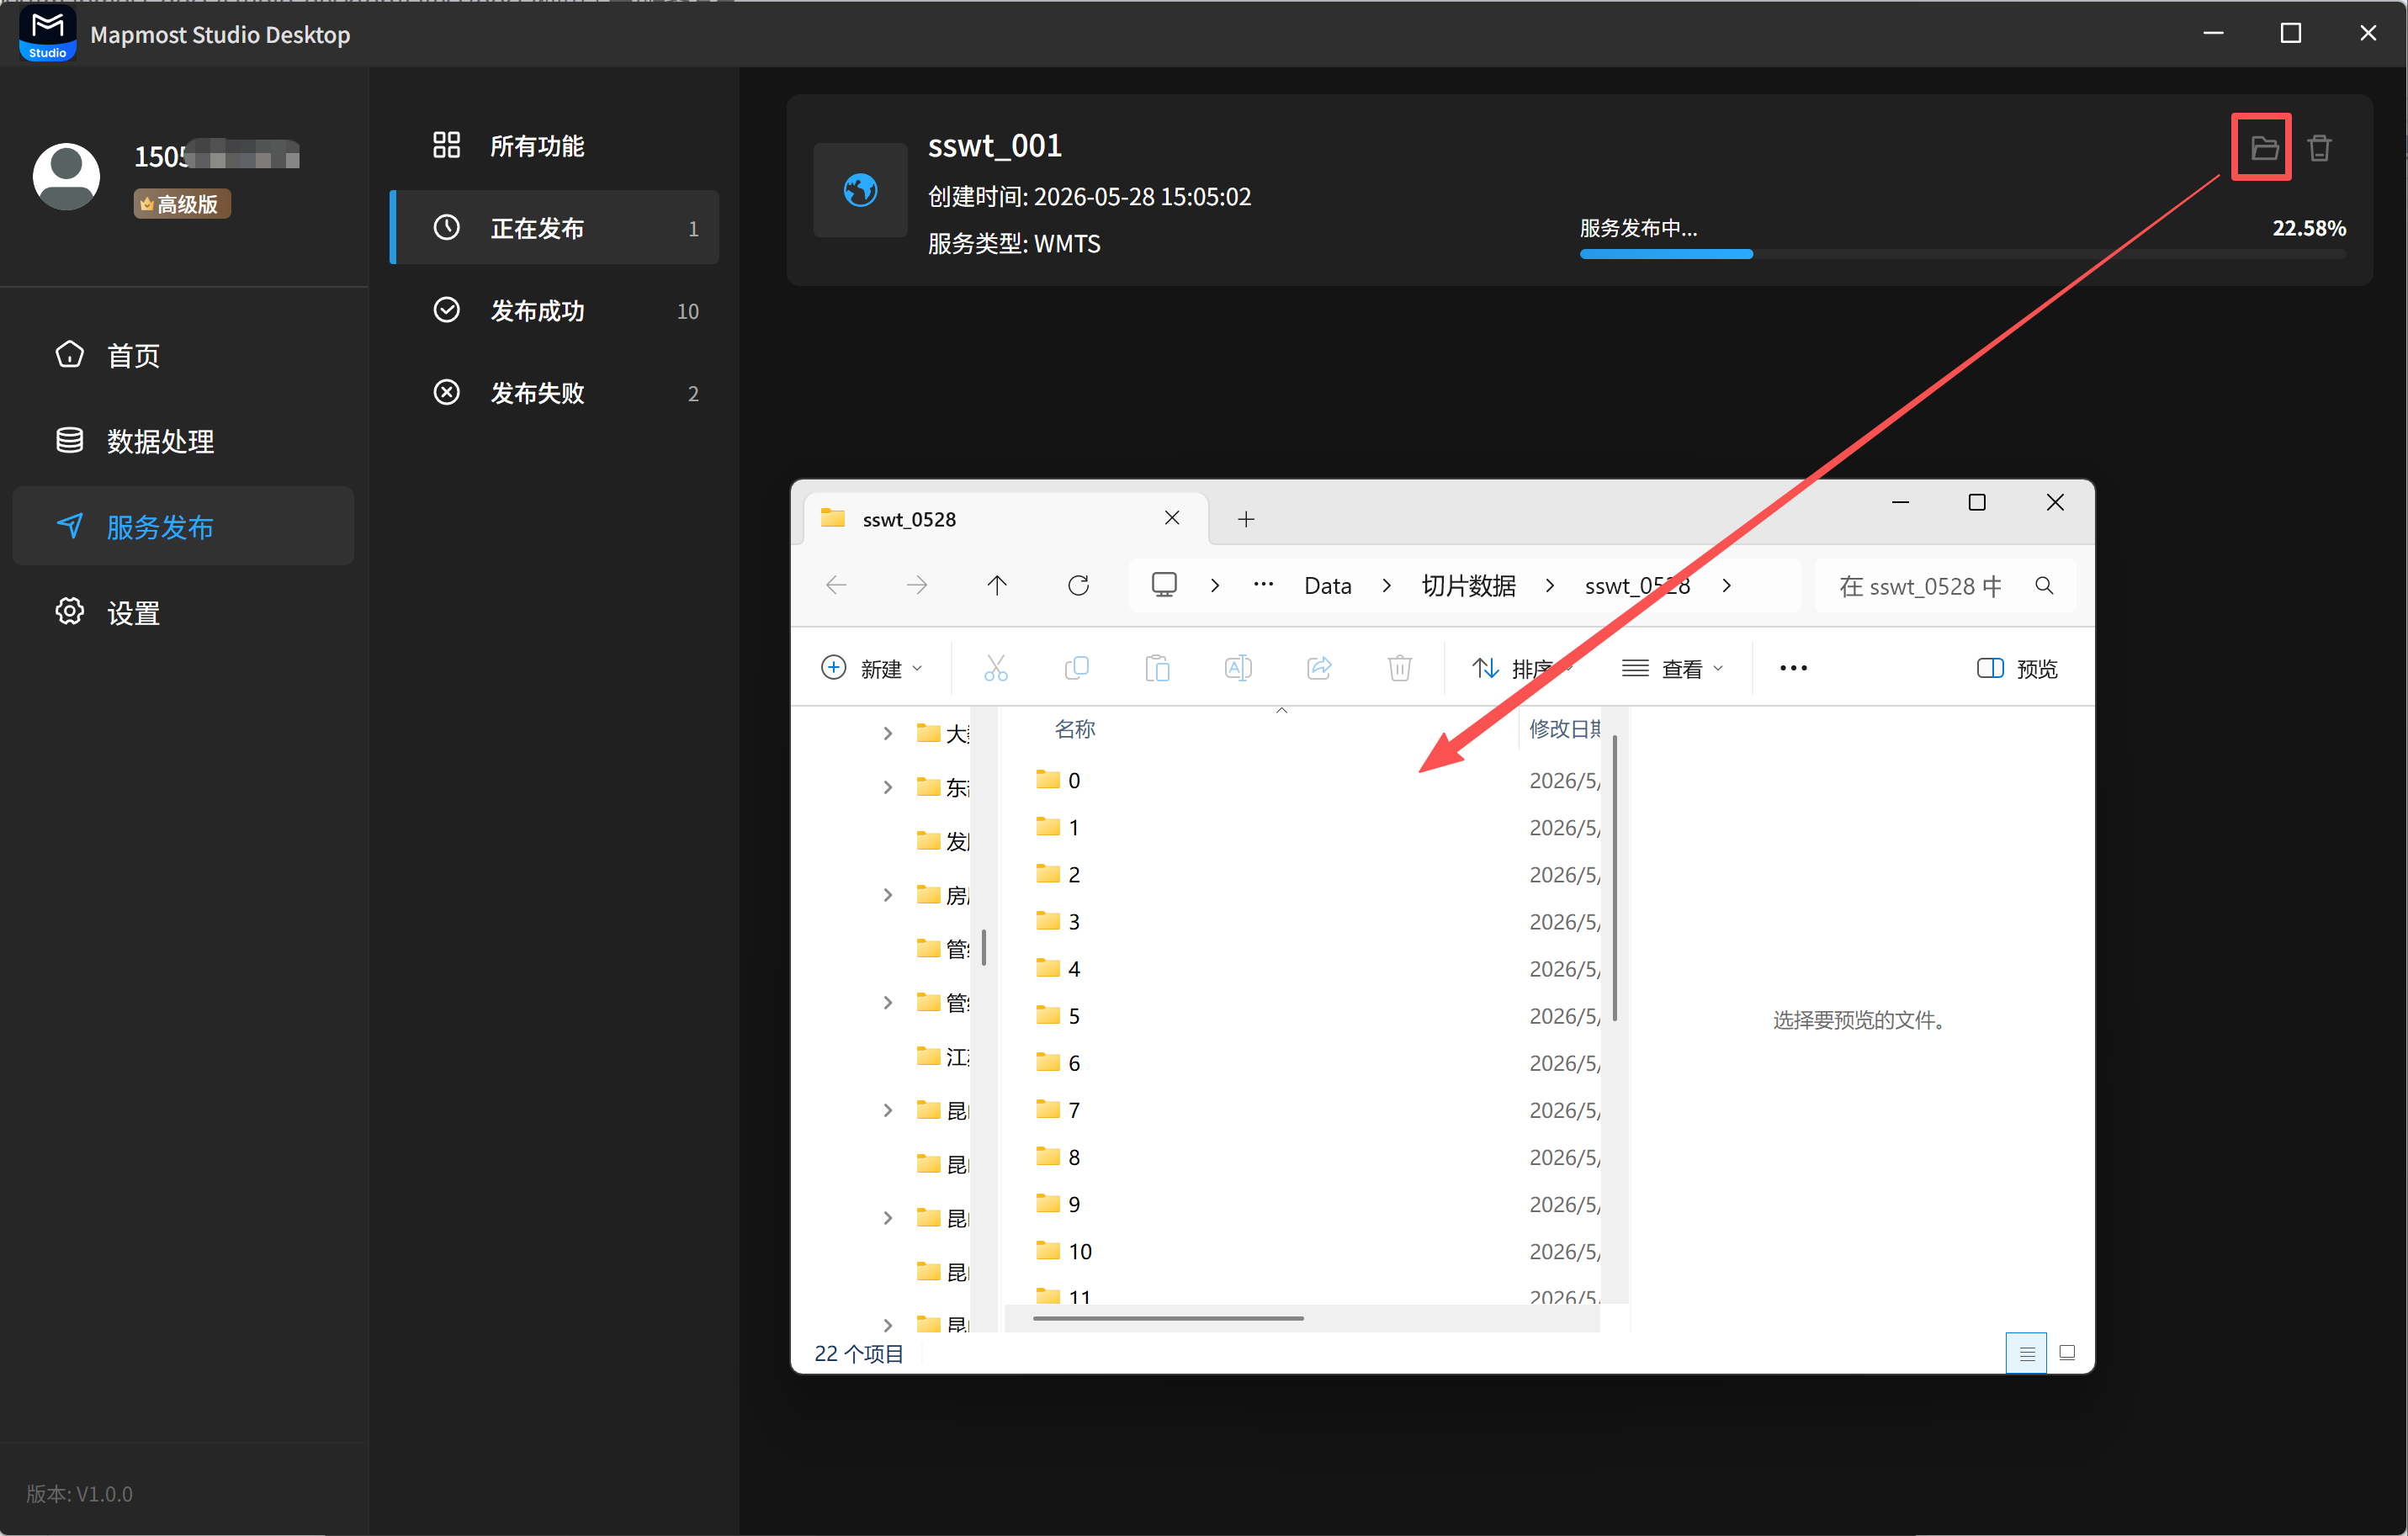
Click the folder button in the upper-right corner of a task card to view result files.
2.3 Delete a Service
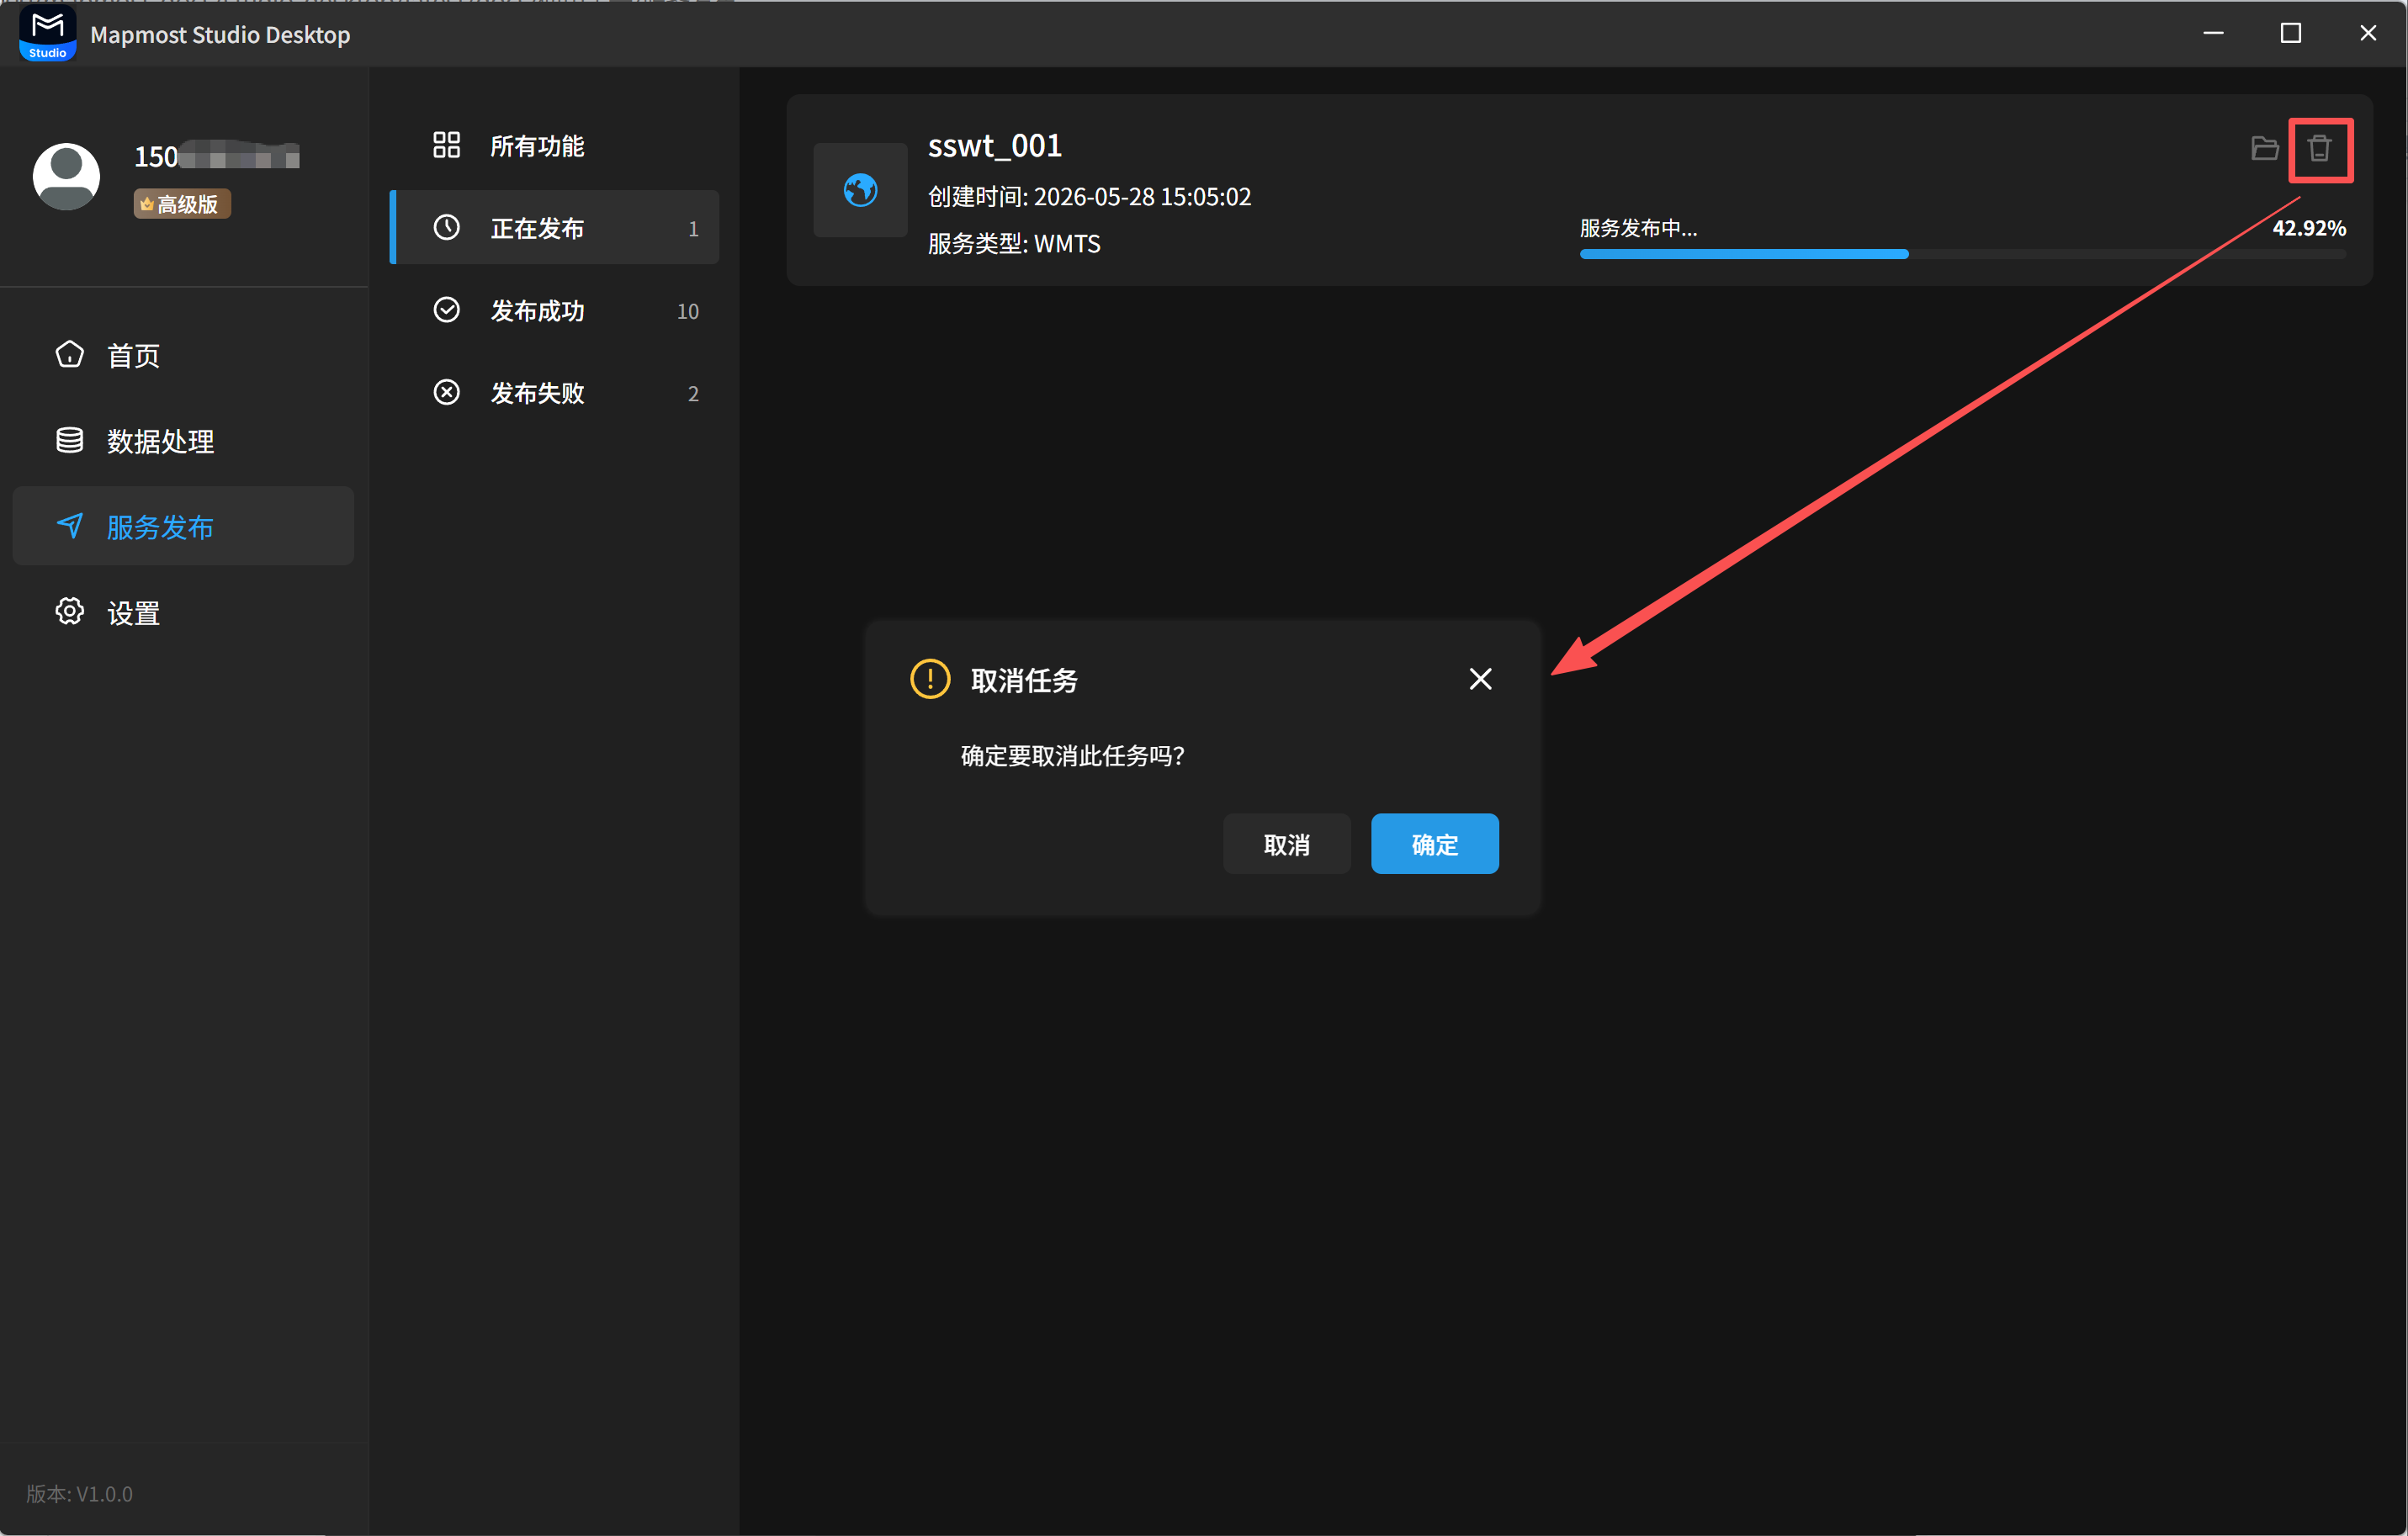
Click the delete button in the upper-right corner of a task card to delete a task that is being processed.
3. Published
3.1 View Service Details
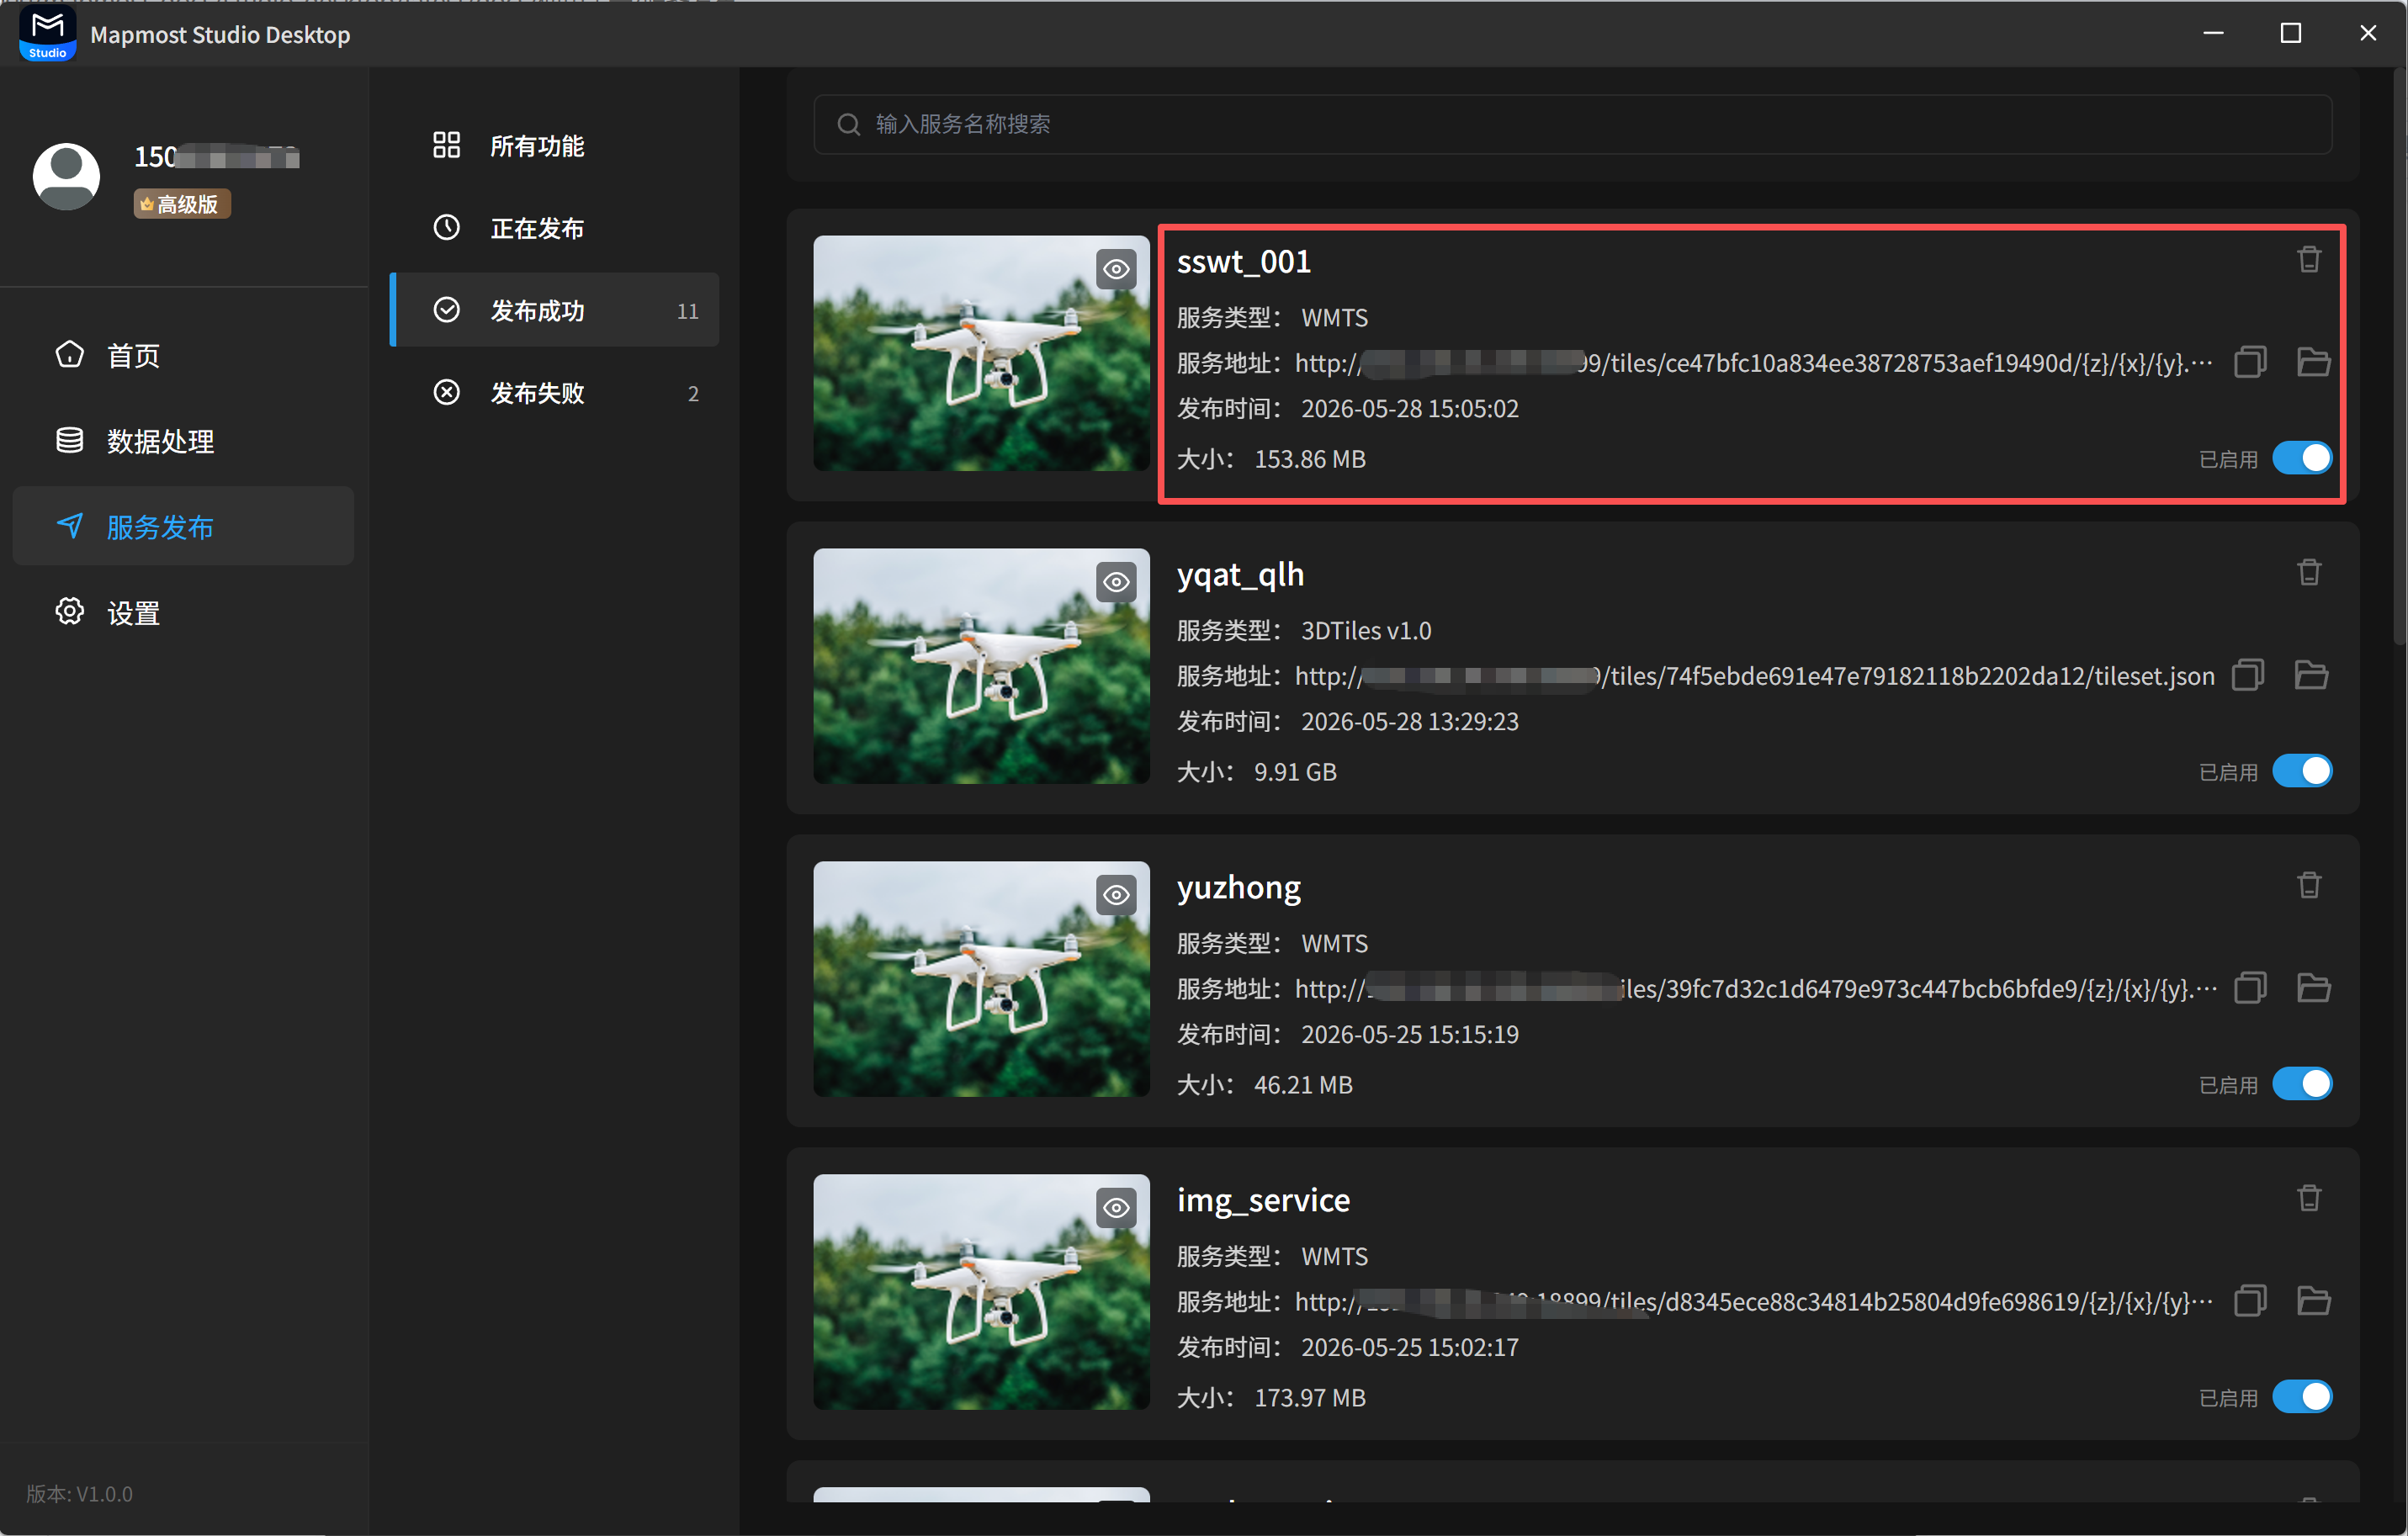
The Published list displays successfully published services. You can view the service name, service type, service URL, publishing time, service data size, and related information.
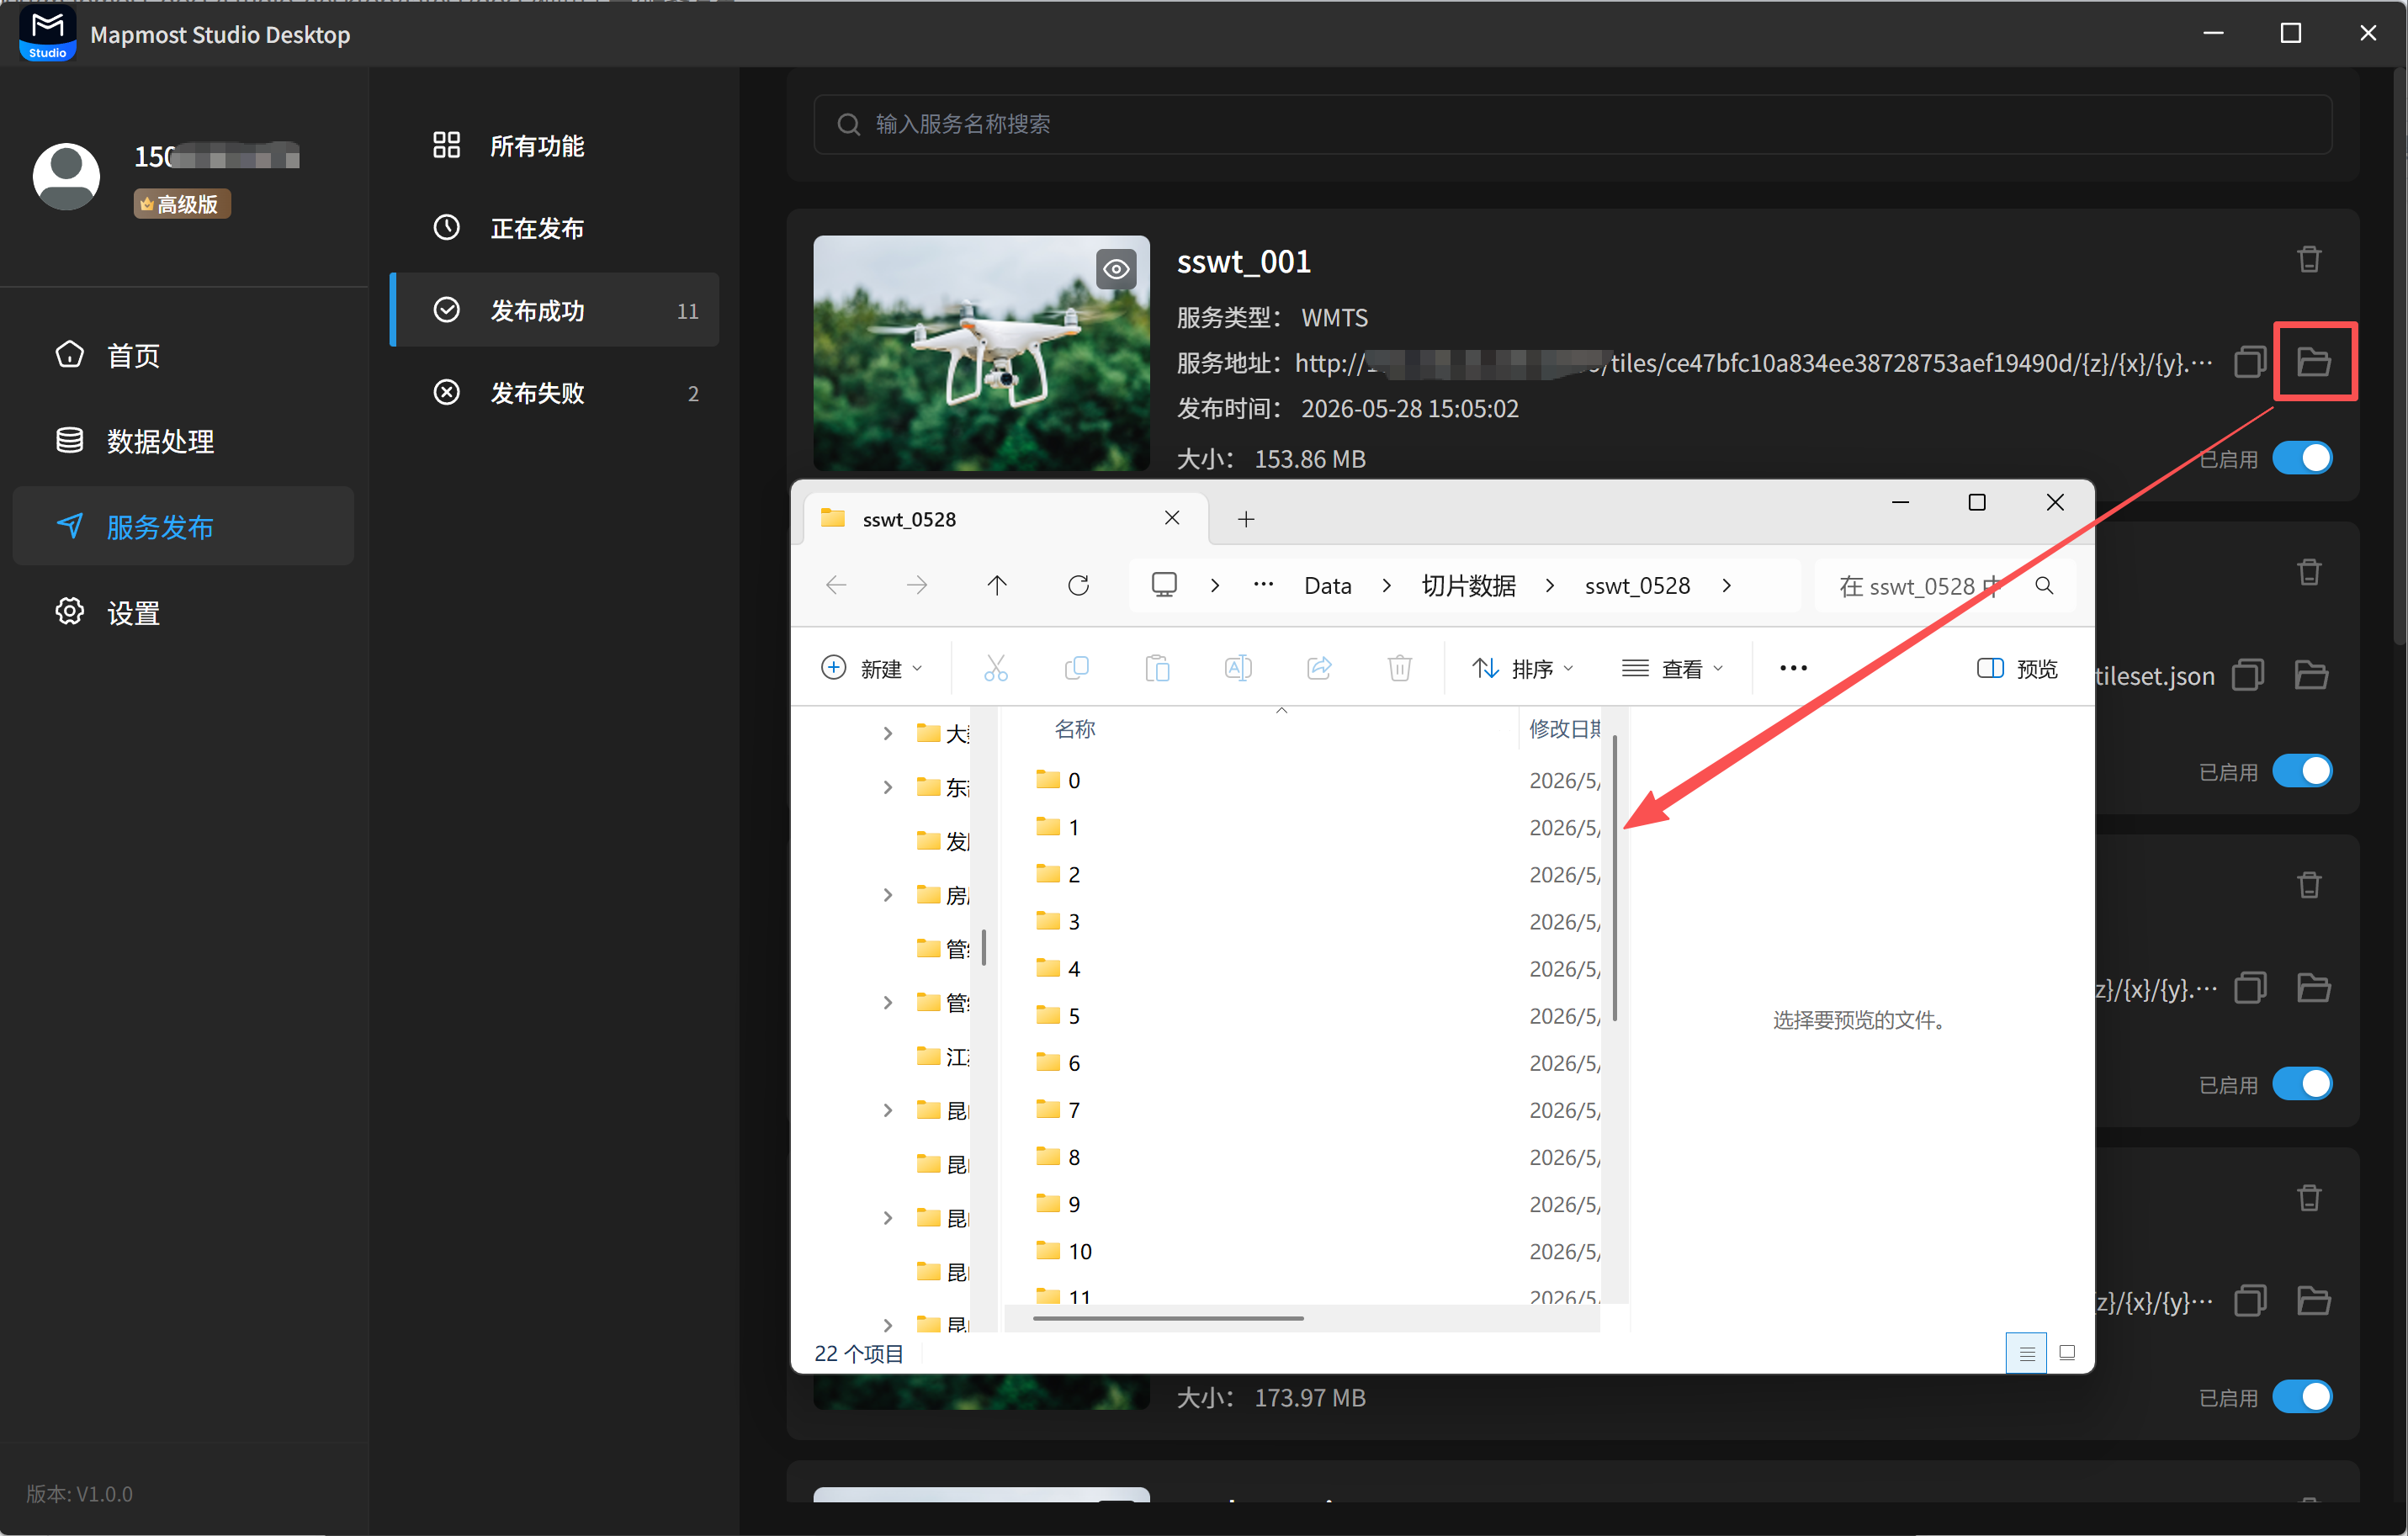
3.2 View Service Results
Click the folder button in a service card to view result files.
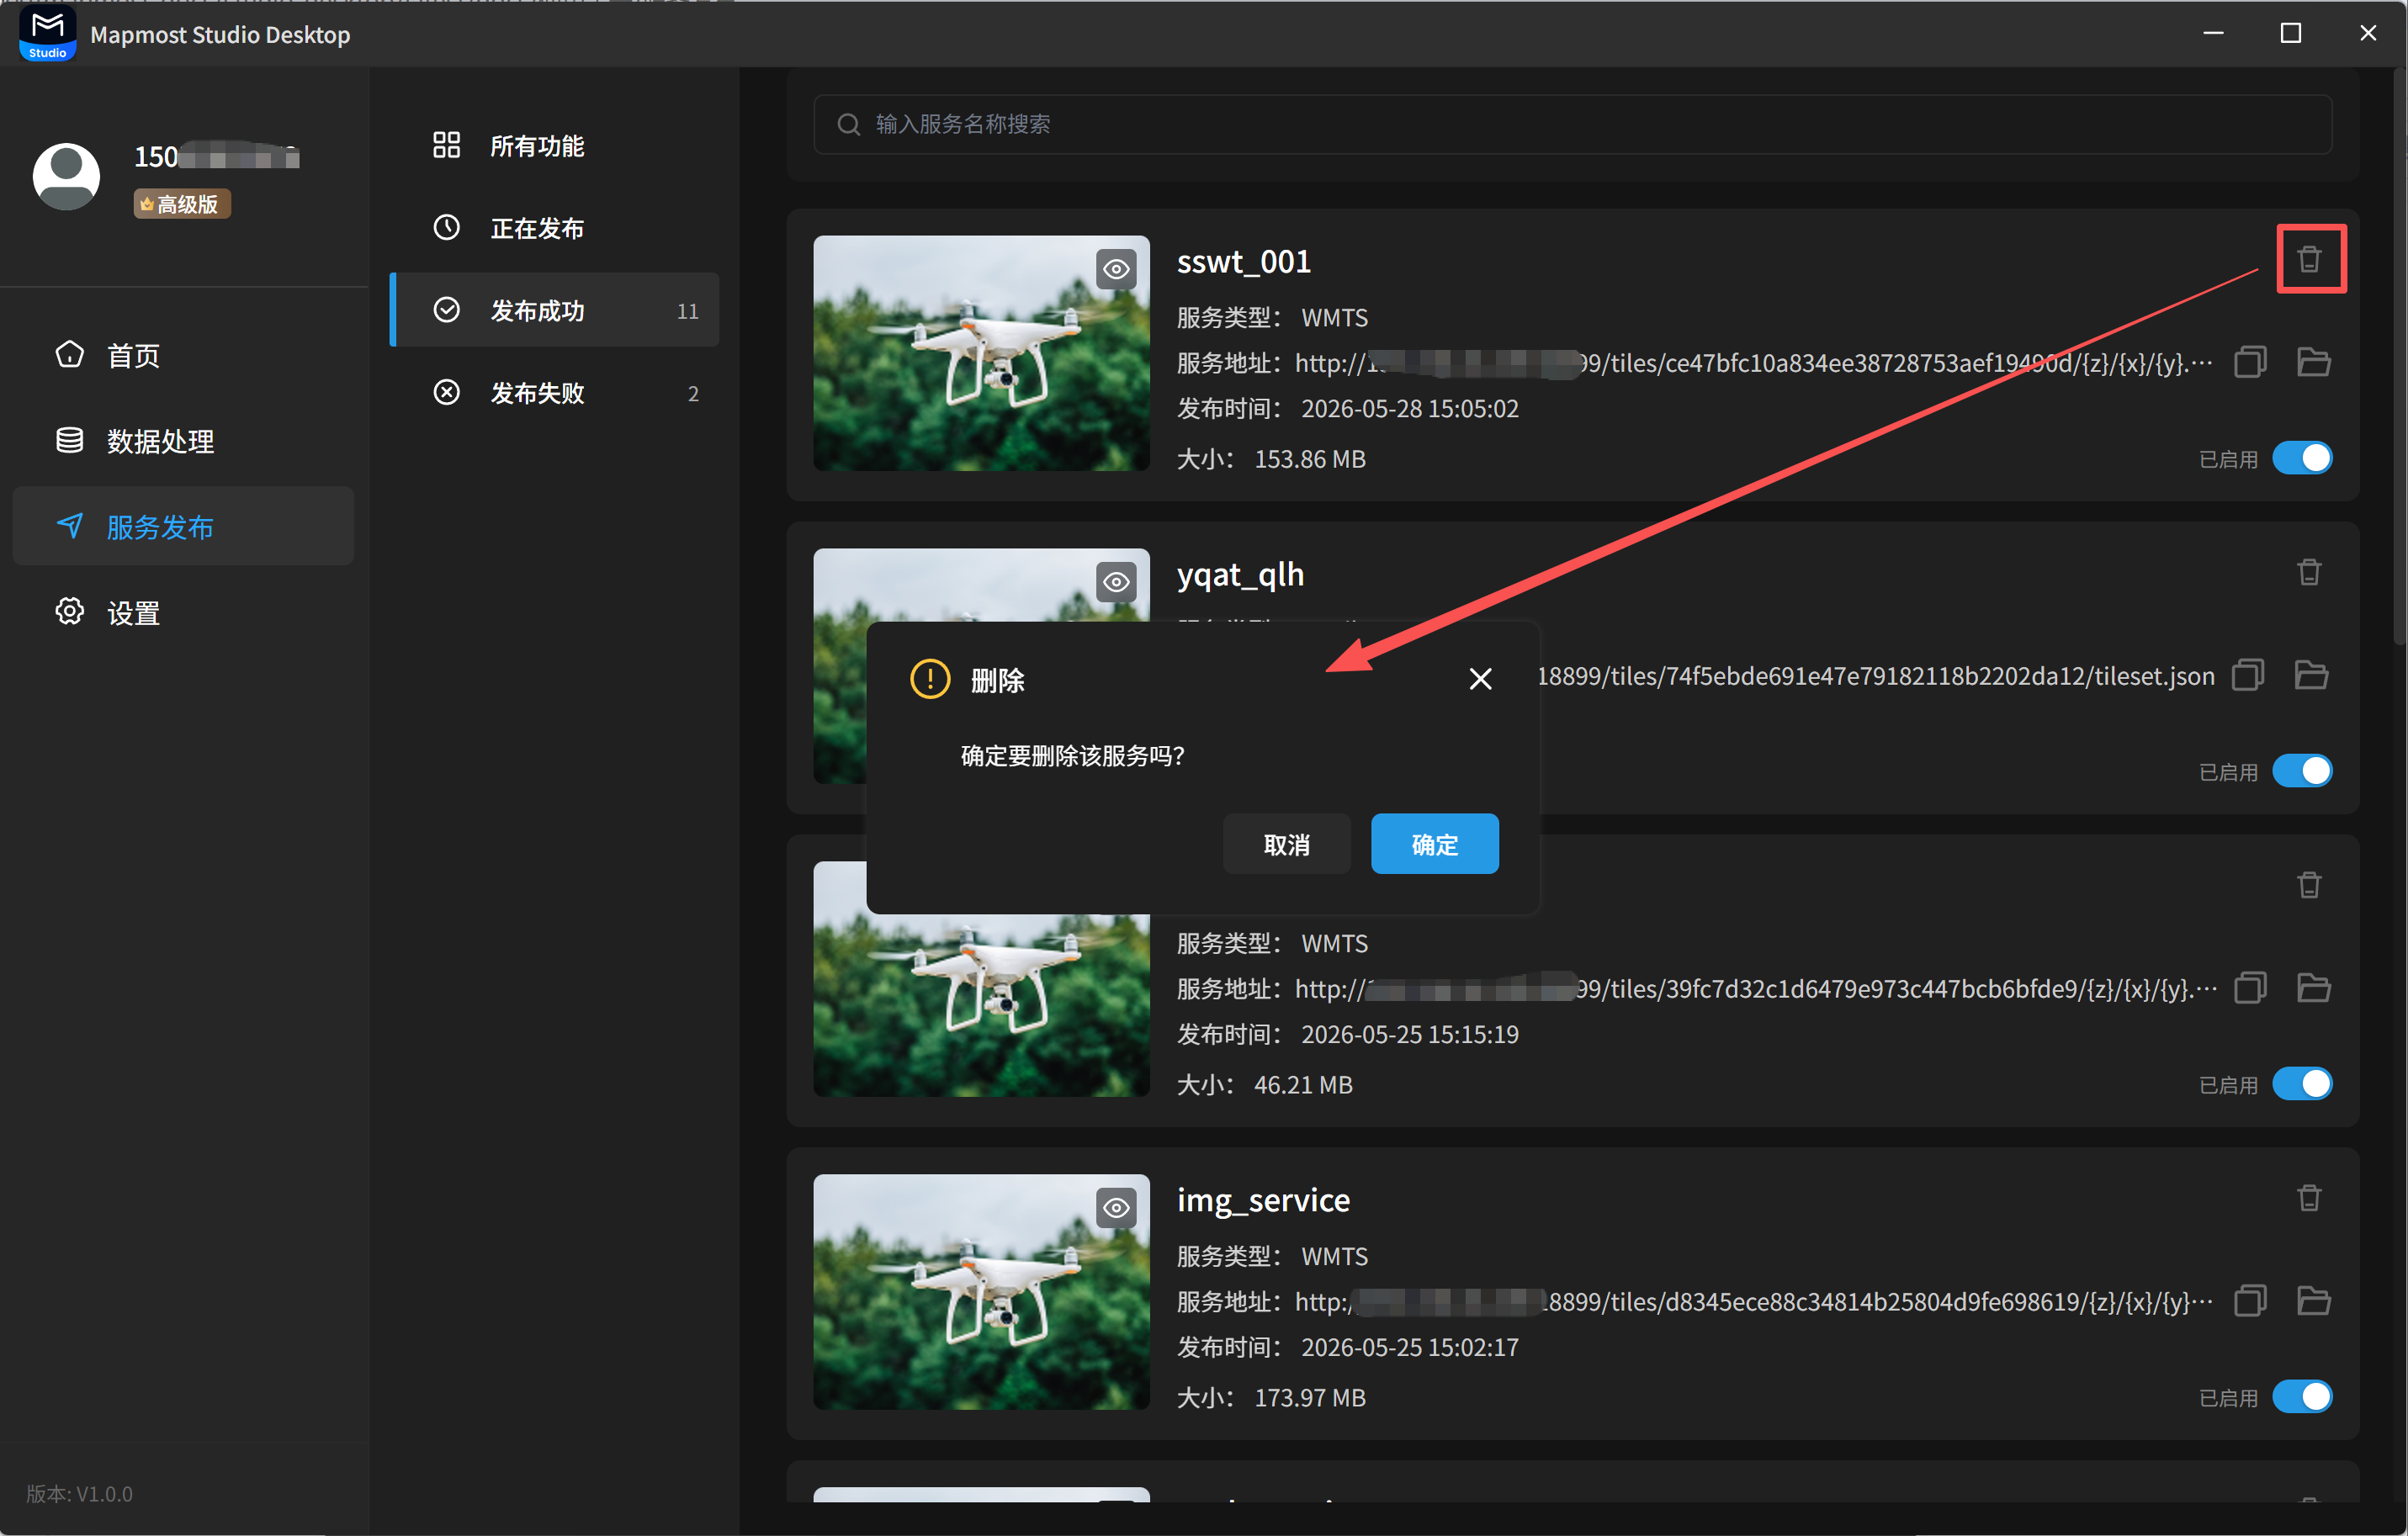
3.3 Delete a Service
Click the delete button in the upper-right corner of a service card to delete a completed service. After deletion, the service and result files cannot be restored.
3.4 Copy Service URL
Click the copy button in a service card to copy the service URL to the clipboard for distribution.
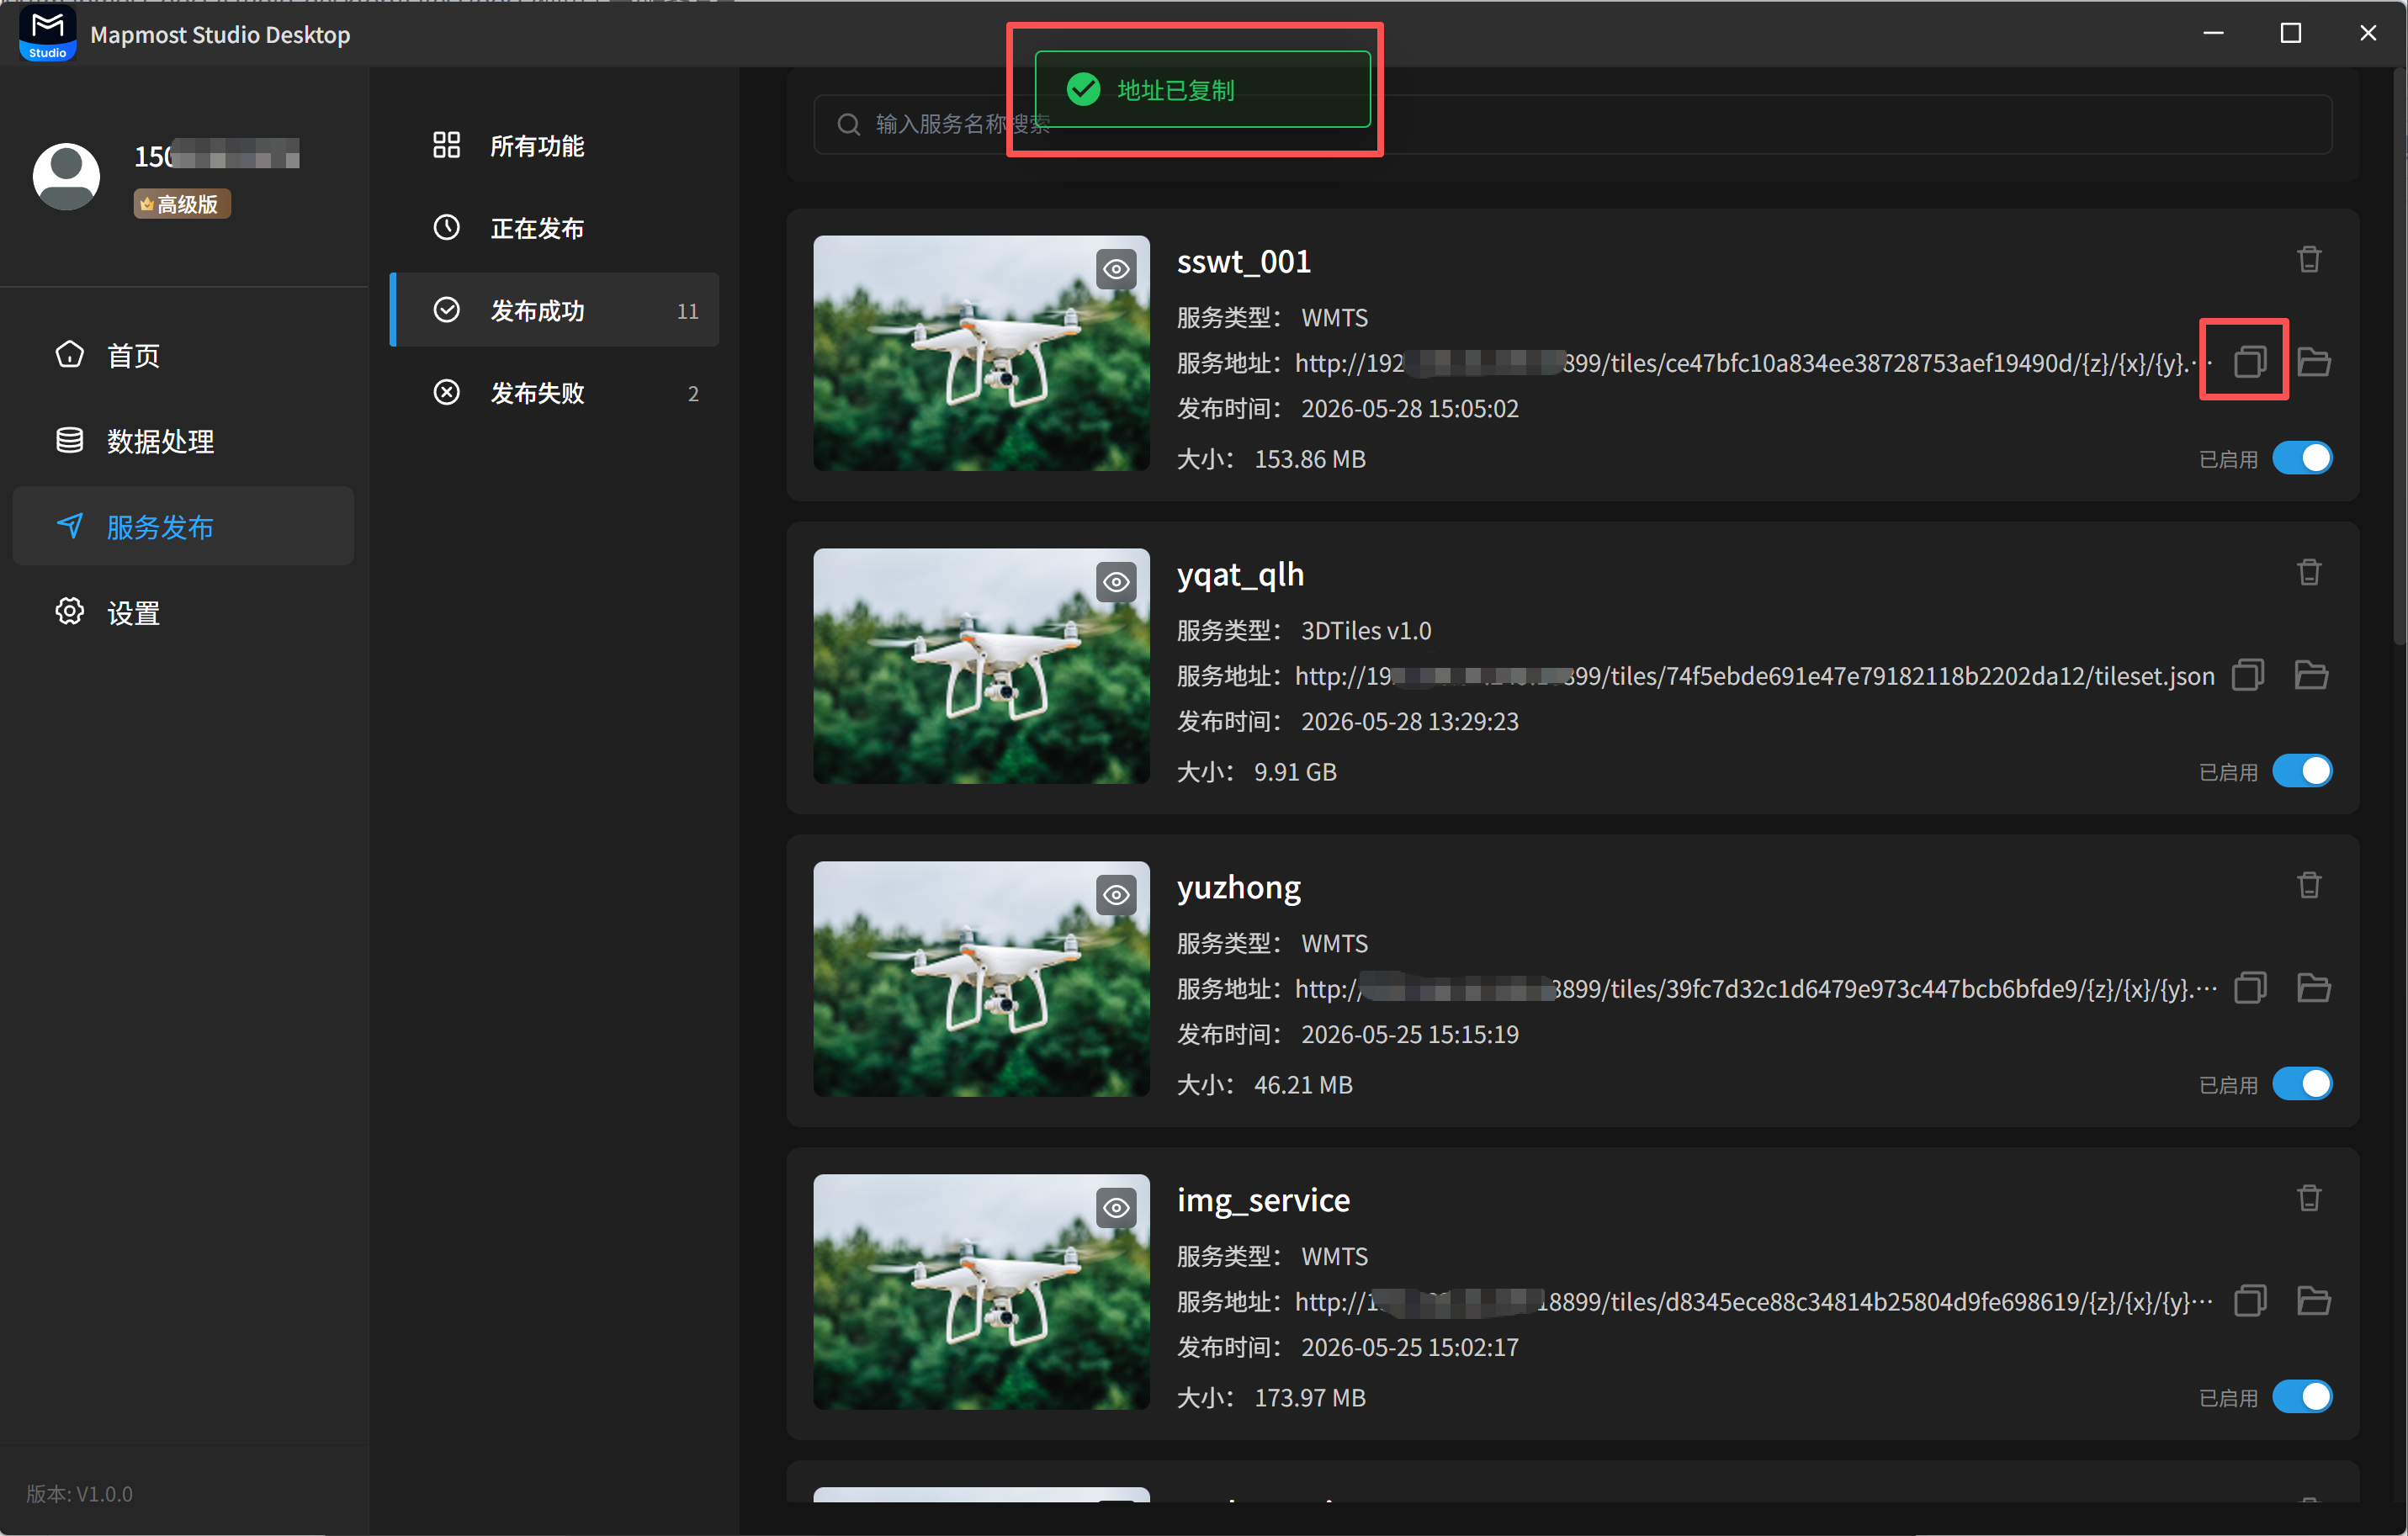
Note: If the service URL contains localhost or 127.0.0.1, the service can only be accessed on the local machine and cannot be accessed from other devices. To access it from other devices, replace the IP address in the service URL with the computer's IPv4 address, such as 192.168.1.100. For details, see the IP configuration method in Settings. The accessing device and the publishing device must be on the same LAN.
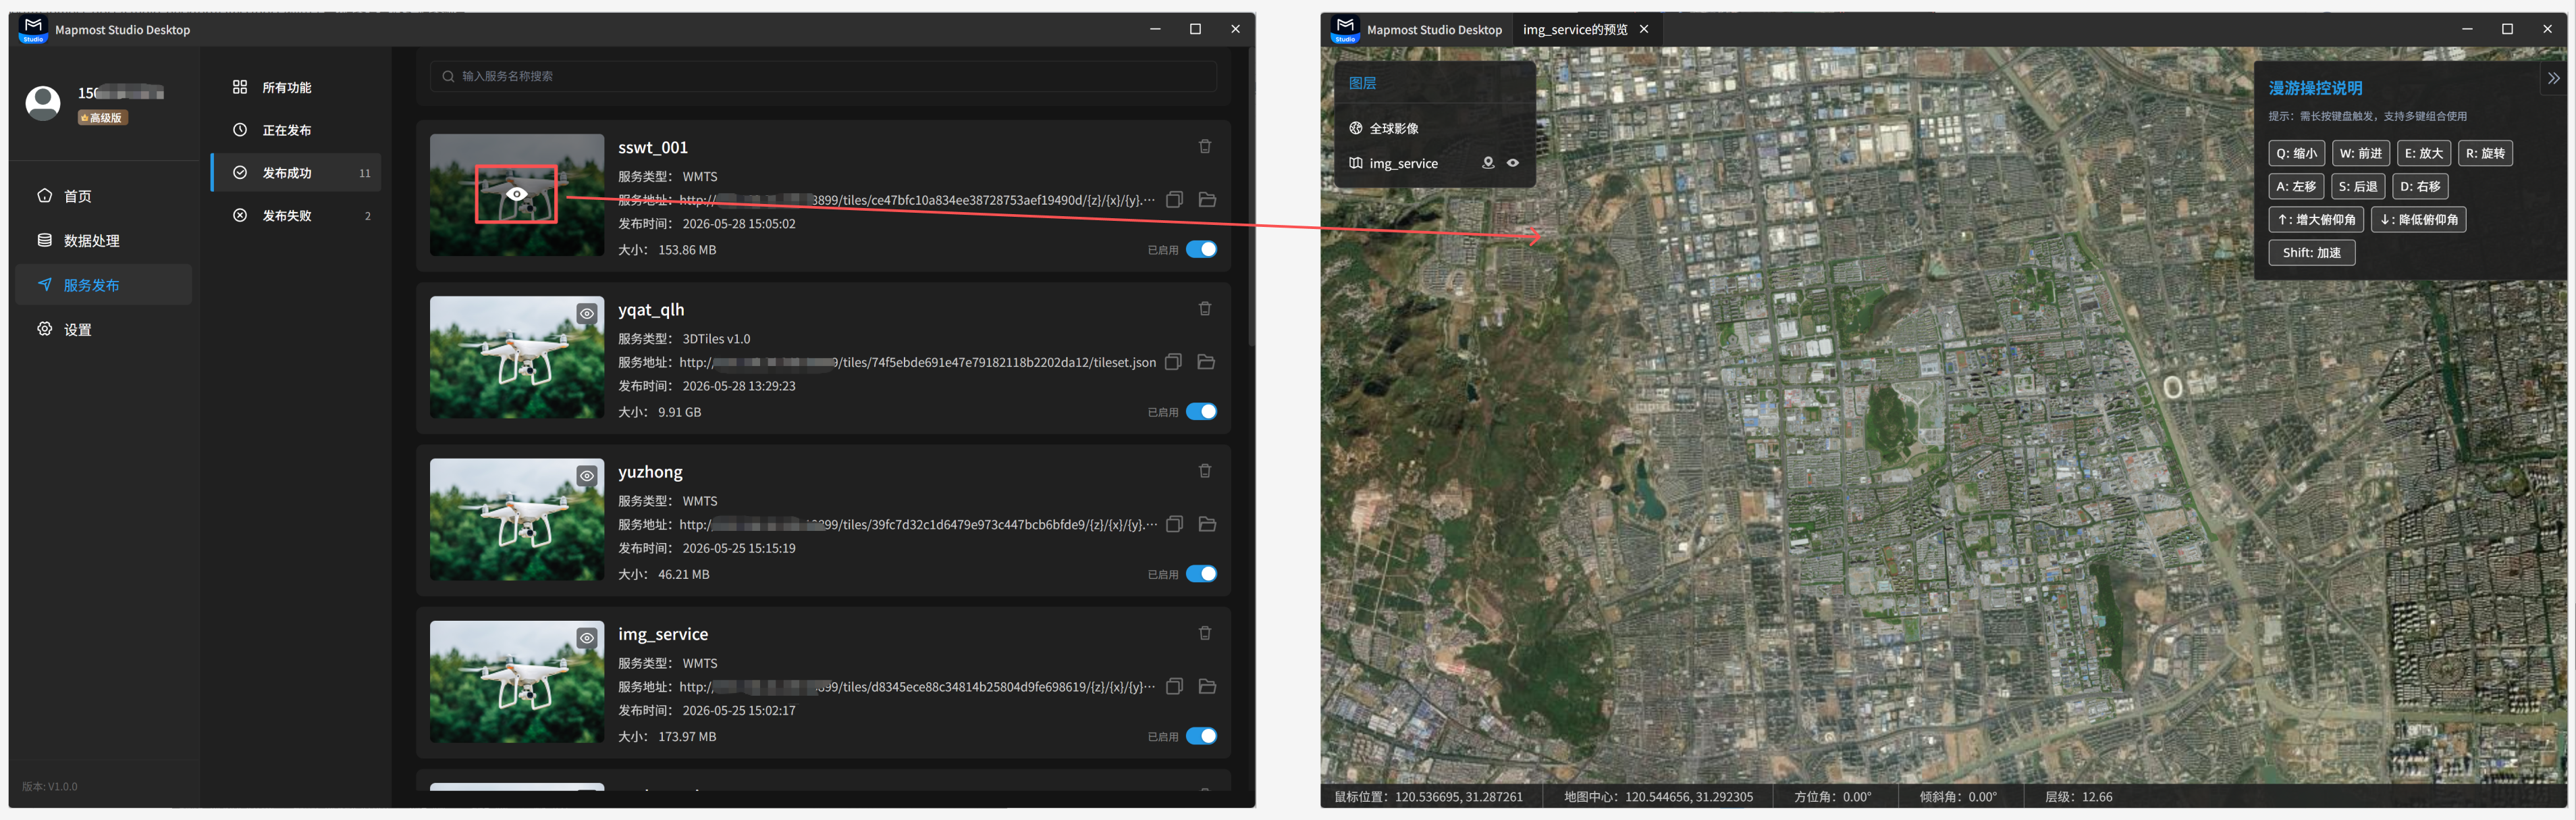
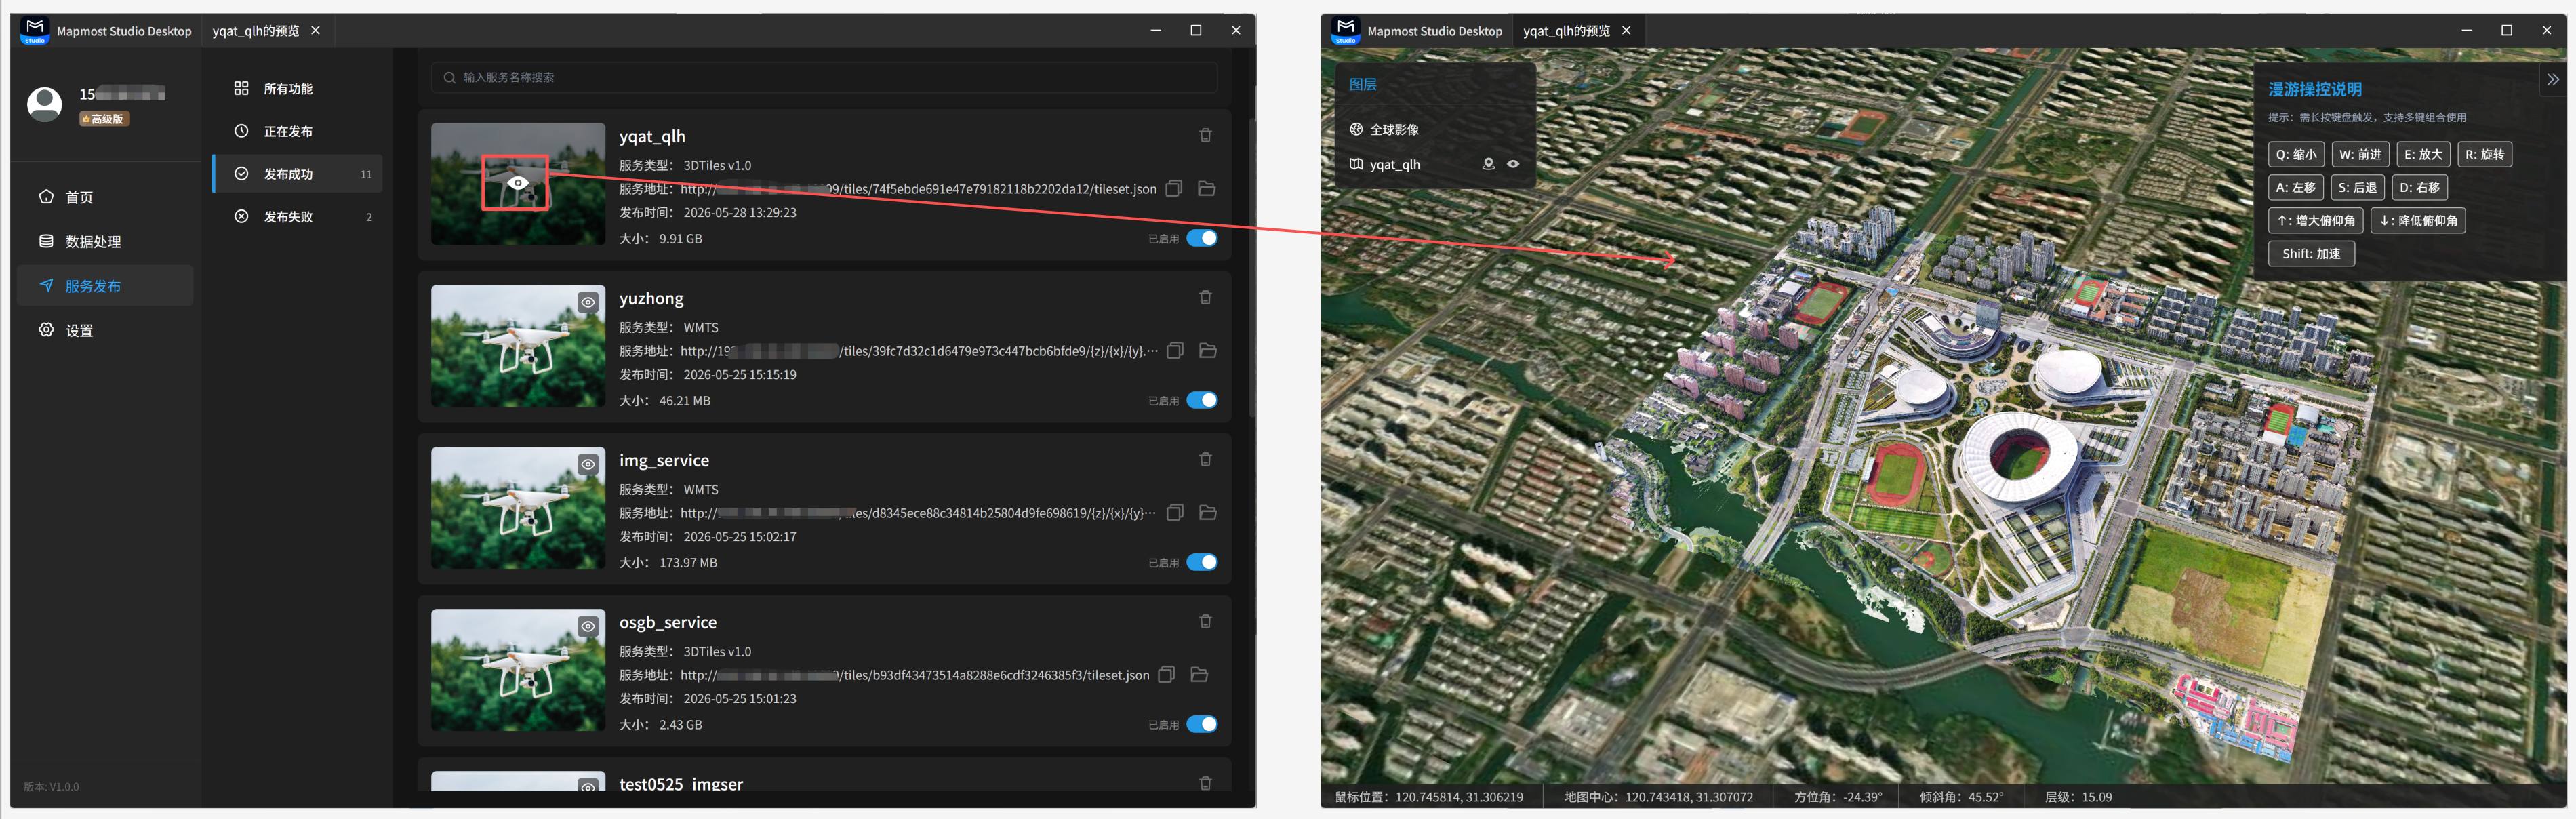
3.5 Preview a Service
Successfully published services can be previewed. Click the eye preview button on the left side of a service card to preview the rendered result.
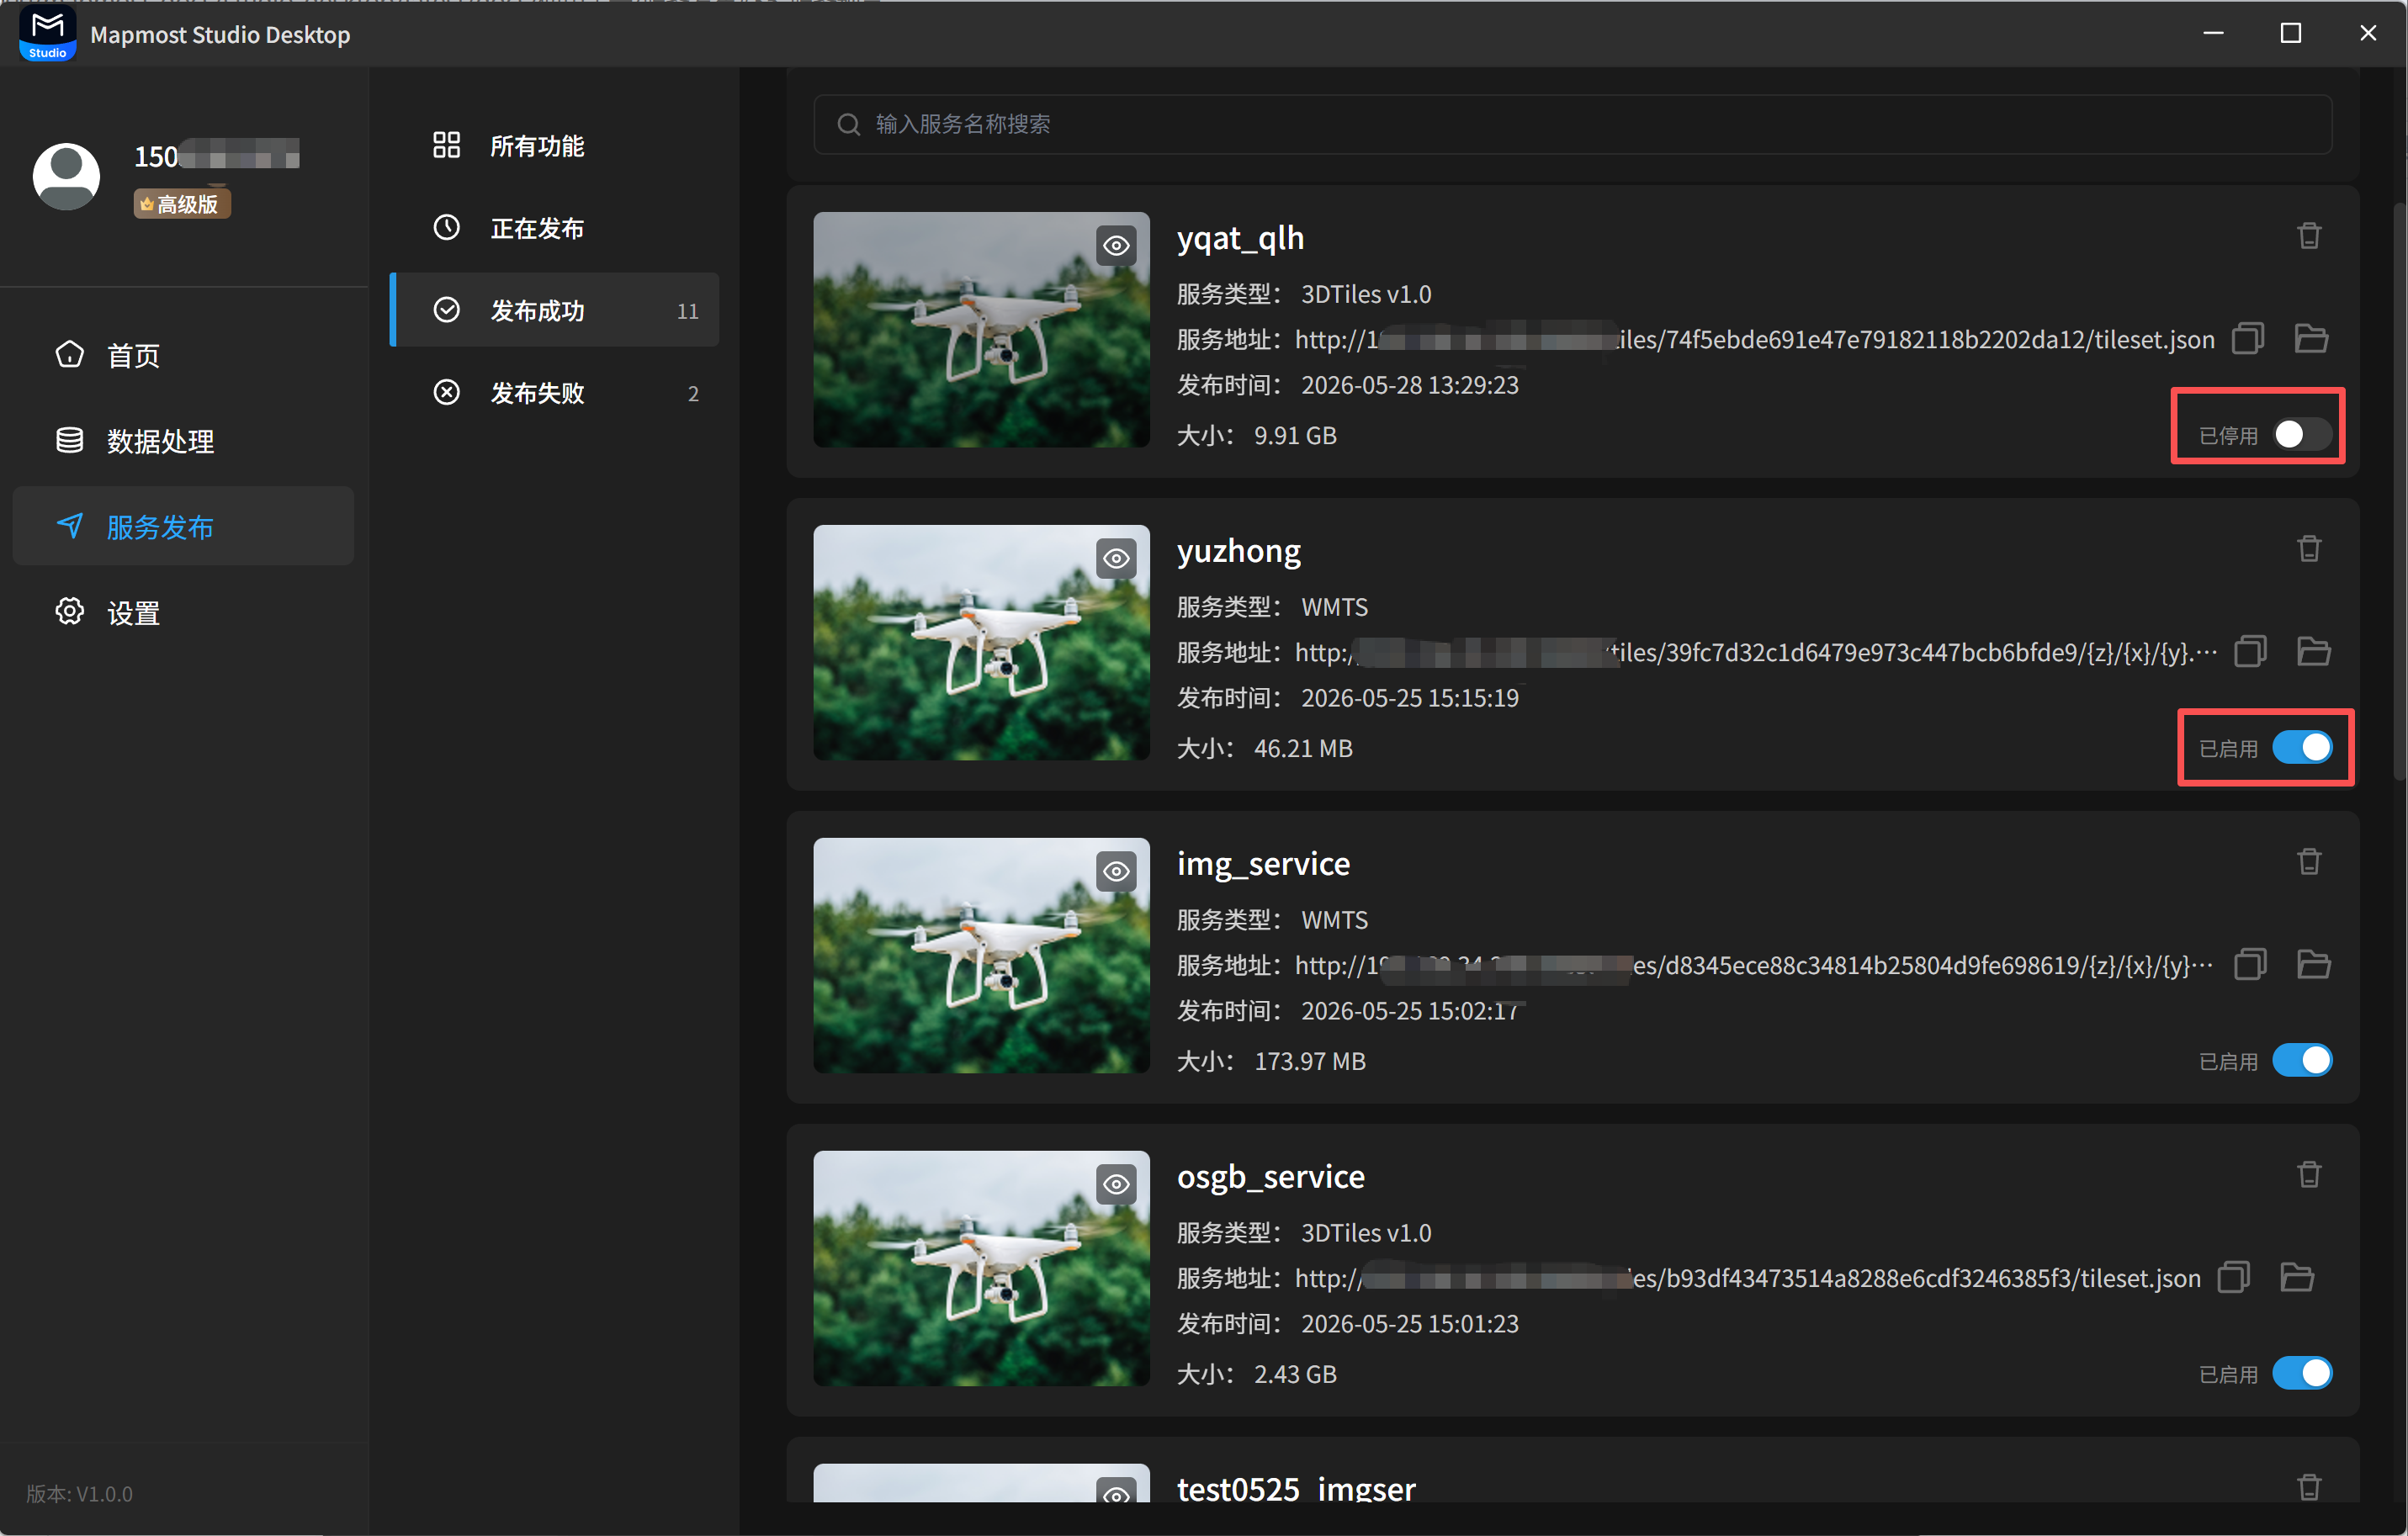
3.6 Start or Stop a Service
Successfully published services can be started or stopped. An enabled service can be previewed and used. A disabled service cannot be previewed or used.
4. Failed
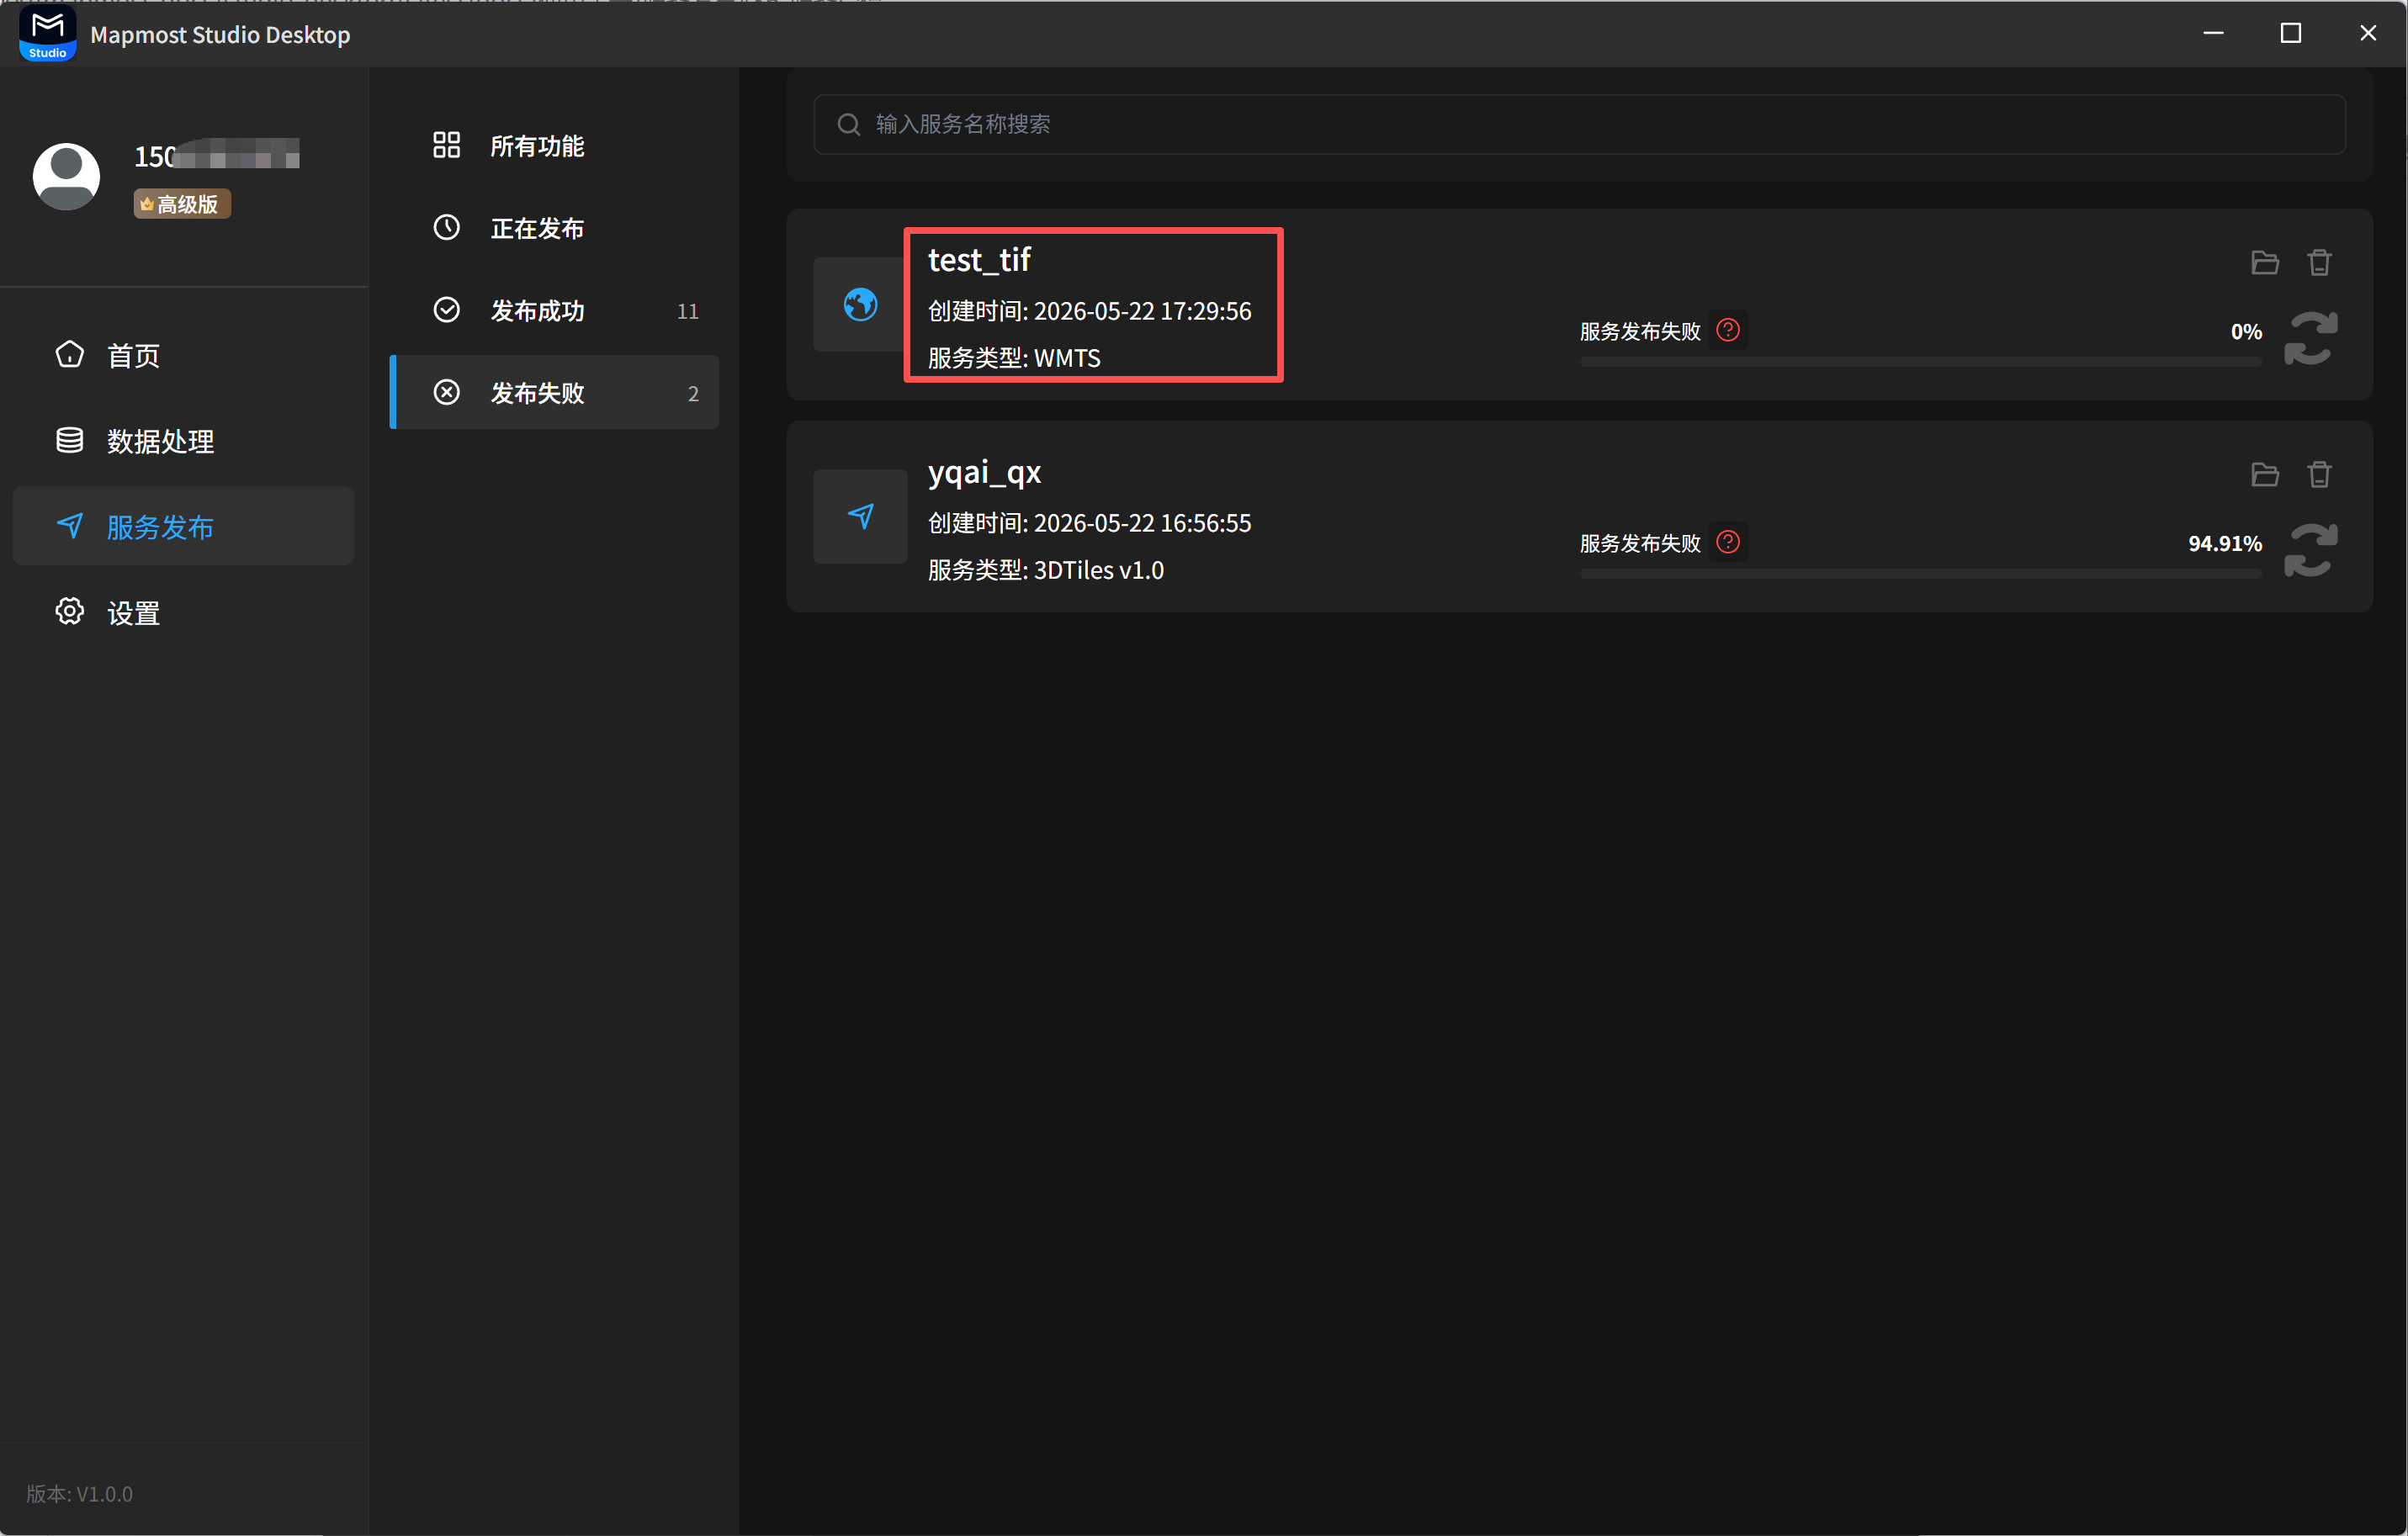
4.1 View Service Details
The Failed list displays services that failed to publish. You can view the service name, service type, creation time, and related information.
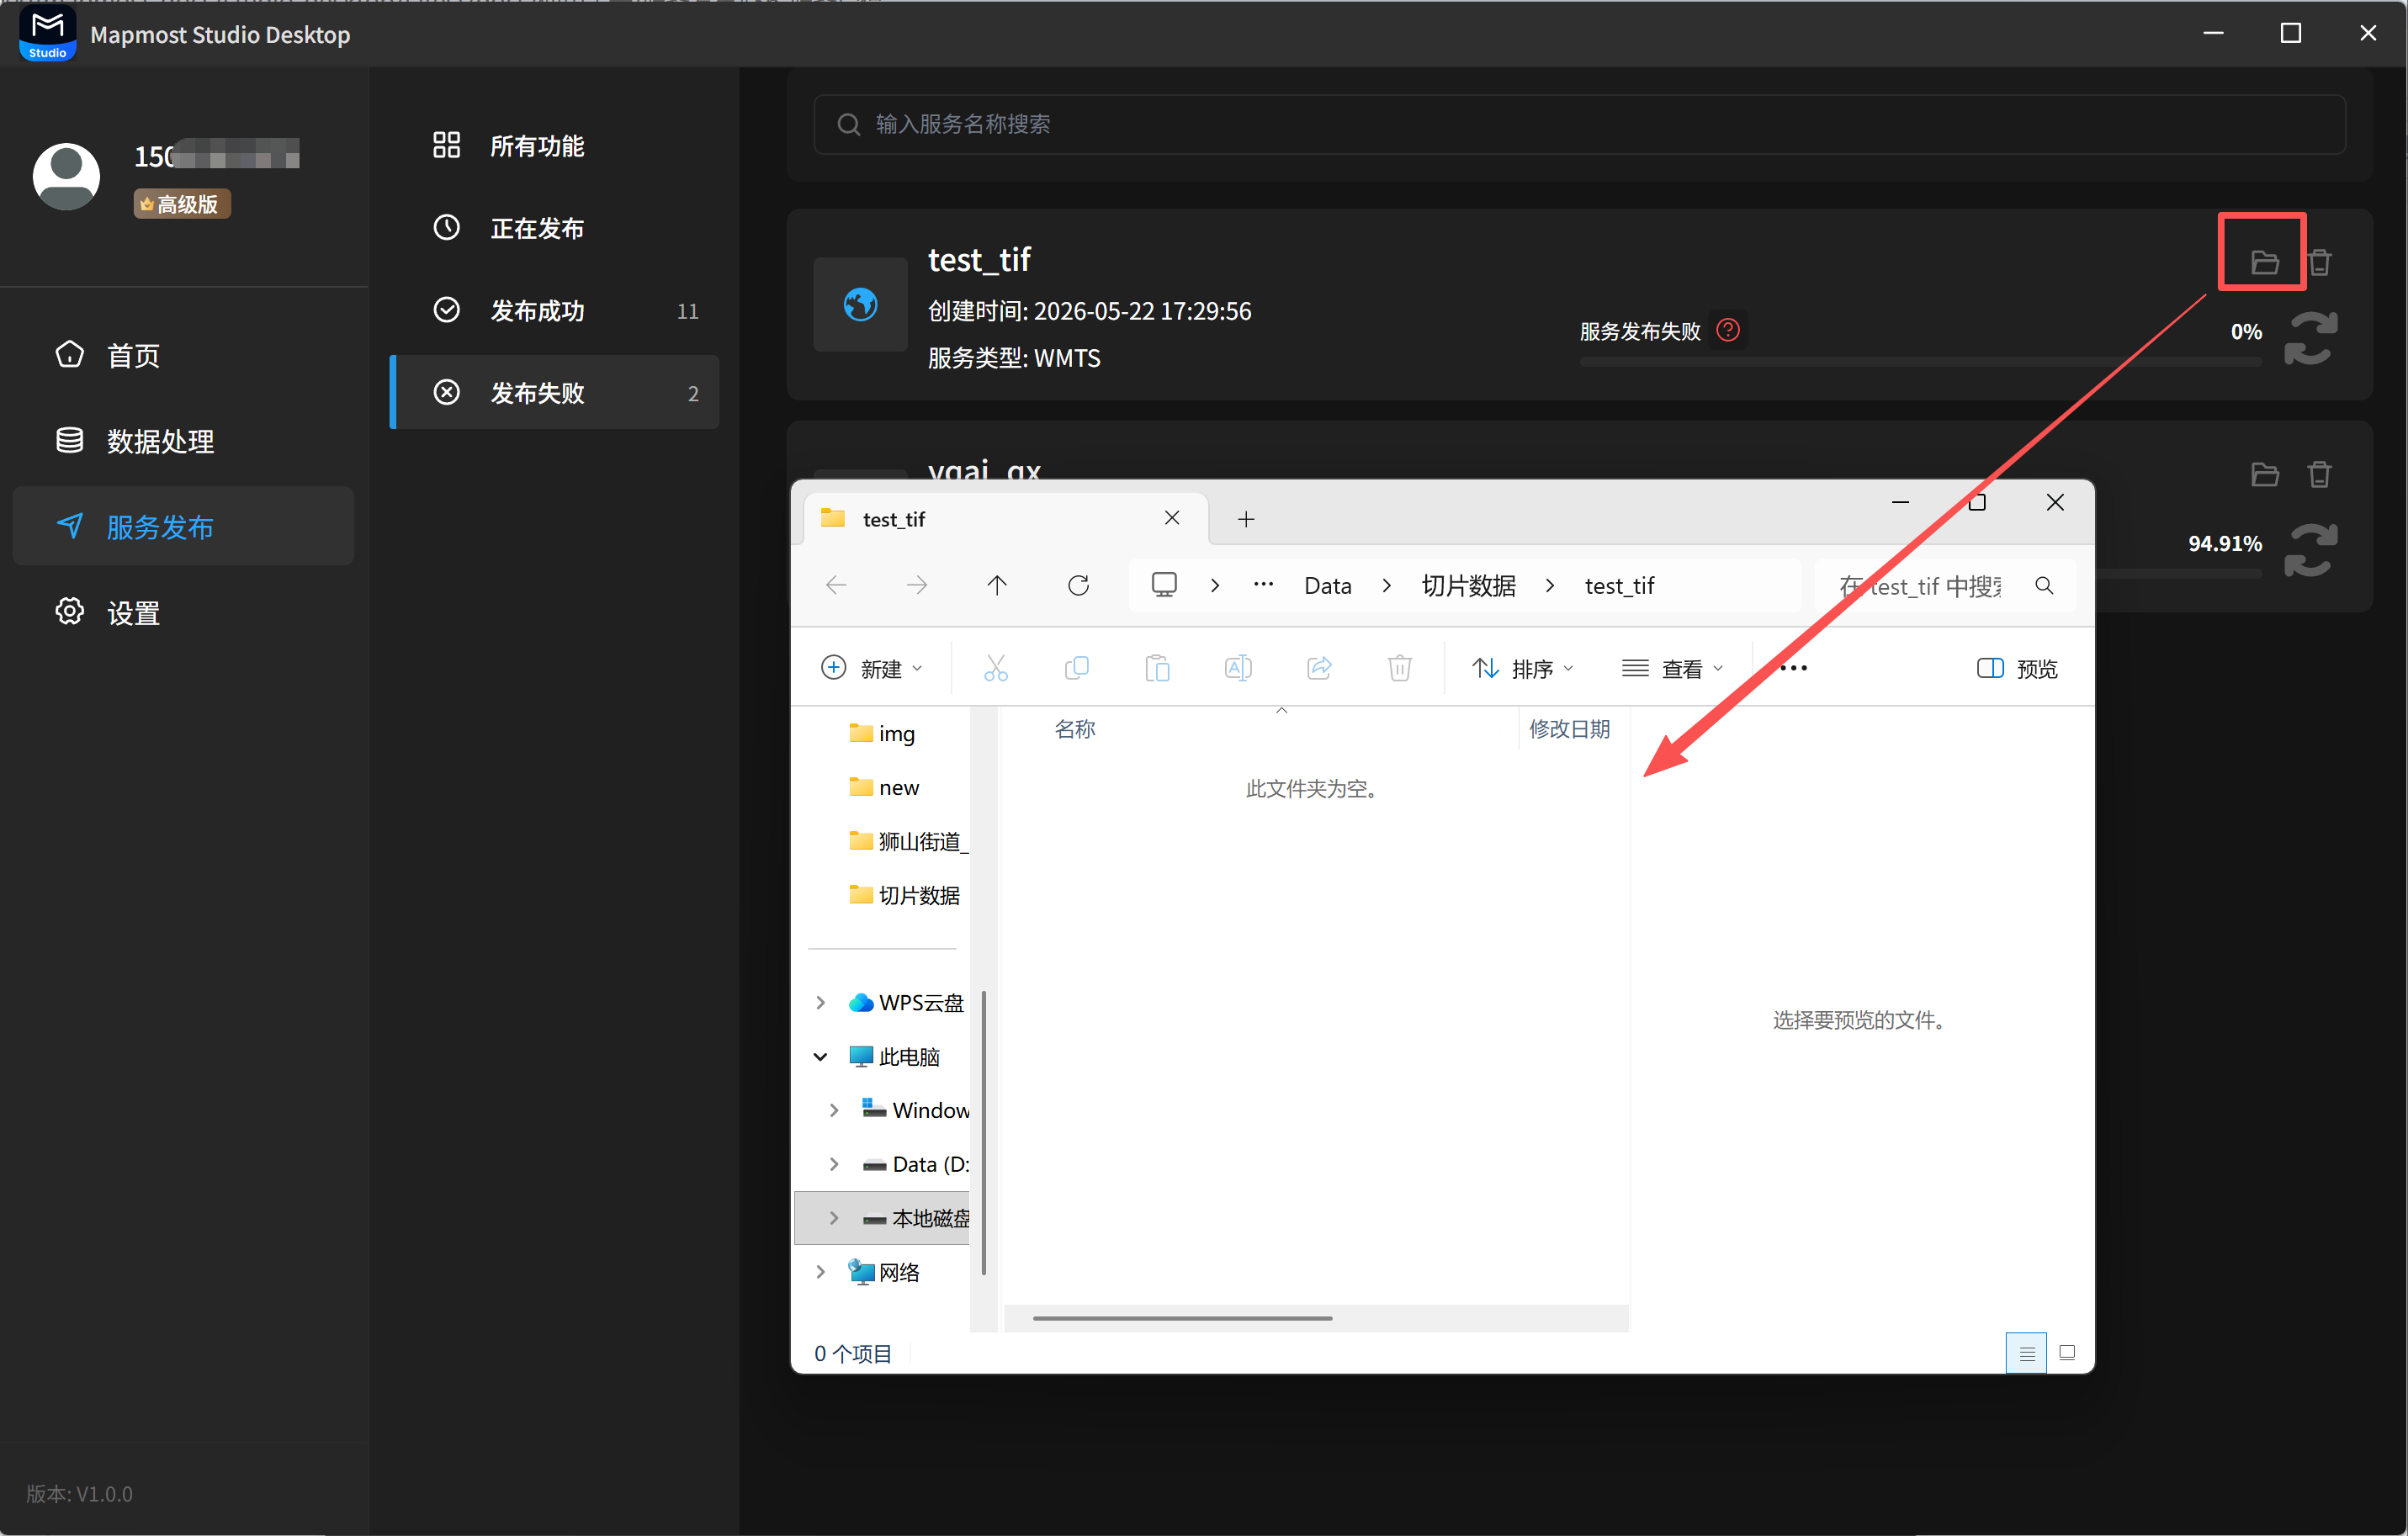
4.2 View Service Results
Click the folder button in the upper-right corner of a service card to view result files.
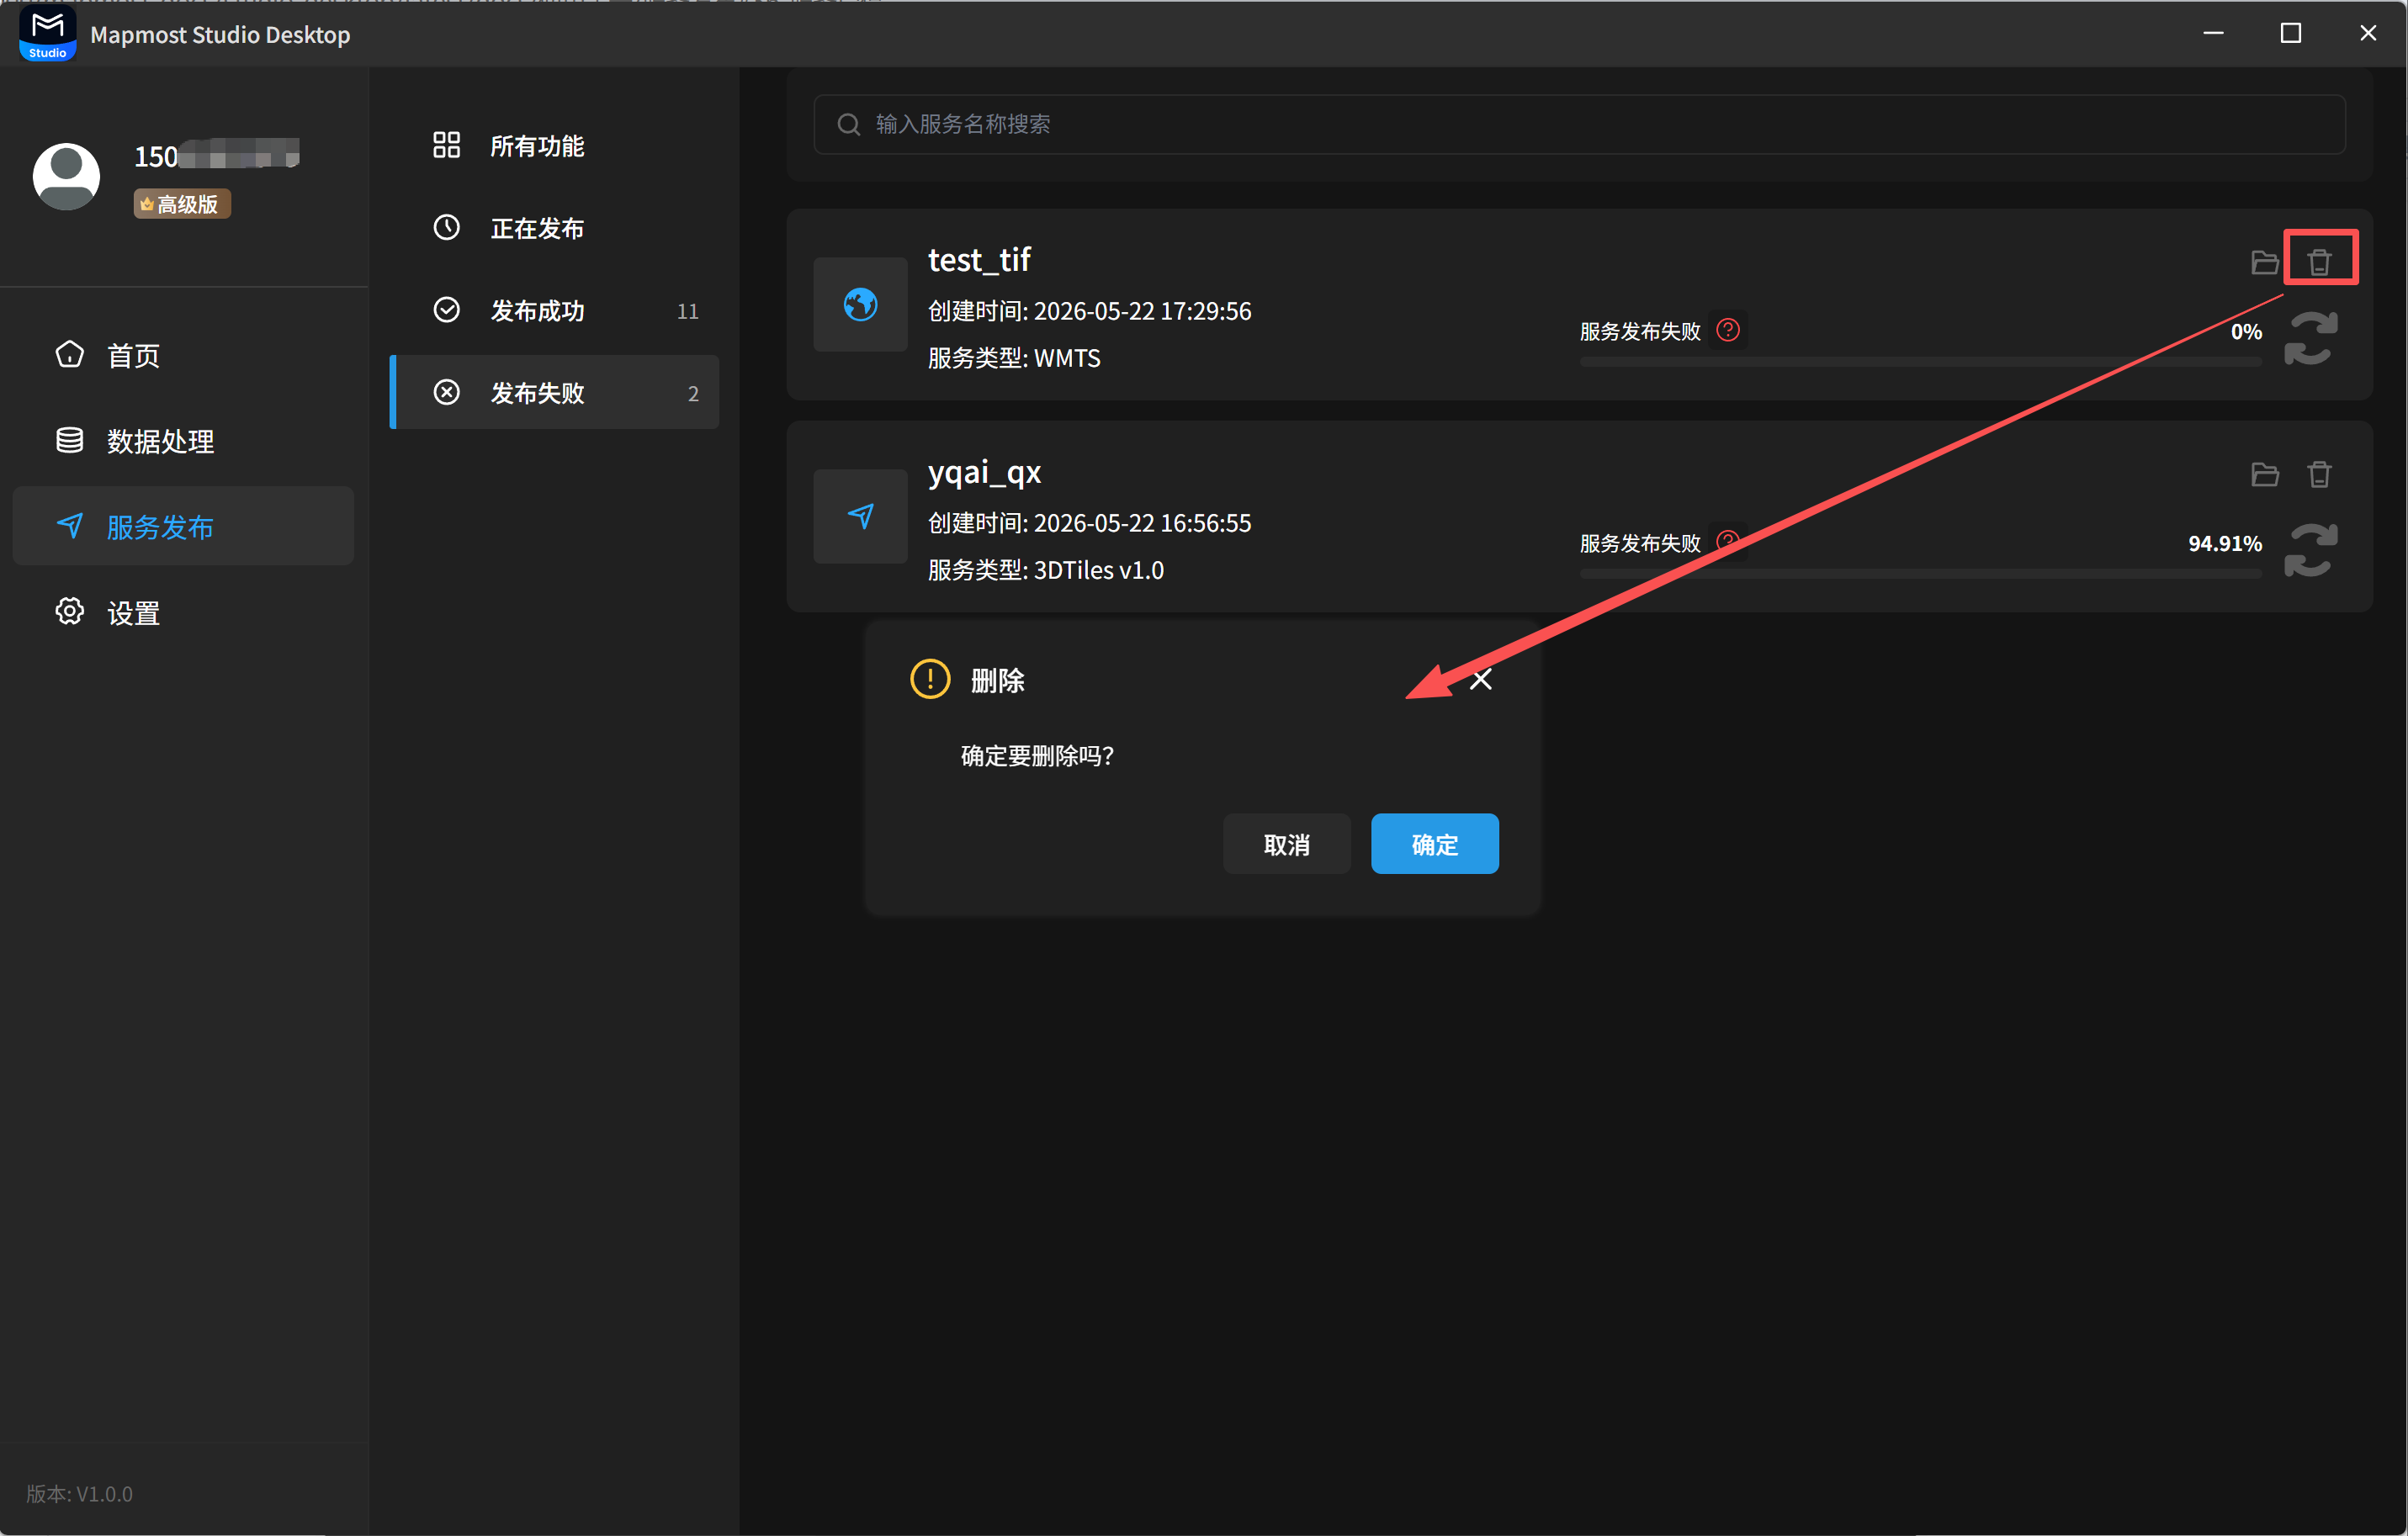
4.3 Delete a Service
Click the delete button in the upper-right corner of a service card to delete a failed service.
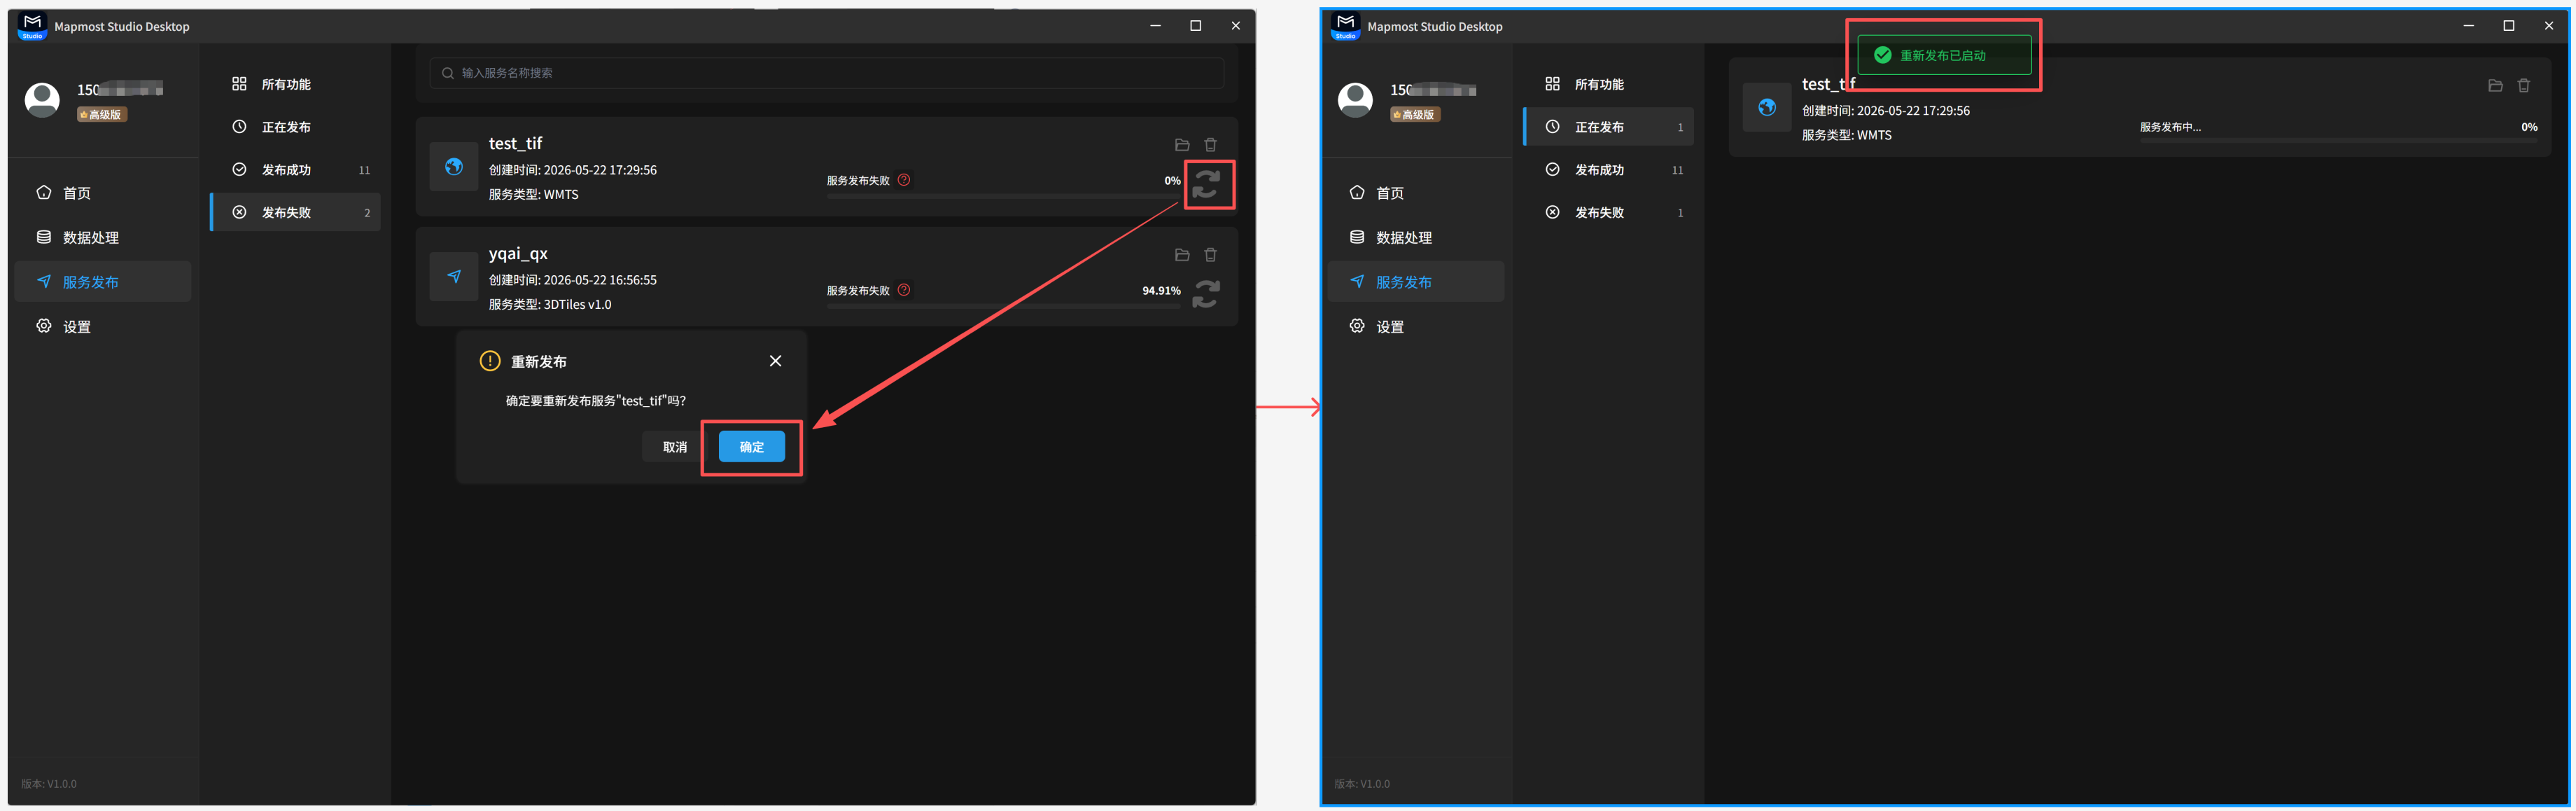
4.4 Process a Service Again
Failed services can be processed again.
4.5 View Service Logs
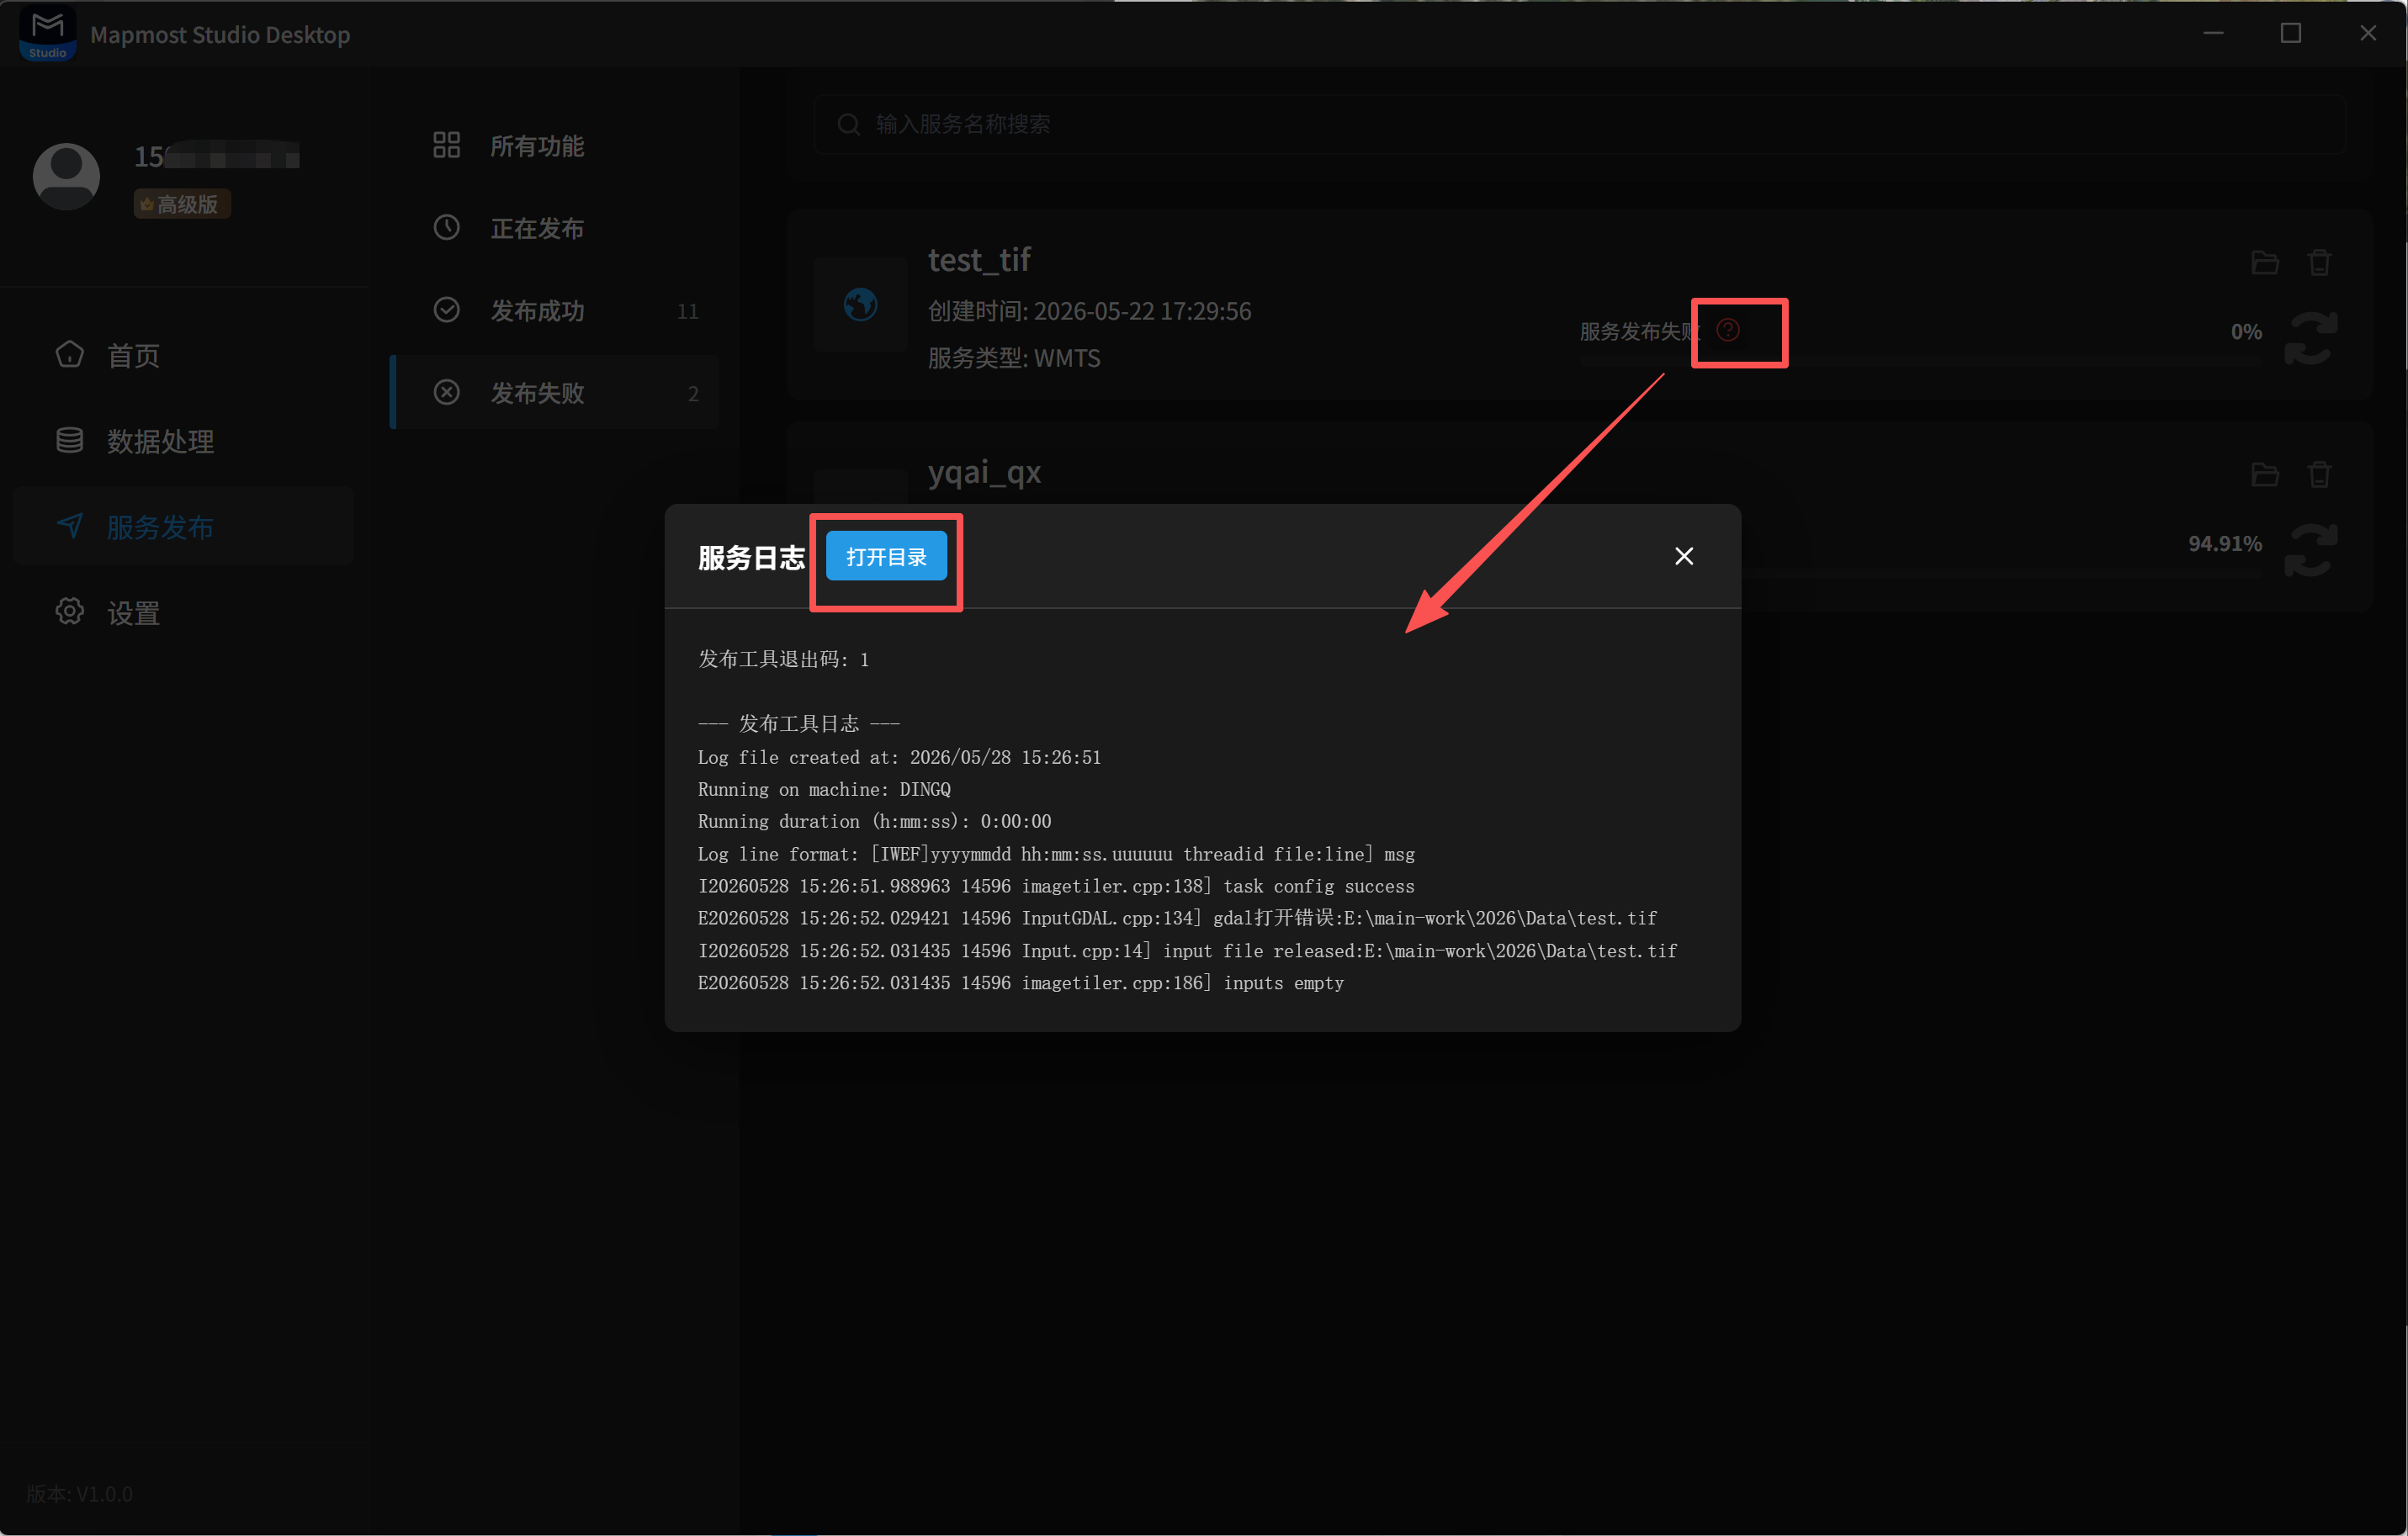
Failed tasks support log viewing.